
1Transaction Processing
Option 2Cash Receipts
Use this function to enter a debit cash receipts. You can also enter cash receipts using the Cash Receipts - Automatic function on this menu. The Automatic function will apply the cash beginning with the oldest invoices, and then allow you to edit the applied cash receipts.
The normal process of posting cash receipts includes:
- Entering the cash receipts.
- Printing the Cash Receipts Journal.
- Posting the cash receipts.
If the journal shows any errors, the errors must be corrected and the journal reprinted. If the journal has been printed and some of the data is modified, the journal must be printed before the data can be posted.
On the following pages, the four screens displayed by this function are shown.
The screen shown below presents information about Cash Receipts control Groups.
When you enter cash receipts, you will see only one of the two possible screens for Cash Receipts Control Groups. Which screen you see will depend on how you answered two questions on you Parameters file. These are the “Ask Operator ID?” question, and the “Use Transaction Control?” question.
If you answered ‘Y’ to both questions, you will see the screen below, and you will be able to enter control and hash totals for your invoices. In addition, a record will be written to the Transaction Control file for each control group posted.
If you answered ‘Y’ to “Ask Operator ID?”, and ‘N’ to “Use Transaction Control?”, you will see the second screen, which displays only the Operator ID and the Control Number.
If you answered ‘N’ to both questions, you will see the second screen, but you will not be allowed to edit the Operator ID.
Cash Receipts Control Group screen
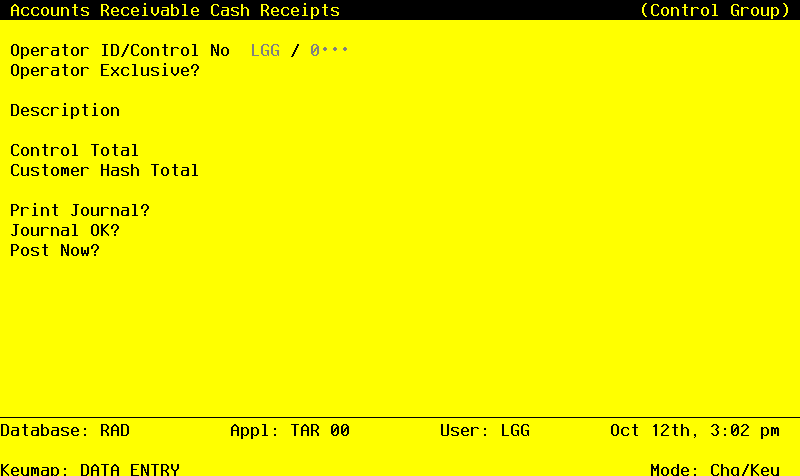
When the key value for a particular record is requested, you can review all the records in the file by selecting the Scan option. The records will be presented on an “Access” screen, and you will be allowed to scan the available data until you find the record you want. Then, position the cursor by that record and press ENTER; the record will be displayed for editing.
Data items for the preceding screen are described below:
- Operator ID
Upper case, up to 3 characters Required Carries forward in ADD mode
Only number and letters are acceptable.
The system displays the operator ID you entered at log-on. All transactions are separated by operator.
- Control No
Positive number, up to 4 digits
A sequential number is supplied to identify this group of cash receipts. This number is printed on the journal, tracked on the Transaction Control file, and posted to General Ledger for detail accounts. Although it is not necessary that this number be exactly sequential, the number itself is important as a part of your audit trail.
- Operator Exclusive?
Y or N Default N Required
Indicate whether or not you want to restrict access to these cash receipts.
- Y
- Yes, access should be restricted to the user who enters the receipts.
- N
- No, access is not restricted. Any user can edit these cash receipts.
- Description
Alphanumeric, up to 30 characters Required
Describe this group of cash receipts. This description appears on the Transaction Control report and inquiry.
- Control Total
Number, up to 9 digits and 2 decimals
Sum all of the checks in this control group, and enter the total.
- Customer Hash Total
Positive number, up to 12 digits
Supply the hash total of all customer number on the group of cash receipts. Any discrepancy between the hash total enter and the calculated hash total may represent transposition errors on one or mare customer numbers.
- Print Journal?
Y or N Default Y Required
‘Y’ is displayed to indicate that these cash receipts are ready for posting. Enter ‘N’ if you want to delay printing of the journal for any reason.
- Journal OK?
Y or N Display only Default N
This indicates whether or not the journal has been printed without errors. If ‘N’, the control group may contain errors and cannot be posted.
- Post Now?
Y or N Default Y
this field is required.
‘Y’ is displayed to indicate that these cash receipts are ready for postings. Enter ‘N’ if you want to delay posting for any reason.
The entered data is validated. During validation, including access to other files, conditions may be found which cause messages to be displayed. Errors (E), Warnings (W), and Messages (M) that may result are shown below:
Press ENTER to continue to the next screen.
Select Next Record to go to the next Cash Receipts Control Groups record.
At this screen, the use of the MODE keys - ADD, DEL, CHG, or INQ - pertain to those records in the Cash Receipts Control Groups file.
This screen may optionally be used to display information about Cash Receipts Control Groups.
Cash Receipts Operator ID screen

When the key value for a particular record is requested, you can review all the records in the file by selecting the Scan Option. The records will be presented on an “Access” screen, and you will be allowed to scan the available data until you find the record you want. Then, position the cursor by that record and press ENTER; the record will be displayed for editing.
Data items for the preceding screen are described below:
- Operator ID
Upper case, up to 3 characters Required Carries forward in ADD mode
Only number and letters are acceptable.
The system displays the operator ID you entered at log-on. All transactions are separated by operator.
- Control No
Positive number, up to 4 digits
A sequential number is supplied to identify this group of cash receipts. This number is printed on the journal, tracked on the Transaction Control file, and posted to General Ledger for detail accounts. Although it is not necessary that this number be exactly sequential, the number itself is important as a part of your audit trail.
The entered data is validated. During validation, including access to other files, conditions may be found which cause messages to be displayed. Errors (E), Warnings (W), and Messages (M) that may result are shown below:
Press ENTER to continue to the next screen.
Select Next Record to go to the next Cash Receipts Control Groups records.
At this screen, the use of the MODE keys - ADD, DEL, CHG, or INQ - pertain to those records in the Cash Receipts Control Groups file.
The screen shown below presents information about cash Receipts.
This file contains information pertaining to the entire receipt: customer, date, amount, check number, and cash account.
Cash Receipts screen
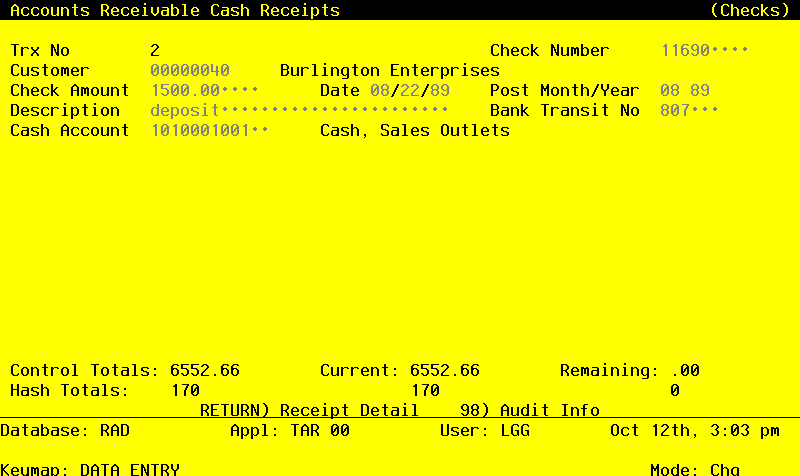
When the key value for a particular record is requested, you can review all the records in the file by selecting the Scan option. The records will be presented on an “Access” screen, and you will be allowed to scan the available data until you find the record you want. Then, position the cursor by that record and press ENTER; the record will be displayed for editing.
Note that the Audit Info option is available at the bottom of this screen. When this option is invoked, the Audit Information overlay appears and displays the date the record was created and who created it, as well as the date the record was last modified and who modified it. Press the END key or the RETURN key to clear the overlay from your screen. The information displayed in the Audit Information overlay is system-supplied and non-modifiable.
Data items for the preceding screen are described below:
- Trx No
Positive number, up to 4 digits Display only
A sequential transaction number is supplied for each check record. This number is printed on the journal, and posted to General Ledger for detail accounts.
Although it is not necessary that this number be exactly sequential, the number itself is important as a part of your audit trail. It is printed on many reports and inquires throughout Accounts Receivable.
- Check Number
Positive number, up to 9 digits
Supply the number imprinted on the check.
- Customer
Upper case, up to 8 characters Numbers only Required
You can use PF2 to search for an appropriate entry.
Identify the customer who issued this check. The customer number must be on file in the Customers file. The system displays the customer name so that you can verify your entry.
- Check Amount
Number, up to 7 digits and 2 decimals
If this cash receipt applies to the receivable accounts entered on the line items, the Check Amount is given by this formula:
Check Amount = Credit Amount - Discount Given - Write Off Amount
Alternatively, if this cash receipt applies to the Direct Accounts entered on the line items, the Check Amount is given by this formula:
Check Amount = Direct Amount - Discount Given
Direct, Credit, and Write Off amounts, as well as Discount Given, are entered on the line item screens for this cash receipt.
- Date
Date (YMD) Required Carries forward in ADD mode
This is the date the check was received (deposited), not the date printed on the check.
- Post Month
Upper case, up to 2 characters Letters and numbers only Valid: 01, 02, 03, 04, 05, 06, 07, 08, 09, 10, 11, 12, 13, EY Required Carries forward in ADD mode
Identify the month to which this transaction is to be posted. The current month defined in the Parameters file is supplied; if you want to post to a prior or future month, you can change it. If your system is based on 12 accounting periods, enter the calendar month; if you are using 13-period accounting, enter the fiscal period. Valid entries and their meanings are:
- 1
- 13: Calendar period
- EY
- End-of-Year
- Post Year
Positive number, up to 2 digits Carries forward in ADD mode
Identify the year to which this transaction is to be posted. The year defined in the Parameters file is supplied; if you want to post to a prior or future year, you can change it. If you are using 12-month accounting, this will be the calendar year; if you are using 13-period accounting, this will be the fiscal year.
- NOTE
- A value of zero in the calendar year will cause the transaction to be posted to the year 2000.
- Description
Alphanumeric, up to 30 characters
Describe the transaction. This description will be printed on various reports throughout Accounts Receivable and may be useful as a part of your audit trail.
- Bank Transit No
Alphanumeric, up to 6 characters
Supply the bank transit number printed on the check. This is the number requested on the bank deposit slip.
- Cash Account
Upper case, up to 12 characters Required
You can use PF2 to search for an appropriate entry.
Provide the number of the cash account that will be debited for this receipt. If your system includes General Ledger, this number must be on file in the Chart of Accounts file, and the system displays the corresponding description so that you can verify your entry.
The entered data is validated. During validation, including access to other files, conditions may be found which cause messages to be displayed. Errors (E), Warnings (W), and Messages (M) that may result are shown below:
Press ENTER to display system-supplied information and then press ENTER again to continue to the next screen.
Select Previous Image to go back to the cash Receipts Control Groups screen. Select Next Record to go to the next Cash Receipts record. Select End to go to the next Cash Receipts Control Groups record.
At this screen, the use of the MODE keys - ADD, DEL, CHG, or INQ - pertain to those records in the Cash Receipts file.
The screen shown below presents information about Cash Receipts Line Items.
Cash Receipts Line Items screen

When the key value for a particular record is requested, you can review all the records in the file by selecting the Scan option. The records will be presented on an “Access” screen, and you will be allowed to scan the available data until you find the record you want. Then, position the cursor by that record and press ENTER; the record will be displayed for editing.
Data items for the preceding screen are described below:
- Line
Positive number, up to 4 digits
The system automatically numbers cash receipt line items in sequence beginning with ‘1’. you may change this number. Each paid invoice or direct sale item must be identified by a unique number.
- Apply To Type
Upper case, 1 character Numbers only Valid: 1, 2, 3 Required Carries forward in ADD mode
Identify how the receipt should be applied. If the customer is a Balance Forward customer, a ‘1’ defaults; if the customer is Open Item, a ‘3’ defaults. If you define this receipt as type 1, the amount will be applied to the oldest invoices first. The system displays the description so that you can verify your entry. Valid codes and their meanings are:
- 1
- Apply on Account
- 2
- Deposit
- 3
- Apply to Invoice or Direct Sale
- Apply To
Upper case, up to 8 characters
Identify the invoice to which this receipt should be applied.
If this receipt is a deposit on a sales order, enter the order number. The order number and deposit amount must also be indicated on the invoice when it is entered so that the system can track the deposit correctly.
If this receipt is not being applied to an invoice (for example, for an on-account receipt), leave this field blank.
You can use PF2 to search the Unpaid Invoices file if this is an Apply To Type 3.
If you enter an invoice number, and that invoice is on you Unpaid Invoices file, you may press PF17 to default the credit amount to the current invoice balance.
- Write Off?
Y or N Default N Required
This field specifies whether or not service charges accrued against the Apply To invoice will be written off when the Write Off Service Charges function is run. By default, the system displays the Write Off Service Charge? field (‘Y’ or ‘N’) from the Customers record. It may be changed:
- Y
- Service Charges accrued against the Apply To invoice will be written off.
- N
- Service Charges accrued against the Apply To invoice will not be written off.
NOTE: This function is only available if you entered ‘N’ as a response to “Summary Service Charges?” on your Parameters file. In other words, you can only use the automatic write off procedure if you are calculating service charges on each individual invoice.
- Description
Alphanumeric, up to 30 characters
If you pressed PF17 as described for Apply To, the system displays the Customer PO number or description that was entered for the Apply To invoice. You can override the display.
- Credit Amount
Number, up to 7 digits and 2 decimals
If the receipt applies to an existing receivable that has been or will be posted, enter the amount to apply. This amount will be credited to the Receivable Account that you enter.
Leave this field blank for items that do not affect a receivable (for example, cash sales). Use the Direct Amount field instead.
- Discount Given
Number, up to 7 digits and 2 decimals
Identify the amount of discount given according to the terms on this transaction. This amount will be debited to the Discounts Given account specified in your Parameters file.
- Write Off Amount
Number, up to 7 digits and 2 decimals
Supply the amount to be written off for this invoice, if applicable. This amount will be debited to the Write Off account number specified in your Parameters file.
- Receivable Account
Upper case, up to 12 characters Carries forward in ADD mode
You can use PF2 to search for an appropriate entry.
The system displays the receivable account from the Customers record (or the unpaid invoice, if PF17 was used to create the receipt). You may change this account number. If this receipt applies to an existing receivable, this receivable account will be credited for the Credit Amount that you enter.
If your system includes General Ledger, this account number must be on file in the Chart of Accounts file, and the system automatically displays the account description from that file so that you can verify your entry.
If you are using a Direct Account, erase this field; if this is a deposit, the Deposits account should default from the Parameters file.
- Direct Account
Upper case, up to 12 characters
You can use PF2 to search for an appropriate entry.
If this receipt does not apply to an invoice that has been or will be posted (if it is, for example, a cash sale), enter the number of the account that will be credited for the Direct Amount. This credit offsets the debit to cash; therefore, this account is usually a revenue account.
If your system includes General Ledger, this account number must be on file in the Chart of Accounts file, and the system displays the account description from that file so that you can verify your entry.
- Direct Amount
Number, up to 7 digits and 2 decimals
If the receipt does not affect an invoice that has been or will be posted (if it is, for example, a cash sale), enter the amount of the sale. This amount will be credited to the Direct Account.
- Sub Type
Upper case, up to 2 characters Letters only
The system displays the subsidiary type for the Direct Account, as defined in General Ledger. This reflects the subsidiary to which the Direct Amount will be posted.
The subsidiary type and code apply only to direct receipts; for posted invoices, the subsidiary type and code were indicated when the invoice was entered.
If General Ledger is not part of your system, you may enter any value in this field. The transactions that are posted to various subsidiary types and codes can be printed on the Subsidiary codes GL Distributions report on the Monthly processing menu.
- Sub Code
Upper case, up to 16 characters
If this is a direct receipt, and the amount is to be passed to a costing subsidiary system, supply the subsidiary code to which the receipt applies. If the subsidiary involved is General Subsidiary, the subsidiary type must be ‘GL’. You cannot enter a subsidiary code if the subsidiary type is blank. Conversely, if the subsidiary type is not blank, you must enter a subsidiary code.
The transactions that are posted with the various subsidiary types and codes can be viewed on the Subsidiary Code GL Distributions report on the Monthly Processing menu.
The subsidiary type and code apply only to direct receipts; for posted invoices, the subsidiary type and code were identified when the invoice was entered.
The entered data is validated. During validation, including access to other files, conditions may be found which cause messages to be displayed. Errors (E), Warnings (W), and Messages (M) that may result are shown below:
Press ENTER to display system-supplied information and then press ENTER again to save the information on this screen.
Select Previous Image to go back to the Cash Receipts screen. Select Next Record to go to the next Cash Receipts Line Items record. Select End to go to the next Cash Receipts record.
At this screen, the use of the MODE keys - ADD, DEL, CHG, or INQ - pertain to those records in the Cash Receipts Line Items file.