
1Transaction Processing
Option 11Special Processing
Use this option to access the Special Processing overlay. The options available from this overlay are described below.
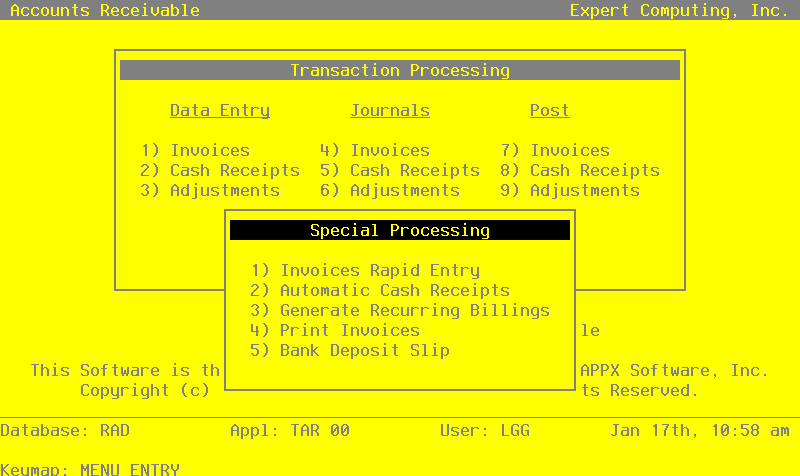
Invoices Rapid Entry
Use this function to enter and edit invoices. Unlike the standard Invoices Entry function, most data will be defaulted and you need only enter certain key items; for this reason, invoices can be entered more quickly than usual. If it becomes necessary to change an invoice entered in this fashion, you can also use the standard Invoices Entry function to edit your data.
If you need to enter invoices that post to a subsidiary application such as General Subsidiary, or that relate to a miscellaneous customer, you should use the standard invoices entry function; Sub Type and Code, and Miscellaneous Customer Name and Address, are not available for editing in this function.
The normal process of posting invoices includes: 10 entering the invoices; 2) printing the invoices and the Invoices Journal; and 3) posting the invoices. If the journal shows any errors, the errors must be corrected and the journal reprinted. If the journal has been printed and some of the data is modified, the journal must be reprinted before the data can be posted.
On the following pages, the four screens displayed by this function are shown.
The screen shown below presents information about Invoice Control Groups.
When you enter invoices, you will see only one of the two possible screens for Invoice Control Groups. Which screen you see will depend on how you answered two questions on your Parameters file. These are the “Ask Operator ID?” question, and the “Use Transaction Control” question.
If you answered ‘Y’ to both questions, you will see the screen below, and you will be able to enter control and hash totals for your invoices. In addition, a record will be written to the Transaction Control file for each control group posted.
If you answered ‘Y’ to “Ask Operator ID?”, and ‘N’ to “Use Transaction Control?”, you will see the second screen, which displays only the Operator ID and the Control Number.
If you answered ‘N’ to both questions, you will see the second screen, but you will not be allowed to edit the Operator ID.
Invoices Control Groups screen
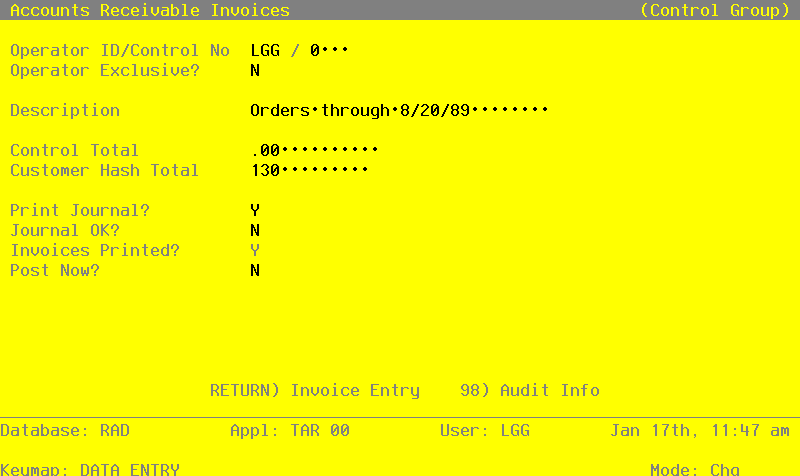
When the key value for a particular record is requested, you can review all the records in the file by selecting the Scan option. The records will be presented on an “Access” screen, and you will be allowed to scan the available data until you find the record you want. Then, position the cursor by that record and press ENTER; the record will be displayed for editing.
Data items for the preceding screen are described below:
- Operator ID
Upper case, up to 3 characters Required Carries forward in ADD mode
Only number and letters are acceptable.
The operator ID which you entered at log-on is displayed. All control groups are separated by operator.
- Control No
Positive number, up to 4 digits
A sequential number is supplied to identify this group of invoices. This number is printed on the journal, tracked on the Transaction Control file, and posted to General Ledger for detail accounts. Although it is not necessary that this number be exactly sequential, the number itself is important as a part of your audit trail.
- Operator Exclusive?
Y or N Default N Required
Indicate whether or not you want to restrict access to these invoices.
- Y
- Yes, access should be restricted to the user who enters the invoices.
- N
- No, access is not restricted. Any user can edit these invoices.
- Description
Alphanumeric, up to 30 characters Required
Describe this group of invoices. This description appears on the Transaction Control report and inquiry.
- Control Total
Number, up to 9 digits and 2 decimals
Supply the total of all invoices. This total is balanced against the running total being kept by the system as each transaction is entered.
Customer Hash Total Enter a positive number with up to 12 digits.
Supply the hash total of all customer numbers on this group of invoices. Any discrepancy between the hash total entered and the calculated hash total may represent transposition errors on one or more customer numbers.
- Print Journal?
Y or N Default Y Required
‘Y’ is displayed to indicate that these invoices are ready for printing. Enter ‘N’ if you want to delay the printing of the journal for any reason.
- Journal OK?
Y or N Display only Default N
This indicates whether or not the journal has been printed without errors. If ‘N’, the control group may contain errors and cannot be posted.
- Invoices Printed?
Y or N Display only Default N
This indicates whether or not invoices have been printed for this control group. The printing of invoices is optional.
- Post Now?
Y or N Default Y Required
‘Y’ is displayed to indicate that these invoices are ready for posting. Enter ‘N’ if you want to delay posting for any reason.
The entered data is validated. During validation, including access to other files, conditions may be found which cause messages to be displayed. Errors (E), Warnings (W), and Messages (M) that may result are shown below:
Press ENTER to continue to the next screen.
Select Next Record to go to the next Invoice Control Groups record.
At this screen, the use of the MODE keys - ADD, DEL, CHG, or INQ - pertain to those records in the Invoice Control Groups file.
This screen may optionally be used to display information about Invoice Control Groups.
Invoices Operator ID screen

When the key value for a particular record is requested, you can review all the records in the file by selecting the Scan option. The records will be presented on an “Access” screen, and you will be allowed to scan the available data until you find the record you want. Then, position the cursor by that record and press ENTER; the record will be displayed for editing.
Data items for the preceding screen are described below:
- Operator ID
Upper case, up to 3 characters Letters and numbers only Required Carries forward in ADD mode
The operator ID which you entered at log-on is displayed. All control groups are separated by operator.
- Control No
Positive number, up to 4 digits
A sequential number is supplied to identify this group of invoices. This number is printed on the journal, tracked on the Transaction Control file, and posted to General Ledger for detail accounts. Although it is not necessary that this number be exactly sequential, the number itself is important as a part of your audit trail.
The entered data is validated. During validation, including access to other files, conditions may be found which cause messages to be displayed. Errors (E), Warnings (W), and Messages (M) that may result are shown below:
Press ENTER to continue to the next screen.
Select Next Record to go to the next Invoice Control Groups record.
At this screen, the use of the MODE keys - ADD, DEL, CHG, or INQ - pertain to those records in the Invoice Control Groups file.
The screen shown below presents information about Invoices.
This file contains information that applies to the entire invoice, such as customer number, terms code, total invoice amount, freight, and sales tax.
Invoices screen
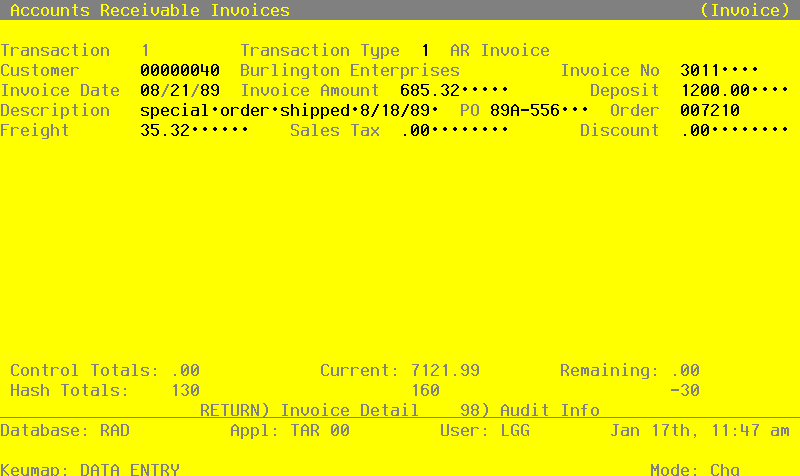
When the key value for a particular record is requested, you can review all the records in the file by selecting the Scan option. The records will be presented on an “Access” screen, and you will be allowed to scan the available data until you find the record you want. Then, position the cursor by that record and press ENTER; the record will be displayed for editing.
Note that the Audit Info option is available at the bottom of this screen. When this option is invoked, the Audit Information overlay appears and displays the date the record was created and who created it, as well as the date the record was last modified and who modified it. Press the END key or the RETURN key to clear the overlay from your screen. The information displayed in the Audit Information overlay is system-supplied and non-modifiable.
Data items for the preceding screen are described below:
- Transaction No
Positive number, up to 4 digits Display only
A sequential transaction number is supplied for each invoice. This number is printed on the journal, and posted to General Ledger for detail accounts. Although it is not necessary that this number be exactly sequential, the number itself is important as a part of your audit trail. It is printed on many reports and inquiries throughout Accounts Receivable.
- Transaction Type
Positive number, 1 digit Carries forward in ADD mode
The system displays a 1-digit code that identifies this type of transaction, along with the description entered for that code on the Descriptions file. The system defaults to an accounts receivable invoice (type 1). However, this value may be changed. If changed, the new description is displayed for verification. Valid choices are:
- 1
- AR Invoice — transaction is entered as an invoice through A/R.
- 2
- Debit/Credit Memo — transaction reflects a debit or credit memo issued.
- 6
- Service Charge — transaction is a service charge on a post-due invoice.
The Transaction Type prints on the Transaction Register and the General Ledger Distribution reports.
- Customer
Upper case, up to 8 characters Numbers only
You can use PF2 to search for an appropriate entry.
Identify the customer who is receiving this invoice. The customer number must be on file in the Customers file; the system displays the customer name so that you can verify your entry.
- Invoice Number
Upper case, up to 8 characters Required
Identify the invoice number for this invoice, debit memo, or credit memo.
- Invoice Date
Date (YMD) Required
Supply the date of the invoice.
- Invoice Amount
Number, up to 7 digits and 2 decimals
Provide the net invoice amount. The Invoice Amount is calculated by this formula:
Amount = Subtotal - Customer Discount - Deposit + Freight + Sales Tax
For a credit memo, enter a negative amount.
- NOTE
- The “subtotal” as listed above, is defined as the sum of all the invoice line items excluding any memo items.
- Deposit
Number, up to 7 digits and 2 decimals
Identify the prepaid deposit on this invoice, if any. This amount is debited to the Deposit account identified in the Parameters file.
Deposits should be entered and posted as cash receipts, using the Order No as the “Paid Invoice” number, before the invoice is posted. If you enter an amount in this field, you must identify the Order No that was used as the “Paid Invoice” number when the cash receipt was posted, so that the system can track the deposit properly.
- Description
Alphanumeric, up to 30 characters
Describe this invoice. This description will be printed on various reports throughout Accounts Receivable. If you leave this field blank, the system will use the customer’s Purchase Order number as the description.
- PO
Alphanumeric, up to 10 characters
Supply the customer’s Purchase Order number, if any. If the Description field is left blank, the system will use the customer’s PO number in its place. The PO number prints on the invoice; the description prints on the invoice; the description prints on statements and dunning letters.
- Order
Positive number, up to 6 digits
Identify the sales order to which this invoice applies, if any. If the Order Entry application is part of your system, this number must be on file in the Sales Orders file.
If there is a deposit associated with this invoice, you should have already entered the deposit as a cash receipt using the order number as the “Paid Invoice”, and posted the cash receipt; enter that order number here.
- Freight
Number, up to 7 digits and 2 decimals
If there are any freight charges, identify them. This amount is credited to the Freight Out account identified in the Parameters file.
You can also enter the freight amount here and enter type 3 (freight) line items. In this case, the line items are memo only: that is, they are printed on the invoice, but no posted to General Ledger. Rather, the General Ledger is posted using this amount, as described above.
If you leave this field blank and enter freight line items, the General Ledger posting will be made to the account numbers supplied on the line items.
- Sales Tax
Number, up to 7 digits and 2 decimals
For an invoice (transaction type 1) or a debit/credit memo (transaction type 2), supply the sales tax for all line items., if any. This is the amount of tax that is billed to the customer. This amount is credited to the sales tax liability account entered for the tax district in the Tax Codes file.
You can enter the sales tax here and enter type 4 (sales tax) line items. In this case, the line items are memo only; that is, they are printed on the invoice but not posted to General Ledger. Rather, General Ledger is posted using this amount as described above.
If you leave this field blank and enter sales tax line items, the General Ledger posting will be made to the account numbers supplied on the line items.
- Discount
Number, up to 7 digits and 2 decimals
For and invoice (transaction type 1), supply any discount offered to this particular customer, independent of the usual terms discount. This amount is debited to the Customer Discount account identified in the Parameters file.
You can enter the customer discount here and enter type 2 (customer discount) line items. In this case, the line items are memo-only; that is they are printed on the invoice but not posted to General Ledger. Rather, the General Ledger posting is taken from this field as described above.
If you leave this field blank and enter discount line items, the General Ledger positing will be made to the account number supplied on the line items.
The entered data is validated. During validation, including access to other files, conditions may be found which cause messages to be displayed. Errors (E), Warnings (W), and Messages (M) that may result are shown below:
Press ENTER to display system-supplied information and then press ENTER again to continue to the next screen.
Select Previous Image to go back to the Invoice Control Groups screen. Select Next Record to go to the next Invoices record. Select End to go to the next Invoice Control Groups record.
At this screen, the use of the MODE keys - ADD, DEL, CHG, or INQ - pertain to those records in the Invoices file.
The screen shown below presents information about Invoice Line Items.
This file identifies and describes the individual purchases made by the customer.
Invoice Line Items screen

When the key value for a particular record is requested, you can review all the records in the file by selecting the Scan option. The records will be presented on an “Access” screen, and you will be allowed to scan the available data until you find the record you want. Then, position the cursor by that record and press ENTER; the record will be displayed for editing.
Note that the Audit Info option is available at the bottom of this screen. When this option is invoked, the Audit Information overlay appears and displays the date the record was created and who created it, as well as the date the record was last modified and who modified it. Press the END key or the RETURN key to clear the overlay from your screen. The information displayed in the Audit Information overlay is system-supplied and non-modifiable.
Data items for the preceding screen are described below:
- Line Item
Positive number, up to 3 digits Display only
The system automatically numbers line items in sequence beginning with “1”. You may return to this field and change the number. However, each line item must be identified by a unique number.
- Description
Alphanumeric, up to 30 characters
If your system includes Inventory Control, the system displays the description (from the Inventory Products file) of the item code you entered in the previous field. You can override the display.
If your system does not include Inventory Control, you can provide a description of the line item.
This entry is printed on invoices, the invoices journal, and the Sales GL Distribution report.
- Item Type
Positive number, 1 digit
Enter a 1-digit code from the Descriptions file that identifies the type of line item. The system displays the description next to this field. Valid codes are:
- 0
- Taxable Sale; 1: Nontaxable Sale; 2: Customer Discount; 3: Freight; 4: Sales Tax; 5: Other
If an entry was made in the Customer Discount field on the header screen, a type 2 line item is memo only. This is, it is printed on the invoice but not posted to General Ledger. If no entry was made in the Customer Discount field on the header, a type 2 line item is posted to the offset account entered for the line item. The same holds true for the Freight and Sales Tax fields on the header and type 3 and 4 line items, respectively. If no entry was made on the header, the line item is posted to the offset account. If an entry was made on the header, the line item is memo only.
- Quantity
Number, up to 7 digits and 2 decimals
Supply the number of items sold. If units do not apply here, enter “1”.
For a credit memo or a discount line item, enter a negative number.
- Price
Positive number, up to 6 digits and 3 decimals
Supply a unit price for the item being sold. If the price per unit does not apply here, enter the line item amount.
- Offset Account
Upper case, up to 12 characters
You can use PF2 to search for an appropriate entry.
The offset account is defaulted from the customer’s record. You may override this entry. This is the account to which the line item amount will be posted. For invoices, freight, sales tax, and debit memos, this account is credited. For credit memos and discounts, this account is debited.
If your system includes General Ledger, this account number must be on file in the Chart of Accounts file. The system displays the corresponding description so that you can verify your entry.
The entered data is validated. During validation, including access to other files, conditions may be found which cause messages to be displayed. Errors (E), Warnings (W), and Messages (M) that may result are shown below:
Press ENTER to save the information on this screen.
Select Previous Image to go back to the Invoices screen. Select Next Record to go to the next Invoice Line Items record. Select End to go to the next Invoices record.
At this screen, the use of the MODE keys - ADD, DEL, CHG, or INQ - pertain to those records in the Invoice Line Items file.
Automatic Cash Receipts
Use this function to enter cash receipts and allow the system to distribute them for you; the payment is distributed to the oldest invoices first. You have the option to edit which invoices are being paid. Also, any cash receipt entered in this fashion can be edited using the standard Cash Receipts Entry function.
This function automatically applies the check amount to outstanding customer invoices, oldest invoice first. You can then edit the created cash receipts. If you want to enter direct sales, or write off any portion of an invoice, you must use the standard cash receipts entry function.
The normal process of posting cash receipts includes:
- Entering the cash receipts.
- Printing the Cash Receipts Journal.
- Posting the cash receipts.
If the journal shows any errors, the errors must be corrected and the journal reprinted. If the journal has been printed and some of the data is modified, the journal must be reprinted before the data can be posted.
On the following pages, the four screens displayed by this function are shown.
The screen shown below presents information about Cash Receipts Control Groups.
When you enter cash receipts, you will see only one of the two possible screens for Cash Receipts Control Groups. Which Screen you see will depend on how you answered two questions on your Parameters file. These are the “Ask Operator ID?” question, and the “Use Transaction Control?” question.
If you answered ‘Y’ to both questions, you will see the screen below, and you will be able to enter control and hash totals for your invoices. In addition, a record will be written to the Transaction Control file for each control group posted.
If you answered ‘Y’ to “Ask Operator ID?”, and ‘N’ to “Use Transaction Control?”, you will see the second screen, which displays only the Operator ID and the Control Number.
If you answered ‘N’ to both questions, you will see the second screen, but you will not be allowed to edit the Operator ID.
Cash Receipts Control Groups screen
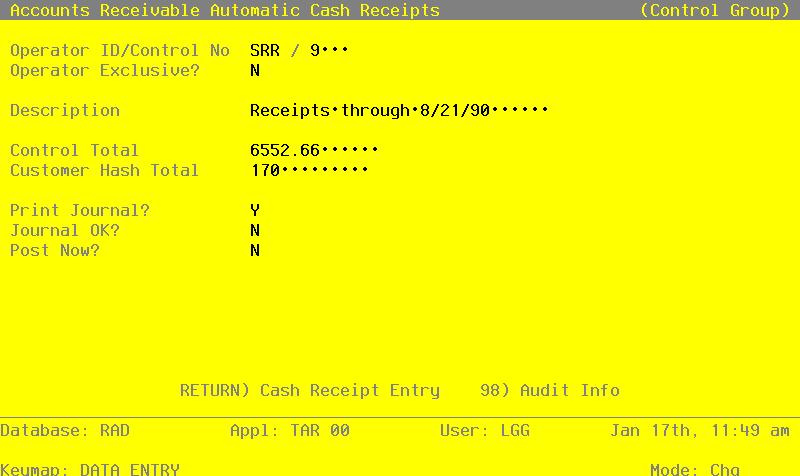
When the key value for a particular record is requested, you can review all the records in the file by selecting the Scan option. The records will be presented on an “Access” screen, and you will be allowed to scan the available data until you find the record you want. Then, position the cursor by that record and press ENTER; the record will be displayed for editing.
Data items for the preceding screen are described below:
- Operator ID
Upper case, up to 3 characters Letters and numbers only Required Carries forward in ADD mode
The system displays the operator ID you entered at log-on. All transactions are separated by operator.
- Control No
Positive number, up to 4 digits
A sequential number is supplied to identify this group of cash receipts. This number is printed on the journal, tracked on the Transaction Control file, and posted to General Ledger for detail accounts. Although it is not necessary that this number be exactly sequential, the number itself is important as a part of your audit trail.
- Operator Exclusive?
Y or N Default N Required
Indicate whether or not you want to restrict access to these cash receipts.
- Y
- Yes, access should be restricted to the user who enters the receipts.
- N
- No, access is not restricted. Any user can edit these cash receipts.
- Description
Alphanumeric, up to 30 characters Required
Describe this group of cash receipts. This description appears on the Transaction Control report and inquiry.
- Control Total
Number, up to 9 digits and 2 decimals
Sum all of the checks in this control group, and enter the total.
- Customer Hash Total
Positive number, up to 12 digits
Supply the hash total of all customer numbers on the group of cash receipts. Any discrepancy between the hash total entered and the calculated hash total may represent transposition errors on one or more customer numbers.
- Print Journal?
Default Y Required
Enter ‘Y’ (Yes) or ‘N’ (no).
‘Y’ is displayed to indicate that these cash receipts are ready for printing. Enter ‘N’ if you want to delay the printing of the journal for any reason.
- Journal OK?
Y or N Display only Default N
This indicates whether or not the journal has been printed without errors. If ‘N’, the control group may contain errors and cannot be posted.
- Post Now?
Y or N Default Y Required
‘Y’ is displayed to indicate that these cash receipts are ready for posting. Enter ‘N’ if you want to delay posting for any reason.
The entered data is validated. During validation, including access to other files, conditions may be found which cause messages to be displayed. Errors (E), Warnings (W), and Messages (M) that may result are shown below:
Press ENTER to continue to the next screen.
Select Next Record to go to the next Cash Receipts Control Groups record.
At this screen, the use of the MODE keys - ADD, DEL, CHG, or INQ - pertain to those records in the Cash Receipts Control Groups file.
This screen may optionally be used to display information about Cash Receipts Control Groups.
Cash Receipts Operator ID screen

When the key value for a particular record is requested, you can review all the records in the file by selecting the Scan option. The records will be presented on an “Access” screen, and you will be allowed to scan the available data until you find the record you want. Then, position the cursor by that record and press ENTER; the record will be displayed for editing.
Data items for the preceding screen are described below:
- Operator ID
Upper case, up to 3 characters Letters and numbers only Required Carries forward in ADD mode
The system displays the operator ID you entered at log-on. All transactions are separated by operator.
- Control No
Positive number, up to 4 digits
A sequential number is supplied to identify this group of cash receipts. This number is printed on the journal, tracked on the Transaction Control file, and posted to General Ledger for detail accounts. Although it is not necessary that this number be exactly sequential, the number itself is important as a part of your audit trail.
The entered data is validated. During validation, including access to other files, conditions may be found which cause messages to be displayed. Errors (E), Warnings (W), and Messages (M) that may result are shown below:
Press ENTER to continue to the next screen.
Select Next Record to go to the next Cash Receipts Control Groups record.
At this screen, the use of the MODE keys - ADD, DEL, CHG, or INQ - pertain to those records in the Cash Receipts Control Groups file.
The screen shown below presents information about Cash Receipts.
This file contains information pertaining to the entire receipt: customer, date amount, check number, and cash account.
Automatic Cash Receipts screen
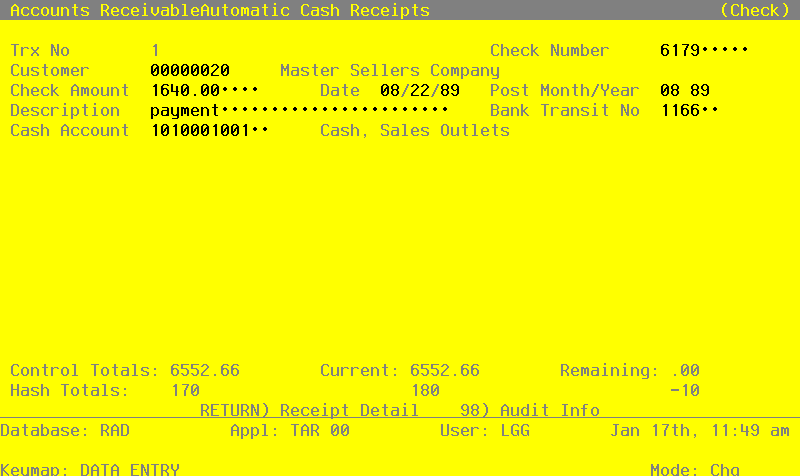
When the key value for a particular record is requested, you can review all the records in the file by selecting the Scan option. The records will be presented on an “Access” screen, and you will be allowed to scan the available data until you find the record you want. Then, position the cursor by that record and press ENTER; the record will be displayed for editing.
Note that the Audit Info option is available at the bottom of this screen. When this option is invoked, the Audit Information overlay appears and displays the date the record was created and who created it, as well as the date the record was last modified and who modified it. Press the END key or the RETURN key to clear the overlay from your screen. The information displayed in the Audit Information overlay is system-supplied and non-modifiable.
Data items for the preceding screen are described below:
- Trx No
Positive number, up to 4 digits Display only
A sequential transaction number is supplied for each check record. This number is printed on the journal, and posted to General Ledger for detail accounts. Although it is not necessary that this number be exactly sequential, the number itself is important as a part of your audit trail. It is printed on many reports and inquiries throughout Accounts Receivable.
- Check Number
Positive number, up to 9 digits
Supply the number imprinted on the check.
- Customer
Upper case, up to 8 characters Numbers only Required
You can use PF2 to search for an appropriate entry.
Identify the customer who issued this check. The customer number must be on file in the Customers file. The system displays the customer name so that you can verify your entry.
- Check Amount
Number, up to 7 digits and 2 decimals
If this cash receipt applies to the receivable accounts entered on the line items, the Check Amount is given by this formula:
Check Amount = Credit Amount - Discount Given - Write Off Amount
Alternatively, if this cash receipt applies to the Direct Accounts entered on the line items, the Check Amount is given by this formula:
Check Amount = Direct Amount - Discount Given
Direct, Credit, And Write Off amounts, as well as Discount Given, are entered on the line item screens for this cash receipt.
- Date
Date (YMD) Required Carries forward in ADD mode
This is the date the check was received (deposited), not the date printed on the check.
- Post Month
Upper case, up to 2 characters Letters and numbers only Valid: 01, 02, 03, 04, 05, 06, 07, 08, 09, 10, 11, 12, 13, EY Required Carries forward in ADD mode
Identify the month to which this transaction is to be posted. The current month defined in the Parameters file is supplied; if you want to post to a prior or future month, you can change it. If your system is based on 12 accounting periods, enter the calendar month; if you are using 13-period accounting, enter the fiscal period. Valid entries and their meanings are:
- 1
- 13: Calendar period
- EY
- End-of-Year
- Post Year
Positive number, up to 2 digits Carries forward in ADD mode
Identify the year to which this transaction is to be posted. The year defined in the Parameters file is supplied; if you want to post to a prior or future year, you can change it. If you are using 12-month accounting, this will be the calendar year; if you are using 13-period accounting, this will be the fiscal year.
- NOTE
- A value of zero in the calendar year will cause the transaction to be posted to the year 2000.
- Description
Alphanumeric, up to 30 characters
Describe the transaction. This description will be printed on various reports throughout Accounts Receivable and may be useful as a part of your audit trail.
- Bank Transit No
Alphanumeric, up to 6 characters
Supply the bank transit number printed on the check. This is the number requested on the bank deposit slip.
- Cash Account
Upper case, up to 12 characters Required
You can use PF2 to search for an appropriate entry.
Provide the number of the cash account that will be debited for this receipt. If your system includes General Ledger, this number must be on file in the Chart of Accounts file, and the system displays the corresponding description so that you can verify your entry.
The entered data is validated. During validation, including access to other files, conditions may be found which cause messages to be displayed. Errors (E), Warnings (W), and Messages (M) that may result are shown below:
Press ENTER to display system-supplied information and then press ENTER again to continue to the next screen.
Select Previous Image to go back to the Cash Receipts Control Groups screen. Select Next Record to go to the next Cash Receipts record. Select End to go to the next Cash Receipts Control Groups record.
At this screen, the use of the MODE keys - ADD, DEL, CHG, or INQ - pertain to those records in the Cash Receipts file.
The screen shown below presents information about Cash Receipts Line Items.
Cash Receipts Line Items screen

When the key value for a particular record is requested, you can review all the records in the file by selecting the Scan option. The records will be presented on an “Access” screen, and you will be allowed to scan the available data until you find the record you want. Then, position the cursor by that record and press ENTER; the record will be displayed for editing.
Data items for the preceding screen are described below:
- Line
Positive number, up to 4 digits Display only
The system automatically numbers cash receipt line items in sequence beginning with ‘1’. You may change this number. Each paid invoice or direct sale item must be identified by a unique number.
- Apply To
Upper case, up to 8 characters Display only
Identify the invoice to which this receipt should be applied.
If this receipt is a deposit on a sales order, enter the order number. The order number and deposit amount must also be indicated on the invoice when it is entered so that the system can track the deposit correctly.
If this receipt is not being applied to an invoice (for example, for an on-account receipt), leave this field blank.
You can use PF2 to search the unpaid Invoices file if this is an Apply To Type 3.
If you enter an invoice number, and that invoice is on your Unpaid Invoices file, you may press PF17 to default the credit amount to the current invoice balance.
- Description
The system displays the amount due on this Apply To invoice, including all invoices, receipts, or adjustments that apply.
- Balance
This field is used to display the description for transaction types, as follows:
1. AR Invoice
2. Debit/Credit Memo
3. AR Adjustment
4. Cash Receipt
5. OE Invoice
6. Service Charge
7. Prepayment
- Credit Amount
Number, up to 7 digits and 2 decimals
If the receipt applies to an existing receivable that has been or will be posted, enter the amount to apply. This amount will be credited to the Receivable Account that you enter.
Leave this field blank for items that do not affect a receivable (for example, cash sales). Use the Direct Amount field instead.
- Discount Given
Number, up to 7 digits and 2 decimals
Identify the amount of discount given according to the terms on this transaction. This amount Will be debited to the Discounts Given account specified in your Parameters file.
- W/O (Write Off?)
Y or N Default N Required
This field specifies whether or not service charges accrued against the Apply To invoice will be written off when the Write Off Service Charges function is run. By default, the system displays the Write Off Service Charges function is run. By default, the system displays the Write Off Service Charge? field (‘Y’ or ‘N’) from the Customers record. It may be changed:
- Y
- Service Charges accrued against the Apply To invoice will be written off.
- N
- Service Charges accrued against the Apply To invoice will not be written off.
NOTE: This function is only available if you entered ‘N’ as a response to “Summary Service Charges?” on your Parameters file. In other words, you can only use the automatic write off procedure if you are calculating service charges on each individual invoice.
The entered data is validated. During validation, including access to other files, conditions may be found which cause messages to be displayed. Errors (E), Warnings (W), and Messages (M) that may result are shown below:
Press ENTER to display system-supplied information and then press ENTER again to save the information on this screen.
Select Previous Image to go back to the Cash Receipts screen. Select Next Record to go to the next Cash Receipts Line Items record. Select End to go to the next Cash Receipts record.
At this screen, the use of the MODE keys - ADD, DEL, CHG, or INQ - pertain to those records in the Cash Receipts Line Items file.
Generate Recurring Billings
Use this function to generate invoice entries for those items defined in the Recurring Billings file. The generated invoices can be reviewed and edited before the journal is printed and the invoices are posted. The following processing steps accomplish this job.
- Step 1This function allows you to enter a month and year for Recurring Billings, prior to generating invoices.
On the following pages, the screen displayed by this function is shown.
The screen shown below allows you to enter parameters needed to generate recurring billings.
Generate Recurring Billings screen
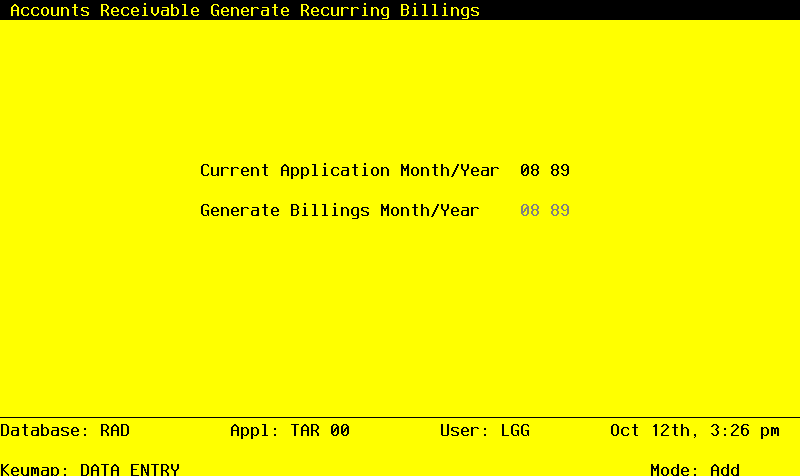
Data items for the preceding screen are described below:
- Generate Billings Month
Upper case, up to 2 characters
This is required.
Supply the month for which recurring billing invoice entries will be generated. The current calendar month defined in the Parameters file is supplied. If you want to post to a prior or future month, you can change it. If your system is based on 12 accounting periods, enter the calendar month; if you are using 13-period accounting, enter the fiscal period.
- Generate Billings Year
Positive number, up to 2 digits
Supply the year for which recurring billing invoice entries will be generated. The calendar year defined in the Parameters file is supplied; you can change it. If you are using 12-month accounting, enter the calendar year; if you are using 13-period accounting, enter the fiscal year.
The entered data is validated. During validation, including access to other files, conditions may be found which cause messages to be displayed. Errors (E), Warnings (W), and Messages (M) that may result are shown below:
Press ENTER to display system-supplied information and then press ENTER again to save the information on this screen.
- Step 2This step provides sequencing of data records by Billing Day, Customer, and Billing, with no option to change the sequence at run time.
- Step 3This is the standard disposition used for all processing functions other than posts.
- Step 4According to previously specified criteria, this step actually performs the desired selection and/or sorting process.
- Step 5This step processes the information for Recurring Billings and Recurring Billings Line Items. Under certain conditions, records in the Invoice Control Groups, Invoices, and Invoice Line Items files will be added. Updates to certain fields in the Parameters, Recurring Billings, and Invoices files will occur. Generalized routines are performed to define Due Dates in Accounts Receivable.
Print Invoices
Use this function to print invoices on standard 8-1/2 x 11 white stock paper or on special preprinted forms depending on the entry in the Parameters file. The following processing steps accomplish this job.
- Step 1In preparation for performing a sort/selection process on the Invoices information, this step provides sequencing of data records by Operator ID, Control Number, and Invoice Number, with no option to change the sequence at run time. Selection of data records is provided by Operator ID, Control Number, and Invoices Printed?, with the option to enter user-specified comparisons at run time.
- Step 2This disposition is used to print invoices. Although they are designed to print on 8-1/2 x 11 white paper, many customers may have preprinted forms they wish to use, which may require modification of this disposition function.
- Step 3According to previously specified criteria, this step actually performs the desired selection and/or sorting process.
- Step 4This function checks the Parameters file to see if preprinted forms are to be used.
- Step 5In order to print Invoices on plain 8-1/2 x 11 inch paper, this step formats the Invoices and Invoice Line Items information. The following data items are shown: Line Item Description, Quantity, Price and Amount.
A sample output is shown below:
    APPX Demonstration Company                                                1
    990 Hammond Dr
    Ste 800
    Atlanta, GA  30328

                                  I N V O I C E

                Invoice Number: 3011            Invoice Date: 08/21/89
                      Apply To: 3011
         Sold To:

         Burlington Enterprises
         404 W. 12th Street

         Spokane, WA 98003

                                 Due Date: 09/20/89
    Your PO No:  89A-556            Terms: 2/10, Net 30
    Salesperson: Mr. Jarvis W. Payne

    ===========================================================================
    Description                          Quantity         Price         Amount
    special order desk                       1.00      1200.000        1200.00
leather office chair 2.00 325.000 650.00- Step 6In order to print Invoices on preprinted forms, this step formats the Invoices and Invoice Line Items information. The following data items are shown: Line Item Description, Quantity, Price and Amount.
A sample output is shown below.
    APPX Demonstration Company                                                1
    990 Hammond Dr
    Ste 800
    Atlanta, GA  30328

                                  I N V O I C E

                Invoice Number: 3011            Invoice Date: 08/21/89
                      Apply To: 3011
         Sold To:

         Burlington Enterprises
         404 W. 12th Street

         Spokane, WA 98003

                                 Due Date: 09/20/89
    Your PO No:  89A-556            Terms: 2/10, Net 30
    Salesperson: Mr. Jarvis W. Payne

    ===========================================================================
    Description                          Quantity         Price         Amount
    special order desk                       1.00      1200.000        1200.00
    leather office chair                     2.00       325.000         650.00
Bank Deposit Slip
Use this function to print a bank deposit slip for cash receipts. The following processing steps accomplish this job.
- Step 1In preparation for performing a sort/selection process on the Cash Receipts information, this step provides sequencing of data records by Cash Account and Check Number, with no option to change the sequence at run time. Selection of data records is provided by Cash Account and Check Number, with the option to enter user-specified comparisons at run time.
- Step 2This is the standard disposition used for all reports not printed on special forms.
- Step 3According to previously specified criteria, this step actually performs the desired selection and/or sorting process.
- Step 4In order to print the Bank Deposit Slip, this step formats the Cash Receipts information. The following data items are shown: Bank Transit No, Check No, Customer, Name, Date, and Check Amount.
A sample output is shown below.
                                                       Expert Computing, Inc.
10/12/94 15:28                                                                                                       LGG Page:  1
                                                         Bank Deposit Slip

         Transit         Check                  Customer                            Date               Check
         No                 No       Cust No    Name                                Received          Amount
=================================================================================================================================


Account 1010001001    Cash, Sales Outlets

         1258        000005208      00000070    Richards & Wright, PC               08/22/89         3200.00
         1166        000006179      00000010    Alexander's, Inc.                   08/22/89         1640.00
         807         000011690      00000040    Burlington Enterprises              08/22/89         1500.00
         987         000654654      00000050    Miscellaneous Customer              08/22/89          212.66
                                                                                                       —————
                                                                — Cash Account Subtotals —>          6552.66
                                                                                                  ===========