
8Financial Statements
Option 2Statement Detail
You can use this function to enter the detail information that prints on financial statements. Define each line of each statement using this function.
If you will think of a statement as being composed of rows and columns of information, then the statement detail records define the contents and format of each row. The content and format of the columns is defined in the Statement Printing function.
When you use this function, a record all entries will be printed. For additions, all new field contents are printed; for deletions the deleted record’s contents are shown; for changes, both old field contents and new field contents are shown; and in all cases, the User ID, date and time are printed.
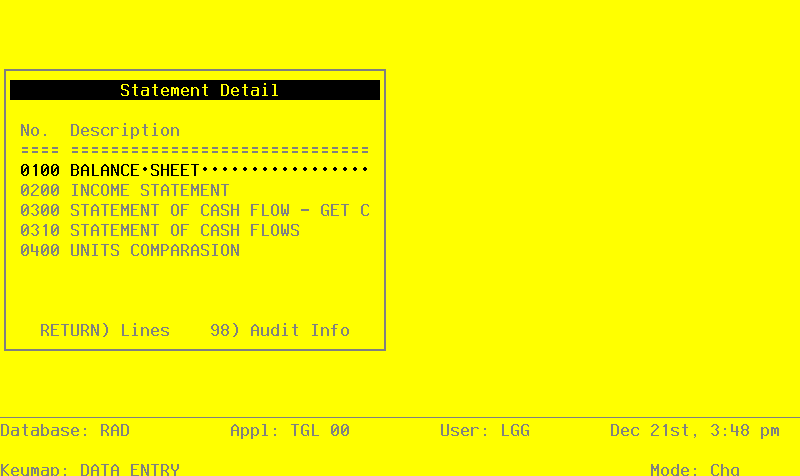
The screen shown below presents information about Statement Detail.
This file is used to define and describe a financial statement format.
Statement Detail screen
When the key value for a particular record is requested, you can review all the records in the file by selecting the Scan option. The records will be presented on an “Access” screen, and you will be allowed to scan the available data until you find the record you want. Then, position the cursor by that record and press ENTER; the record will be displayed for editing.
Note that the Audit Info option is available at the bottom of this screen. When this option is invoked, the Audit Information overlay appears and displays the date the record was created and who created it, as well as the date the record was last modified and who modified it. Press the END key or the RETURN key to clear the overlay from your screen. The information displayed in the Audit Information overlay is system-supplied and non-modifiable.
Data items for the preceding screen are described below:
- Statement No
Positive number, up to 4 digits Scan by this field (access key)
Enter a number to identify the financial statement. This unique number will be used to access the statement for maintenance and printing.
- Description
Upper case, up to 40 characters
Enter a description for this financial statement. This description is for your reference only; it does not appear on the printed financial statement.
Press ENTER to continue to the next screen.
Select the Next Record option to go to the next Statement Detail record.
At this screen, the use of the MODE keys - ADD, DEL, CHG, or INQ - pertain to those records in the Statement Detail file.
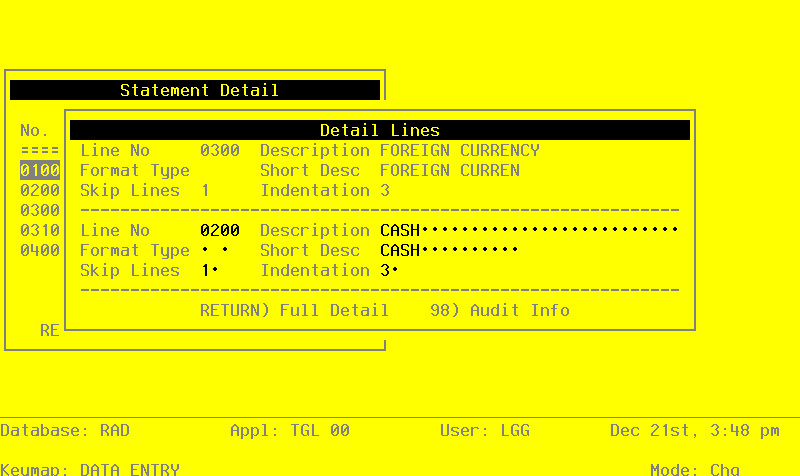
The screen shown below presents additional information about Statement Detail.
This file specifies the format and contents of each line on the financial statement. The key to this file is Statement No/Line No.
You can refer to samples of how statement detail entries relate to the actual statement produced by examining Appendix A of this manual.
Statement Detail Format screen
When the key value for a particular record is requested, you can review all the records in the file by selecting the Scan option. The records will be presented on an “Access” screen, and you will be allowed to scan the available data until you find the record you want. Then, position the cursor by that record and press ENTER; the record will be displayed for editing.
Data items for the preceding screen are described below:
- Line No
Positive number, up to 5 digits
The line number is used to identify each line on the financial statement. The system begins with ‘00100’ and increments by 100 from the last number added. Lines will be used in numeric order when the statement or mask is printed. You may change the number to obtain greater flexibility in formatting statements.
- Description
Alphanumeric, up to 30 characters
Enter a description for this line on the statement. At your option, this description may be printed on the body of the statement. If the line is to be printed and is indicated, the number of characters available for the description is reduced by the number of characters indented. For example, if you indent 5 characters only the first 5 characters of this description will print.
- Format Type - 1
Upper case, 1 character
- H
- Heading. Only the description will be printed. If you select this option, no additional Statement Detail entry windows will appear.
‘ ‘: (blank) This is a detail line that will be further described on the next entry screen.
T: Totaling. The T designates that the contents of the total register defined in the next field (Format Type - 2) is printed. The registers 1 through are zeroed after the result prints. The contents of each statement detail record defined is always added to all nine registers (#1-#9). The user controls the amounts being totaled by defining when totals are printed and what level of totaling is printed.
- Z
- Zeroing. The Z designation zeroes the cumulative registers beginning with register 1 and continues through the register defined in the next field.
- Format Type - 2
Upper case, 1 character
If using the Totaling (T) option or Zeroing option (Z) enter the number of the register that designates the appropriate total to print (for T option) or the number of the register that designates the cumulative registers to zero (for Z option). For example:
If the total accumulated in register 4 is to be printed, enter ‘T’ in the previous field and ‘4’ in this field. If the total accumulated in register 6 is to be printed, enter ‘T’ and ‘6’.
If registers 1 through are to be zeroed enter ‘Z’ in the previous field and ‘3’ in this field. If registers 1 through 7 are to be zeroed, enter ‘Z’ and ‘7’.
- Short Description
Alphanumeric, up to 14 characters
The “Short Description” will be used if the previously entered description is longer than the “Description Length” defined on the Statement Print record and this field is not blank.
- Skip No Lines
Positive number, up to 2 digits
Enter 2 digits to indicate the number of lines to be skipped before printing this detail line. If this line is to start a new page, enter “99”.
- Indentation
Positive number, up to 2 digits
Enter 2 digits to indicate the number of spaces from the left margin to indent before printing the description. If the description is to be centered, enter ‘99’.
The entered data is validated. During validation, including access to other files, conditions may be found which cause messages to be displayed. Errors (E), Warnings (W), and Messages (M) that may result are shown below:
Press ENTER to display system-supplied information and then press ENTER again to continue to the next screen.
Select the Previous Image option to go back to the Statements screen. Select the Next Record option to go to the next Statement Detail record. Select the End option to go to the next Statements record.
At this screen, the use of the MODE keys - ADD, DEL, CHG, or INQ - pertain to those records in the Statement Detail file.
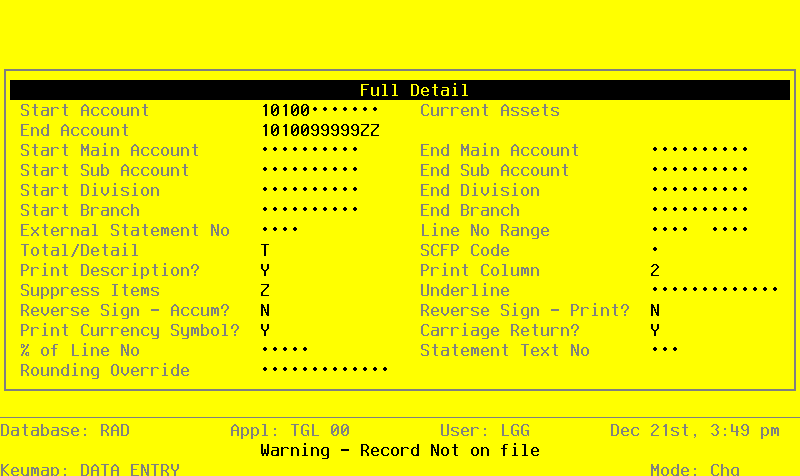
The screen below presents additional information about Statement Detail. This information is entered is the “Format Type” field was left blank.
Statement Detail Line screen
When the key value for a particular record is requested, you can review all the records in the file by selecting the Scan option. The records will be presented on an “Access” screen, and you will be allowed to scan the available data until you find the record you want. Then, position the cursor by that record and press ENTER; the record will be displayed for editing.
Data items for the preceding screen are described below:
- Start Account
Upper case, up to 12 characters Scan available
Define the first account in the range of account numbers to be accumulated and/or printed. You can further define the accounts to be accumulated by also entering “Start” and “End” parameters for components 1-4. If you want to accumulate a single account, the “sort Account” and “End Account” should be the same and the start and end components should be blank.
- End Account
Upper case, up to 12 characters Scan available
Define the low value for the first component of the account if you want only certain first components included in the account range entered above. This field may be left blank. For example, if your first account component was the main account and you wished to include only accounts with main account 21100 to 21299, enter 21100 as the “Start Component 1”.
- Start/End Main Account
Upper case, up to 10 characters
Define the low and high values for the first component of the account if you want only certain first components included in the account range entered above. This field may be left blank. For example, if your first account component was the main account and you wished to include only accounts with main account 21100 to 21299, enter 21299 as the “End Component 1”.
- Start/End Subsidiary Account
Upper case, up to 10 characters
Define the low and high values for the second component of the account if you want only certain second components included in the account range entered above. This field may be left blank. For example, if your second account component was the sub account and you wished to include only accounts with sub account 010 to 019, enter 010 as the “Start Component 2”.
- Start/End Division
Upper case, up to 10 characters
Define the low and high values for the third component of the account if you want only certain third components included in the account range entered above. This field may be left blank. For example, if your third account component was the division and you wished to include only accounts with division 20 to 49, enter 20 as the “Start Component 3”.
- Start/End Branch
Upper case, up to 10 characters
Define the low and high values for the fourth component of the account if you want only certain fourth components included in the account range entered above. This field may be left blank. For example, if your fourth account component was the branch and you wished to include only accounts with branch AA, enter AA as the “Start Component 4”.
- External Statement No
Positive number, up to 4 digits
You may enter a valid financial statement to reference within the current statement. This may be a previously defined financial statement, or a previously defined portion of the current financial statement. This function allows you to retrieve or copy data from another statement to the current statement without recreating the detail lines. The data that is copied is the amount printed for the external statement when it was last printed. Make sure that both statements reflect equivalent accounting periods as defined in the corresponding Statement Print record.
- Line No. Range
Positive number, up to 5 digits
Enter the starting and ending line number for the previously entered external statement from which data is being transferred. The data is drawn from column 1 and cannot be copied from any other column.
- Total/Detail
Upper case, 1 character Letters only Valid: T, D Default T Required
This entry specifies the manner in which data is to be printed on the statement. The options are:
- T
- Total. All accounts within the range of accounts specified will be added, and the sum will be printed on the statement.
- D
- Detail. Each account within the range of accounts specified will be printed as a separate line item.
- SCFP Code
Positive number, 1 digit
This entry defines the manner in which Source, Use, Neither information for each account in the specified range is to be printed. This information would normally be used only for a Statement of Changes in Financial Position or a Cash Flow Statement.
‘ ‘: No Source/Use totals are to be printed.
- 1
- Source totals are to be printed.
- 2
- Use totals are to be printed.
- 3
- Neither totals are to be printed.
- 4
- Source, Use, Neither totals are to be summed and the result printed.
- 5
- Use totals are subtracted from Source totals, and the result is printed.
- 6
- Use totals are added to Source totals, and the result is printed.
- Print Description?
Y or N Default Y Required
This entry designates the line description to be printed. The options are:
Y: Yes. A description will be printed on the detail line. If an entry has been made in Description on the initial Statement Detail screen, that entry will be printed.
- N
- No. No description will print on the detail line.
If no entry was made in the Description field and a “D” was entered in the Total/Detail field, the description printed for each account in the specified range will be the account name in the Account Balances file.
If no entry was made in Description and a ‘T’ was entered in Total/Detail, no description will be printed.
- Print Column
Positive number, 1 digit
In a noncomparative financial statement (a statement whose format is defined to have only 1 logical column in the Statement Printing definition, e.g. a Balance Sheet), enter the number of the column (1 through 13) in which the amount is to appear. In a comparative financial statement (a statement defined with more than 1 logical column in the Statement Printing definition, e.g. a Budget vs. Actual Income Statement), the print columns are defined in the Statement Printing file and any entry here will be ignored.
- Suppress Items
Upper case, 1 character Letters only Valid: Z, A, N Default N Carries forward in ADD mode
This entry allows you to suppress the printing of the statement line. The options are:
- N
- No, do not suppress any items in the range.
- A
- Suppress all items in the range.
- Z
- Suppress the line if the column amount is zero. (In a comparative statement, all columns must have a zero amount.)
- Underline
Upper case, up to 13 characters Numbers only
Each entry position in the field designates the line/column to be underlined when the statement is printed. The options are:
‘ ‘: No underlining is to be performed for this line/column position.
- 1
- A single underline is printed in this line/column position.
- 2
- A double under is printed in this line/column position.
Note: Each characters in this field represents a column. For example, if the first two characters are blank and the next two are ‘2’, the first two columns will not be underlined and the third and fourth will be double underlined.
- Reverse Sign - Accum?
Y or N Default N Required
This entry allows you to reverse the sign of the amount accumulated in the registers, and is used, for example, when developing a Statement of Changes in Financial Position or a Cash Flow Statement. The options are:
Y: Sign is reversed for accumulation. A debit balance account is accumulated as a negative number and a credit balance account is accumulated as a positive number.
N: Sign is not reversed for accumulation. A debit balance account is accumulated as a positive number and a credit balance account is accumulated as a negative number.
- Reverse Sign - Print?
Y or N Default N Required
This entry allows you to enter the sign of the amount to be printed. The options are:
Y: Print the currency symbol, as appropriately defined for each column in the Statement Printing file, for this statement detail line. If a line is set to print detail of a range of accounts, each amount will carry a currency symbol.
- N
- Do not print a currency symbol.
- Print Currency Symbol
This entry designates whether or not the currency symbol is to be printed on the financial statement. The options are:
Y: Print the currency symbol as appropriately defined for each column in the Statement Printing file for this statement detail line. If a line is set to print detail of a range of accounts, each amount will carry a currency symbol.
- N
- Do not print a currency symbol.
- Carriage Return?
Y or N Default Y Required
Enter ‘Y’ or ‘N’ to designate whether or not a carriage return is to be executed before the next line is printed. (This item is ignored when producing comparative statements).
- Y
- The carriage is returned before printing the next line.
N: The carriage is not returned before printing the next line. The next line item balance will print in the indicated column and on the same line as the current line item balance. ‘N’ cannot be used for a range of accounts with detail. The following restrictions also apply:
- The current line item cannot be underlined.
- The current line item balance cannot be printed in the righmost column.
- The next line item balance can only be printed in a column to the right of the current line item balance.
- The next line item balance cannot have lines skipped before printing.
- % of Line No
Positive number, up to 5 digits
This entry defines the calculation of vertical percentages for printing on the financial statement. Enter the line number of the account to be used as the denominator of the % fraction. The current line account serves as the numerator. If left blank, no calculation will be performed for this line. To show the results of this calculation, a vertical % column must be defined in the Statement Printing definition for this statement.
- Statement Text No
Upper case, up to 3 characters Numbers only Scan available
Enter a number to identify the text from the Statement Text file to be printed in the body of the financial statement at this line location.
- Rounding Override
Upper case, up to 13 characters Letters only
This entry designates the type of rounding operation to be performed for the specific line/ column if rounding is designated for the column in Statement Printing. This is necessary, for example, when normal rounding throws a Balance Sheet out of balance. The options are:
- U
- The line/column amount is always rounded up.
- D
- The line/column amount is always rounded down.
‘ ‘: The normal rounding method is used. ( A value of 5 or more rounds up, a value of less than 5 rounds down.)
Note: Each character position in this field represents a column. For example, if the first two characters are blank and the next tow are ‘U’, normal rounding will occur for the first two columns and the third and fourth columns will be rounded up.
The entered data is validated. During validation, including access to other files, conditions may be found which cause messages to be displayed. Errors (E), Warnings (W), and Messages (M) that may result are shown below:
Press ENTER to display system-supplied information and then press ENTER again to continue to the next screen
Select the Previous Image option to go back to the Statements screen. Select the Next Record option to go to the next Statement Detail record. Select the End option to go to the next Statements record.
At this screen, the use of the MODE keys - ADD, DEL, CHG, or INQ - pertain to those records in the Statement Detail file.
This screen may optionally be used to display information about Statement Detail. This screen will appear if a ‘T’ was entered in the “Format Type” field.
Statement Detail Total screen

When the key value for a particular record is requested, you can review all the records in the file by selecting the Scan option. The records will be presented on an “Access” screen, and you will be allowed to scan the available data until you find the record you want. Then, position the cursor by that record and press ENTER; the record will be displayed for editing.
Data items for the preceding screen are described below:
- Print Description?
Y or N Default Y Required
This entry designates the line description to be printed. The options are:
Y: Yes. A description will be printed on the detail line. If an entry has been made in Description on the initial Statement Detail screen, that entry will be printed.
- N
- No. No description will print on the detail line.
If no entry was made in the Description field and a “D” was entered in the Total/Detail field, the description printed for each account in the specified range will be the account name in the Account Balances file.
If no entry was made in Description and a ‘T’ was entered in Total/Detail, no description will be printed.
- Print Column
Positive number, 1 digit
In a noncomparative financial statement (a statement whose format is defined to have only 1 logical column in the Statement Printing definition, e.g. a Balance Sheet), enter the number of the column (1 through 13) in which the amount is to appear. In a comparative financial statement (a statement defined with more than 1 logical column in the Statement Printing definition, e.g. a Budget vs. Actual Income Statement), the print columns are defined in the Statement Printing file and any entry here will be ignored.
- Suppress Items
Letters only Valid: Z, A, N Default N Carries forward in ADD mode
Enter an upper case alphanumeric field, 1 character sin length.
This entry allows you to suppress the printing of the statement line. The options are:
- N
- No, do not suppress any items in the range.
- A
- Suppress all items in the range.
- Z
- Suppress the line if the column amount is zero. (In a comparative statement, all columns must have a zero amount.)
- Underline
Upper case, up to 13 characters Numbers only
Each entry position in the field designates the line/column to be underlined when the statement is printed. The options are:
‘ ‘: No underlining is to be performed for this line/column position.
- 1
- A single underline is printed in this line/column position.
- 2
- A double underline is printed in this line/column position.
Note: Each character in this field represents a column. For example, if the first two characters are blank and the next two are ‘2’, the first two columns will not be underlined and the third and fourth will be double underlined.
- Reverse Sign - Accum?
Y or N Default N Required
This entry allows you to reverse the sign of the amount accumulated in the registers and is used, for example, when developing a Statement od Changes in Financial Position or a Cash Flow Statement. The options are:
Y: Sign is reversed for accumulation. A debit balance account is accumulated as a negative number and a credit balance account is accumulated as a positive number.
N: Sign is not reversed for accumulation. A debit balance account is accumulated as a positive number and a credit balance account is accumulated as a negative number.
- Reverse Sign - Print?
Y or N Default N Required
This entry allows you to reverse the sign of the amount to be printed. The options are:
Y: Sign is reversed during printing. This option allows you to suppress a negative sign during printing. This feature is commonly used in the Liability/Owner’s Equity section of a Balance Sheet. When used in conjunction with Reverse Sign - Accum? you may access a debit balance account, reverse the sign in the registers to subtract that balance from another debit balance account, and reverse the sign again during printing to suppress the negative sign.
- N
- Sign is not reversed during printing. A debit amount will print with no sign and a credit amount will print with a minus sign.
- Print Currency Symbol?
Y or N Default N Required
This entry designates whether or not the currency symbol is to be printed on the financial statement. The options are:
Y: Print the currency symbol, as appropriately defined for each column in the Statement Printing file, for this statement detail line. If a line is set to print detail of a range of accounts, each amount will carry a currency symbol.
- N
- Do not print a currency symbol.
- Carriage Return?
Y or N Default N Required
Enter ‘Y’ or ‘N’ to designate whether or not a carriage return is to be executed before the next line is printed. (this item is ignored when producing comparative statements.)
- Y
- The carriage is returned before printing the next line.
N: The carriage is not returned before printing the next line. The next line item balance will print in the indicated column and on the same line as the current line item balance. ‘N’ cannot be used for a range of accounts with detail. The following restrictions also apply:
- The current line item cannot be underlined.
- The current line item balance cannot be printed in the rightmost column.
- The next line item balance can only be printed in a column to the right of the current line item balance.
- The next line item balance cannot have lines skipped before printing.
- % of Line No
Positive number, up to 5 digits
This entry defines the calculation of vertical percentages for printing on the financial statement. Enter the line number of the account to be used as the denominator of the % fraction. The current line account serves as the numerator. If left blank, no calculation will be performed for this line. To show the results of this calculation, a vertical % column must be defined in the Statement Printing definition for this statement.
- Statement Text No
Upper case, up to 3 characters Numbers only Scan available
Enter a number to identify the text from the Statement Text file to be printed in the body of the financial statement at this line location.
- Rounding Override
Upper case, up to 13 characters Letters only
This entry designates the type of rounding operation to be performed for the specific line/ column if rounding is designated for the column in Statement Printing. This is necessary, for example, when normal rounding throws a Balance sheet out of balance. The options are:
- U
- The line/column amount is always rounded up.
- D
- The line/column amount is always rounded down.
‘ ‘ The normal rounding method is used. (A value of 5 or more rounds up, a value of less than 5 rounds down.
Note: Each character position in this field represents a column. For example, if the first two characters are blank and the next two are ‘U’, normal rounding will occur for the first two columns and the third and fourth columns will be rounded up.
The entered data is validated. During validation, including access to other files, conditions may be found which cause messages to be displayed. Errors (E), Warnings (W), and Messages (M) that may result are shown below:
Press ENTER to save the information on this screen.
Select the Previous Image option to go back to the Statements screen. Select the Next Record option to go to the next Statement Detail record. Select the End option to go to the next Statements record.
At this screen, the use of the MODE keys - ADD, DEL, CHG, or INQ - pertain to those records in the Receiving Allocation Accounts file.