
1Transaction Processing
Option 1Journal Entries
You can use this function to enter and edit journal entries. Each journal entry can post to a current, prior, or future period. End-of-year adjustments can be made at any time.
Each set of journal entries includes a control group record and a series of one or more journal entries, each with any number of line items.
The normal process of posting journal entries includes:
- Entering the journal entries.
- Printing the Journal Entries Journal.
- Posting the journal entries.
If the journal shows any errors, the errors must be corrected and the journal reprinted. If the journal has been printed and some of the data is modified, the journal must be reprinted before the data can be posted.
The screen shown below presents information about Journal Entry Control Groups.
When you enter journal entries, you will see only one of the two possible screens for Journal Entry Control Groups. Which screen you see will depend on how you answered two questions on your parameters file. These are the “Ask Operator ID?” question, and the “Use Transaction Control” question.
If you answered ‘Y’ to both questions, you will see the screen below, and you will be able to enter control and hash totals for your journal entries as well as enter transactions in foreign currencies. In addition, a record will be written to the Transaction Control file for each control group posted.
If you answered ‘Y’ to “Ask Operator ID?”, and ‘N’ to “Use Transaction Control?”, you will see the second screen, which displays only the Operator ID and the Control Number.
If you answered ‘N’ to both questions, you see the second screen but you are not allowed to edit the Operator ID.
Journal Entry Control Groups screen
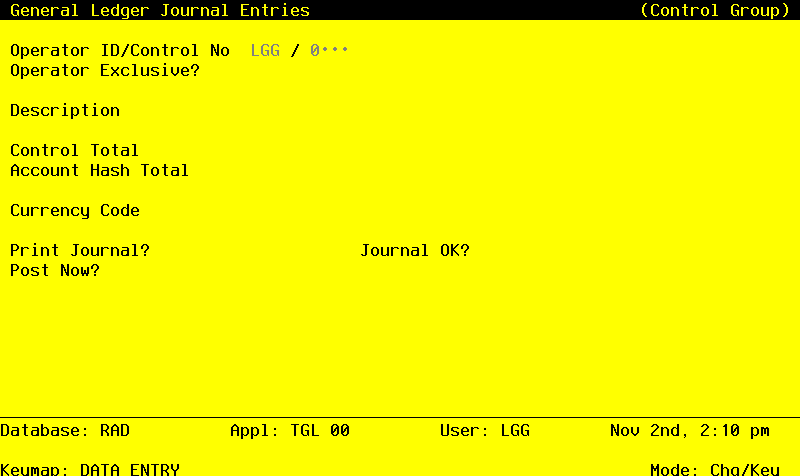
When the key value for a particular record is requested, you can review all the records in the file by selecting the Scan option. The records will be presented on an “Access” screen, and you will be allowed to scan the available data until you find the record you want. Then, position the cursor by that record and press ENTER; the record will be displayed for editing.
Data items for the preceding screen are described below:
- Operator ID
Upper case, up to 3 characters Display only Letters and numbers only
The operator ID which you entered at log-on is displayed. All control groups are separated by operator.
- Control No
Positive number, up to 4 digits
A sequential number is supplied to identify this group of journal entries. This number is printed on the journal, tracked on the Transaction Control file, and posted to General Ledger for detail accounts. Although it is not necessary that this number be exactly sequential, the number itself important as a part of your audit trail.
- Operator Exclusive?
Y or N Default N Required Carries forward in ADD mode
Indicate whether or not the operator is reserving exclusive rights to this group of entries.
- Y
- Yes, access is restricted to the original operator.
- N
- No, access is not restricted.
- Description
Alphanumeric, up to 30 characters Required
Describe this group of journal entries. This description will appear on the Transaction Control report and inquiry.
- Control Total
Number, up to 9 digits and 2 decimals
This entry is balanced against the running total kept by the system as entries are made. For journal entries, it may be used in either of two ways:
Option 1: Enter the adding machine total of all the debit entries to be made. The system will display the running total of debits entered in the “Current” field, and the balance remaining will be shown in the “Remaining” field.
Option 2: Leave this entry blank. As entries are made, the system displays the “Current” or net total of all entries made, and the “Remaining” or total yet to be entered before the control group nets to zero.
- Account Hash Total
Positive number, up to 15 digits
Enter the total of all account numbers to be used during entry. The system will run a total as the entries are made and balance it against this total. (The hash total asked for may be different for different types of transaction entries. For journal entries, account number is used.)
- Currency Code
Alphanumeric, up to 6 characters Scan available
Identify the foreign currency that applies to the transactions in this control group, if the transactions are not in domestic currency. This entry will be validated in the Exchange Rates file. The system displays the description so that you can verify your entry.
- Print Journal?
Y or N Default Y Required
‘Y’ is displayed to indicate that this group is ready for journal printing. If you want to delay journal printing for any reason, enter ‘N’.
- Journal OK?
Y or N Display only Default N
The system displays ‘Y’ or ‘N’ to indicate whether or not this group has been verified (the journal has been printed and the entries balance) and is correct.
- Post Now?
Y or N Default Y Required
‘Y’ is displayed to indicate that this group is ready for posting. If you want to delay posting for any reason, enter ‘N’.
The entered data is validated. During validation, including access to other files, conditions may be found which cause messages to be displayed. Errors (E), Warnings (W), and Messages (M) that may result are shown below:
Press ENTER to display system-supplied information and then press ENTER again to continue to the next screen.
Select the Next Record to go to the next Journal Entry Control Groups record.
At this screen, the use of the MODE keys - ADD, DEL, CHG, or INQ - pertain to those records in the Journal Entry Control Groups file.
This screen may optionally be used to display information about Journal Entry Control Groups.
Journal Entry Operator ID screen

When the key value for a particular record is requested, you can review all the records in the file by selecting the Scan option. The records will be presented on an “Access” screen, and you will be allowed to scan the available data until you find the record you want. Then, position the cursor by that record and press ENTER; the record will be displayed for editing.
Data items for the preceding screen are described below:
- Operator ID
Upper case, up to 3 characters Letters and numbers only Required Carries forward in ADD mode
The operator ID which you entered at log-on is displayed. All control groups are separated by operator.
- Control No
Positive number, up to 4 digits
A sequential number is supplied to identify this group of journal entries. This number is printed on the journal, tracked on the Transaction Control file, and posted to General Ledger for detail accounts. Although it is not necessary that this number be exactly sequential, the number itself is important as a part of your audit trail.
The entered data is validated. During validation, including access to other files, conditions may be found which cause messages to be displayed. Errors (E), Warnings (W), and Messages (M) that may result are shown below:
Select the Next Record option to go to the next Journal Entry Control Groups record.
At this screen, the use of the MODE keys - ADD, DEL, CHG, or INQ - pertain to those records in the Journal Entry Control Groups file.
The screen shown below presents information about Journal Entries.
Journal Entries screen
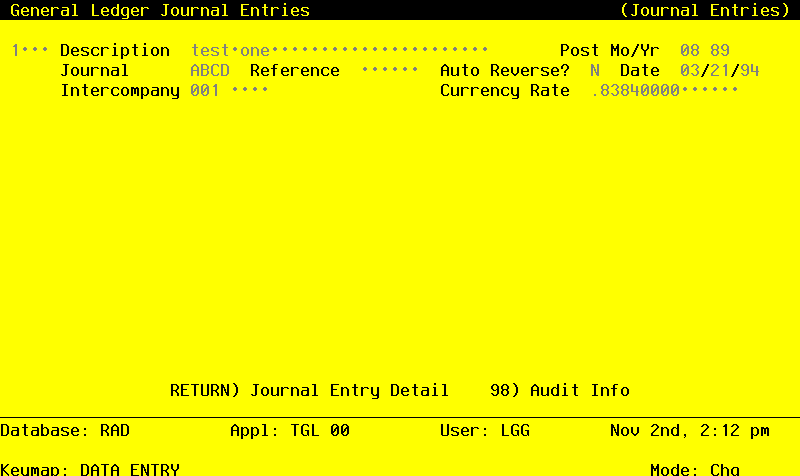
When the key value for a particular record is requested, you can review all the records in the file by selecting the Scan option. The records will be presented on an “Access” screen, and you will be allowed to scan the available data until you find the record you want. Then, position the cursor by that record and press ENTER; the record will be displayed for editing.
Data items for the preceding screen are described below:
- Transaction No
Positive number, up to 4 digits
A sequential transaction number is supplied for each detail record. This number is printed on the journal, and posted to General Ledger for detail accounts. Although it is not necessary that this number be exactly sequential, the number itself is important as a part of your audit trail. It is printed on many reports and inquiries throughout General Ledger.
- Description
Alphanumeric, up to 30 characters Required
Describe the entry. This description will be printed on the General Ledger report and will appear on several inquiries throughout General Ledger.
- Post Month
Upper case, up to 2 characters Letters and numbers only Valid: 02, 02, 03, 04, 05, 06, 07, 08, 09, 10, 11, 12, 13, EY Required Carries forward in ADD mode
Identify the month to which these transactions are to be posted. The current month defined in the Parameters file is supplied. If you want to post to a prior or future month, you can change it. If your system is based on 12 accounting periods, enter the calendar month; if you are using 13-period accounting, enter the fiscal period. Your options are:
- 1
- 13: Calendar month, or fiscal period if you are using 13-period accounting
- EY
- End of year
- Post Year
Positive number, up to 2 digits Carries forward in ADD mode
Enter the year to which these transactions are to be posted. If you are using 12-month accounting, this will be the calendar year; if you are using 13-period accounting, this will be the fiscal year. The year defined in the Parameters file is supplied; if you want to post to a prior or future period, you can change it.
- Journal Code
Upper case, up to 4 characters Required Carries forward in ADD mode
Identify the journal associated with this entry. This will be printed on the General Ledger report and will appear on several inquiries throughout the system.
- Reference
Upper case, up to 6 characters Carries forward in ADD mode
Provide a reference for this entry. This reference will be printed on the General Ledger report and supplied to several inquiries throughout the system.
- Auto Reverse?
Upper case, 1 character Letters only Valid: Y, N Default N Carries forward in ADD mode
Indicate whether or not this entry is to be reversed automatically in the following month.
- Y
- Yes, reverse the entry next month.
- N
- No, do not reverse the entry next month.
- Date
Date (YMD) Required Carries forward in ADD mode
If this is an intercompany transaction and code was entered from the Intercompany file, you can enter up to 4 characters to reference the transaction.
- Intercompany
Upper case, up to 3 characters Scan available
If this is an intercompany transaction, supply the code from the Intercompany Names file which identifies the company.
- Intercompany Reference
Upper case, up to 4 characters
If this is an intercompany transaction, supply an intercompany reference for this transaction.
- Currency Rate
Positive number, up to 6 digits and 8 decimals Carries forward in ADD mode
The currency rate on file for the foreign currency identified on the header record is displayed. You may change it. If no currency code was entered on the Control Group header, this field will be blank.
The entered data is validated. During validation, including access to other files, conditions may be found which cause messages to be displayed. Errors (E), Warnings (W), and Messages (M) that may result are shown below:
Press ENTER to continue to the next screen.
Select the Previous Image option to go back to the Journal Entry Control Groups screen. Select the Next Record option to go to the next Journal Entries record. Select the End option to go to the next Journal Entry Control Groups record.
At this screen, the use of the MODE keys - ADD, DEL, CHG, or INQ - pertain to those records in the Journal Entries file.
The screen shown below presents information about Journal Entry Items.
This file stores the individual journal entries, identifying account numbers and amounts.
Journal Entry Items screen

When the key value for a particular record is requested, you can review all the records in the file by selecting the Scan option. The records will be presented on an “Access” screen, and you will be allowed to scan the available data until you find the record you want. Then, position the cursor by that record and press ENTER; the record will be displayed for editing.
Data items for the preceding screen are described below:
- Line Item
Positive number, up to 3 digits
A sequential line number is supplied. Although it is not necessary that this number be exactly sequential, it is printed on the journal and is an important part of your audit trail.
- Account
Upper case, up to 12 characters Required Scan available
Identify the account number to which this entry should be posted. The system displays the description so that you can verify your entry.
- Amount
Number, up to 9 digits and 2 decimals
Supply the amount of the entry. A positive entry represents a debit, and a negative entry represents a credit.
- NOTE
- The system keeps a running total of all items entered for each journal entry. You can supply this sum at any time by pressing Option 17.
- Sources/Uses/Neither (S/U/N)
Upper case, 1 character Valid: S, U, N
For the Statement of Cash Flow, this entry is used to specify how the journal entries are to be accumulated in the Account Balances file. Your options are:
(Blank): Credits are accumulated as sources; debits are accumulated as uses.
- S
- This transaction is to be accumulated as a source.
- U
- This transaction is to be accumulated as a use.
- N
- This transaction is to be accumulated as a neither.
Examples: “Source” — Equipment is sold for $5000. The credit to Equipment would be a source of cash. “Use” — Equipment is purchased for $3000. The debit to Equipment would be a use of cash. “Neither” — A building’s monthly depreciation of $10,000 is recognized on the financial statements but has no impact on cash.
- Adj?
Y or N Default N Required Carries forward in ADD mode
Indicate whether or not this entry is an adjustment. If ‘Y’ is entered, a credit adjustment reduces month-to-date and year-to-date uses and a debit adjustment reduces month-to-date and year-to-date sources in the Account Balances file.
- Y
- Yes, this is an adjustment.
- N
- No, this is not an adjustment.
Example: A purchase of $4500 for equipment was incorrectly entered as $5400. An entry of $900 - with this field = ‘Y’ will reduce MTD and YTD Uses appropriately in the Account Balances file.
- Subsidiary Code
Upper case, up to 16 characters Scan available
If the Sub Type is ‘GL’, you must enter a subsidiary code, and postings are made to the General Subsidiary files. Identify the subsidiary code to which the transaction is to be posted. The subsidiary code is only used if the Sub Type is ‘GL’.
- Home Amount
Number, up to 9 digits and 2 decimals Display only
If the currency code has been entered, the home currency amount is calculated by multiplying the currency rate times the amount entered above.
The entered data is validated. During validation, including access to other files, conditions may be found which cause messages to be displayed. Errors (E), Warnings (W), and Messages (M) that may result are shown below:
M In ADD Mode, Use Option 17 to Automatically Compute Offset Amount Press ENTER to display system-supplied information and then press ENTER again to save the information on this screen.
Select the Previous Image option to go back to the Journal Entries screen. Select the Next Record option to go to the next Journal Entry Items record. Select the End option to go to the next Journal Entries record.
At this screen, the use of the MODE keys - ADD, DEL, CHG, or INQ - pertain to those records in the Journal Entry Items file.