
6Check Processing
Option 6Checks Approval / Revision
Use this function to approve printed checks or make changes to either printed or unprinted checks. The checks selected for approval and revision are not actually updated until the system verifies the selections and prints a ‘Checks Revision List’. If the function is canceled any time prior to printing this list the selections will not be incorporated. See Appendix B for more details. The following processing steps accomplish this job.
- Step 1This function is used to enter information about the status of a Control Group of checks, allowing you to approve, delete, renumber, reprint, cancel, or void and cancel one or more checks in the Control Group.
Under normal conditions you would use this function only once during each check cycle, to approve the entire range of printed checks. However, sometimes you may encounter situations where revisions are necessary. For example, you may have created check records for vendors that you really did not want to pay at this time, or the check stock may have jammed in the printer midway during the physical printing of the checks. This function allows you to make changes during the check cycle and provides a printed audit list of all changes.
To make change to check records that HAVE NOT been printed, your options are:
- Delete a range of check records
- Renumber a range of check records
- Delete and renumber check records
To make changes to check records that HAVE been printed, your options are:
- Approve the printed checks (or a range of checks)
- Renumber a range of checks
- Reprint a range of checks (which require approval after reprinting)
- Cancel, or Void and Cancel, a range of checks
You can review on-line documentation for any field at any time by positioning the cursor at that field and selecting the Help option.
On the following pages, the two screens displayed by this function are shown.
The screen shown below presents information about Disbursements Control Groups.
Checks Approval - Control Group screen
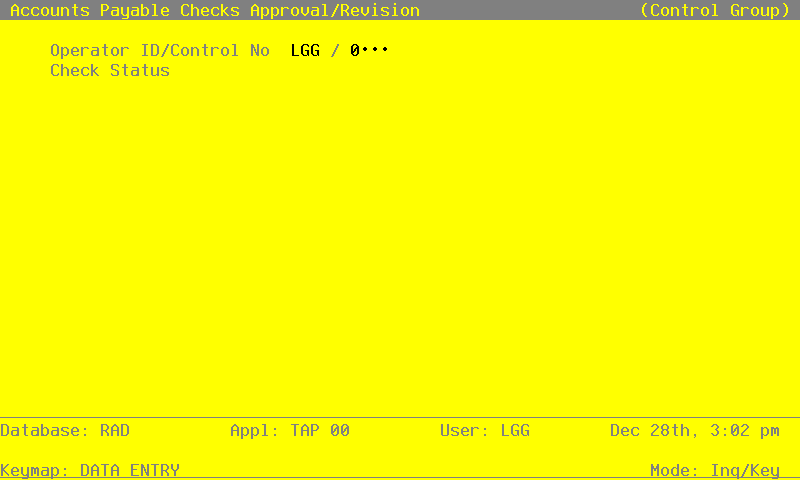
When the key value for a particular record is requested, you can review all the records in the file by selecting the Scan option. The records will be presented on an “Access” screen, and you will be allowed to scan the available data until you find the record you want. Then, position the cursor by that record and press ENTER; the record will be displayed for editing.
Data items for the preceding screen are described below:
- Operator ID
Upper case, up to 3 characters Display only Letters and numbers only
The operator ID you entered at log-on is displayed. The default may be changed in order to edit transactions for another operator. All control groups are separated by operator.
- Control Number
Positive number, up to 4 digits Display only
A sequential number is supplied to identify this group of invoices. This number is printed on the journal, tracked on the Transaction Control file, and if General Ledger is a part of your system it is posted to General Ledger for detail accounts. Although this number need not be exactly sequential, the number itself is important as a part of your audit trail.
- Description
Alphanumeric, up to 30 characters Display only
Describe this group of checks. This description will appear on the Transaction Control report and inquiry.
The entered data is validated. During validation, including access to other files, conditions may be found which cause messages to be displayed. Errors (E), Warnings (W), and Messages (M) that may result are shown below:
Press ENTER to display system-supplied information and then press ENTER again to continue to the next screen.
Select Next Record to go the next Disbursements Control Groups record.
At this screen, the use of the MODE keys - INQ - pertain to those records in the Disbursements Control Groups file.
The screen shown below presents information about Check Detail. The first ten check records are displayed. Press ‘Enter’ to view the next ten check records. Press the ‘Inquire’ option to view a specific check record.
Press ‘End’ to end the edit process. After you ‘End’ your selections are verified for consistency. If there are errors, go back and modify your selections. Otherwise, a disposition screen is provided to print the Check Approval/Revision List. Press ‘Cancel’ to cancel all changes. If checks are printed, each check record must be designated as ‘approved’ or ‘revised’. Each option works like a toggle in selecting and deselecting a range of records.
The following options allow you to approve or revise the check records:
Option 17 - Delete a range of unprinted check records. Note that you may need to ‘Renumber’ the records following the deletion.
Option 18 - Renumber a range of unprinted or printed check records. This may be necessary if the check control number must equal the check stock number.
Option 19 - Approve a range of printed checks. This designation means that the checks have been printed successfully.
Option 20 - Reprint a range of check records. All check records do not have to be reprinted. Some may already be approved or canceled.
Option 21 - Cancel and/or void a range of printed checks. If a canceled check is designated as VOID a voided outstanding check record will be created.
Checks Approval - Check Detail screen
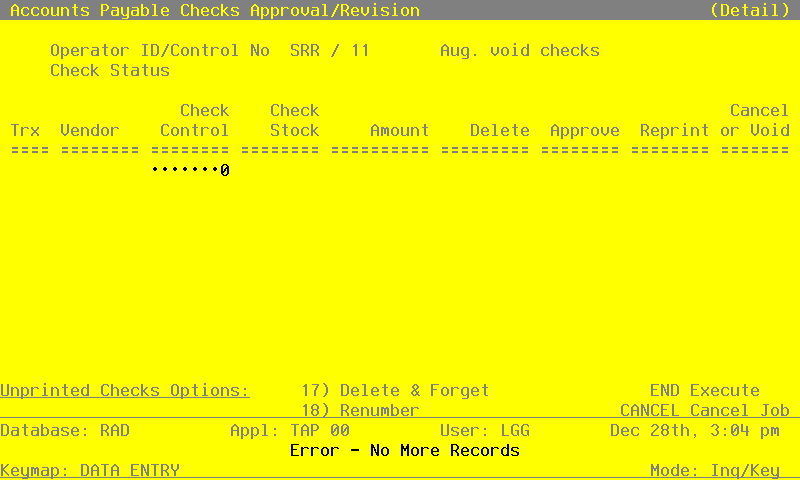
When the key value for a particular record is requested, you can review all the records in the file by selecting the Scan option. The records will be presented on an “Access” screen, and you will be allowed to scan the available data until you find the record you want. Then, position the cursor by that record and press ENTER; the record will be displayed for editing.
Data items for the preceding screen are described below:
- Trx (Transaction Number)
Positive number, up to 4 digits Display only
The transaction number is supplied for each check record. It provides a unique identifier for each record.
- Vendor
Upper case, up to 8 characters Display only Numbers only
The system displays the vendor number that corresponds to the check record.
- Check Control
Positive number, up to 8 digits Display only
The check control number is assigned to each check record during the Checks Creation function. This control number is printed on the check form during the Print Checks function.
- Check Stock
Positive number, up to 8 digits Display only
If your system requires the Check Stock number to equal the Check Control number the system displays the Check Stock number. If not, the system displays a blank until you assign Check Stock numbers to each check record in the ‘Approve’ option. The Checks Approval and Revision process is simpler if the Check Control Number and Check Stock Number are not required to be equal.
- Amount
Number, up to 7 digits and 2 decimals Display only
The system displays the check amount as determined during the Checks Creation function.
Delete: If the unprinted check record is designated as ‘Deleted’ the Check Control number is displayed in the ‘Delete’ column.
Approve: If the printed check record is designated as ‘Approved’ the Check Control number is displayed in the ‘Approve’ column.
Reprint: If the printed check record is designated as ‘Reprint’ the Check Control number is displayed in the ‘Reprint’ column.
Cancel/Void: If the printed check record is designated as ‘Cancel/Void’ the Check Control number is displayed in the ‘Cancel/Void’ column.
The entered data is validated. During validation, including access to other files, conditions may be found which cause messages to be displayed. Errors (E), Warnings (W), and Messages (M) that may result are shown below:
Press ENTER to display system-supplied information and then press ENTER again to save the information on this screen.
Select Previous Image to go back to the Disbursements Control Groups screen. Select Cancel to cancel all entries and changes to these checks and return to the Check Processing menu.
At this screen, the use of the MODE keys - INQ - pertain to those records in the Check Detail file.
On the following pages, the six screens displayed by this function are shown.
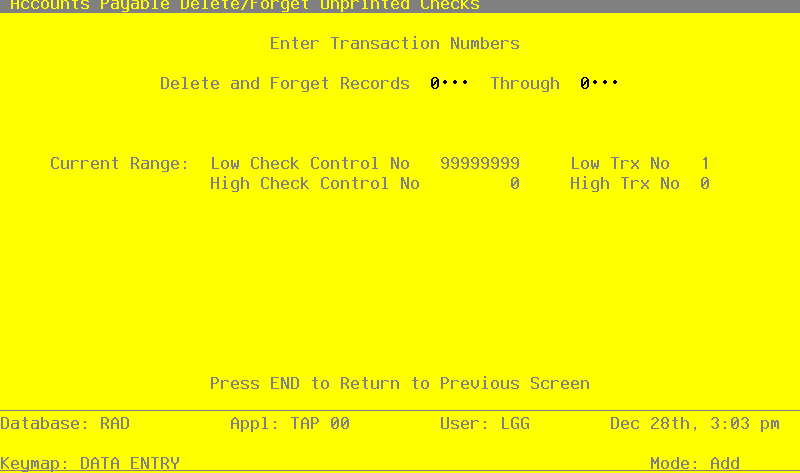
If you select the ‘Delete and Forget’ option, the screen shown below allows you to delete and forget check records before they are printed.
For example, assume that you have mistakenly created check records for vendors that you want to pay at this time. Enter the range of unprinted check records that you wish to delete. Note that you may also wish to renumber the check records after one or more is deleted.
Delete and Forget Option screen
Data items for the preceding screen are described below:
- Delete and Forget (Start)
Positive number, up to 4 digits
After you determine the range of check records you want to delete, enter the transaction number of the first check record in the range. Be sure to enter the TRANSACTION number, not the check control number or check stock number.
For example, if you wish to delete check records 80, 81, and 82 enter ’80 in this field.
- Delete and Forget (End)
Positive number, up to 4 digits
After you determine the range of check records you want to delete, enter the transaction number of the last check record in the range. Be sure to enter the TRANSACTION number, not the check control number or check stock number.
For example, if you wish to delete check records 80, 81, and 82 enter ‘82’.
The entered data is validated. During validation, including access to other files, conditions may be found which cause messages to be displayed. Errors (E), Warnings (W), and Messages (M) that may result are shown below:
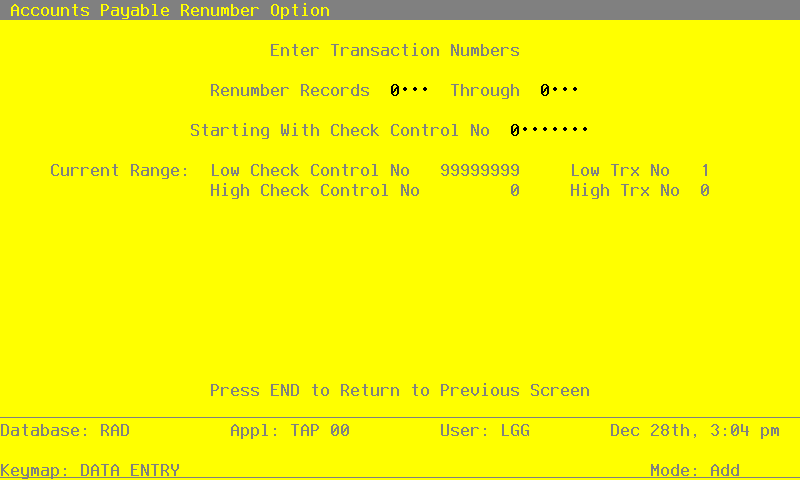
If you select the ‘Renumber’ option, this screen may be used to renumber check records, either before or after they are printed.
For example, if you delete one or more ranges of check records and your parameter selection requires the Check Control Number to be equal to the Check Stock Number, then you need to renumber the check records in order to keep the numbers in a continuous sequence. If your Check Control Number and Check Stock Number do not have to be equal, the renumber may not be necessary since the Check Stock number is assigned sequentially to the check records during the Checks Approval process.
Renumber Option screen
Data items for the preceding screen are described below:
- Renumber (Start)
Positive number, up to 4 digits
Assume you have already deleted checks records 80, 81, and 82 before they were printed. Also assume that check records 1-79 and 83-100 are to be processed. If your check control number must equal your check stock number, you need to resequence the remaining check records before they are printed. In this example, you would renumber records 83 through 100 starting with 80. The result would be check records 1-97.
After you determine the range of check records you want to renumber, enter the transaction number of the first check record in the range. Be sure to enter the TRANSACTION number, not the check control number or check stock number.
- Renumber (End)
Positive number, up to 4 digits
After you determine the range of check records you want to renumber, enter the transaction number of the last check record in the range. Be sure to enter the TRANSACTION number, not the check control number or check stock number.
- Starting Check Control Number
Positive number, up to 8 digits
Enter the new check control number of the first renumbered check. For example, if you are renumbering check control numbers 500 through 550 to 555 through 605 then enter ‘555’.
The entered data is validated. During validation, including access to other files, conditions may be found which cause messages to be displayed. Errors (E), Warnings (W), and Messages (M) that may result are shown below:
Press ENTER to continue to the next screen.
If you select the ‘Approve’ option, this screen is used to approve ranges of printed check records.
The approval designation means that the checks within the range have been printed (or reprinted) successfully.
If all checks have been given a designation of either ‘Approved’, ‘Deleted’, or ‘Canceled/Void’, the Checks Journal can be printed and the checks can be posted. If a printed check is not approved it should be designated as ‘Canceled/Void’ or ‘Reprint’.
Approve Option screen
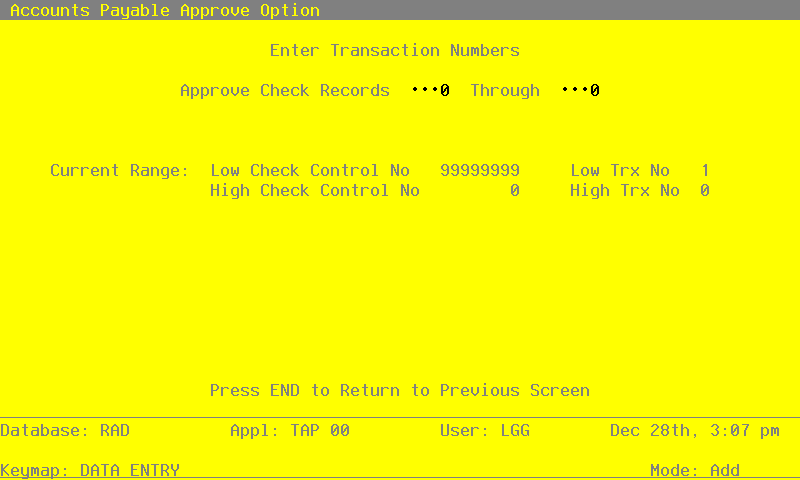
Data items for the preceding screen are described below:
- Approve (Start)
Positive number, up to 4 digits
Under normal conditions you need only to approve your entire range of checks and move on to printing the Checks Journal. For example, if all checks records 1-149 are processed and printed correctly, approve range 1 through 149. Under other unusual conditions it may be necessary to approve a portion of the checks and renumber, reprint, or cancel the remainder.
After you determine the range of check records you want to approve, enter the transaction number of the first check record in the range. Be sure to enter the TRANSACTION number, not the check control number or check stock number.
- Approve (End)
Positive number, up to 4 digits
After you determine the range of check records you want to approve, enter the transaction number of the last check record in the range. Be sure to enter the TRANSACTION number, not the check control number or check stock number.
The entered data is validated. During validation, including access to other files, conditions may be found which cause messages to be displayed. Errors (E), Warnings (W), and Messages (M) that may result are shown below:
Press ENTER to continue to the next screen.
If you select the ‘Approve’ option, the screen below issued to assign the beginning check stock number to printed check records. The screen only appears if your check control number is not required to equal the check stock.
Assign Check Stock Number screen
Data items for the preceding screen are described below:
- Starting Check Stock Number
Positive number, up to 8 digits
Supply the number of the first preprinted check stock number used in the check run. (For example, if the system printed a check control number of 300 on a check preprinted with a stock number of 500, you would enter ‘500’ in this field.) This entry is only required if your parameters selection for Checks Stock Number = Check Control Number is ‘N’.
The entered data is validated. During validation, including access to other files, conditions may be found which cause messages to be displayed. Errors (E), Warnings (W), and Messages (M) that may result are shown below:
Press ENTER to continue to the next screen.
If you select the ‘Reprint Checks’ option, this screen is used to designate a range of check records to reprint during the current check processing cycle.
All checks in the cycle may not have to be reprinted. However, each range of checks to be reprinted should be a contiguous range. Some checks may be ready for ‘Approval’ or some may be ‘Canceled’. For example, the first 50 of 100 checks are printed. The printer jams. Checks 51-100 may need to be reprinted. Note that renumbering may be required prior to reprinting if some of the check stock was destroyed. Reprinted checks must be subsequently printed and approved before continuing the check cycle.
Reprint Checks Option screen
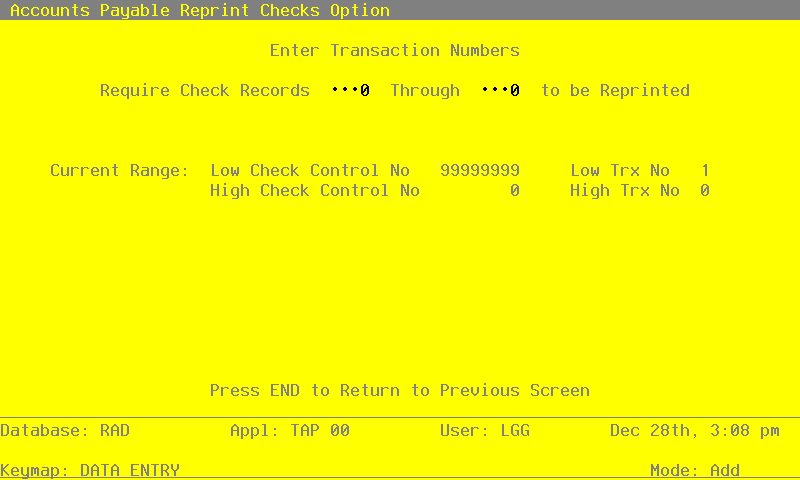
Data items for the preceding screen are described below:
- Reprint (Start)
Positive number, up to 4 digits
If some checks are printed out-of-alignment or are jammed in the printer, it may be necessary to reprint these check records. The records to be reprinted must be a contiguous range of records. For example, you could reprint check records 100-149 in one cycle but to reprint checks 80-98 and 100-149 requires two separate reprinting cycles.
After you determine the range of check records you want to reprint, enter the transaction number of the first check record in the range. Be sure to enter the TRANSACTION number, not the check control number or check stock number.
- Reprint (End)
Positive number, up to 4 digits
After you determine the range of check records you want to reprint, enter the transaction number of the last check record in the range. Be sure to enter the TRANSACTION number, not the check control number or check stock number.
The entered data is validated. During validation, including access to other files, conditions may be found which cause messages to be displayed. Errors (E), Warnings (W), and Messages (M) that may result are shown below:
Press ENTER to continue to the next screen.
If you select the ‘Cancel/Void’ option, this screen is used to cancel and void check records that have been printed.
For example, after printing checks you determine that you do not want to issue one or more of these checks. You may designate these checks as ‘Canceled’. The canceled checks are not included on the Checks Journal nor will they be posted. They appear on the Checks Register as ‘Canceled’. If you designate the canceled checks as ‘Void’ they are recorded as ‘VOID’ on the Checks Register and Checks Reconciliation report.
Cancel/Void Option screen
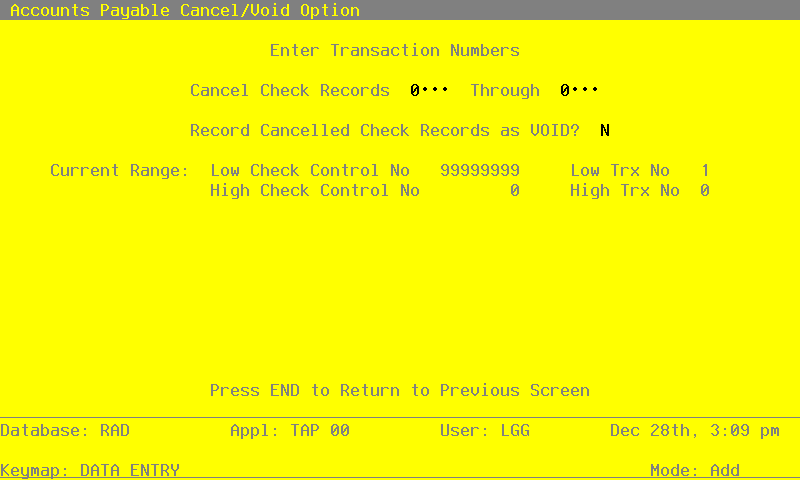
Data items for the preceding screen are described below:
- Cancel Check Records
Positive number, up to 4 digits
If after printing checks you discover that checks 90-91 should not have been printed, you can Cancel the records. Also, if check records 100-149 did not print because of a printer jam, you could either cancel or reprint these records.
After you determine the range of check records you want to reprint, enter the transaction number of the last check record in the range. Be sure to enter the TRANSACTION number, not the check control number or check stock number.
- Record Cancelled Check Records as Void?
Y or N Default N Required
If you wish to record the canceled check records as VOID enter ‘Y’. Otherwise, enter ‘N’ and the canceled check records will not show up as VOID on the Checks Register and Check Reconciliation Report.
The entered data is validated. During validation, including access to other files, conditions may be found which cause messages to be displayed. Errors (E), Warnings (W), and Messages (M) that may result are shown below:
Press ENTER to save the information on this screen.
- Step 3This function tests for errors or inconsistencies with the selections made during the Checks Approval/ Revision process. If problems are discovered, you are given the option to cancel the current process or to go back and revise your current Approval/Revision selections. Warnings are issued if a:
- check is designated as both ‘Approve’ and ‘Reprint’ - check is designated as both ‘Cancel’ and ‘Reprint’ - check is designated as both ‘Approve’ and ‘Cancel’ - check is printed but has no approval or revision designation - check has a Check Stock number not matching the Check Control number - printed check has been renumbered but is not designated for reprinting - check number has previously been used Step 4 This step conditionally allows a job to branch forward or backward to any sequence number in the list of functions in the job.
- Step 5This function sorts the Check records by Operator ID, Control Number, and Transaction Number.
- Step 6This disposition type is used for all standard Accounts Payable reports.
- Step 7According to previously specified criteria, this step actually performs the desired selection and/or sorting process.
- Step 8This step prevents CANCEL from canceling the current job.
- Step 9In order to print the Checks Approval/Revision List, this step formats the Current Check Run information. The following data items are shown: Transaction Number, Vendor, Check Control No, Check Stock No, Check Amount, Original check Control No, Original Check No, and whether the check is Void and Canceled. The check control number is shown under the appropriate designation heading for each check record.
A sample output is shown below.
                                                     APPX Demonstration Company
11/30/94 09:53                                                                                                       LGG Page:  1


                                                        Checks Revision List
                         Check      Check                    Orig Chk   Orig Chk                                         Cancel/
 Trx    Vendor           Cntrl No   Stock No     Amount      Cntrl No   Stock No    Delete   Approve   Reprint  Cancel    Void
=================================================================================================================================

Operator ID/Control No   LGG /     8 Aug. 1st check run               Printed Checks


    1     00000040         100       5500        11110.46                                      100
    2     00000050         101       5501         2028.31                                      101
    3     00000070         102       5502          254.80                                      102
    4     00000080         103       5503         4253.38                                      103
    5     00000010         104       5504         5641.22                                      104
    6     00000010         105       5505         2212.25                                      105
    7     00000030         106       5506         1457.00                                      106
    8     00000090         107       5507         4034.16                                      107
    9     00000020         108       5508         4514.91                                      108
    10    00000060         109       5509        10134.33                                      109
    11    00000100         110       5510         4350.68                                      110