
6Check Processing
Option 2Pay Status Edit
Use this function to change the pay status, pay date, or other information before creating the checks. For example, you may want to place a contested invoice on “Hold” by changing the pay status to ‘H’, or delay payment of a particular invoice by editing the pay date. A check will not be eligible for payment if it has a blank pay date. The following processing steps accomplish this job.
- Step 1This function is used to enter the Edit Pay Status option of editing by vendors or invoices.
On the following pages, the screen displayed by this function is shown.
The screen shown below allows you to choose to edit the pay status by vendor or invoice.
Edit Pay Status screen
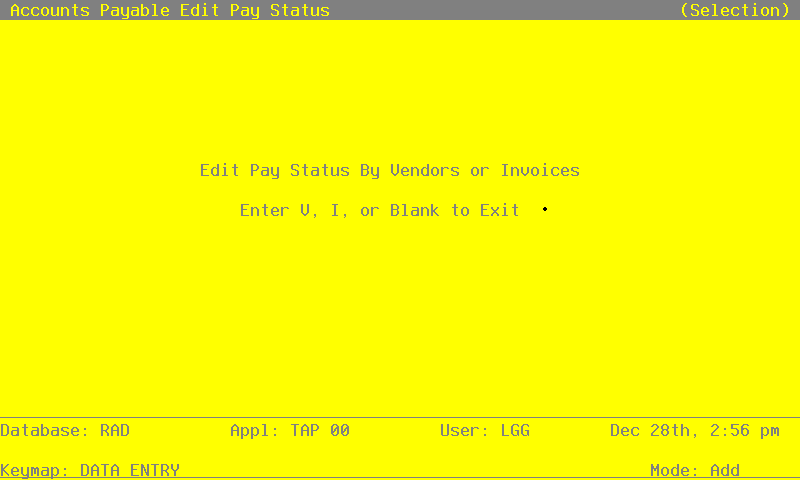
Data items for the preceding screen are described below:
- Edit Pay Status
Upper case, 1 character Valid: V, I,, ‘ ‘
You may edit invoices by vendor or invoice. Select either:
‘ ‘: Return to the Checks Processing menu.
- V
- Edit all invoices for a particular vendor.
- I
- Edit each invoice individually.
Press ENTER to save the information on this screen.
- Step 2This function is used to edit the pay status information, by invoice, in the Unpaid Invoices records.
On the following pages, the screen displayed by this function is shown.
The screen below presents information about Unpaid Invoices.
This file contains a record for each vendor invoice. Transaction postings either create a record or update a record in this file. All unpaid invoice records are considered for payment and approval during the check processing cycle. Through the Edit Pay Status function, unpaid invoices are selected for check processing payment or held for future payment.
Edit Pay Status - Invoice screen
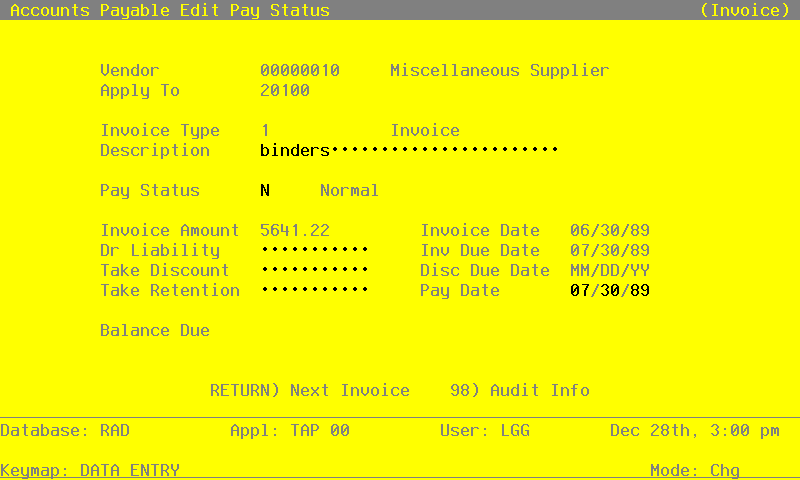
When the key value for a particular record is requested, you can review all the records in the file by selecting the Scan option. The records will be presented on an “Access” screen, and you will be allowed to scan the available data until you find the record you want. Then, position the cursor by that record and press ENTER; the record will be displayed for editing.
Data items for the preceding screen are described below:
- Vendor
Upper case, up to 8 characters Display only Numbers only
Supply the number to identify the vendor record to edit. The system displays the vendor’s name so you may verify your entry.
- Apply To
Upper case, up to 8 characters Display only
Provide the number of the invoice, credit memo, or debit memo affected by this transaction. The Apply To is generally the invoice number. For debit or credit memos, the Apply To may refer to the original invoice number which was adjusted by the memo entry.
- Invoice Type
Upper case, 1 character Display only Valid: 1, 2
Only number are acceptable.
Identify the type of the invoice. Valid types are:
1) Invoice
2) Retention Invoice
- Description
Alphanumeric, up to 30 characters
The description of the invoice is given.
- Pay Status
Upper case, 1 character Valid: N, T, H, D Default N
The pay status of the invoice is displayed. If you want to change this field, enter a valid pay status code form the Descriptions file. The system then displays the corresponding description so you may verify your entry., Valid codes and standard descriptions are:
- N
- Normal - Use the payment terms as defined in the terms file.
- T
- Take Discount - Take the discount regardless of the payment terms.
- H
- Hold - Place payment on ‘Hold’ until released by changing to ‘N’ or ‘T’.
- D
- Disputed - Same as ‘Hold’ status by payment is in dispute.
- Invoice Amount
Number, up to 7 digits and 2 decimals Display only
The amount to be debited or credited for this invoice is shown. For invoices that have adjusting or “apply to” transactions, this field only reflects the amount of the original invoice.
If you Parameters file is set up with a discount method of ‘E’ (Earned), this is the gross amount of the invoice.
If you Parameters file is set up with a discount method of ‘L’ (Lost), this is the gross amount of the invoice less the discount amount.
- Invoice Date
Date (YMD) Display only
The invoice date from the original invoice posting is shown.
- Dr Liability
Enter a number with up to 7 digits to the left of the decimal and w digits to the right of the decimal.
The amount to be paid for this invoice is shown. The Dr Liability is originally set to the amount of the invoice. If the invoice has been partially paid, this is the amount remaining.
If a partial payment is made to an invoice, the system automatically assigns the unpaid portion of the invoice a ‘Hold’ status. You must change the hold status to ‘N’ (Normal) for the unpaid portion to be processed during the check processing cycle.
- Invoice Due Date
Date (YMD) Display only
Give the date that the invoice is due.
- Take Discount
Number, up to 7 digits and 2 decimals
The amount of discount to be taken upon payment of the invoice is displayed.
- Discount Due Date
Date (YMD) Display only
The date of the last day of the discount period is shown. If the pay status for an invoice is ‘T’ for ‘Take Discount’, the discount will be taken regardless of the Discount Due Date.
- Take Retention
Number, up to 7 digits and 2 decimals
If the invoice includes retention, this is the amount to be retained upon payment of the invoice.
- Pay Date
Date (YMD)
The date to pay the invoice is shown. This date is initially set to the Discount Due Date, if applicable, or to the Invoice Due Date. You may change this date to delay payment or to pay early.
If this field is blank, the invoice will not be paid, and will be marked “hold” on the Cash Requirements Report.
If a partial payment is made to an unpaid invoice the system will set the pay date to blank. Any subsequent payment against the invoice requires a pay date to be entered.
- Balance Due
Number, up to 7 digits and 2 decimals Display only
The amount due on the invoice, net of all adjustments and payments applied to this invoice, is displayed.
The entered data is validated. During validation, including access to other files, conditions may be found which cause messages to be displayed. Errors (E), Warnings (W), and Messages (m) that may result are shown below:
Press ENTER to display system-supplied information and then press ENTER again to save the information on this screen.
Select Next Record to go to the next Unpaid Invoices record.
At this screen, the use of the MODE keys - CHG, or INQ - pertain to those records in the Unpaid Invoices file.
- Step 3This step conditionally allows a job to branch forward or backward to any sequence number in the list of functions in the job.
- Step 4This function is used to enter the Edit Pay Status by vendor number. The pay status is changed for each invoice for the chosen vendor.
On the following pages, the screen displayed by this function is shown.
The screen shown below allows you to edit the pay status of all invoices for the given vendor.
Edit Pay Status - Vendor screen
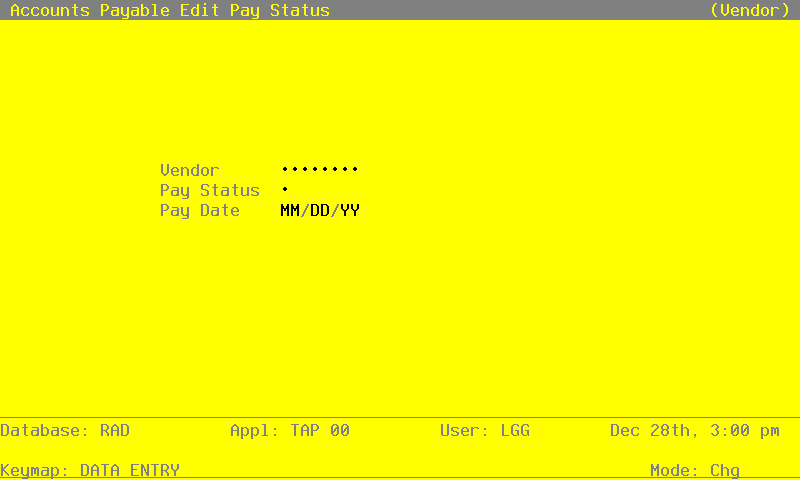
Data items for the preceding screen are described below:
- Vendor
Upper case, up to 8 characters Numbers only Scan available
Supply a number to identify the vendor record to edit. The system displays the vendor’s name so that you can verify your entry.
- Pay Status
Upper case, 1 character Valid: N, T, H, D Required
Enter a 1-character pay status code form the Descriptions file. This entry does not change the pay status established for the vendor in the Vendors file. The status code will apply to all invoices which are due for this particular vendor. The system displays the corresponding pay status description next to the code. Valid codes and standard descriptions are:
- N
- Normal - Use the payment terms as defined in the terms file.
- T
- Take Discount - Take the discount regardless of the payment terms.
- H
- Hold - Place payment on ‘Hold’ until released by changing to ‘N’ or ‘T’.
- D
- Disputed - Same as ‘Hold’ status by payment is in dispute.
- Pay Date
Date (YMD)
Enter a pay date that applies to all invoices for this vendor. You may enter this date only if the Pay Status field is either ‘N’ or ‘T’. If you leave this field blank, the invoice pay date is not changed.
The entered data is validated. During validation, including access to other files, conditions may be found which cause messages to be displayed. Errors (E), Warnings (W), and Messages (M) that may result are shown below:
Press ENTER to display system-supplied information and then press ENTER again to save the information on this screen.
- Step 5This function changes the defined pay status and pay date in the unpaid Invoice records for the vendor specified.
- Step 6This step conditionally allows a job to branch forward or backward to any sequence number in the list of functions in the job.