
1Transaction Processing
Option 2Warehouse Transfers
This function records transfers of inventory products from one warehouse to another warehouse that stocks the same products.
The cost “in” at the receiving warehouse is equal to the cost “out” of the sending warehouse. You must use the Product Transfers function for any cost differential between the two warehouses.
The Update On Hand with Warehouse Transfers? option in the Parameters file specifies whether warehouse transfers update on hand or on order quantities in the destination warehouse. If this option is chosen, warehouse transfers update on hand quantities in the sending and receiving warehouses. If this option is not chosen, warehouse transfers update on hand quantities in the sending warehouse and on order quantities in the receiving warehouse. An inventory receipt must be entered to move the on order quantity to the on hand quantity when the inventory arrives at the warehouse.
When you enter warehouse transfers, you see only one of the two possible screens for Warehouse Transfers Control Groups. Which screen you see depends on how you answered two questions on your Parameters file. These are the “Ask Operator ID?” question, and the “Use Transaction Control?” question.
If you answered ‘Y’ to both questions, you see the first screen and can enter control and hash totals for your warehouse transfers. In addition, a record is written to the Transaction Control file for each group posted.
If you answered ‘Y’ to “Ask Operator ID?”, and ‘N’ to “Use Transaction Control?”, you see the second screen, which displays only the Operator ID and the Control Number.
If you answered ‘N’ to both questions, you see the second screen, but you are not allowed to edit the Operator ID.
The screen below presents information about Warehouse Transfers Control Groups.
Warehouse Transfers Control Groups screen

When the key value for a particular record is requested, you can review all the records in the file by selecting the Scan option. The records will be presented on an “Access” screen, and you will be allowed to scan the available data until you find the record you want. Then, position the cursor by that record and press RETURN; the record will be displayed for editing.
Data items for the preceding screen are described below:
- Operator ID
Upper case, up to 3 characters Letters and numbers only Required Carries forward in ADD mode
The operator ID you entered at log-on is displayed. The default may be changed in order to edit transactions for another operator. All control groups are separated by operator.
- Control No
Positive number, up to 4 digits
A sequential number is supplied to identify this group of warehouse transfers. This number is printed on the journal, tracked on the Transaction control file, and if General Ledger is part of your system it is posted to General Ledger for detail accounts. Although this number need not be exactly sequential, the number itself is important as a part of your audit trail.
- Operator Exclusive?
Y or N Default N Required
Indicate whether or not you are reserving exclusive rights to this group of warehouse transfers.
- Y
- Yes, access is restricted to the original operator. N: No, access is not restricted.
- Description
Alphanumeric, up to 30 characters Required
Describe this group of warehouse transfers. This description will appear on the Transaction Control report and inquiry.
- Quantity Control Total
Number, up to 9 digits and 2 decimals
Enter the adding machine total of all warehouse transfer quantities to be entered. This entry is balanced against the running total kept by the system as warehouse transfer entries are made. The system displays the running total of quantities entered in the “Current” field, and the balance remaining is shown in the “Remaining” field.
This field is optional.
- Product Hash Total
Positive number, up to 12 digits
Enter the total of all product numbers to be entered in this control group. The system will keep a running total of product numbers and balance it against this entry.
This field is optional.
- Print Journal?
Y or N Default Y Required
‘Y’ is displayed to indicate that this group is ready for journal printing. If you want to delay journal printing for any reason, enter ‘N’.
- Journal OK?
Y or N Display only Default N
The system displays ‘Y’ or ‘N’ to indicate whether or not this group has been verified (the journal printed and no errors are present) and is correct.
- Post Now?
Y or N Default Y Required
‘Y’ is displayed to indicate that this group is ready for posting. If you want to delay posting for any reason, enter ‘N’.
The entered data is validated. Press RETURN to save the information on this screen.
Select the Next Record option to go to the next Warehouse Transfers Control Groups record.
At this screen, the use of the MODE keys—ADD, DEL, CHG, or INQ—pertain to those records in the Warehouse Transfers Control Groups file.
This screen may optionally be used to display information about Warehouse Transfers Control Groups.
Warehouse Transfers Operator ID screen
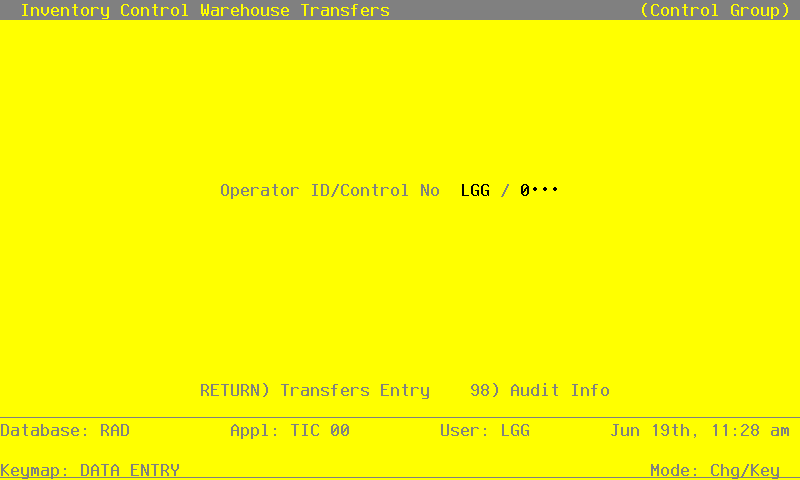
When the key value for a particular record is requested, you can review all the records in the file by selecting the Scan option. The records will be presented on an “Access” screen, and you will be allowed to scan the available data until you find the record you want. Then, position the cursor by that record and press RETURN; the record will be displayed for editing.
Data items for the preceding screen are described below:
- Operator ID
Upper case, up to 3 characters Letters and numbers only Carries forward in ADD mode
This field required.
The operator ID you entered at log-on is displayed. The default may be changed in order to edit transactions for another operator. All control groups are separated by operator.
Control No
Enter a positive number with up to 4 digits.
A sequential number is supplied to identify this group of warehouse transfers. This number is printed on the journal, tracked on the Transaction Control file, and if General Ledger is part of your system it is posted to General Ledger for detail accounts. Although this number need not be exactly sequential, the number itself is important as a part of your audit trail.
Press RETURN to save the information on this screen.
Select the Next Record option to go to the next Warehouse Transfers Control Groups record.
At this screen, use of MODE keys — ADD, DEL, CHG, or INQ — pertain to those records in the Warehouse Transfers Control Groups file.
The screen shown below presents information about Warehouse Transfers.
Warehouse Transfers screen
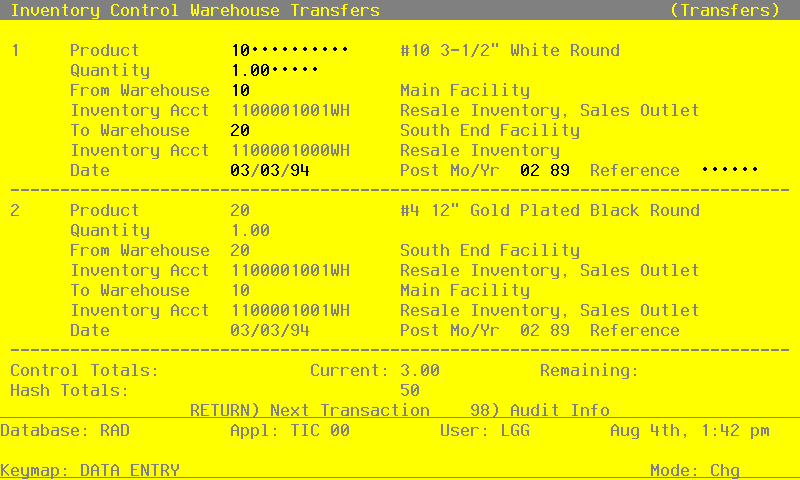
Certain entries on this screen will be automatically displayed. In most cases, the displayed entry can be changed. If an asterisk (*) appears next to one of the fields listed below, it indicates a “display only” field, which cannot be changed.
When the key value for a particular record is requested, you can review all the records in the file by selecting the Scan option. The records will be presented on an “Access” screen, and you will be allowed to scan the available data until you find the record you want. Then, position the cursor by that record and press RETURN; the record will be displayed for editing.
Data items for the preceding screen are described below:
- Transaction No
The system automatically assigns a transaction number, beginning with ‘1’.
- Product
Enter the number of the product to be transferred between warehouses. You can use the Scan option to find an appropriate entry. This product must be on file in the Products file. The combinations of this product with the “from” and “to” warehouses (see below) must be on file in the Products By Warehouse file.
The system displays the corresponding description from the Products file so that you may verify your entry.
- Quantity
Enter up to 5 digits and 2 decimals for the number of stockkeeping units to be transferred between warehouses.
- From Warehouse
Enter the number of the warehouse from which products are being transferred. You can use the Scan option to find an appropriate entry. This number must be on file in the Warehouses file; the combination of this number and the product number must be on file in the Products By Warehouse file.
The system displays the corresponding description from the Warehouses file so that you may verify your entry.
- Inventory Acct*
The inventory account for the sending warehouse defaults from the warehouse’s Product Classes record.
If General Ledger is part of your system, the corresponding description is displayed from the Chart of Accounts file.
- To Warehouse
Enter the number of the warehouse to which products are being transferred. You can use the Scan option to find an appropriate entry. This number must be on file in the Warehouses file; the combination of this number and the product number must be on file in the Products By Warehouse file. The system displays the corresponding description from the Warehouses file so that you may verify your entry.
- Inventory Acct*
The inventory account for the receiving warehouse defaults from the warehouse’s Product Classes record.
If General Ledger is part of your system, the corresponding description is displayed from the Chart of Accounts file.
- Date
The system displays today’s date. You may override the display.
- Post Mo/Yr
Enter up to 2 characters each for the month and year to identify the calendar month and year to which this transaction is to be posted. Valid entries are:
1—13: Calendar period EY: End-of-year
- Reference
Enter up to 6 characters to further describe and reference the warehouse transfer.
This entered data is validated. Press RETURN to display system-supplied information and then press RETURN again to save the information on this screen.
Select the Previous Image option to go back to the Warehouse Transfers Control Groups screen. Select the Next Record option to go to the next Warehouse Transfers record.
At this screen, use of the MODE keys — ADD, DEL, CHG, or INQ — pertain to those records in the Warehouse Transfers file.