
2Initial Setup Opening Entries
Option 5Unit Accounts
You can use this function to enter or edit basic information in the Unit Accounts file. In addition during the Initial Setup phase of your operations, you can enter monthly unit balances. Each Unit Account record defined corresponds to an account defined in the Chart of Accounts. However, each balance is given in a non-monetary denomination, such as ‘machine hours’.
An example of the use of a unit account might be to track machine hours for equipment, or miles accumulated on company cars, or the number of defective parts discovered on an assembly line. Statistical information can then be gleaned from the Unit Balances report.
When you use this function, a record of all entries will be printed. For additions, all new field contents are printed; for deletions, the deleted record’s contents are shown; for changes, both old field contents and new field contents are shown; and in all cases, the User ID, date, and time are printed.
The screen shown below presents information about Unit Accounts.
Initial Setup Unit Accounts screen

When the key value for a particular record is requested, you can review all the records in the file by selecting the Scan option. The records will be presented on an “Access” screen, and you will be allowed to scan the available data until you find the record you want. Then, position the cursor by that record and press ENTER; the record will be displayed for editing.
Note that the Audit Info option is available at the bottom of this screen. When this option is invoked, the Audit Information overlay appears and displays the date the record was created and who created it, as well as the date the record was last modified and who modified it. Press the END key or the RETURN key to clear the overlay from your screen. The information displayed in the Audit Information overlay is system-supplied and non-modifiable.
Data items for the preceding screen are described below:
- Unit Type
Alphanumeric, up to 12 characters Scan available
In ADD mode this field will automatically saved from one record to the next.
Supply a code from the types file for this unit. The system displays the description so that you can verify your entry.
- Account
Upper case, up to 12 characters Required Scan available
Supply the account number for this unit balance. The system displays the description so that you can verify your entry.
- Description
Alphanumeric, up to 30 characters Required
Name or describe this Unit Balances record. This description will be printed on lists and report.
Press ENTER to display system-supplied information and then press ENTER again to continue to the next screen.
Select the Next Record option to go the next Unit Accounts record.
At this screen, the use of the MODE keys - ADD, DEL, CHG, or INQ - pertain to those records in the Unit Accounts file.
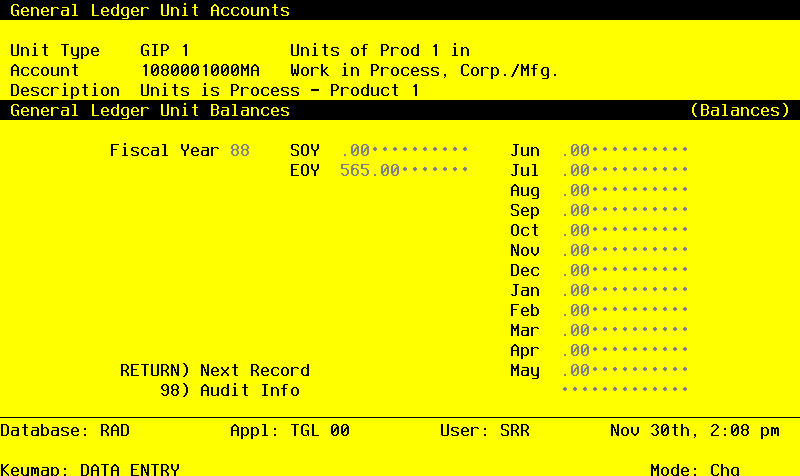
The screen shown below presents information about Unit Balances.
During the Initial Setup phase of your operations, you can enter monthly unit balances using this screen. During Live Operations, this screen will not appear.
This file stores the Unit Balances information by account number and type. A separate Units Entry function is provided to post units transactions to this file.
Initial Setup Unit Balances Enter screen
When the key value for a particular record is requested, you can review all the records in the file by selecting the Scan option. The records will be presented on an “Access” screen, and you will be allowed to scan the available data until you find the record you want. Then, position the cursor by that record and press ENTER; the record will be displayed for editing.
Data items for the preceding screen are described below:
- Fiscal Year
Positive number, up to 2 digits
Identify the fiscal year for which you are entering balances.
- SOY
Number, up to 9 digits and 2 decimals
Supply the start-of-year unit balance.
- Monthly Balances
Number, up to 9 digits and 2 decimals
Supply the unit balances for each fiscal month. Thirteen months are allowed.
- EOY
Number, up to 9 digits and 2 decimals
Supply the end-of-year unit balance.
The entered data is validated. During validation, including access to other files, conditions may be found which cause messages to be displayed. Errors (E), Warnings (W), and Messages (M) that may result are shown below:
Press ENTER to display system-supplied information and then press ENTER again to save the information on this screen.
Select the Previous Image option to go back to the Unit Accounts screen. Select the Next Record option to go to the next Unit Balances record. Select the End option to go the next Unit Accounts record.
At this screen, the use of the MODE keys - ADD, DEL, CHG, or INQ - pertain to those records in the Unit Balances file.
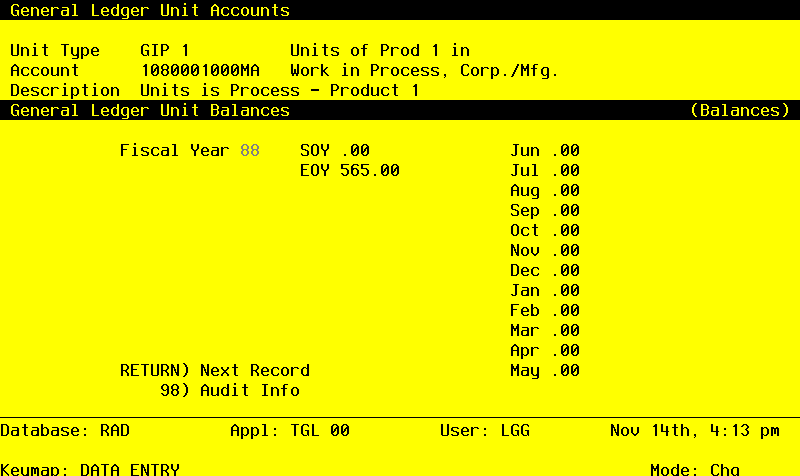
This screen may optionally be used to display information about Unit Balances.
During the Initial Setup phase of your operations, this screen will not appear. During Live Operations, you can use this screen to view your unit balances.
Initial Setup Unit Balances - Display screen
When the key value for a particular record is requested, you can review all the records in the file by selecting the Scan option. The records will be presented on an “Access” screen, and you will be allowed to scan the available data until you find the record you want. Then, position the cursor by that record and press ENTER; the record will be displayed for editing.
Data items for the preceding screen are described below:
- Fiscal Year
Positive number, up to 2 digits
Identify the fiscal year for which you are entering balances.
- SOY
Number, up to 9 digits and 2 decimals Display only
Supply the start-of-year unit balance.
- Monthly Balances
Number, up to 9 digits and 2 decimals Display only
Supply the unit balances for each fiscal month. Thirteen months are allowed.
- EOY
Number, up to 9 digits and 2 decimals Display only
Supply the end-of-year unit balance.
The entered data is validated. During validation, including access to other files, conditions may be found which cause messages to be displayed. Errors (E), Warnings (W), and Messages (M) that may result are shown below:
Press ENTER to display system-supplied information and then press ENTER again to save the information on this screen.
Select the Previous Image option to go back to the Unit Accounts screen. Select the Next Record option to go to the next Unit Balances record. Select the End option to go the next Unit Accounts record.
At this screen, the use of the MODE keys - ADD, DEL, CHG, or INQ - pertain to those records in the Unit Balances file.