
Chapter 4: Recovery Processing
Option 7Unpaid Invoices
You can use this function to edit the Unpaid Invoices file in Recovery Processing, in the unlikely event that a post fails to complete.
When you use this function, a record of all entries will be printed. For additions, all new field contents are printed; for deletions, the deleted record’s contents are shown; for changes, both old field contents and new field contents are shown; and in all cases, the User ID, date, and time are printed.
The screen shown below presents information about Unpaid Invoices.
This file contains a record for each customer/apply to combination. Transaction postings either create or update records in this file. Unpaid invoice records are used to generate automatic cash receipts, and determine the order in which On Account payments are applied (by customer and due date).
Recovery Processing Unpaid Invoices screen
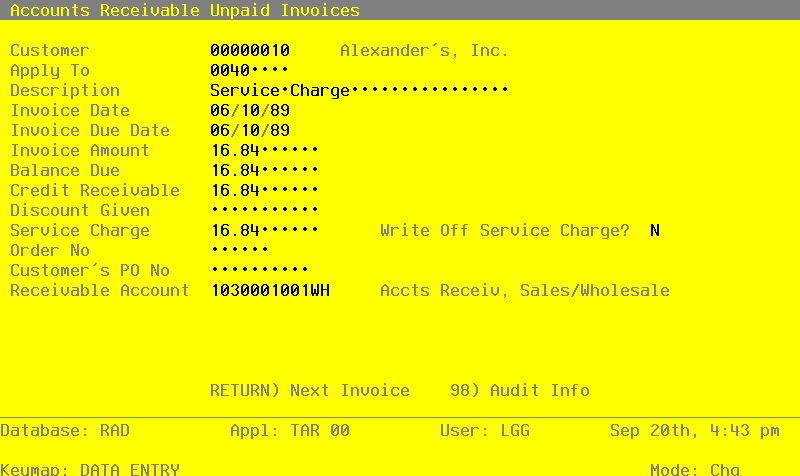
When the key value for a particular record is requested, you can review all the records in the file by selecting the Scan option. The records will be presented on an “Access” screen, and you will be allowed to scan the available data until you find the record you want. Then, position the cursor by that record and press ENTER; the record will be displayed for editing.
Data items for the preceding screen are described below:
- Customer
Upper case, up to 8 characters Numbers only Scan available
Identify the customer record to edit. the system displays the customer’s name so that you can verify your entry.
- Apply To
Upper case, up to 8 characters Required
Enter the number of the invoice, credit memo, or debit memo affected by this transaction. The Apply To is generally the invoice number, except for invoices that affect a previously received invoice. For those adjustments, the Apply To refers to the original invoice number.
- Description
Alphanumeric, up to 30 characters
The system displays the description of the invoice.
- Invoice Date
Date (YMD)
The system displays the invoice date from the original invoice posting.
- Invoice Due Date
Date (YMD)
The system displays the date that the invoice is due.
- Invoice Amount
Number, up to 7 digits and 2 decimals
The system displays the original invoice amount.
- Balance Due
Number, up to 7 digits and 2 decimals
The system displays the amount due on this Apply To invoice, including all invoices, receipts, or adjustments that apply.
- Credit Receivable
Number, up to 7 digits and 2 decimals
The system displays the amount to be received. The CR Receivable is originally set to the amount of the invoice. If the invoice has been partially paid, this amount will reflect that.
- Discount Given
Number, up to 7 digits and 2 decimals
The system displays the amount of discount given when the cash receipt was entered and posted. If more than one cash receipt with a discount given was entered and posted, this field represents the sum of all the discounts given.
- Service Charge
Number, up to 7 digits and 2 decimals
The system displays the service charge assessed against this invoice, if any.
- Write Off Service Charge?
Y or N Required
the initial default value is ‘N’.
The system displays the current value of the Write Off Service Charge? field. this field is originally obtained from the invoice, but can be altered either by an adjustment transaction or by a cash receipt. This field is used by the Write Off Service Charges function to remove any existing service charges from the invoice.
- Order No
Positive number, up to 6 digits
The system displays the sales order number, if applicable.
- Customer’s PO No
Alphanumeric, up to 10 characters
The system displays the customer’s PO number for this invoice.
- Receivable Account
Upper case, up to 12 characters Required Scan available
The system displays the receivable account associated with this invoice. If General Ledger is part of your system, this account must be on file in the Chart of Accounts file; the description from that file is displayed.
Press ENTER to display system-supplied information and then press ENTER again to save the information on this screen.
Select the Next Record option to go to the next Unpaid Invoices record.
At this screen, the use of the MODE keys - ADD, DEL, CHG, or INQ - pertain to those records in the Unpaid Invoices file.