
Chapter 2: Initial Setup File Maintenance
Option 9Customers
Use this function to enter and edit customer records. Make sure the information you enter is accurate and complete, as this data is crucial to the proper functioning of the Accounts Receivable application
When you use this function, a record of all entries will be printed. For additions, all new field contents are printed; for deletions, the deleted record’s contents are shown; for changes, both old field contents and new field contents are shown; and in all cases, the User ID, date, and time are printed.
The screen shown below presents information about Customers.
This field contains the information for a specific customer. Some of the information is used as reference information and some is used in processing the customer’s transactions.
Initial Setup Customers screen, part 1 of 3
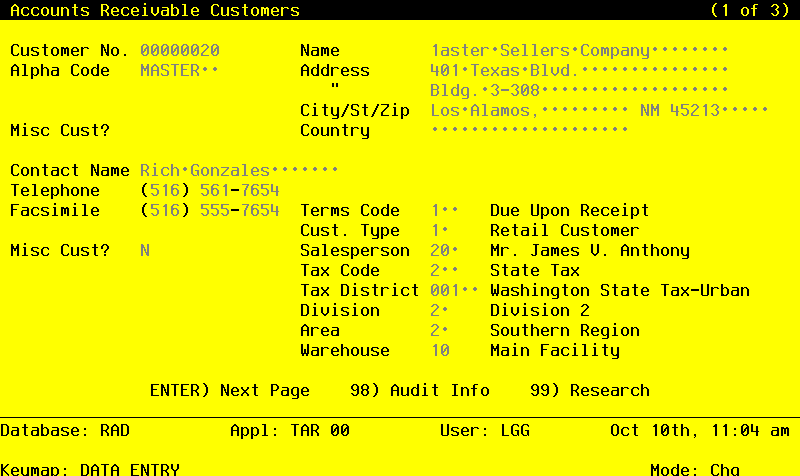
When the key value for a particular record is requested, you can review all the records in the file by selecting the Scan option. The records will be presented on an “Access” screen, and you will be allowed to scan the available data until you find the record you want. Then, position the cursor by that record and press ENTER; the record will be displayed for editing.
Note that the Audit Info option is available at the bottom of this screen. When this option is invoked, the Audit Information overlay appears and displays the date the record was created and who created it, as well as the date the record was last modified and who modified it. Press the END key or the RETURN key to clear the overlay from your screen. The information displayed in the Audit Information overlay is system-supplied and non-modifiable.
Data items for the preceding screen are described below:
- Customer
Upper case, up to 8 characters Numbers only Scan by this field (access key)
Supply a unique number to identify this customer. This is the number that is used to recall or reference the customer’s records throughout the Accounts Receivable application.
- Customer Alpha
Alphanumeric, up to 8 characters Required Scan by this field (access key)
Supply a code that will provide alternative identification for the customer. You may want to use a portion of the customer name. Many reports are sorted by Customer Alpha throughout Accounts Receivable.
- Name
Alphanumeric, up to 30 characters Required Scan by this field (access key)
Provide the customer’s name.
- Address (Line 1)
Alphanumeric, up to 30 characters
Provide the first line of the customer’s street address.
- Address (Line 2)
Alphanumeric, up to 30 characters
If appropriate, enter additional information to complete the customer’s address.
- City
Alphanumeric, up to 20 characters
Supply the city in the customer’s address.
- State
Upper case, up to 2 characters
Supply the standard 2-letter state abbreviation for the customer’s state.
- Zip Code
Upper case, up to 10 characters
Supply the customer’s zip code.
- Country
Alphanumeric, up to 20 characters
Name the customer’s country, if appropriate.
- Phone
Upper case, up to 14 characters
Provide the customer’s phone number, including the area code. You may use any notation or format (for example, ‘(###)###-#### or’###-###-####).
- FAX Number
Upper case, up to 14 characters
Supply the customer’s FAX number, if appropriate. Include the area code; any format is appropriate.
- Contact
Alphanumeric, up to 20 characters
Name the contact person at the customer’s office. (This will be the addressee on dunning letters sent to this customer.)
- Miscellaneous Customer?
Y or N Default N Required
If this record is being set up to handle “miscellaneous” customer — that is, customers you may only do business with occasionally, and whom you do not want to track individually
— enter ‘Y’. When you enter an invoice for a miscellaneous customer, the system will prompt you for a name and address to be printed on the invoice. You may create as many miscellaneous customers as you want; many businesses create only one, for all such customers.
- Salesperson
Positive number, up to 3 digits Scan available
If Commission Accounting is included in your system, enter the code that identifies that salesperson to be credited with sales to this customer. Only numbers from the Salespersons file are accepted. The salesperson’s name is displayed so that you can verify your entry. If your system does not include Commission Accounting, you can make an entry here for your information.
This code is defaulted when invoices are entered fro this customer.
- Terms Code
Positive number, up to 3 digits Scan available
Identify the payment terms that apply to this customer. This code must be on file in the Terms file. The system displays the description from this field so that you can verify your entry.
This code is defaulted when invoices are entered for this customer.
- Tax Code
Positive number, up to 3 digits Scan available
Supply the tax code that applies to this customer, if any. If entered, this code must be on file in the Sales Tax Codes file. The system displays the description from this file so that you can verify your entry.
This code is defaulted when invoices are entered for this customer. If no tax code and tax district are entered, sales tax cannot be entered on invoices for this customer.
- Tax District
Alphanumeric, up to 5 characters
You can use Scan to search form an appropriate entry.
Supply the tax district that applies to this customer, if appropriate. If entered, this code must be on file in the Sales Tax Codes file for the tax code you entered in the previous field. The system displays the description of the tax district from this file so that you can verify your entry.
If you enter a tax code, you should also enter a tax district. This district is defaulted during invoices entry for this customer. If no tax code and tax district are entered, sales tax cannot be calculated on invoices for this customer.
- Division
Positive number, up to 2 digits Scan available
Identify the division to which the customer belongs. This number must be on file in the Customer Divisions file. The system displays the description of the division from this file so that you can verify your entry.
Many reports in Accounts Receivable are sorted by customer division, customer area, and customer type.
- Type
Positive number, up to 2 digits Scan available
Identify the type that applies to this customer. Your entry must be on file in the Customer Types file. The system displays the type description from this file so that you can verify your entry.
Many reports in Accounts Receivable are sorted by customer division, customer area, and customer type.
- Warehouse
Positive number, up to 2 digits Scan available
Identify the warehouse that usually supplies the inventory items purchased by this customer. If your system includes Inventory Control, this number must be on file in the Warehouses file. The system displays the warehouse description from this file so that you can verify your entry.
This warehouse is used as a default for this customer in the Order Entry application.
The entered data is validated. During validation, including access to other files, conditions may be found which cause messages to be displayed. Errors (E), Warnings (W), and Messages (M) that may result are shown below:
Press ENTER to display system-supplied information and then press ENTER again to continue to the next screen.
Select the Next Record option to go to the next Customers record.
At this screen, the use of the MODE keys - ADD, DEL, CHG, or INQ - pertain to those records in the Customers file.
The screen below presents additional information about Customers.
Initial Setup Customer screen, part 2 of 3
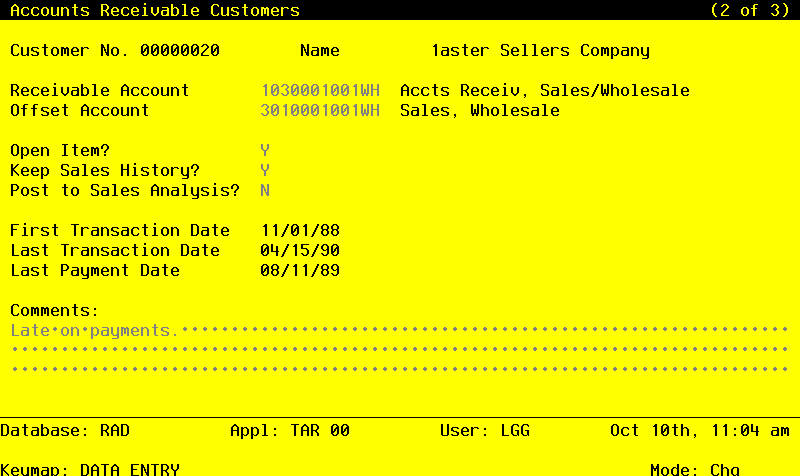
When the key value for a particular record is requested, you can review all the records in the file by selecting the Scan option. The records will be presented on an “Access” screen, and you will be allowed to scan the available that until you find the record you want. Then, position the cursor by that record and press ENTER; the record will be displayed for editing.
Data items for the preceding screen are described below:
- Receivable Account
Upper case, up to 12 characters Required Scan available
Supply the receivable account for this customer from the General ledger Chart of Accounts field. If General Ledger is a part of your system, this number must be a valid account number. When you enter a valid account number, the system displays the account description from the Chart of Accounts file so that you can verify your entry.
During Live Operations, this account number will be used as the default receivable account for this customer’s transactions.
- Offset Account
Upper case, up to 12 characters Scan available
Supply the standard offset account for this customer. This is usually a revenue account. This account will default for you when you are entering invoices. If there is no default offset account for this customer, leave this field blank.
If entered, this account must be on file in the General ledger Chart of Accounts file. The system will display the account description from that file so that you can verify your entry.
- Open Item?
Default Y Required
Enter ‘Y’ (yes) or ‘N’ (No).
Specify whether this customer’s account will be maintained on an open-item or balance-forward basis. Values and their meanings are:
Y: The customer’s account is maintained on an open-item basis. All transactions will be kept in detail in the transactions file. During Close Month processing in Live Operations, the system will delete only zero-balance invoices from these files.
N: The customer’s account will be maintained on a balance-forward basis. During Close Month processing in Live Operations, all of the month’s invoice records, based on due date, will be summed into a single balance-forward record. After the Close Month function has finished, statements, transaction reports, dunning letters, and inquiries will not show prior months’ transaction detail for this customer. However, an invoice with a due date in a future month will be excluded from the summary and maintained in detail.
- Keep Sales History?
Default Y Required
Enter ‘Y’ (yes) or ‘N’ (No).
Specify whether or not sales history will be maintained for this customer in the Customer History file.
- Y
- Keep sales history for this customer.
- N
- Do not keep sales history for this customer.
History will be maintained for the number of months specified in the Months of Customer History field in the Parameters file.
- Post to Sales Analysis?
Y or N Default N Required
Specify whether or not you want to post this customer’s invoices to the Sales Analysis application.
- Y
- Post this customer’s invoices to Sales Analysis.
- N
- do not post this customer’s invoices to Sales Analysis (or, Sales Analysis is not part of your system).
- First Transaction Date
Date (YMD)
During Initial Setup, you can enter the date of the first sale to this customer. During Live operations, the system sets and displays the date of the first sale to this customer. Once set, this field never changes.
- Last Transaction Date
Date (YMD)
During Initial Setup, you can enter the date of the most recent sale to this customer. During Live Operations, the system maintains and displays the date of the most recent sale to this customer. This field is updated during transaction posting. If a cash receipt was the last posted transaction, this date and the Last Payment date are the same.
- Last Payment Date
Date (YMD)
During Initial Setup, you can enter the date the most recent payment was received from this customer. During Live Operations, the system maintains and displays the date the most recent payment was received from this customer. This field is updated during transaction posting.
- Comments
Enter a text field, up to 237 characters in length. You can use the options to split, join and redisplay text, the End Paragraph option, and the fixed space character to “hold” spaces in this field.
Supply any additional information you may need about this customer. This field is optional, and appears only on the standard Customer List, the Customer Credit Inquiry, and the Customer Credit report.
The entered data is validated. During validation, including access to other fields, conditions may be found which cause messages to be displayed. Errors (E), Warnings (W), and Messages (M) that may result are shown below:
Press ENTER to display system-supplied information then press ENTER again to continue to the next screen.
Select the next Record option to go to the next Customers record.
At this screen, the use of the MODE keys - ADD, DEL, CHG, or INQ - pertain to those records in the Customers file.
The screen below present additional information about Customers.
Initial Setup Customers screen, part 3 of 3
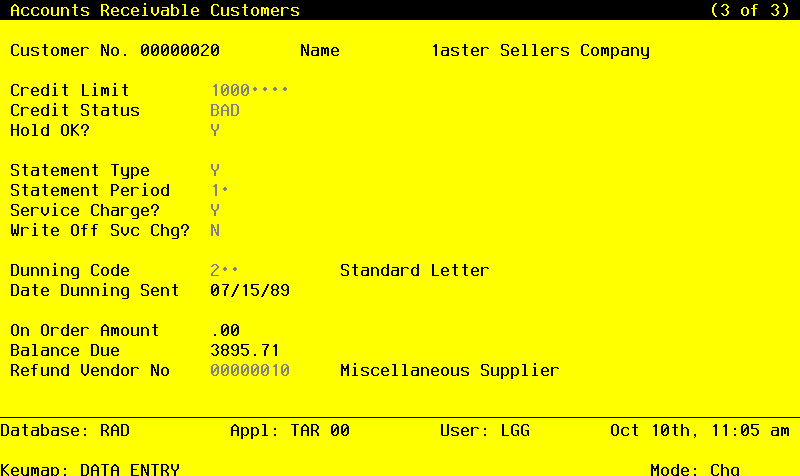
When the key value for a particular record is requested, you can review all the records in the file by selecting the Scan option. The records will be presented on an “Access” screen, and you will be allowed to scan the available data until you find the record you want. Then, position the cursor by that record and press ENTER; the record will be displayed for editing.
Data items for the preceding screen are described below:
- Credit Limit
Number, up to 7 digits
Define the maximum amount of credit extended to this customer. The system uses this amount to set the Credit Status for this customer if the system is set up to maintain this information (see the Hold OK? field). The Credit Limit does not prevent you from entering sales over the limit.
If you leave a blank entry in this field, the system assumes a limit of 0, not an unlimited line of credit. The default value is 9999999, meaning that unlimited credit is available for this customer.
- Credit Status
Upper case, up to 3 characters Valid: OK, NO, BAD Default OK Required
Use one of the following codes to identify this customer’s credit status:
- OK
- The customer’s credit limit is not exceeded.
- NO
- The customer’s balance exceeds the customer’s credit limit.
BAD: For some reason other than the credit limit, this customer is considered to be a poor credit risk. You are the only one allowed to set or change this status code; the system will not alter a credit status of “BAD”.
The credit status indicator is used in Order Entry, to inform users entering sales orders of the customer’s current credit status.
The system will maintain this field only if the Hold OK? field (see next field) is set to ‘Y’.
- Hold OK?
Y or N Default Y Required
Indicate whether or not the system should maintain this customer’s credit status (that is, whether or not the system should update the credit status field).
- N
- The system should not maintain this customer’s credit status.
Y: The system should maintain this customer’s credit status. It will set Credit Status to ‘NO’ during any post when this customer’s credit limit is exceeded, and will set Credit Status to ‘OK’ during any post when this customer’s balance goes below the credit limit.
- NOTE
- The system will not alter the credit status if you set it to ‘BAD’. See the Credit Status field above.
- Statement Type
Upper case, 1 character Valid: N, Y, Z Default Y
.This field is required.
Supply one of the following codes to identify how monthly statement will be handled for this customer.
- N
- Do not print a statement for this customer.
- Y
- Print a statement if there is an outstanding balance for this customer’s account.
- Z
- Print a statement even if there is a zero balance for the customer’s account.
- Statement Period
Upper case, up to 2 characters
Specify the statement period; this code is used for sorting when statements are printed. For example, if you wanted to separate your customers into three segments, you might choose Period 1 as all customers whose names begin with A through H; Period 2 as all customers whose names begin with I through P; and Period 3 as all customers whose names begin with Q through Z. Any combination or separation is allowed.
- Service Charge?
Y or N Default Y Required
Specify whether or not service charges should be calculated on past-due invoices and added to the customer’s account when the Calculate Service Charges function is run during Live Operations. Values are:
- N
- This customer is not subject to service charges.
- Y
- this customer is subject to service charges. The basis of the service charge is defined on the terms record identified by the Terms Code entered.
Service charges should be calculated, edited, printed, posted, and written off on a monthly basis. The type of service charges calculated are affected by your responses to two questions on the Parameters file: “Summary Service Charges?” and “Use Average Daily Balance?”. A response of ‘N’ to “Summary Service Charges?” will cause service charge invoices to be created for each customer invoice. A response of ‘Y’ will cause one service charge invoice to be created per customer. “Average Daily Balance” is a Summary charge.
- Write Off Service Charge?
Y or N Required
the initial default value is ‘Y’.
Specify whether or not service charges can be written off for this customer when the Write Off Service Charges program is run in Live Operations. Values are:
- Y
- Service charges can be written off for this customer.
- N
- Service charges can not be written off for this customer.
During Live Operations, this entry will be the default on invoices for this customer. However, it can be changed for individual invoices during cash receipts and adjustments entry.
The automatic Service Charge Write Off feature can only be used if service charges are calculated on each invoice individually. This means that the question “Summary Service Charges?” in the Parameters field has an entry of ‘N’.
- Dunning Code
Positive number, up to 3 digits Scan available
Identify the set of dunning letters which will be sent to this customer if receivables are overdue. The code you enter must be on file in the dunning Codes file. The system displays the description of the code from that file so that you can verify your entry.
Dunning Letters are printed from the Reports and Inquiry menu in Live Operations.
- Date Dunning Sent
Date (YMD)
The date on which the last dunning letter was printed for this customer is displayed.
- On Order Amount
Number, up to 7 digits and 2 decimals
During Initial Setup, supply the total dollar value of all outstanding sales orders not yet shipped to the customer.
During Live Operations, the system maintains and displayed the total amount of all outstanding sales orders not yet shipped to the customer. The Order Entry application updates this field.
- Balance Due
Number, up to 7 digits and 2 decimals
For new records entered during Initial Setup, this field is zero. When you run the Process Initial Setup function, the system will calculate the total amount of outstanding invoices based on the opening entries and will place the result in this field.
During Live Operations, the system maintains and displays the total amount of all outstanding invoices for the customer. This field is updated during transaction posting.
- Refund Vendor No
Upper case, up to 8 characters Numbers only Scan available
If this customer will need a refund for any reason, it will be necessary to transfer the refund to Accounts Payable in order to print a check. Supply the vendor number for this customer, if a check is possible.
You might want to create a Miscellaneous Vendor specifically to handle refunds. If a refund is created for a Miscellaneous Vendor, the name and address for the vendor invoice are transferred from the Customers file.
Press ENTER to display system-supplied information and then press ENTER again to save the information on this screen.
Select the next Record option to go to the next Customers record.
At this screen, the use of the MODE keys - ADD, DEL, CHG, or INQ - pertain to those records in the Customers file.