
Chapter 4: Recovery Processing
Option 4Transactions
You can use this function to enter and edit opening transaction records in Initial Setup.
This function also allows you to modify the Transactions file in Recovery Processing, in the unlikely event that a post fails to complete.
When you use this function, a record of all entries will be printed. For additions, all new field contents are printed; for deletions, the deleted record’s contents are shown; for changes, both old field contents and new field contents are shown; and in all cases, the User ID, date, and time are printed.
The screen shown below presents information about Transactions.
This file contains the chronological audit trail for every invoice for every customer. this includes all invoices, receipts, adjustments, service charges, and refunds. During Initial Setup, these transactions can be viewed by printing the Transaction Register, which can be sorted by Post Month and Year to check for end-month balances. Invoices with zero balances are usually deleted at end-of-month, but may be kept in the Transaction History field for any number of months.
Recovery Processing Opening Transactions screen
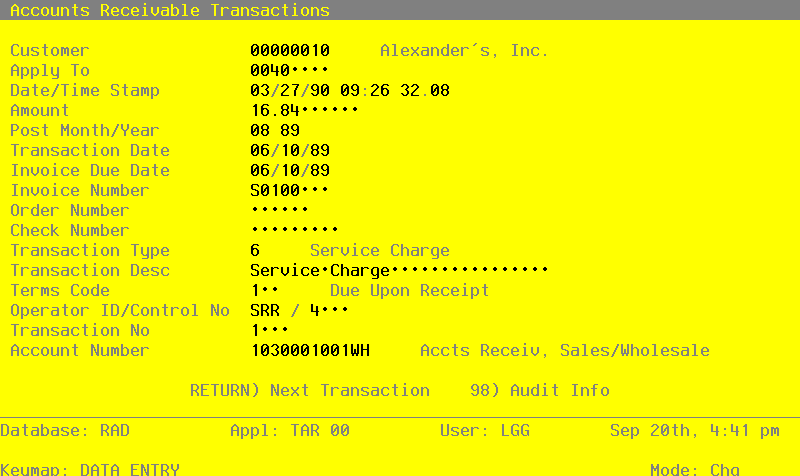
When the key value for a particular record is requested, you can review all the records in the file by selecting the Scan option. The records will be presented on an “Access” screen, and you will be allowed to scan the available data until you find the record you want. then, position the cursor by that record and press ENTER; the record will be displayed for editing.
Data items for the preceding screen are described below:
- Customer
Upper case, up to 8 characters Numbers only Scan available
Identify the customer on the transaction. The customer number you enter must bon file din the Customers file; the system displays the customer name from that file so that you can verify your entry.
- Apply To
Upper case, up to 8 characters Required
Identify the invoice, credit memo, or debit memo affected by this transaction. Many different entries may “apply to” the same invoice.
The Apply To entry is generally the invoice number, except for transactions that adjust a previously posted invoice. In this instance, the Apply To entry refers to the original invoice number.
If this is a deposit for which no invoice has yet been entered, enter the sales order number (from order entry or Cash Receipts Entry) here. When the invoice is entered, this number is entered as the order number on the invoice. This is necessary in order to properly track and post the deposit.
- Date/Time Stamp
Date and time (YMDHMSH)
The system adds the current date and time to the record when it is posted. During Initial Setup, this may be changed. if several transactions have the same Customer and Apply To number, the date and time are used to distinguish between the transactions.
- Amount
Number, up to 7 digits and 2 decimals
Identify the amount of the transaction. For invoices or service charges, this is a positive number; for receipts or refunds, it is negative.
- Post Month
Upper case, up to 2 characters Letters and numbers only Valid: 01, 02, 03, 04, 05, 06, 07 08, 09, 10, 11, 12, 13, EY Required
Identify the calendar month or accounting period to which this transaction was posted. If you are using 12-period accounting, enter the calendar month; if you are using 13-period accounting, enter the fiscal period.
- Post Year
Positive number, up to 2 digits
Identify the calendar year (or fiscal year for 13-period accounting) to which this transaction was posted.
- Transaction Date
Date (YMD)
this field is required.
Supply the date of the transaction.
- Invoice Due Date
Date (YMD)
this field is required.
Identify the date when the invoice is due . For receipts, enter the transaction date.
- Invoice Number
Upper case, up to 8 characters
Identify the invoice number for the transaction.
- Order Number
Positive number, up to 6 digits
- Check Number
Positive number, up to 9 digits
Identify the check number for this transaction. This field applies only to receipts.
- Transaction Type
Positive number, 1 digit
Identify the type of transaction. Valid options are:
- 1
- AR Invoice
- 2
- Debit/Credit memo
- 3
- AR Adjustment 4 = Cash Receipt
- 5
- OE Invoice
- 6
- Service Charge
- 7
- Deposit
- Transaction Description
Alphanumeric, up to 30 characters
During Initial Setup, you can enter a description of this transaction.
During Live Operations, this field will appear on the Transaction Register report if you choose to print descriptions.
- Terms Code
Positive number, up to 3 digits Scan available
The system displays the terms code from the Customers record. during Initial Setup, you can override the display by entering code to identify the payment terms that apply to this transaction. The terms code must be on field in the Terms field. The system displays the description from this file so that you can verify your entry.
- Operator ID
Upper case, up to 3 characters Letters and numbers only Required
Supply the Operator ID of the person who added this transaction to the file.
- Control No
Positive number, up to 4 digits
Supply the Control Number of the original control group of transactions.
- Transaction No
Positive number, up to 4 digits
Supply the transaction number of this transaction.
- Account Number
Upper case, up to 12 characters Required Scan available
The system displays the receivable account number from the Customers record. During Initial Setup, you can override the display. More specifically, if you are entering a transaction record for:
- 1
- a normal receivable, or for a receipt on a previously posted invoice, do no change the displayed receivable account number.
- 2
- a service charge or deposit receipt, enter the service charge or deposit account number, respectively.
- 3
- a direct receipt, enter the revenue account number.
If your system includes General Ledger, this account number must be on file in the Chart of Accounts field, and the system displays the account description from that file so that you can verify your entry.
The entered data is validated. During validation, including access to other files, conditions may be found which cause messages to be displayed. Errors (E), Warnings (W), and Messages (M) that may result are shown below:
Press ENTER to display system-supplied information and then press ENTER again to save the information on this screen.
Select the Next Record option to go to the next Transaction record.
At this screen, the use of the MODE keys - ADD, DEL, CHG, or INQ - pertain to those records in the Transactions file.