
Chapter 4: Recovery Processing
Option 6Vendors
You can use this function to perform file maintenance on Vendor records.
This vendor information is defaulted throughout the Accounts Payable application for vendor specific functions. The system also maintains information about the last purchase made from each vendor as well as the last payment made to the vendor.
When you use this function, a record of all entries will be printed. For additions, all new field contents are printed; for deletions, the deleted record’s contents are shown; for changes, both old field contents and new field contents are shown; and in all cases, the User ID, date, and time are printed.
The screen shown below presents information about Vendors.
This file contains name, address, and other data specific to each vendor.
Recovery Processing Vendors screen, part 1 of 2
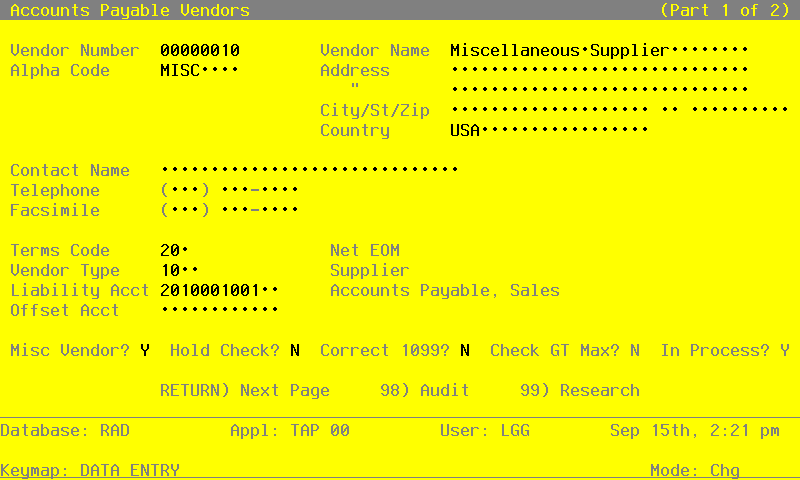
When the key value for a particular record is requested, you can review all the records in the file by selecting the Scan option. The records will be presented on an :Access” screen, and you will be allowed to scan the available data until you find the record you want. Then, position the cursor by that record and press ENTER; the record will be displayed for editing.
Note that the Audit Info option is available at the bottom of this screen. When this option is invoked, the Audit Information overlay appears and displays the date the record was created and who created it, as well as the date the record was last modified and who modified it. Press the END key or the RETURN key to clear the overlay from your screen. The information displayed in the Audit Information overlay is system-supplied and non-modifiable.
Data items for the preceding screen are described below:
- Vendor
Upper case, up to 8 characters Numbers only
By using Scan you may use this field as an ‘access key’ for selecting records.
This unique number will be used throughout the system to identify the vendor.
- Vendor Alpha
Alphanumeric, up to 8 characters Required Scan by this field (access key)
Determine a code to use when sorting data during report and check processing. You may want to use a portion of the vendor name as an alphabetical sort.
- Name
Alphanumeric, up to 30 characters Required
Furnish the vendor’s name. This name will generally appear next to the vendor number field whenever it is displayed on other screens and reports. If this is a miscellaneous vendor, it may be helpful to enter ‘Miscellaneous Vendor’ for the name. During invoice and hand check entry for miscellaneous vendors, you can specify the actual name.
- Address - Line 1
Alphanumeric, up to 30 characters
Give the first line of the vendor’s address. You may want to enter the shipping address in this line and the mailing address in the second line (see next field.).
- Address - Line 2
Alphanumeric, up to 30 characters
You may want to enter the mailing address on the second line of the vendor’s address and the shipping address in the first line.
- City
Enter an alphanumeric filed, up to 20 characters in length.
Supply the city in the vendor’s address. Be sure to enter a comma(‘,’) after the city if you want a comma to print between the city and state on the vendor’s check.
- State
Upper case, up to 2 characters Letters only
Provide the standard 2-letter state abbreviation. This entry should be in the State abbreviation table.
- Zip
Enter an upper case alphanumeric filed, up to 10 characters in length.
Supply the postal zip code.
- Country
Alphanumeric, up to 20 characters
Furnish the country name where the vendor is located.
- Contact
Alphanumeric, up to 20 characters
State the name of the person to be contacted when communicating with this vendor.
- Phone
Upper case, up to 14 characters
Furnish the vendor’s phone number.
- FAX
Upper case, up to 14 characters
Supply the Vendor’s FAX number.
- Terms Code
Positive number, up to 3 digits Scan available
Provide the code, from the Terms file, to represent the payment terms for this vendor. The description of the terms is printed next to the code so that you can verify your entry. The terms code will be used to calculate the invoice due date and discount due date, if applicable, during invoice entry.
- Miscellaneous Vendor?
Y or N Default N Required
Indicate whether or not the vendor is a miscellaneous vendor. Miscellaneous vendor records are normally used for one-time vendors. Note that Vendor History data is not recorded for individual miscellaneous vendors.
To differentiate between miscellaneous vendors, you need to enter a name and address during invoice entry rather than have the system use a fixed name and address from the Vendors file. You can establish more than one miscellaneous vendor.
- Vendor Type
Alphanumeric, up to 4 characters Scan available
The vendor type is another method that can be used to categorize vendors. Many reports and updating functions can be sorted and selected using the vendor type.
- Liability Account
Upper case, up to 12 characters Required Scan available
Supply the liability account to use as a default on invoices, adjustments, and checks for this vendor. If the General Ledger application is part of your system, this account number must be in the Chart of Accounts file. The system displays the description of this account so you may verify your entry.
- Offset Account
Upper case, up to 12 characters Scan available
Provide an offset account to use as a default on invoices entry for this vendor. For example, if you always purchase office supplies from this particular vendor, enter the expense account number for office supplies. You may change the default during transaction entry. If no Offset Account is specified, no default is made by the system during transaction entry.
If the General Ledger application is part of your system, the account number must be in the Chart of Accounts file. The system displays the description of this account so you may verify your entry.
- Retention %
Positive number, up to 3 digits
Supply the non-decimal percentage to use for computing the retention amount of invoices from this vendor. For example, if you want to retain 10% of the total invoice amount on all invoices, enter ‘10’.
- Hold Checks?
Y or N Default N Required
Indicate whether or not you want to prevent this vendor’s checks from being created.
Y: Do not create checks for this vendor, regardless of pay status or unpaid invoice setting. If you print a Cash Requirements report, all invoices for this vendor will have a hold status.
- N
- Do not place this vendor’s checks on a hold status. Process as usual.
- Tax Identifying No
Upper case, up to 11 characters
Give the social security number if this vendor will be the recipient of income reported to the IRS on the 1099-MISC form. Use this field only if you plan on generating a 1099 form for this vendor. If you have an entry in the field, the system automatically calculates reportable income for this vendor during 1099 form printing, and all yearly disbursements for this vendor are included on the 1099-MISC form.
- Pay Status
Upper case, 1 character Valid: N, T, H, D Default N
Define the manner in which you want to pay this particular vendor. This code is defaulted for all invoices for this vendor. The payment status can be overridden during invoice entry or changed through the Edit Pay Status function. The valid Pay Status codes and standard descriptions are:
- N
- Normal - Use the payment terms as defined in the Terms file.
- T
- Take Discount - Take the discount regardless of the payment terms.
- H
- Hold - Place all invoices on hold until they are released during Edit Pay Status.
- D
- Disputed - Keep the invoice on hold until the disputed problem is resolved. Similar to ‘Hold’ status.
- Bank Account No
Upper case, up to 20 characters
For vendors expected to receive a 1099 form, an account number identifying the vendor is required. When creating 1099 forms on magnetic media, it is necessary to be able to distinguish various accounts in this way.
This entry may be a checking or savings account number, or any other unique combination of characters. Using a vendor’s Social Security Number is NOT recommended.
- Checks in Process?
Y or N Default N
The system displays either ‘Y’ or ‘N’ to indicate whether checks have been created for this vendor, but are not yet posted. This field is used during the checks processing cycle to prevent the creation of multiple checks for the same invoice.
- Needs Corrected 1099?
Y or N Default N Required
The system defaults ‘N’, which assumes that the creation of 1099 forms has or will run smoothly. If it is necessary to create a correction tape for some vendors, enter ‘Y’ and modify the sort range to create a tape containing only corrections.
- Check Amount Greater Than Max?
Y or N Default N
The system displays either ‘Y’ or ‘N’ to indicate whether a check to be created will exceed the user specified ‘maximum check amount’. This field is used in the Cash requirements Report to indicate this condition for all checks to be created.
The entered data is validated. During validation, including access to other files, conditions may be found which cause messages to be displayed. Errors (E), Warnings (W), and Messages (M) that may result are shown below:
Press ENTER to display system-supplied information and then press ENTER again to continue to the next screen.
Select Next Record to go to the next Vendors record.
At this screen, the use of the MODE keys - ADD, DEL, CHG, or INQ - pertain to those records in the Vendors file.
The screen below presents additional information about Vendors.
Recovery Processing Vendors screen, part 2 of 2
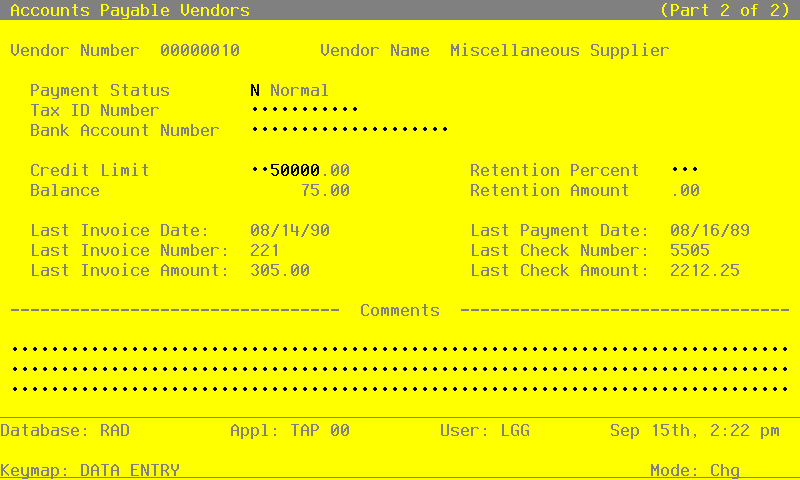
When the key value for a particular record is requested, you can review all the records in the file by selecting the Scan option. The records will be presented on an “Access” screen, and you will be allowed to scan the available data until you find the record you want. Then, position the cursor by that record and press ENTER; the record will be displayed for editing.
Data items for the preceding screen are described below:
- Credit Limit
Positive number, up to 7 digits
Supply the amount of your credit limit with this particular vendor. If you leave a blank or zero (‘0’) entry in this field, the system assumes a limit of zero, not an unlimited line of credit. An unlimited amount of credit is represented by 999999999. However, the Credit Limit field does not preclude entry of purchases over the limit. For informational purposes only, the Vendor Credit Limit appears on the Vendor Activity Inquiry and the Vendor Credit Report.
- Balance
Number, up to 7 digits and 2 decimals
During Initial Setup, enter the outstanding balance owed to the vendor. In Live Operations, this balance is maintained by the system based on the invoices, payments, and adjustments posted to the Vendor’s account. For informational purposes only, the Vendor Balance appears on the Vendor Activity Inquiry and the Vendor Credit Report.
- Retention
Number, up to 7 digits and 2 decimals
Provide the retention balance owed to this vendor. During Live Operations, this field is system maintained and display only.
- Last Invoice Date
Date (YMD)
The date of the most recent invoice processed for this vendor is shown.
- Last Payment Date
Date (YMD)
The check date of the last payment made to this vendor is shown. During Initial Setup, you may enter this date.
- Last Invoice Number
Upper case, up to 8 characters
The number of the last invoice processed for this vendor is shown. During Initial Setup, you may enter the number of the last invoice received from this vendor.
- Last Check Number
Positive number, up to 9 digits
The check number of the last check processed for this vendor is displayed. During Initial Setup, you may supply the number of the last check issued to this vendor.
- Last Invoice Amount
Number, up to 7 digits and 2 decimals
The amount of the last invoice posted for this vendor is displayed. During Initial Setup, you may provide the amount of the invoice you entered in the ‘Last Invoice Number’ field.
- Last Check Amount
Number, up to 7 digits and 2 decimals
This is the amount of the last check processed for this vendor. During Initial Setup, you may provide the amount of the check you entered in the ‘Last Check Number’ field.
- Comment
Enter a text field, up to 237 characters in length. You can use the options to split, join and redisplay text, the End Paragraph option, and the fixed space character to “hold” spaces in this field.
Use this field to store a comment or any other pertinent information relating to this vendor. This text is displayed on several inquiries and reports.
Press ENTER to save the information on this screen.
Select Next Record to go to the next Vendors record.
At this screen, the use of the MODE keys - ADD, DEL, CHG, or INQ - pertain to those records in the Vendors file.