
Chapter 4: Recovery Processing
Option 10Transaction Control
This job allows you to modify the Transaction Control file. The following processing steps accomplish this job.
- Step 1This function checks to see whether the end user has chosen to use the Transaction Control option, before executing any function that requires the file.
- Step 2This function allows the editing of Transaction Control records. This function is accessed only through Recovery Processing. The editing of these records should be done only with much caution.
When you use this function a record of all entries will be printed. For additions, all new field contents are printed; for deletions, the deleted record’s contents are shown; for changes, both old field contents and new field contents are shown; and in all cases, the User ID, date, and time are printed.
The screen shown below presents information about Transaction Control.
This file contains one record for each control group posted, if you indicate in the Parameters file that you want to use Transaction Control. These records are saved for the number of months that you specified in the Parameters file. Whether or not these records are deleted during Close Month processing depends on the actual calendar date, not the posting date.
Recovery Processing Transaction Control screen
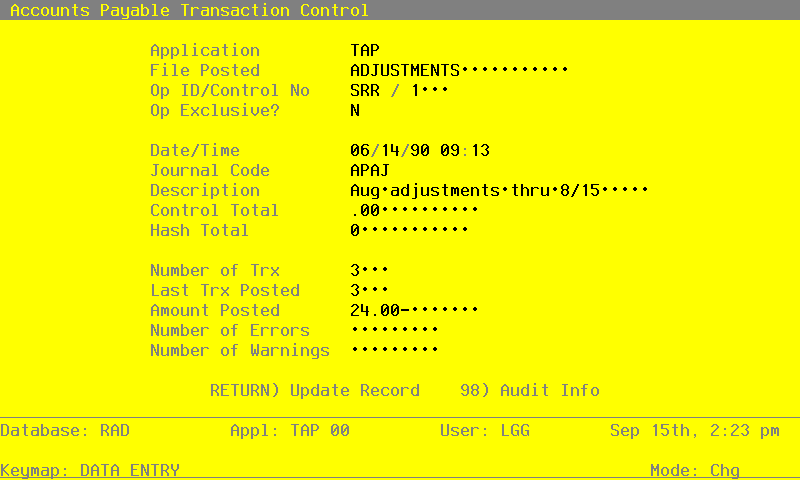
When the key value for a particular record is requested, you can review all the records in the file by selecting the Scan option. The records will be presented on an “Access” screen, and you will be allowed to scan the available data until you find the record you want. Then, position the cursor by that record and press ENTER; the record will be displayed for editing.
Data items for the preceding screen are described below:
- Application
Upper case, up to 3 characters Letters only Required
The application from which the control group originated is identified. For example, TAP represents the Accounts Payable application.
- File Posted
Alphanumeric, up to 22 characters Letters and numbers only Required
The file from which the transaction originated is identified; for example, INVOICES, AD- JUSTMENTS, or DISBURSEMENTS.
- Operator ID
Letters and numbers only Required
Enter an upper case alphanumeric filed, up to 3 characters in length.
The operator ID of the operator who entered the control group is displayed.
- Control No
Positive number, up to 4 digits
The Control Number of the original group of transaction is displayed.
- Operator Exclusive?
Y or N Default N Required
This indicates whether or not access to this group of transactions was limited to the original operator.
- Date/Time
Date and time (YMDHM) Required
The date and time when this control group was posted is given.
- Journal code
Alphanumeric, up to 4 characters
The journal reference for the transaction entry function and control group is displayed. For example, the journal code for Accounts Payable Invoices is APIV. Inventory Receipts are represented by ICRC.
- Description
Enter an alphanumeric filed, up to 30 characters in length.
The description that was entered for the control group is displayed.
- Control Total
Number, up to 9 digits and 2 decimals
The control total for this group of transactions is displayed.
- Hash Total
Positive number, up to 12 digits
The hash total for this group of transactions is shown. In Accounts Payable, hash totals are performed on the vendor number and can be useful in detecting entry errors.
- Number of Trx
Positive number, up to 4 digits
The system displays the total number of transactions posted from this group.
- Last Trx Posted
Positive number, up to 4 digits
This is the transaction number of the last transaction posted.
- Amount Posted
Number, up to 9 digits and 2 decimals
The total amount posted from the control group is displayed.
- Number of Errors
Positive number, up to 9 digits
If errors were found during posting, the total number is displayed. These errors were also noted in the error log created by the system.
- Number of Warnings
Positive number, up to 9 digits
The number of warnings generated during posting of this control group is displayed. These warnings were noted in the error log created by the system.
Press ENTER to save the information on this screen.
Select Next Record to go to the next Transaction Control record.
At this screen, the use of the MODE keys - ADD, DEL, CHG, or INQ - pertain to those records in the Transaction Control file.