
Chapter 4: Maintenance
Parameters (Reporting & Posting) Screen
The Parameters (Reporting & Posting) Screen, shown in Figure 4-3a below, appears automatically in Add mode when you save the record or in any mode when you click on the Reporting & Posting button from the Parameters (Interfaces) Screen in Parameters File Maintenance. You remain in the same mode and you cannot change mode from this screen.
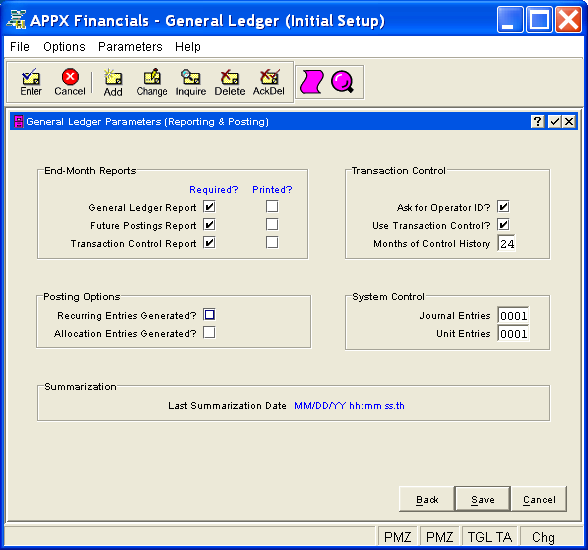
This screen contains the following fields grouped by sections.
End-Month Reports
- General Ledger Report .......... Required?/Printed? Future Postings Report .......... Required?/Printed? Transaction Control Report ... Required?/Printed?*
Select "yes" or
 if you want printing of the respective report to be required before end-of-month processing can proceed; otherwise, select "no" or
 . The default is "no".
Select "yes" or
if the respective report has been printed for this month; otherwise, select "no" or . The default is "no".*Note: If you are not using the system's Transaction Control feature (see the Use Transaction Control? field below), you should answer "no" to both questions.
Transaction Control
Refer to Transaction Control Options in Chapter 3 for a more comprehensive discussion of these options and how they are interrelated.
- Ask for Operator ID?
Select "yes" or
to have the system ask for the Operator ID of a control group in transaction entry; otherwise, select "no" or . The default is "yes".The system assumes that you prefer to ask for the operator's ID during transaction entry. This allows you to edit other operators' transactions. If you want to bypass all Control Group screens altogether, enter "no". "No" means that each operator can only enter or edit his or her own transactions. It also means that Use Transaction Control? must be "no".
- Use Transaction Control?
Select "yes" or
to use the system's Transaction Control feature; otherwise, select "no" or . The default is "yes".The system assumes that you want to use the Transaction Control feature. This includes the ability to process transactions in a foreign currency; track and report on the Transaction Control file, which is an additional audit trail; and enter control and hash totals for your transactions.
If Use Transaction Control? is "yes", then Ask for Operator ID? must also be "yes". If you want to use this feature and also want to ensure that an operator has exclusive control of his or her own transactions, enter "yes" in this field, and change the default value of the Operator Exclusive? field on each Control Group record in transaction entry to "yes".
- Months of Control History
Enter the number of months to keep Transaction Control History records. Records older than this will be deleted during Close Month processing.
Transaction Control History is kept by actual date rather than accounting period or posting month.
Posting Options
- Recurring Entries Generated ?
Select "yes" or
if recurring entries have been generated for this month; otherwise, select "no" or . The default is "no".- Allocation Entries Generated ?
Select "yes" or
if allocations have been made for this month; otherwise, select "no" or . The default is "no".
System Control
- Journal Entries
Enter the control number (up to 4 digits) to be assigned to the first control group in Journal Entries in Live Operations. The system maintains this number sequentially. The default is "0001".
- Unit Entries
Enter the control number (up to 4 digits) to be assigned to the first control group in Unit Entries in Live Operations. The system maintains this number sequentially. The default is "0001".
Summarization
- Last Summarization Date
The system displays the date/time that the Summarize Accounts function was last run, if applicable. This field is also displayed on the Monthly Status inquiry function in Live Operations. It is updated each time the Summarize Accounts function is run (either from Utilities on the Monthly Pulldown Menu in Live Operations or as part of Process Initial Setup).
Press ENTER or click  or the Save button to save the information on this screen. If any information has changed, the system may redisplay the screen to show any new or changed system-supplied items or to report any error or warning messages. If so, the current screen has not yet been saved and you must address any concerns and press ENTER or click or the Save button again.
When the screen has been saved, you will return to the Parameters (Interface) Screen. To return without saving, press END or click  or the Back or Cancel buttons.
The following icons are available for use on the toolbar:
 List Parameters: See Parameters List for further information.
 Display Parameters Audit Info: See Audit Info for further information.
Click the appropriate icon to perform the desired operation (which first saves the current screen if applicable), after which you will return to where you are.