
1Transaction Processing
Option 1Purchase Orders
This function is used to enter and edit purchase orders. Two screens are used: the first, or Purchase Orders header screen, to enter general information for a purchase order, and the second to enter line items. Any number of line items may be entered for a single purchase order. After you enter a purchase order, you can recall and edit it at any time.
Regardless of how your system is configured, the on order quantities and last purchase date in the Products By Warehouse file are updated on line when you enter purchase orders.
Once a purchase order has been entered, receipts and invoices can be entered for it. A fully receipted and invoiced purchase order is deleted when the Delete Completed POs or Post All posting functions are run.
Select “Purchase Orders” from the Order Entry option on the Transaction Processing menu. The first of two Purchase Order entry screens is shown below:
Purchase Order screen
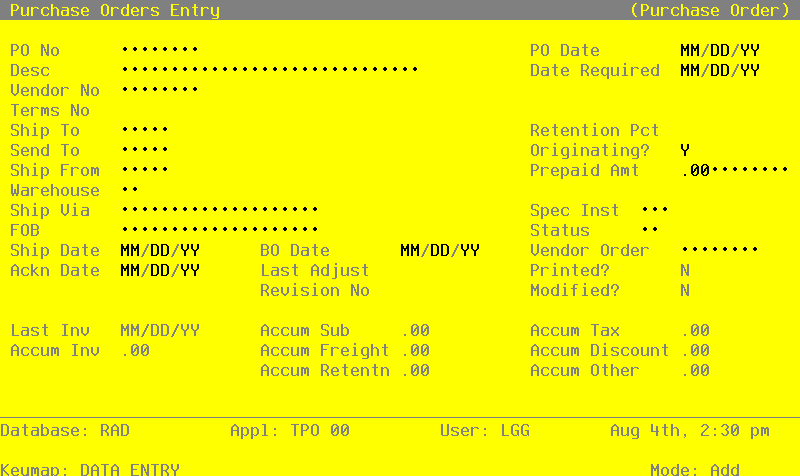
Certain entries on this screen will automatically display. In most cases, a displayed entry can be changed. If an asterisk (*) appears next to one of the fields listed below, it indicates a “display-only” field, which cannot be changed.
When the key value for a particular record is requested, you can review all the records in the file by selecting the Scan option. The records will be presented on an “Access” screen, and you will be allowed to scan the available data until you find the record you want. Then, position the cursor by that record and press RETURN; the record will be displayed for editing.
Data items for the preceding screen are described below:
- PO No
Enter a unique code of up to 8 characters to identify the purchase order. This is the number that will be used to recall or reference this record elsewhere in the system.
- PO Date
Enter the date for the purchase order.
- Desc
Enter up to l6 characters to describe this purchase order.
If Option 17 is used to create an invoice record from the purchase order (see the description of the Invoices Data Entry program), the description is transferred as the invoice description.
- Date Required
Enter the date the order is required. This date is used as a sort option for the Purchase Orders report.
- Vendor No
Enter the supplying vendor’s number from the Vendors file. You can use the Scan option to find an appropriate entry. The system displays the corresponding name so that you can verify your entry.
- Terms No
The system displays the terms code for the vendor you identified in the preceding field. You can enter another terms code from the Terms file to change this display. You can use the Scan option to find an appropriate entry. The system displays the corresponding description so that you can verify your entry. The system uses the terms selected here to calculate discount dates and amounts and due dates during invoice entry.
- Ship To
If the product will be shipped to an address other than that of the warehouse you select (see the Warehouse field description below), enter the corresponding code from the Alternate Addresses file. You can use the Scan option to find an appropriate entry. The system displays the corresponding Addressee Name so that you can verify your entry.
If no alternate address code is entered, the system displays the description from the Warehouses record.
This address is only printed on the purchase order form if you enter an alternate address code.
- Retention Pct
The system displays the Retention Percent field from the Vendors record. You can enter a different, nondecimal retention percentage to override the display.
The system uses this percentage to compute the retention amount during invoice entry.
- Send To
If the purchase order (that is, the physical paperwork) will be sent to an address other than the address on the Vendors record (see the Vendor No field description), enter the code from the Alternate Addresses file for that address. You can use the Scan option to find an appropriate entry. The system displays the corresponding Addressee Name so that you can verify your entry.
If no alternate address code is entered, the system displays the name from the Vendors record.
- Originating?
Enter ‘Y’ or ‘N’ to indicate whether this purchase order is an original order to the supplying vendor, or whether it is a confirmation of an order already placed with the vendor.
- Y
- This purchase order is the initial order to the vendor.
- N
- The purchase order is a confirmation of an order already placed with the vendor.
This field is for your information only.
- Ship From
If the order will be shipped from an address other than the address on the Vendors record (see the Vendor No field description), enter a code of up to 5 characters from the Alternate Addresses file for that address. You can use the Scan option to find an appropriate entry. The system displays the corresponding Addressee Name so that you can verify your entry.
If no alternate address code is entered, the system displays the name from the Vendors record.
The “ship from” address is only printed on the purchase order form if it is different from the address on the Vendors record.
- Prepaid Amt
Enter up to 7 digits and 2 decimals for the amount prepaid against this purchase order.
The prepayment is carried over to the invoice to reduce the invoice amount.
- Warehouse
Enter a warehouse number to identify the warehouse to which the order will apply. You can use the Scan option to find an appropriate entry. The system displays the corresponding description from the Warehouses file so that you can verify your entry.
This entry appears as the default Warehouse No when you enter line items for this purchase order.
- Ship Via
Enter up to 20 characters to identify the freight company to be used.
This entry is printed on the purchase order.
- Spec Inst
Enter a code of up to 3 digits from the Special Instructions file for the instructions that will be printed on the bottom of the purchase order. You can use the Scan option to find an appropriate entry. The system displays the corresponding description so that you can verify your entry.
- FOB
Enter up to 20 characters to identify the destination or shipping point to which the order will be shipped “free on board.”
This entry is printed on the purchase order.
- Status
Enter a 2-digit code from the Status Codes file to describe the status of this order. You can use the Scan option to find an appropriate entry. The system displays the corresponding description so that you can verify your entry.
The status code is included on the Purchase Orders Report and provides a way to selectively print purchase orders.
- Ship Date
Enter the date the order will be (or was) shipped. This field is for your information only.
- BO Date
If the purchase order is backordered, enter the date the order was placed on backorder. This field is for your information only.
- Vendor Order
Enter up to 8 characters for the vendor’s order number for the purchase order.
- Ackn Date
Enter the date that the vendor acknowledged the purchase order. This field is for your information only.
- Last Adjust
If the purchase order is revised or adjusted you may enter the date of the most recent revision.
- Printed?*
The system displays ‘Y’ or ‘N’ to indicate whether or not the purchase order has been printed since it was last modified.
- Y
- This purchase order has been printed.
- N
- This purchase order has not been printed.
This flag is reset to ‘N’ if any changes are made to this purchase order.
- Revision No
If the purchase order is revised, you may enter a Revision Number which will be printed on the Purchase Order form.
- Modified?*
The system displays ‘Y’ or ‘N’ to indicate whether or not the purchase order has been modified since the last time the Delete Completed POs function was run.
- Y
- This purchase order has been modified.
- N
- This purchase order has not been modified.
The system sets this flag to ‘Y’ if any changes are made to this purchase order, and resets the flag to ‘N’ when the delete completed POs function is run.
- Last Inv*
The system displays the date of the last invoice posted for the purchase order. The system updates this date as invoices are processed for the purchase order.
- Accum Sub*
The system displays the subtotal amount (line items exclusive of freight, tax, and “other” amounts) already invoiced on the purchase order. The system updates this figure as invoices are posted.
- Accum Tax*
The system displays the tax amount already invoiced on the purchase order. The system updates this figure as invoices are posted.
- Accum Inv*
The system displays the amount already invoiced on the purchase order. The system updates this figure as invoices are posted.
- Accum Frt*
The system displays the freight amount already invoiced for the purchase order. The system updates this figure as invoices are posted.
- Accum Discount*
The system displays the discount amount already taken on invoices for the purchase order. The system updates this figure as invoices are posted.
- Accum Retention*
The system displays the retention amount already withheld on invoices for the purchase order. The system updates this figure as invoices are posted.
- Accum Other*
The system displays “other” charges already invoiced on the purchase order. The system updates this figure as invoices are posted.
The entered data is validated. Press RETURN to save the information on this screen.
Select Next Record to go to the next Purchase Orders record.
At this screen the use of the MODE keys—ADD, DEL, CHG, or INQ—pertain to those records in the Purchase Orders file.
The screen shown below presents information about Purchase Order Line Items.
Purchase Order Line Items screen
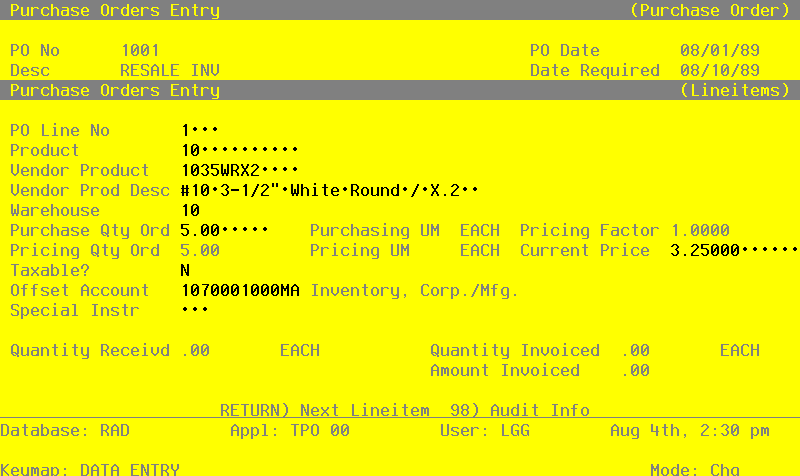
Certain entries on this screen will be automatically displayed. In most cases, the displayed entry can be changed. If an asterisk (*) appears next to one of the fields listed below, it indicates a “display-only” field, which cannot be changed.
When the key value for a particular record is requested, you can review all the records in the file by selecting the Scan option. The records will be presented on an “Access” screen, and you will be allowed to scan the available data until you find the record you want. Then, position the cursor by that record and press RETURN; the record will be displayed for editing.
Data items for the preceding screen are described below:
- PO Line No
The system provides a line number, beginning with ‘1’, for each line item on the order. You can enter a new line number to override the display.
- Product
Enter a product number from the Products file. You can use the Scan option to find an appropriate entry. This entry identifies the product that will appear on this line item on the purchase order.
The system verifies that the product is on file in the Products file. It also verifies that this product is on file in the Products By Warehouse and Products By Vendor files for the warehouse and vendor that you enter. If the Products By Vendor record is not on file, the system displays a warning. You can create a Products By Vendor record by selecting Option 17.
The record that you create will have valid product and vendor numbers if the following condition is true:
The option to keep detailed product by vendor information is selected in the Inventory Control Parameters file.
If the option to keep product by vendor detail is not selected, the record you create will have a valid product number and a blank vendor number. The pricing and unit of measure information that you enter on this screen are used as the initial values for the generated Products By Vendor record.
Similarly, if the Products By Warehouse record is not on file, the system displays a warning. You can create a Products By Warehouse record by selecting Option 18.
You should use caution in creating records in this way, as only a skeleton record will be created, and many fields will be filled with default values. One such field is the Qty Factor field, which is set to 1. (See the description of this field in the discussion of the Products By Vendor file in the File Maintenance section of this manual.) You can edit the record later to complete the details.
- Vendor Product
The system displays the vendor’s number for this product from the Products By Vendor file. You can enter a different vendor product number of up to 12 characters to override the display.
- Vendor Prod Desc
The system displays the vendor’s product description from the Products By Vendor file. You can enter a different description of up to 30 characters to override this display.
- Warehouse
The system displays the Warehouse entry from the previous screen and the corresponding description from the Warehouses file. You can enter a different warehouse number to override the display. You can use the Scan option to find an appropriate entry.
The system verifies that the product that you enter for each line item is available at this warehouse (that is, that the product/warehouse combination is on file in the Products By Warehouse file). If not, you can select Option 18 to create a Products By Warehouse record for this combination.
- Purchase Qty Ord
Enter up to 5 digits and 2 decimals for the number of purchasing units on the order. The purchasing unit description displays in the Purchasing UM field on this screen (see below).
- Purchasing UM*
The system displays the description of the purchasing unit for the product from the Products By Vendor file.
- Pricing Factor*
The system displays the pricing factor for the product from the Products By Vendor file. This is the factor used to convert the number of purchasing units (Purch Units Ord) to pricing units.
- Pricing Qty Ord*
The system displays the number of pricing units on the order. This is the number of purchasing units on the order (Purch Units Ord) multiplied by the Pricing Factor.
The pricing unit of measure is displayed in the Pricing UM field on this screen (see below).
- Pricing UM*
The system displays the description of the pricing unit of measure for the product from the Products By Vendor file.
- Current Price
The system displays the unit price of the product from the Products By Vendor file. This is the price per pricing unit of measure quoted by the supplying vendor. You can enter a different current price of up to 6 digits and 5 decimals to override the display.
- Amount
The system displays the extended amount of this line item. The amount is computed according to this formula:
Purch Units Ord x Pricing Factor x Current Price
This formula is equivalent to the following:
Pricing Unit x Current Price
You can enter up to 7 digits and 2 decimals to override the display. If you change the amount, the system recalculates the Current Price.
- Taxable?
This field indicates whether or not sales tax is charged for this product.
- Y
- Sales tax is charged for this product.
- N
- Sales tax is not charged for this product.
This entry is printed on the purchase order.
- Offset Account
The system displays the offset account for the product from the Product Classes file, followed by the description of this account from the Chart of Accounts file. You can enter a different offset account number to override this display; use the Scan option to find an appropriate entry.
- Special Instr
If a special instruction will be printed on the purchase order for this line item, enter the 3-digit code from the Special Instructions file. You can use the Scan option to find an appropriate entry. The system displays the associated description so that you can verify your entry.
- Quantity Received*
The system displays the number of purchasing units that have been received. This information is updated from posted receipts.
- Quantity Invoiced*
The system displays the number of pricing units that have been invoiced. This information is updated from posted invoices.
- Amount Invoiced*
The system displays the amount that has already been invoiced.
The entered data is validated. Press RETURN to display system-supplied information and then press RETURN again to save the information on this screen.
Select the Previous Image option to go back to the Purchase Orders screen. Select the Next Record option to go to the next Line Items screen. Select the END option to go to the next Purchase Orders screen.
At this screen the use of the MODE keys—ADD, DEL, CHG, or INQ—pertain to those records in the Purchase Order Line Items file.