
1Initial Setup File Maintenance
Option 1Parameters
The Parameters file contains a single record that defines how the Inventory Control application functions. This record contains information about the fiscal and calendar year, product costing method, and required monthly reports.
It also indicates whether or not various system options are used. These options include:
- Keeping history information on a calendar or fiscal year basis • Posting to other applications
- Specifying other applications to update product costs and quantities
- Maintaining detail for product purchases and transaction entries.
Select “Parameters” from the File Maintenance menu. Here is the first Parameters entry screen:
Parameters screen, part 1 of 2
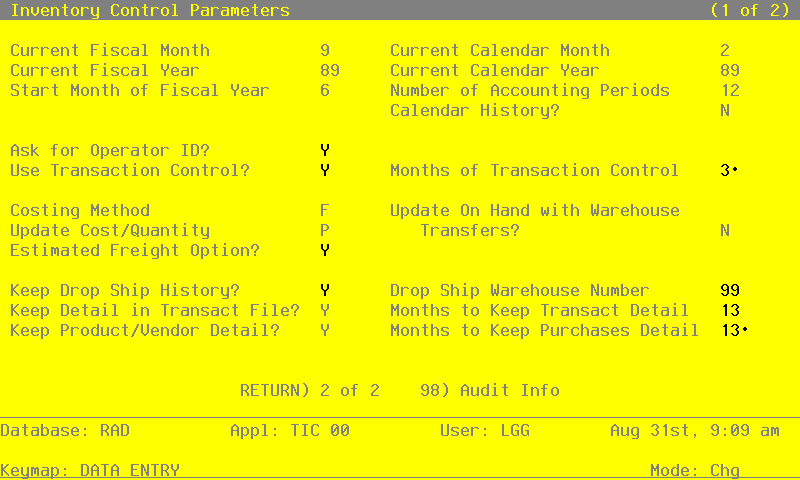
Data items for the preceding screen are described below:
- Current Fiscal Month /Year
Enter the fiscal month and year for the first live month. The fiscal month can be a value between ‘1’ and ‘13’, depending on the entry you make in the Number of Fiscal Months field (see below).
- Current Calendar Month /Year*
The system displays the calendar month and year for the first live month based on the entries you make in the Current Fiscal Month and Year and Start Month of Fiscal Year fields (see below).
- Start Month of Fiscal Year
Enter the calendar month that begins your fiscal year. For example, if your fiscal year begins on July 1, the start month is ‘7’.
- Number of Accounting Periods
Enter ‘12’ or ‘13’ to specify the number of periods in the fiscal year.
- Calendar History?
Enter ‘Y’ or ‘N’ to specify whether or not the history fields in the Product By Warehouse and Product By Vendor files will be kept on a calendar year basis.
- Y
- History fields will be kept on a calendar year basis.
- N
- History fields will be kept on a fiscal year basis.
- Ask for Operator ID?
If this field is set to ‘Y’, the operator ID is requested at the beginning of transaction entry within this application. This permits editing of another operator’s transactions. If this field is set to ‘N’, then the system does not request an operator ID at the beginning of transaction entry. Transactions ‘belong’ to the operator who entered the transactions; therefore it is not possible to edit another operator’s transactions.
- Use Transaction Control?
Y or N Required
The initial default value ‘Y’.
The system assumes you want to use the Transaction Control feature. This includes the ability to track and report on the Transaction Control file, which is an additional audit trail, and to enter control and hash totals for your transactions. If you do not choose to use this feature, enter ‘N’.
If you want to use this feature and also want to ensure that an operator has exclusive control of his or her own transactions, enter ‘Y’ in this field, and change the default value of the ‘Operator Exclusive?’ field on each Control Group record in Transaction Processing to ‘Y’.
- NOTE
- If you enter ‘Y’ to this question, the system assumes that ‘Ask for Operator ID?’ is also ‘Y’.
- Months of Transaction Control
Positive number, up to 2 digits
Enter the number of months of Transaction Control history you wish to keep. Records older than the number of months specified in this field are deleted during Close Month processing.
- Costing Method
Enter one of the following codes to specify the costing method to be used for Inventory Control.
- A
- Average cost
- F
- FIFO (first in first out)
- L
- LIFO (last in first out)
- S
- Standard cost
- T
- Last cost
This entry specifies how Inventory Control interfaces with the Purchase Orders and
Accounts Payable applications. Refer to the Special Considerations section of this manual for more details about this option.
- Update On Hand with Warehouse Transfers?
Enter ‘Y’ or ‘N’ to specify whether or not entering warehouse transfers will update on hand quantities in the Products By Warehouse records for both the sending and the receiving warehouse.
Y: Warehouse transfer entries will update on hand quantities in both the sending and the receiving warehouse. That is, on hand quantities in the Products By Warehouse record for the sending warehouse will be reduced; those for the receiving warehouse will be increased.
N: Warehouse transfer entries will only update on hand quantities in the sending warehouse. That is, on hand quantities in the Products By Warehouse record for the sending warehouse will be reduced. The on order quantity in the receiving warehouse will be increased; an inventory receipt must be entered to record receipt of the transferred goods and move the on order quantity to on hand. In either case, the costing for the transaction will be recognized when the warehouse transfer is posted.
- Update Cost/Quantity
Enter one of the following codes to specify which applications will update product costs and quantities.
- A
- Update costs through invoice postings from Accounts Payable and quantities received through receipt entries in Inventory Control.
- P
- Update costs through invoice postings from Purchase Orders and quantities received through receipt entries from Purchase Orders.
- I
- Update costs through receipt postings in Inventory Control and quantities received through receipt entries in Inventory Control.
- Estimated Freight Option?
Enter ‘Y’ or ‘N’ to specify whether or not the estimated freight option will be used.
- Y
- The estimated freight option will be used. The Update Cost/Quantity field must be set to ‘A’ or ‘P’ if this option is chosen.
- N
- The estimated freight option will not be used.
The estimated freight percentage is entered on the Products record. It defaults to the Products By Warehouse record, where it may be changed. The Estimated Freight accounts must be entered in the Product Classes file.
For more information on this option, refer to the Special Considerations section of this manual.
- Keep Drop Ship History?
Enter ‘Y’ or ‘N’ to specify whether or not historical data will be maintained for “drop shipped” products.
Y: Keep history for drop shipped products. History will be maintained in the Products By Warehouse records that include the drop ship warehouse (see the next field description).
- N
- Do not keep history for drop shipped products.
- Drop Ship Warehouse Number
If drop ship history will be maintained, enter the number of the “dummy” warehouse that will be used to track drop shipped products. A record must be set up in the Products By Warehouse file for each product that will be drop shipped.
This warehouse should be used for drop shipped inventory only.
- Keep Detail in Transact File?
Enter ‘Y’ or ‘N’ to specify whether or not transaction detail from Inventory Control and external applications will be kept in the Inventory Transactions file.
Enter ‘Y’ if you are using the LIFO costing method (‘L’ in the Costing Method field). Refer to the Special Considerations section for information about how LIFO functions in Inventory Control. The file must have been created large enough to hold transaction detail for the number of months specified in the Months To Keep Transact Detail field.
During Live Operations, the Transaction Detail report shows the data in this file.
Y: Transaction detail will be kept in the Inventory Transactions file. When Inventory Control transactions and inventory-related transactions from Accounts Payable, Order Entry, or Purchase Orders are posted, detail from these transactions will also be posted to this file.
- N
- Transaction detail will not be posted to the Inventory Transactions file.
- Months to Keep Transact Detail
Enter up to 2 digits for the number of months for which transaction detail will be kept.
In Live Operations, the Close Month function will delete all transactions older than this number of months from the file.
- Keep Product/Vendor Detail?
Enter ‘Y’ or ‘N’ to specify whether or not vendor purchase detail will be kept by vendor in the Products By Vendor file.
Y: Keep purchase detail by vendor in the Products By Vendor file. A separate Products By Vendor record will be maintained for each product/vendor combination in the file.
N: Do not keep purchase detail by vendor in the Products By Vendor file. A single record will be maintained for each product in the file, and all purchase detail from all vendors will be summarized in that record.
- Months to Keep Purchases Detail
Product Purchases records will be created only if the FIFO or LIFO costing method is used (see the Costing Method field). Enter up to 3 digits for the number of months for which purchase detail records will be kept in the Product Purchases file.
For FIFO, this field indicates how often the Product Purchases file will be cleared. During Live Operations, the appropriate Close Month function will clear all transactions older than the number of months specified here. However, Close Month will not delete records below the on hand quantity in the Products By Warehouse file. That is, the Product Purchases file must include at least one more record than those required to equal the on hand quantity in the Products By Warehouse file. If you are using the LIFO costing method, records will be written to the Product Purchases file. However, because of the nature of the information flow, records must be purged manually. (Refer to the Special Considerations section of this manual for more details on LIFO implementation.) Press RETURN to go on to the next Parameters screen.
Parameters screen, part 2 of 2
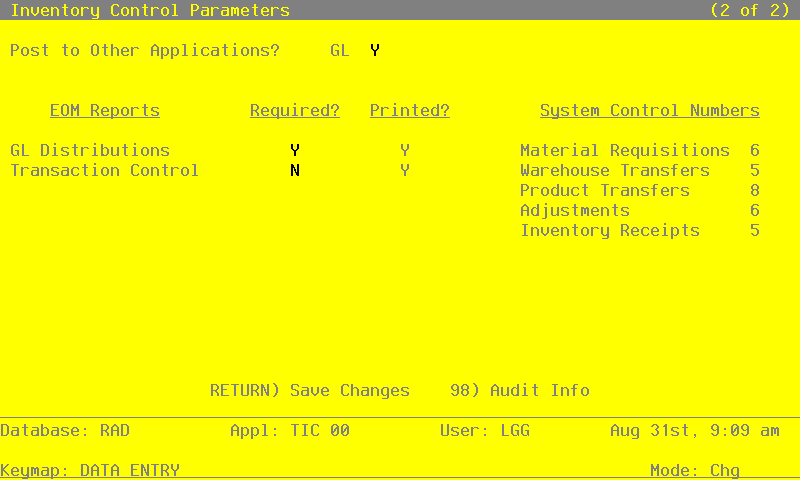
Data items for the preceding screen are described below:
- Post to Other Applications - GL?
Enter ‘Y’ or ‘N’ to tell the system whether or not to allow information to be posted to the General Ledger application.
Enter ‘N’ if General Ledger is not part of the system.
- EOM Reports Required? Printed?
Enter ‘Y’ or ‘N’ for each Monthly Processing report. Use the “Required?” column to indicate whether or not the report must be printed before running the Close Month procedure. The system uses the “Printed?” column to indicate whether the report has been printed during the current period.
- System Control Numbers
The system maintains a running control number for each transaction entry file. This number is defaulted as the next control group number when you enter transactions.
The entered data is validated. Press RETURN to save the information on these screens.