
Chapter 3: Selecting APPX File Availability
Selecting APPX File Availability
Before using APPX/ODBC on your client PC, the APPX® files that you wish to access must be selected and the data definitions must be imported into the Dharma database. You may select a single file from a single APPX® application, all files from all APPX® applications, or any number of files from any number of applications.
The utility used to make APPX® data available to a client PC via APPX/ODBC is asql. It can be run from a DOS prompt or from the Windows® Program Menu.
Follow these steps to make your file selections:
- From the DOS prompt (make sure you are in the APPX/ODBC installation directory—usually C:\Program Files\APPXODBC), run asql to execute the file selection utility.
c:\Program Files\APPXODBC> asql
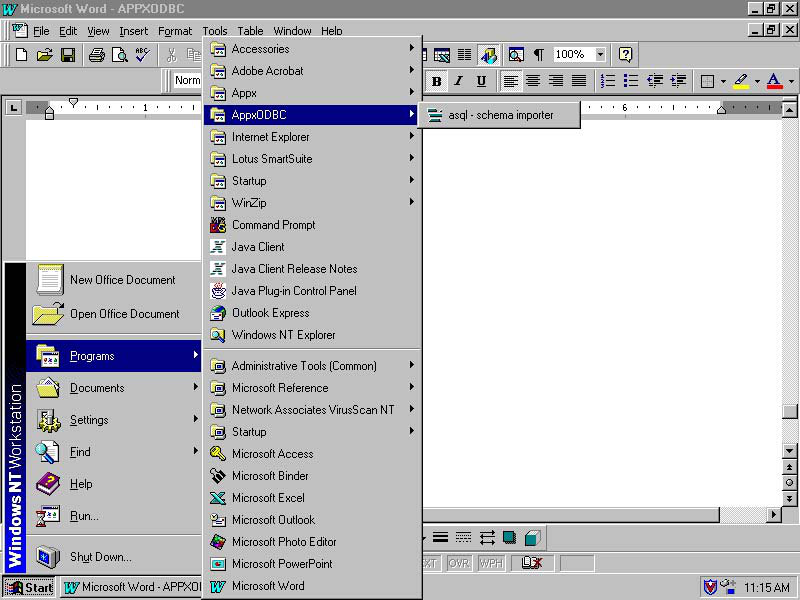
OR, from the taskbar, select Start, Programs, APPXODBC, then asql – schema importer (see Figure 5).
You will be prompted for host and other log information (See Figure 2):

Enter the same values for Username, Password, Host and Port as if you were logging into a normal APPX® session with the GUI client. If you already know what Database and Application you are interested in, you can fill them in at the bottom. This will simplify the next step.
When you click Ok, a connection will be made to the APPX® server, and Data Dictionary information will be downloaded. You will see a display similar to Figure 3:

If you do not see a display like this, then you have a connection problem with the APPX® server. Perhaps you entered an invalid User Id/Password, Host Name, or Port, or perhaps there is a problem at the server end. You can check the server side by logging in with the APPX® GUI client. If that works, then you probably misspelled something on the login dialog box.
Once connected, you will see a display similar to Figure 4.
Note: If the display appears, but no databases or applications are shown, it could be because you accidentally entered a space for either the Database or Application on the login dialog box. In this case, end asql and connect again, making sure you delete any spaces in the Database or Application fields

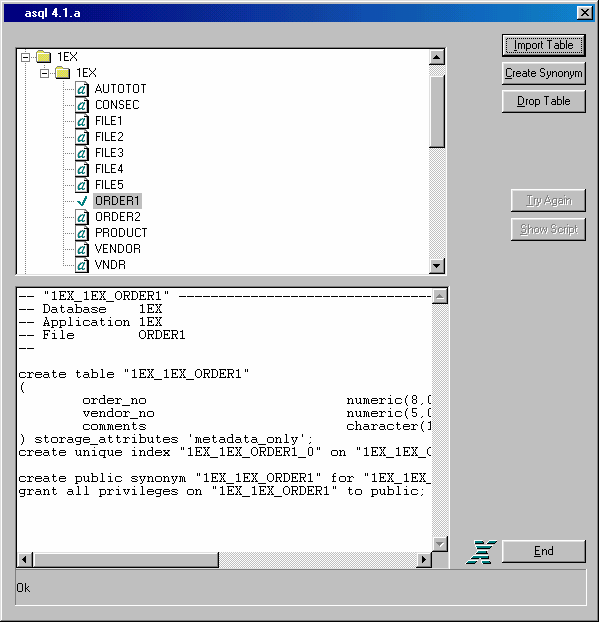
- The asql window shown in Figure 4 contains a list of APPX® databases available on the server or local PC. Scroll the display to the first database containing a file you want to make available to the client PC user. Click on the database name to expand the view to a list of applications within the database. Scroll to your selected application and click on it to further expand the view to a list of files residing in the selected application/database (see Figure 5).
- Click the file name you want to import then click
Import Tableto import the file dictionary into the client PC’s version of APPX/ODBC.
Note: asql strips file name prefixes from APPX® field names. For example, Customer Zip Code becomes zip code. In some instances, stripping this prefix from the name results in a field name that is an ODBC Reserved Keyword. In that case, the prefix is left intact. For example, Customer No cannot be shortened to no because NO is a Reserved Keyword. Field names that are not changed due to conflicts with Reserved Keywords are listed at the top of the script displayed in the bottom half of the asql window.
Warning: Generally speaking, if a data dictionary change is made that requires a restructure in APPX®, the table MUST be imported again using asql. No automatic synchronization of fields and their positioning currently exists between APPX® and APPX/ODBC. Importing the table again automatically drops the existing table format from the APPX/ODBC database and imports the new layout. Therefore, execution of the Drop Table function is not necessary prior to re-importation. The exception is if the change was only a simple change of field length, i.e., increasing the size of an alpha or numeric field.
Note the buttons Create Synonym, Try Again, and Show Script, and the list of Reserved Keywords (sometimes displayed in the lower right side of the window). In most cases, use of these buttons is not necessary and the Reserved Keyword list is not usually displayed. These features can be enabled by setting ‘Export Mode’ or come into play when Import Table is unable to execute successfully (watch the bottom of the window for error messages).
- Create Synonym
Edit the script to create a synonym for a file name to make it more meaningful to users viewing a list of available files. This is done by selecting a file in the upper pane of the window, typing a synonym name in the lower pane, then pressing the
Create Synonymbutton.- Drop Table
Delete the table definition of the selected file from APPX/ODBC. The client application will no longer be able access the selected APPX® file.
- End
Exit asql.
- Try Again
Try the importation process again, after correcting script errors or making script changes. This option is only visible when Expert Mode is enabled, or if an error is encountered when defining a file.
- Show Script
View and/or edit the completed importation script that defined the file. This option is only visible when Expert Mode is enabled, or if an error is encountered when defining a file.
- Reserved Keywords
The list of Reserved Keywords should be referenced to determine if a field name is identical to a keyword reserved for exclusive use by APPX®. This list is only visible when Expert Mode is enabled, or if an error is encountered when defining a file.
Tip: You can import all files for a Database by selecting the Database Folder and then clicking ‘Import Table’, or you can import all files for a selected Database and Application by selecting the Application Folder and then clicking ‘Import Table’.