
Chapter 7: A Typical Output Process
Printing on Screen
APPX's Report Display Facility allows you to view a report on your screen instead of printing a hard copy or before printing a hard copy. The screen shown in Figure 25 is an example of how your screen will look when you send a report to the screen.

On the left-hand side of the first row of the screen, also called the Report Display Facility Status Bar, the page count of the entire report and the current page number are displayed. The report title is also on this row. On the right-hand side is a field that indicates whether or not the report will be sent to the printer.
An arrow on the furthermost right edge of the screen on the Report Display Facility Status Bar indicates that the report is wider than the screen. This arrow is called a Margin Indicator and will also appear in the left corner of the Report Display Facility Status Bar if you have panned so far over to the right of the report that there is additional data to the left that does not fit on the screen.
When you select Help, the Report Display Facility Options screen, shown in Figure 26, appears. All but two of the options listed on this screen are available from both the Report Display Facility and the Report Display Facility Options screen.
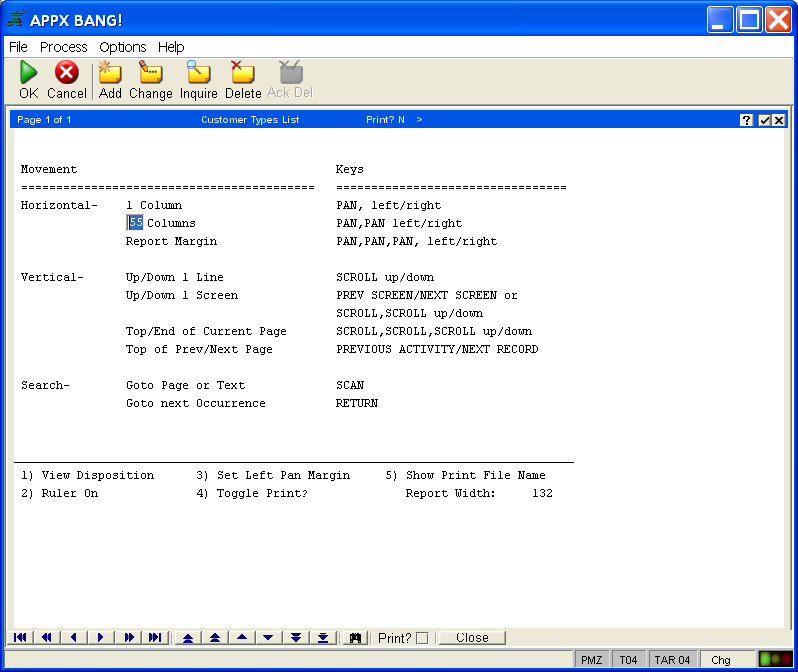
The Report Display Facility Options screen lists the keystrokes that allow you to move horizontally and vertically around your report. You can alternatively use the Pan and Scroll arrow buttons located at the bottom of the screen. Note that one field on this screen, Horizontal Columns, is modifiable and determines how many columns across the PAN command moves your cursor. The default value for this field is half of the screen width, and an entry in this field may not exceed half of the screen width.
Use the Pan and Scroll control buttons to move from left to right and from top to bottom. The first and last pan buttons move you to the right margin or left margin, respectively. The other pan buttons move you left or right in single or double increments of the horizontal column factor. The first and last scroll buttons move you to the top or the end of the report, respectively, while the others move you up or down a single line or single page.
This screen also lists these options which are available within the Report Display Facility:
- View Disposition allows you to see the disposition screen for the report, but does not allow you to modify anything. See the Disposition Section for more information about the specifications on the Disposition screen. Select ENTER
 to return to the report screen. View Disposition can be invoked either by clicking on the button on this screen or by pressing OPTION 1 from the report screen.
 - Ruler On activates a ruler at the bottom of your screen so that you will always know which columns you are viewing as you pan across your report. This option turns the ruler off as well. Ruler On can be invoked either by clicking on the button on this screen or by pressing OPTION 2 from the report screen.
- Set Left Pan Margin places a left margin wherever your cursor is at the time. Data that is to the left of this margin locks into place while you pan across the screen. Selecting this option also activates the Ruler On option. NOTE: This option can only be invoked by pressing OPTION 3 from the report screen. Clicking the button on this screen has no effect. OPTION 3 turns this feature off as well.
- Toggle Print? turns the Print? field in the top right corner of the screen on and off. For example, if the Print? field was originally set to N, this option will change it to Y and vice versa. Toggle Print can be invoked either by clicking on the button on this screen or by pressing OPTION 4 from the report screen.
- Show Print File Name displays the path information and file name on the bottom of the screen. NOTE: This option can only be invoked from the Report Display Facility Options screen, either by clicking on the button above or by pressing OPTION 5.
- Print? indicates whether the report is printed or not upon exiting.
- Close closes the Report Display Facility window.
When you have finished viewing your report, select Close from the lower title bar to exit the Report Display Facility and return to your previous screen.