
Chapter 2: Initial Setup File Maintenance
Option 3Vendors
The Vendors file contains a record for each vendor. Each Vendors record includes general information such as the vendor’s name and address, the terms to use from the Terms file, and the credit limit with that vendor.
Vendors are also assigned attributes that affect the method and impact of the payment. For instance, you can place a “hold” status on a particular vendor to prevent check generation in the Accounts Payable application. You also assign vendors to a specific liability account so that the system automatically posts payments to this account.
Vendors - Part 1 of 2 screen
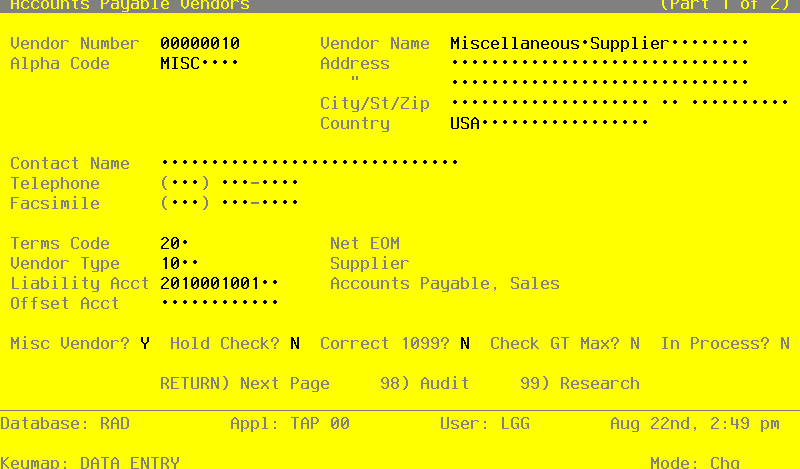
When the key value for a particular record is requested, you can review all the records in the file by selecting the Scan option. The records will be presented on an “Access” screen, and you will be allowed to scan the available data until you find the record you want. Then, position the cursor by that record and press RETURN; the record will be displayed for editing.
Data items for the preceding screen are described below:
- Vendor Number
Enter a unique code of up to 8 characters to identify the vendor. This is the number that will be used to recall or reference this vendor elsewhere in the system.
- Vendor Name
Required
Enter up to 30 characters for the vendor name.
If this is a miscellaneous vendor, you may want to enter ‘Miscellaneous Vendor’ for the name. During invoice entry in Live Operations, you can change this entry to a specific vendor name.
- Alpha Code
Required
Enter a unique code of up to 8 characters for this vendor. You may want to use a portion of the vendor name as the code.
The code that you enter allows you to locate the vendor if you do not know the vendor number. Also, the system will use this code to sort data for reports.
- Address (Line 1)
Enter up to 30 characters for the first line of the vendor address.
When entering a purchase order for this vendor in Live Operations, if you do not enter a code from the Alternate Addresses file, then the address that you enter here appears in the Ship From and Send To fields. The default address is only printed in the Ship To field on the purchase order.
- Address (Line 2)
Enter up to 30 characters for the second line of the vendor address.
- City
Enter up to 20 characters for the city in the vendor address. Be sure to enter a comma (,) as the last character if one should be printed between the city and state on the vendor’s check during Accounts Payable Check Processing.
- State
Enter the standard 2-letter state abbreviation, if applicable.
- Zip Code
Enter up to 10 characters for the zip code in the vendor address, if applicable.
- Country
Enter up to 20 characters for the vendor’s country.
- Contact Name
Enter up to 20 characters for the name of the contact person for this vendor.
- Telephone
Enter up to 14 characters for the vendor’s phone number, including area code. You can use any notation or format (for example, ‘(###) ###-####’ or ‘###-###-####’).
- Facsimile
Furnish the Vendor’s FAX number.
- Terms Code
Enter the code from the Terms file that identifies the payment terms for this vendor. You can use the Scan option to find an appropriate entry. The system displays the description of the payment terms so that you can verify your entry.
- Vendor Type
The vendor type is another method that can be used to categorize vendors. Many reports can be sorted and selected using vendor type. You can use the Scan option to find an appropriate entry; the system displays the corresponding description.
- Liability Account
Required
Enter a liability account number from the General Ledger Chart of Accounts file. You can use the Scan option to find an appropriate entry. The system displays the corresponding description so that you can verify your entry.
- Offset Account
Provide an offset account to use as a default on invoices entry for the vendor. You may change the default during transaction entry. You can use the Scan option to find an appropriate entry. The system displays the corresponding description so that you can verify your entry. For example, if you always purchase office supplies from this particular vendor, enter the expense account for offices supplies. If no offset account is specified, no default will occur during transaction entry.
- Misc Vendor?
Enter ‘Y’ or ‘N’ to indicate whether or not this vendor is a miscellaneous vendor. Miscellaneous vendor records are normally used for one-time vendors.
During invoice entry, you enter a name and address to differentiate between miscellaneous vendors, rather than allowing the system to use a fixed name and address from the Vendors file.
You can set up more than one miscellaneous vendor.
- Hold Checks?
Enter ‘Y’ or ‘N’ to indicate whether or not the system will prevent this vendor’s checks from being created during Accounts Payable Check Processing.
Y: Do not create checks for this vendor, regardless of pay status. If a Cash Requirements Report is printed in Accounts Payable, all invoices for this vendor will have a “hold” status.
- N
- Process this vendor’s checks as usual.
- Tax Number
Enter the social security number or other tax identification number for the recipient of income reported on the 1099 form. Use this field only if you plan to generate a 1099 form for this vendor. If you make an entry in this field, the system automatically reports income for the vendor on a 1099 form.
- Payment Status
Enter one of the following codes to define the way in which the vendor is paid:
Code Description
N Normal: use the payment terms defined in the Terms file.
T Take the discount regardless of the payment terms.
H Hold: place a hold on the check until it is released during Accounts Payable Check Processing (Edit Pay Status).
D Disputed: Keep the payment on hold until the problem is resolved. This status is similar to “hold” status.
- Bank Account No
For vendors expected to receive a 1099 form, an account number identifying the vendor is required. When creating 1099 forms on magnetic media, it is useful to be able to distinguish various accounts in this way.
This entry may be a checking or savings account number, or any other unique combination of characters. Using a vendor’s Social Security Number is NOT recommended.
- In Process?
The system displays either ‘Y’ or ‘N’ to indicate whether checks have been created for this vendor, but are not yet posted. This field is used in the Cash Requirements Report to prevent the creation of multiple checks for the same invoice.
- Correct 1099?
The system defaults ‘N’, which assumes that the creation of 1099 forms has or will run smoothly. If it is necessary to create a correction tape for some vendors, enter ‘Y’ and modify the sort range to create a tape containing only corrections.
- Check GT Max
The system displays either ‘Y’ or ‘N’ to indicate whether a check to be created will exceed the user specified ‘maximum check amount.’ This field is used in the Cash Requirements Report to indicate this condition for all checks to be created.
The entered data is validated. Press RETURN to continue. Select Next Record to go to the next Vendors record.
At this screen the use of the MODE keys—ADD, DEL, CHG, or INQ—pertain to those records in the Vendors file.
The screen below presents additional information about Vendors.
Vendors - Part 2 of 2 screen
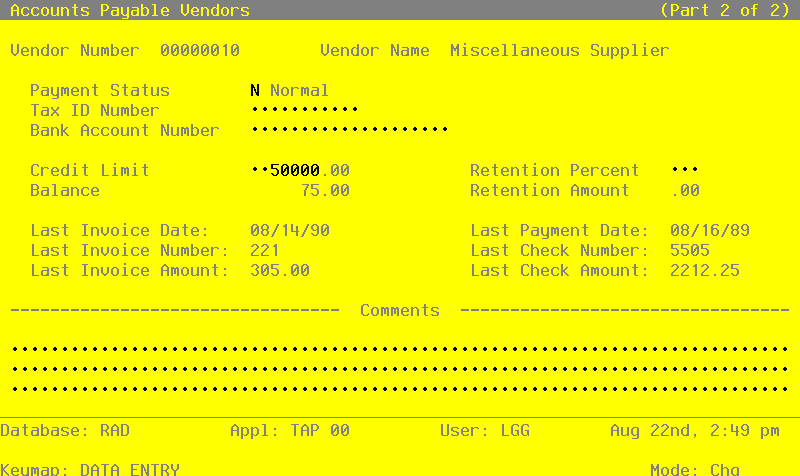
Data items for the preceding screen are described below:
- Vendor Nmuber
The vendor number and name are displayed from the previous screen, and are not editable.
- Credit Limit
Supply the amount of your credit limit with this particular vendor. If you leave a blank or zero (0) entry in this field, the system assumes a limit of zero, not an unlimited line of credit. An unlimited amount of credit is represented by 9999999999. However, the Credit Limit field does not preclude entry of purchases over the limit. For informational purposes only, the Vendor Credit Limit appears on the Accounts Payable Vendor Activity Inquiry and the Vendor Credit Report.
- Retention Percent
Enter a nondecimal number of up to 3 digits as a percentage for computing the retention amount. For example, to retain 10% on invoices from this vendor, enter ‘10’.
- Balance
During Initial Setup, enter the outstanding balance owed to the vendor. In Live Operations, this balance is maintained by the system based on the invoices, payments, and adjustments posted to the Vendor’s account. For informational purposes only, the Vendor Balance appears on the Accounts Payable Vendor Activity Inquiry and the Vendor Credit Report.
- Retention Amount
Provide the retention balance owed to this vendor. During Live Operations, this field is system maintained and display only.
- Last Invoice Date
Enter the date of the most recent invoice processed for this vendor.
- Last Payment Date
Enter the check date of the last payment made to this vendor.
- Last Invoice Number
Enter the number of the last invoice processed for this vendor.
- Last Check Number
Enter the check number of the last check processed for this vendor.
- Last Invoice Amount
Enter the amount of the last invoice posted for this vendor.
- Last Check Amount
Enter the amount of the last check processed for this vendor.
- Comments
Enter a text field, up to 237 characters in length. Use this field to store a comment or any other pertinent information relating to this vendor. This text is displayed on several inquiries and reports.
Press RETURN to save the information on these screens. Press Next Record to go to the next Vendors record.
At this screen, the use of the MODE keys—ADD, DEL, CHG, or INQ—pertain to those records in the Vendors file.