
3File Maintenance
Option 3Variable Budgets
This function allows you to enter or edit Variable Budget records. Variable Budget records contain definitions of how budget amounts are to be determined. The budget amounts will vary according to the definitions in this file.
Variable budget capabilities allow you to determine budget amounts based on a relationship of accounts and/or amounts rather than just fixed amounts. For example, you may want to establish a sales projection for the next three months based on a percentage of the actual sales for the last 3 months. Or you might want to establish the expense budget for “Division 10” as a ratio of (last year sales for Division 10 / last year sales for all divisions) * (total expense budget). These variable budget relationships are all user-defined. The actual budget records are created according to this variable budget definition only when the “Generate Variable Budgets” function is selected.
Initially, you can select whether to enter (ADD), update (CHG), delete (DEL) or review (INQ).
When you use this function, a record of all entries will be printed. For additions, all new field contents are printed; for deletions, the deleted record’s contents are shown; for changes, both old field contents and new field contents are shown; and in all cases, the User ID, date, and time are printed.
The screen shown below presents information about Variable Budgets.
This file stores general information about variable budget definitions.
Variable Budgets screen
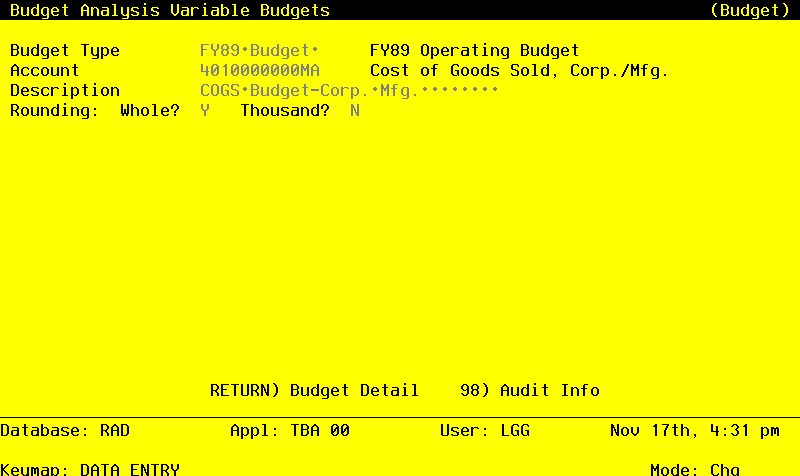
When the key value for a particular record is requested, you can review all the records in the file by selecting the Scan option. The records will be presented on an “Access” screen, and you will be allowed to scan the available data until you find the record you want. Then, position the cursor by that record and press ENTER; the record will be displayed for editing.
Note that the Audit Info option is available at the bottom of this screen. When this option is invoked, the Audit Information overlay appears and displays the date the record was created and who created it, as well as the date the record was last modified and who modified it. Press the END key or the RETURN key to clear the overlay from your screen. The information displayed in the Audit Information overlay is system-supplied and non-modifiable.
Data items for the preceding screen are described below:
- Budget Type
Alphanumeric, up to 12 characters Required Scan available
Supply a code from the Types file that identifies the type of budget you are generating.
- Account
Alphanumeric, up to 12 characters Required Scan available
Identify the general ledger account number to which the budget applies. It must be on file in the Chart of Accounts.
- Description
Alphanumeric, up to 30 characters
Describe the variable budget record. This description will be displayed on the Variable Budgets List.
- Rounding to Whole?
Y or N Default N Required
If you want the budget amounts that are created for this Budget Type / Account record to be rounded to the nearest whole dollar, enter ‘Y’. For example, if the variable budget amount was determined to be $1091.65, and you entered ‘Y’, then the amount would be rounded to $1092.
- Rounding to Thousand?
Y or N Default N Required
If you want the budget amounts that are created for this Budget Type / Account record to be rounded to the nearest thousand dollar, enter ‘Y’. For example, if the variable budget amount was determined to be $1091.65, and you entered ‘Y’, then the amount would be rounded to $1000.
The entered data is validated. During validation, including access to other files, conditions may be found which cause messages to be displayed. Errors (E), Warnings (W), and Messages (M) that may result are shown below:
Press ENTER to display system-supplied information and then press ENTER again to continue to the next screen.
Select the Next Record option to go to the next Variable Budgets record.
At this screen, the use of the MODE keys - ADD, DEL, CHG, or INQ - pertain to those records in the Variable Budgets file.
The screen shown below presents information about Variable Budget Detail.
This file defines the detailed composition of variable budgets. There may be one or more detail records for every variable budget. The amount determined by these definitions will be summed into the actual budget amount.
Variable Budget Detail screen

When the key value for a particular record is requested, you can review all the records in the file by selecting the Scan option. The records will be presented on an “Access” screen, and you will be allowed to scan the available data until you find the record you want. Then, position the cursor by that record and press ENTER; the record will be displayed for editing.
Data items for the preceding screen are described below:
- Sequence No
Positive number, up to 5 digits
The system supplies a sequential number to make the current variable budget unique.
- Method
Upper case, 1 character Numbers only Valid: 1, 2, 3 Default 1 Required
Indicate the method for determining the variable budget amount. The options and their meanings are:
1: Fixed percent of the amount accumulated by the range of account balances, budgets, or unit balances defined. The computation performed is “Amount = (Fixed Percent/100) * Basis Amount”.
- 2
- Fixed amount
3: Ratio, where the numerator of the ratio is the amount accumulated within the account range defined for the numerator, and the denominator of the ratio is the amount accumulated within the account range defined for the denominator. The computed ratio is multiplied by the amount accumulated within the account range defined for the ‘Basis’. The computation performed is “Amount = (Numerator / Denominator) * Basis Amount”.
- Fixed Percent
Positive number, up to 3 digits and 2 decimals
If the method selected was ‘1’ for Fixed Percent, supply the percent of the amount accumulated in the defined account range (Basis Amount) that is to be added to the variable budget account. The calculation performed is “Variable Budget Amount = Sum of Previous Sequence Numbers + (Fixed Percent/100) * Basis Amount”.
- NOTE
- The “Basis Amount” will defined on the next screen.
Example: Suppose you want to establish a budget for Region 3’s sales expenses as 15% of the last year’s revenues for Region 3. In this example, the Basis account range would be the account or account range that made up Region 3’s sales revenues, and the Fixed Percentage would be 15.0 (i.e., Budget Amount = (15.0 / 100) * Sales revenues.)
- Fixed Amount
Positive number, up to 9 digits and 2 decimals
If the method selected was ‘2’ for Fixed Amount, supply the fixed amount that is to be added to the previously entered variable budget account. The calculation performed is “Variable Budget Amount = Sum of Previous Sequence Numbers’ Amounts + Fixed Amount”.
Example: Suppose you want to establish a budget for Region 3’s sales expenses as $50000 + 15% of the last year’s revenues for Region 3. In this example, the fixed amount would be entered as ‘50000’. The 15% would be entered as a separate sequence number, for a Fixed Percent entry (Method = ‘1’). Then, Budget Amount = 50000 + (15.0 /100) * Sales revenues.
- NOTE
- This example requires two separate Variable Budget Detail entries (sequence numbers).
- Factor
Number, up to 5 digits and 3 decimals
If necessary, enter a multiplier (a number that will be multiplied by the amount as defined in the result of the fixed percentage, fixed amount, or ratio amount). For example, if you want to define an expense budget as the sum of all revenues, you may want to define a factor ‘-1.0’ (your revenues are normally represented by a negative number and your expenses are normally represented by a positive number). A sum of revenues might be -1000000.00. To make this a positive number, enter a factor of ‘-1’. The final result would then be a Variable expense budget of 50000.00.
The entered data is validated. During validation, including access to other files, conditions may be found which cause messages to be displayed. Errors (E), Warnings (W), and Messages (M) that may result are shown below:
Press ENTER to display system-supplied information and then press ENTER again to continue to the next screen.
Select the Previous Image option to go back to the Variable Budgets screen. Select the Next Record option to go to the next Variable Budget Detail record. Select the End option to go the next Variable Budgets record.
At this screen, the use of the MODE keys - ADD, DEL, CHG, or INQ - pertain to those records in the Variable Budget Detail file.
The screen below presents additional information about Variable Budget Detail. It is used if either the ‘Fixed Percent’ or ‘Ratio’ method was selected.
Variable Budget Percent/Ratio screen
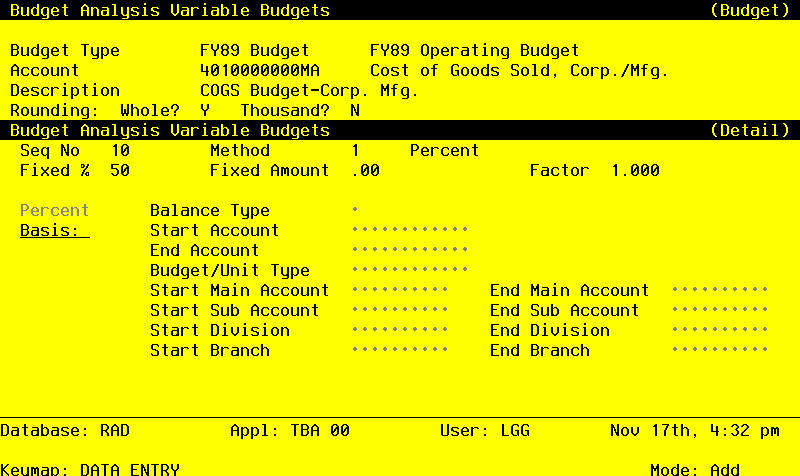
When the key value for a particular record is requested, you can review all the records in the file by selecting the Scan option. The records will be presented on an “Access” screen, and you will be allowed to scan the available data until you find the record you want. Then, position the cursor by that record and press ENTER; the record will be displayed for editing.
Data items for the preceding screen are described below:
- Balance Type
Upper case, 1 character Letters only Valid: B, D, U Default B Required
Supply the type of balance to use in determining the ratio Basis Amount that will be multiplied by the fixed percent that was previously entered, or by the calculated ratio. The account range that you enter for the fixed percent or ratio Basis will be used to accumulate this amount, and the values will be taken from the file corresponding to this type. The options are their meanings are:
- B
- Account Balances
- D
- Budget Amounts
- U
- Unit Balances
- Start/End Account
Upper case, up to 12 characters Required Scan available
Define the starting and ending account of the range that contains the value to which fixed percent or computed ratio will apply. For example, suppose you want to establish a variable budget for salesperson #1’s expenses, based on the ratio of (salesperson #1’s revenue) / (revenue for all salespersons); and you want to apply it to the budget for all salespersons’ expenses. In this case the ‘Basis’ would be the budget for all salespersons’ expenses. To set up this example, you would enter the starting account in the range of salesperson expense accounts in this field, and enter the ending account of salesperson expense accounts in the End Account field. And when the computation is complete, you will have “Expense Budget for Salesperson #1 = Expense Budget for all * (revenue for #1 / revenue for all)”. Since the basis for the ratio is the ‘Expense Budget for all’, the account range you should enter is the account(s) for the ‘Expense Budget for all’. In this example, you are allocating expenses to salespeople based on the percentage of revenue they generated.
- Budget/Unit Type
Alphanumeric, up to 12 characters Scan available
If you have selected a ‘Balance Type’ of ‘D’ for Budgets or ‘U’ for Unit Balances, then you must also enter a Budget or Unit Type. This entry must be on file in the Types file.
- Start/End Main Account
Upper case, up to 10 characters
A start and end range on the first component of the account structure can be entered to further refine the range selection of the records to be used in the calculation of the percent or ratio Basis. For example, if you want to include in the percent or ratio Basis only the accounts whose first account component is in the range of 10100 to 12000, then enter ‘10100’ and ‘12000’ as the Start and End range respectively. These fields may be left blank.
- Start/End Sub Account
Upper case, up to 10 characters
A start and end range on the second component of the account structure can be entered to further refine the range selection of the records to be used in the calculation of the percent or ratio Basis. For example, if you want to include in the percent or ratio Basis only the accounts whose second account component is in the range of 100 to 300, then enter ‘100’ and ‘300’ as the Start and End range respectively. These fields may be left blank.
- Start/End Division
Upper case, up to 10 characters
A start and end range on the third component of the account structure can be entered to further refine the range selection of the records to be used in the calculation of the percent or ratio Basis. For example, if you want to include in the percent or ratio Basis only the accounts whose third account component is in the range of 10 to 15, then enter ‘10’ and ‘15’ as the Start and End range respectively. These fields may be left blank.
- Start/End Branch
Upper case, up to 10 characters
A start and end range on the fourth component of the account structure can be entered to further refine the range selection of the records to be used in the calculation of the percent or ratio Basis. For example, if you want to include in the percent or ratio Basis only the accounts whose fourth account component is in the range of 50 to 60, then enter ‘50’ and ‘60’ as the Start and End range respectively. These fields may be left blank.
The entered data is validated. During validation, including access to other files, conditions may be found which cause messages to be displayed. Errors (E), Warnings (W), and Messages (M) that may result are shown below:
Press ENTER to display system-supplied information and then press ENTER again to continue to the next screen.
Select the Previous Image option to go back to the Variable Budgets screen. Select the Next Record option to go to the next Variable Budget Detail record. Select the End option to go the next Variable Budgets record.
At this screen, the use of the MODE keys - ADD, DEL, CHG, or INQ - pertain to those records in the Variable Budget Detail file.
The screen below presents additional information about Variable Budget Detail. It is used if the ‘Ratio’ method was selected.
Variable Ratio - Numerator screen
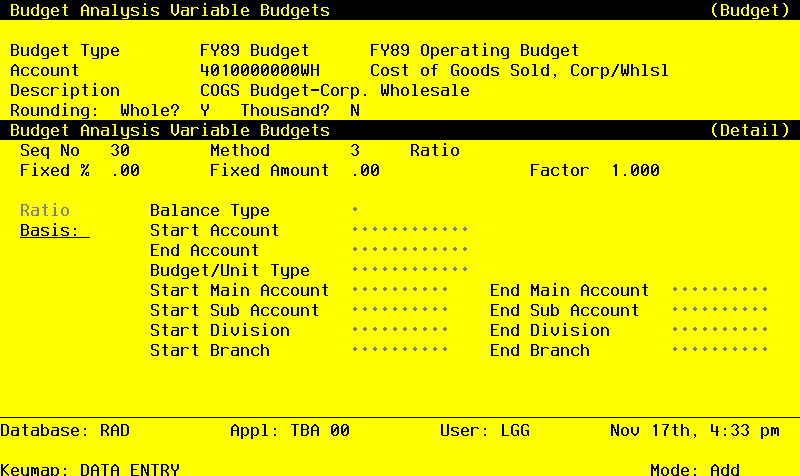
When the key value for a particular record is requested, you can review all the records in the file by selecting the Scan option. The records will be presented on an “Access” screen, and you will be allowed to scan the available data until you find the record you want. Then, position the cursor by that record and press ENTER; the record will be displayed for editing.
Data items for the preceding screen are described below:
- Balance Type
Upper case, 1 character Letters only Valid: B, D, U Required
Supply the type of balance to use in determining the numerator amount to be used in calculating the ratio. The account range that you enter for the numerator will be used to accumulate this amount, and the values will be taken from the file corresponding to this type. The options and their meanings are:
- B
- Account Balances
- D
- Budget Amounts
- U
- Unit Balances
- Start/End Account
Upper case, up to 12 characters Required Scan available
Define the starting and ending account of the range of accounts that contains the values to be used in the calculation of the numerator portion of the ratio. For example, suppose you want to establish a variable budget for salesperson #1’s expenses, based on the ratio of (salesperson #1’s revenue) / (revenue for all salespersons); and you want to apply it to the budget for all salespersons’ expenses. To set up this example, you would enter the starting account in the range of revenue account(s) for salesperson #1 in this field, and the ending account in the range of revenue account(s) for salesperson #1 in the Numerator End Account field. They may be the same account. And when the computation is complete, you will have “Expense Budget for #1 = Expense Budget for all * (revenue for #1 / revenue for all)”. Since the numerator for the ratio is 'revenue for #1', the account range you should enter is the account(s) for the ‘Revenue for #1’. In this example, you are allocating expenses to salespeople based on the percentage of revenue they generated.
- Budget/Unit Type
Alphanumeric, up to 12 characters Scan available
If you have selected a ‘Balance Type’ of ‘D’ for Budgets or ‘U’ for Unit Balances, then you must also enter a Budget or Unit Type. This entry must be on file in the Types file.
- Start/End Main Account
Upper case, up to 10 characters
A start and end range on the first component of the account structure can be entered to further refine the range selection of the records to be used in the calculation of the ratio numerator. For example, if you want to include in the ratio numerator only those accounts whose first account component is in the range of 10100 to 12000, then enter ‘10100’ and ‘12000’ as the Start and End range respectively. These fields may be left blank.
- Start/End Sub Account
Upper case, up to 10 characters
A start and end range on the second component of the account structure can be entered to further refine the range selection of the records to be used in the calculation of the ratio numerator. For example, if you want to include in the ratio numerator only those accounts whose second account component is in the range of 100 to 300, then enter ‘100’ and ‘300’ as the Start and End range respectively. These fields may be left blank.
- Start/End Division
Upper case, up to 10 characters
A start and end range on the third component of the account structure can be entered to further refine the range selection of the records to be used in the calculation of the ratio numerator. For example, if you want to include in the ratio numerator only those accounts whose third account component is in the range of 10 to 20, then enter ‘10’ and ‘20’ as the Start and End range respectively. These fields may be left blank.
- Start/End Branch
Upper case, up to 10 characters
A start and end range on the fourth component of the account structure can be entered to further refine the range selection of the records to be used in the calculation of the ratio numerator. For example, if you want to include in the ratio numerator only those accounts whose fourth account component is in the range of 50 to 51, then enter ‘50’ and ‘51’ as the Start and End range respectively. These fields may be left blank.
The entered data is validated. During validation, including access to other files, conditions may be found which cause messages to be displayed. Errors (E), Warnings (W), and Messages (M) that may result are shown below:
Press ENTER to display system-supplied information and then press ENTER again to continue to the next screen.
Select the Previous Image option to go back to the Variable Budgets screen. Select the Next Record option to go to the next Variable Budget Detail record. Select the End option to go the next Variable Budgets record.
At this screen, the use of the MODE keys - ADD, DEL, CHG, or INQ - pertain to those records in the Variable Budget Detail file.
The screen below presents additional information about Variable Budget Detail. It is used if the ‘Ratio’ method was selected.
Variable Ratio - Denominator screen
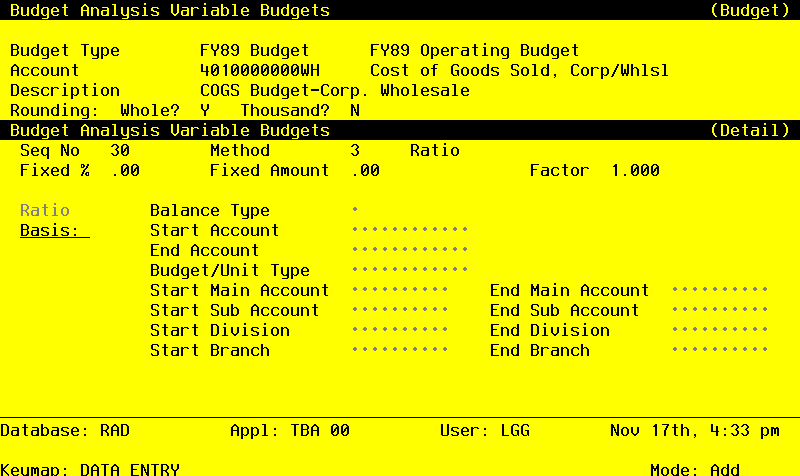
When the key value for a particular record is requested, you can review all the records in the file by selecting the Scan option. The records will be presented on an “Access” screen, and you will be allowed to scan the available data until you find the record you want. Then, position the cursor by that record and press ENTER; the record will be displayed for editing.
Data items for the preceding screen are described below:
- Balance Type
Upper case, 1 character Letters only Valid: B, D, U Required
Supply the type of balance to use in determining the ratio denominator amount to be used in calculating the ratio. The account range that you enter for the denominator will be used to accumulate this amount, and the values will be taken from the file corresponding to this type. The options and their meanings are;
- B
- Account Balances
- D
- Budget Amounts
- U
- Unit Budgets
- Start/End Account
Upper case, up to 12 characters Required Scan available
Define the starting and ending account of the range of accounts that contains the values to be used in the calculation of the denominator portion of the ratio. For example, let’s say you want to establish a variable budget for salesperson #1’s expenses, based on the ratio: (salesperson #1’s revenue) / (revenue for all salespersons); and you want to apply it to the budget for all salespersons’ expenses. To set up this example, you would enter the starting account in the range of revenue accounts for all salespersons in this field, and the ending account in the range of revenue accounts for salespersons in the Denominator End Account field. And when the computation is complete, you will have: Expense Budget for #1 = Expense Budget for all * (revenue for #1 / revenue for all). Since the denominator for the ratio is ‘revenue for all salespersons’, the account range you should enter is the accounts for the ‘Revenue for All Salespersons’. In this example, you are allocating expenses to salespeople based on the percentage of revenue they generated.
- Budget/Unit Type
Alphanumeric, up to 12 characters Scan available
If you have selected a ‘Balance Type’ of ‘D’ for Budgets or ‘U’ for Unit Balances, then you must also enter a Budget or Unit Type. This entry must be on file in the Types file.
- Start /End Main Account
Upper case, up to 10 characters
A start and end range on the first component of the account structure can be entered to further refine the range selection of the records to be used in the calculation of the ratio denominator. For example, if you want to include in the ratio denominator only those accounts whose first account component is in the range of 10100 to 12000, then enter ‘10100’ and ‘12000’ as the Start and End range respectively. These fields may be left blank.
- Start/End Sub Account
Upper case, up to 10 characters
A start and end range on the second component of the account structure can be entered to further refine the range selection of the records to be used in the calculation of the ratio denominator. For example, if you want to include in the ratio denominator only those accounts whose second account component is in the range of 100 to 300, then enter ‘100’ and ‘300’ as the Start and End range respectively. These fields may be left blank.
- Start/End Division
Upper case, up to 10 characters
A start and end range on the third component of the account structure can be entered to further refine the range selection of the records to be used in the calculation of the ratio denominator. For example, if you want to include in the ratio denominator only those accounts whose third account component is in the range of 10 to 20, then enter ‘10’ and ‘20’ as the Start and End range respectively. These fields may be left blank.
- Start /End Branch
Upper case, up to 10 characters
A start and end range on the fourth component of the account structure can be entered to further refine the range selection of the records to be used in the calculation of the ratio denominator. For example, if you want to include in the ratio denominator only those accounts whose fourth account component is in the range of 50 to 51, then enter ‘50’ and ‘51’ as the Start and End range respectively. These fields may be left blank.
The entered data is validated. During validation, including access to other files, conditions may be found which cause messages to be displayed. Errors (E), Warnings (W), and Messages (M) that may result are shown below:
Press ENTER to display system-supplied information and then press ENTER again to save the information on this screen.
Select the Previous Image option to go back to the Variable Budgets screen. Select the Next Record option to go to the next Variable Budget Detail record. Select the End option to go the next Variable Budget Detail record.
At this screen, the use of the MODE keys - ADD, DEL, CHG, or INQ - pertain to those records in the Variable Budget Detail file.