
Chapter 2: Initial Setup File Maintenance
Option 5Addresses
As an alternative to using the address on the Customers record in Accounts Receivable, the Addresses file allows you to set up and maintain one or more shipping address records for each customer.
If an Addresses record is not set up for a customer, the system defaults the address on the Customers record during Sales Orders entry.
If an Addresses record is set up for a customer, the system assumes that a record established with a “ship to” of ‘1’ references the most frequently-used shipping address for the customer. If such a record is set up for the customer, the system defaults information from that record during Sales Orders entry. It may be changed at that time.
The Addresses entry screen is shown below.
Addresses screen
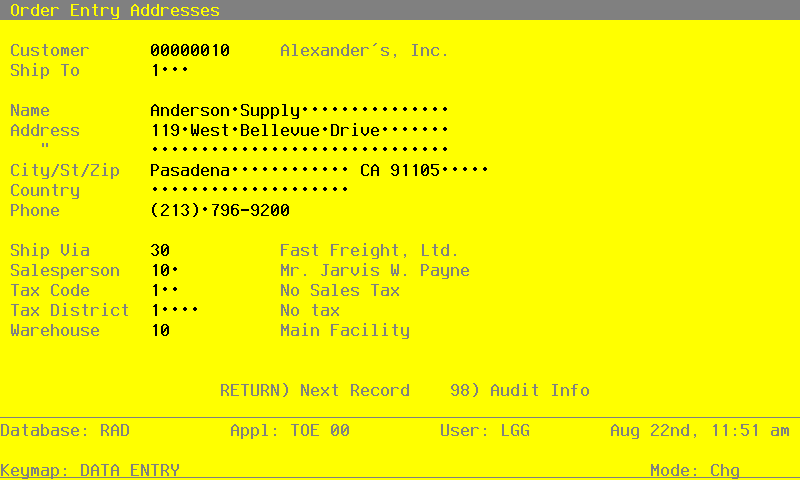
When the key value for a particular record is requested, you can review all the records in the file by selecting the Scan option. The records will be presented on an “Access” screen, and you will be allowed to scan the available data until you find the record you want. Then, position the cursor by that record and press RETURN; the record will be displayed for editing.
Data items for the preceding screen are described below:
- Customer
Enter a valid customer number from the Accounts Receivable Customers file. You can use the Scan option to find an appropriate entry. The system displays the customer name so that you can verify your entry.
- Ship To
Enter a code to identify the shipping address for this customer. During Sales Orders entry, the Addresses record with a “ship to” of ‘1’, if one is established, is defaulted. If you wish to use such a default, establish the most frequently used shipping address for this customer as ‘1’.
- Name
Enter up to 30 characters to identify the name of the person or company receiving ordered merchandise at this shipping address.
- Address (Line 1)
Enter up to 30 characters to indicate the address where ordered merchandise is to be shipped.
- Address (Line 2)
If necessary, enter up to an additional 30 characters to complete the shipping address.
- City
Enter up to 20 characters for the city in the shipping address. Be sure to enter a comma (,) after the city if you want a comma to be printed between the city and state on the customer’s sales order forms, backorder forms, invoices forms, shipping papers, and bills of lading.
- State
Enter the standard 2-letter state abbreviation.
- Zip Code
Enter up to 10 characters for the zip code.
- Country
Enter up to 20 characters to identify the country.
- Phone
Enter up to 14 characters for the addressee’s phone number, including area code. You can use any notation or format (for example, ‘(###) ###-####’ or ‘###-###-####’).
- Ship Via
Enter a code from the Shippers file to identify the shipper who is to ship ordered merchandise to this customer/ship to. You can use the Scan option to find an appropriate entry. This field serves as the default during Sales Orders entry. It is optional. If entered, it must be on file in the Shippers file. The system displays the description so that you may verify your entry.
- Salesperson
This field identifies the salesperson to be credited with sales to this customer/ship to. The system displays the Salesperson set up on the Customers record. You may override the display. The entry you make here is defaulted to the first Salesperson field during Sales Orders entry. You can use the Scan option to find an appropriate entry.
If you change this number and Commission Accounting is part of your system, the new number must be on file in the Salespersons file. The system displays the corresponding name so that you may verify your entry.
- Tax Code
The Tax Code identifies the sales tax code that applies to sales for this customer/ship to. The system displays the Tax Code set up on the Customers record. You may override the display. The entry you make serves as the default for this customer/ship to during Sales Orders entry. You can use the Scan option to find an appropriate entry.
If you change this number, the new number must be on file in the Accounts Receivable Sales Tax Codes file. The system displays the corresponding description so that you may verify your entry.
- Tax District
This field identifies the tax district that applies to this customer/ship to. The system displays the Tax District set up on the Customers record. You may override the display. The entry you make serves as the default for this customer/ship to during Sales Orders entry. You can use the Scan option to find an appropriate entry.
If you change this number, the new number must be on file in the Accounts Receivable Sales Tax Code file for the Tax Code you entered. The system displays the corresponding description so that you may verify your entry.
- Warehouse
This field identifies the warehouse from which the merchandise is to be shipped. The system displays the Warehouse set up on the Customers record. You may override the display. The entry you make serves as the default for this customer/ship to during Sales Orders entry. You can use the Scan option to find an appropriate entry.
If you change this number, the new number must be on file in the Inventory Control Warehouses file. The system displays the corresponding description so that you may verify your entry.
The entered data is validated. Press RETURN to save the information on this screen.
Select Next Record to go to the next Addresses record.
At this screen the use of the MODE keys—ADD, DEL, CHG, or INQ—pertain to those records in the Addresses file.