
2Initial Setup Opening Entries
Option 1Opening Transactions
Before the Live Operations phase begins, you have the option of entering sales detail history information into this Sales Detail file. If you choose to use this program, please refer first to the Special Considerations section of this manual for a detailed explanation and example as to how you might set up and maintain these records. If you choose not to use this program, you should not use the File Maintenance program to enter summarized sales history into the Sales History file.
The system will store this history for the period of time specified in the Parameters file. Once Sales Analysis goes into the Live Operations phase, this file will become inaccessible, and transaction detail posted from Accounts Receivable, Order Entry, and Commission Accounting will build in this file.
Here is the Opening Transactions screen:
Initial Setup Sales Detail screen
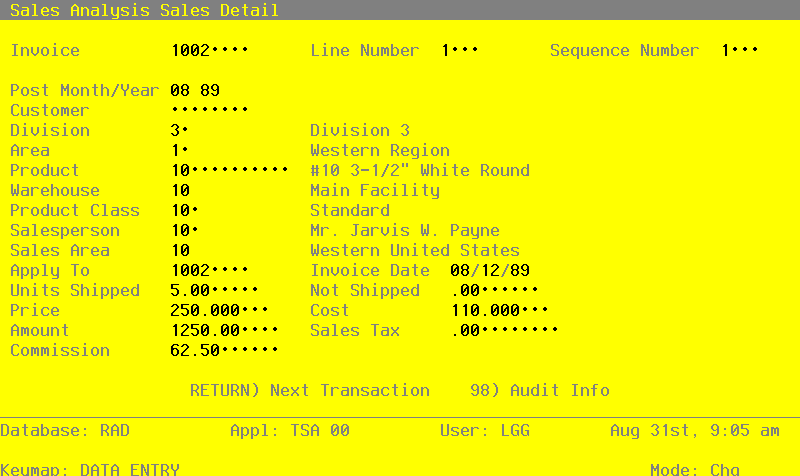
When the key value for a particular record is requested, you can review all the records in the file by selecting the Scan option. The records will be presented on an “Access” screen, and you will be allowed to scan the available data until you find the record you want. Then, position the cursor by that record and press RETURN; the record will be displayed for editing.
Data items for the preceding screen are described below:
- Invoice
Enter up to 8 characters to identify the invoice number of this sale.
- Line Number
Enter up to 4 digits to identify the invoice line number for this sales detail.
- Sequence
In case of duplicate invoice numbers, enter up to 4 digits to assign a sequential number to this invoice/line item combination.
- Post Month/Year
Enter 2 digits for the calendar month and 2 digits for the calendar year in which the invoice was posted.
Month ‘EY’ (End-of-year) is entered as 99.
- Customer
Enter a code to identify the customer on the sales invoice. You can use the Scan option to find an appropriate entry. If your system includes the Accounts Receivable application, this number must be on file in the Customers file. The system displays the customer’s name so that you may verify your entry.
If the Accounts Receivable application is not included in your system, enter a unique number to identify the customer.
- Division
Enter a code to identify the sales division credited for the sales invoice. You can use the Scan option to find an appropriate entry. If your system includes the Accounts Receivable application, this field will default, based on the customer, from the Customers file. The system displays the corresponding description so that you may verify your entry.
If the Accounts Receivable application is not included in your system, enter a unique number to identify the customer division.
- Area
Enter a code to identify the customer area credited for the sales invoice. You can use the Scan option to find an appropriate entry. If your system includes the Accounts Receivable application, this field will default, based on the customer, from the Customers file. The system displays the corresponding description so that you may verify your entry.
If the Accounts Receivable application is not included in your system, enter a unique number to identify the customer area.
- Product
Enter a code to identify the product on the sales invoice. You can use the Scan option to find an appropriate entry. If your system includes the Inventory Control application, this code must be on file in the Products file. The system displays the corresponding description so that you may verify your entry.
If the Inventory Control application is not included on your system, enter a unique code to identify the product.
- Warehouse
Enter a code to identify the warehouse from which the sales invoice product was shipped. You can use the Scan option to find an appropriate entry. If your system includes the Inventory Control application, this number must be on file in the Products By Warehouse file. The system displays the corresponding description so that you may verify your entry.
If the Inventory Control application is not included in your system, enter a unique number to identify the warehouse.
- Product Class
Enter a code to identify the product class for the product on the sales invoice. You can use the Scan option to find an appropriate entry. If your system includes the Inventory Control application, this number will default, based on the product, from the Products By Warehouse file. The system displays the corresponding description so that you may verify your entry.
If the Inventory Control application is not included in your system, enter a unique number to identify the product class.
- Salesperson
Enter a code to identify the salesperson on the sales invoice. You can use the Scan option to find an appropriate entry. If your system includes the Commission Accounting application, this code must be on file in the Salespersons file. The system displays the salesperson’s name so that you may verify your entry.
If the Commission Accounting application is not included in your system, enter a unique number to identify the salesperson.
- Sales Area
Enter a code to identify the salesperson’s sales area for the sales invoice. You can use the Scan option to find an appropriate entry. If your system includes the Commission Accounting application, this code will default, based on the salesperson, from the Sales Areas file. The system displays the sales area name so that you may verify your entry.
If the Commission Accounting application is not included in your system, enter a unique number to identify the sales area.
- Apply To
If this sales invoice is to be applied to an existing invoice, enter up to 8 characters to identify that invoice. This field is required.
- Invoice Date
Required
Enter the date of the invoice.
- Units Shipped
Enter up to 5 digits and 2 decimals for the number of stockkeeping units shipped on this sales invoice. Enter ‘1’ if units do not apply.
- Not Shipped
Enter up to 5 digits and 2 decimals for the total number of stockkeeping units ordered — but not shipped — to this customer/product/salesperson. “Not shipped” orders (that is, orders which were neither filled, nor backordered) represent lost sales.
- Price
Enter up to 7 digits and 2 decimals for the price per stockkeeping unit of the product on this sales invoice. If the price per unit does not apply in this case, enter the amount of the sale here and enter a ‘1’ in the Units Shipped field.
- Cost
Enter up to 6 digits and 3 decimals for the cost per stockkeeping unit of the product on this sales invoice. If the cost per unit does not apply in this case, enter the amount of the sale here and enter a ‘1’ in the Units Shipped field.
- Amount
The system calculates and displays the amount of this line item by multiplying Units Shipped by Price.
If you change this field, the Price will be recomputed and redisplayed.
- Sales Tax
Enter up to 7 digits and 2 decimals for the sales tax on this sales invoice. When posted from Accounts Receivable or Order Entry, this amount is prorated based on the line item amount and the invoice Subtotal.
- Commission
Enter up to 7 digits and 2 decimals for the amount of commission on this sales invoice line item.
The entered data is validated. Press RETURN to save the information on this screen.
Select Next Record to go to the next Sales Detail record.
At this screen the use of the MODE keys—ADD, DEL, CHG, or INQ—pertain to those records in the Sales Detail file.