Database Interface Upgrades
Compatibility with newer versions of popular databases is among the many features of APPX 4.3.- Database Interface Upgrades
- Oracle
- APPX to Oracle quick installation steps:
- APPX to Oracle detailed installation example:
- Create directory for Oracle Instant Client bundle to download to.
- Download the Oracle Instant Client files for Linux.
- Place the basic and sqlplus zipped files into /usr/local/src/oracle/instantclient/, and unzip them:
- Place unzipped Oracle Instant Client files into permanent installation target directory.
- Configure the operating system's dynamic linker run time bindings
- Build cache used by the operating system's run-time linker
- Identify version of libclntsh.so that is included with downloaded Oracle Instant Client bundle
- Use the Oracle Instant Client's version of SQL*Plus to verify connectify to Oracle.
- Configure APPX FMS settings
- ODBC
- MySQL 5.0.22
- Detailed installation example of the APPX to MySQL connection:
- Download mysql-connector-odbc from MySQL.com website.
- Install MySQL, MySQL-Server, and UnixODBC
- Install mysql-connector-odbc version 3.51.22 or newer.
- Create MySQL database and database user.
- Configure /etc/odbc.ini
- Configure /etc/odbcinst.ini
- Verify DSNs are working.
- Set the APPX_ODBC_LIB environment variable
- Configure APPX FMS parameters.
- PostgreSQL 8.1.9
- IBM DB/2
- Microsoft SQL-Server
- Database connectivity debug tools
- Bugs:
- Comments:
- Oracle
Oracle
- Oracle 10g R2 (10.2.0.1)
- Oracle 11g
APPX to Oracle quick installation steps:
- Install Oracle Instant Client Basic.
- Make the Oracle Instant Client library files visible to the system with the ldconfig tool or it's equivalent.
- Set, in either the APPX Login Manager's daemon environment or the appx.env file, the APPX environment variable APPX_OCI_LIB equal to the file name of the liblcntsh.so contained in the Oracle Instant Client library files (For example APPX_OCI_LIB=libclntsh.so.10.1).
- Define APPX FMS settings.
APPX to Oracle detailed installation example:
Here are the steps I used to make connection with APPX 4.3.0 and Oracle 10gR2 with both installed on the same Red Hat Enterprise 5.1, 32 bit server.Create directory for Oracle Instant Client bundle to download to.
I'm going to create a directory to place the zipped bundled Oracle Instant Client files. For my example, I'm going to use /usr/local/src/oracle/instantclient/.[root@tubes /]# mkdir -p /usr/local/src/oracle/instantclient/ [root@tubes /]# cd /usr/local/src/oracle/instantclient/ [root@tubes instantclient]#
Download the Oracle Instant Client files for Linux.
APPX requires at least the Basic package, but it is recommended that you grab the SQL*Plus package too for debugging. http://www.oracle.com/technology/tech/oci/instantclient/index.htmlFor 10gR2
If you are running Oracle 10gR2, then use the 10gR2 Instant Client. At the time this document was created, the current version for Linux X86 is 10.2.0.4, oracle-instantclient-basic-10.2.0.4-1.i386.zip (34,687,861 bytes), and oracle-instantclient-sqlplus-10.2.0.4-1.i386.zip (744,730 bytes). Place the downloaded files in the /usr/local/src/oracle/instantclient/ directory.For 11g
If you are running Oracle 11g, then use the 11g Instant Client. At the time this document was created, the current version is 11.1.0.6.0 , basic.zip (42,285,643 bytes), and sqlplus.zip (784,417 bytes). Place the downloaded files in the /usr/local/src/oracle/instantclient/ directory, then unzip them.Place the basic and sqlplus zipped files into /usr/local/src/oracle/instantclient/, and unzip them:
[root@tubes instantclient]# pwd
/usr/local/src/oracle/instantclient
[root@tubes instantclient]# ls -la
total 34656
drwxr-xr-x 2 root root     4096 Jun  5 15:01 .
drwxr-xr-x 3 root root     4096 Jun  5 14:59 ..
-rw-r--r-- 1 root root 34687861 Jun  5 15:01 oracle-instantclient-basic-10.2.0.4-1.i386.zip
-rw-r--r-- 1 root root   744730 Jun  5 15:01 oracle-instantclient-sqlplus-10.2.0.4-1.i386.zip
[root@tubes instantclient]# unzip oracle-instantclient-basic-10.2.0.4-1.i386.zip
Archive:  oracle-instantclient-basic-10.2.0.4-1.i386.zip
  inflating: instantclient_10_2/BASIC_README
  inflating: instantclient_10_2/classes12.jar
  inflating: instantclient_10_2/genezi
  inflating: instantclient_10_2/libclntsh.so.10.1
  inflating: instantclient_10_2/libnnz10.so
  inflating: instantclient_10_2/libocci.so.10.1
  inflating: instantclient_10_2/libociei.so
  inflating: instantclient_10_2/libocijdbc10.so
  inflating: instantclient_10_2/ojdbc14.jar
[root@tubes instantclient]# unzip oracle-instantclient-sqlplus-10.2.0.4-1.i386.zip
Archive:  oracle-instantclient-sqlplus-10.2.0.4-1.i386.zip
  inflating: instantclient_10_2/SQLPLUS_README
  inflating: instantclient_10_2/glogin.sql
  inflating: instantclient_10_2/libsqlplus.so
  inflating: instantclient_10_2/libsqlplusic.so
  inflating: instantclient_10_2/sqlplus
[root@tubes instantclient]# ls -la
total 34660
drwxr-xr-x 3 root root     4096 Jun  5 15:01 .
drwxr-xr-x 3 root root     4096 Jun  5 14:59 ..
drwxr-xr-x 2 root root     4096 Jun  5 15:01 instantclient_10_2
-rw-r--r-- 1 root root 34687861 Jun  5 15:01 oracle-instantclient-basic-10.2.0.4-1.i386.zip
-rw-r--r-- 1 root root   744730 Jun  5 15:01 oracle-instantclient-sqlplus-10.2.0.4-1.i386.zip
[root@tubes instantclient]# ls -la instantclient_10_2/
total 102424
drwxr-xr-x 2 root root     4096 Jun  5 15:01 .
drwxr-xr-x 3 root root     4096 Jun  5 15:01 ..
-rw-rw-r-- 1 root root      238 Feb 17 03:57 BASIC_README
-r--r--r-- 1 root root  1609607 Feb 17 03:57 classes12.jar
-rwxrwxr-x 1 root root    67766 Feb 17 03:57 genezi
-r--r--r-- 1 root root     1525 Feb 17 03:58 glogin.sql
-rwxrwxr-x 1 root root 19076649 Feb 17 03:57 libclntsh.so.10.1
-r-xr-xr-x 1 root root  5656445 Feb 17 03:57 libnnz10.so
-rwxrwxr-x 1 root root  1398244 Feb 17 03:57 libocci.so.10.1
-rwxrwxr-x 1 root root 72698427 Feb 17 03:57 libociei.so
-r-xr-xr-x 1 root root   120443 Feb 17 03:57 libocijdbc10.so
-r-xr-xr-x 1 root root  1434263 Feb 17 03:58 libsqlplusic.so
-r-xr-xr-x 1 root root  1069221 Feb 17 03:58 libsqlplus.so
-r--r--r-- 1 root root  1555682 Feb 17 03:57 ojdbc14.jar
-r-xr-xr-x 1 root root     8903 Feb 17 03:58 sqlplus
-rw-rw-r-- 1 root root      242 Feb 17 03:58 SQLPLUS_README
[root@tubes instantclient]#
Place unzipped Oracle Instant Client files into permanent installation target directory.
Now move the unzipped directory (instantclient_10_2) that contains both the basic and SQL*Plus files from the Oracle Instant Client, into the desired permanent directory. In my example, I'm using /usr/local/, so that the Oracle files will be in a directory /usr/local/instantclient_10_2/.[root@tubes instantclient]# pwd /usr/local/src/oracle/instantclient [root@tubes instantclient]# ls -la total 34660 drwxr-xr-x 3 root root 4096 Jun 5 15:01 . drwxr-xr-x 3 root root 4096 Jun 5 14:59 .. drwxr-xr-x 2 root root 4096 Jun 5 15:01 instantclient_10_2 -rw-r--r-- 1 root root 34687861 Jun 5 15:01 oracle-instantclient-basic-10.2.0.4-1.i386.zip -rw-r--r-- 1 root root 744730 Jun 5 15:01 oracle-instantclient-sqlplus-10.2.0.4-1.i386.zip [root@tubes instantclient]# ls /usr/local/ appx appx.tgz basic.zip bin etc games include lib libexec sbin share src [root@tubes instantclient]# mv instantclient_10_2/ /usr/local/ [root@tubes instantclient]# ls /usr/local/ appx appx.tgz basic.zip bin etc games include instantclient_10_2 lib libexec sbin share src [root@tubes instantclient]#
Configure the operating system's dynamic linker run time bindings
Now we must register the Oracle Instant Client library files with the system to make the shared library's path known. I'm going to use ldconfig.[root@tubes instantclient]# ldconfig -v|grep libclntsh [root@tubes instantclient]# ldconfig -v|grep instant [root@tubes instantclient]# [root@tubes instantclient]# cat /etc/ld.so.conf include ld.so.conf.d/*.conf [root@tubes instantclient]# echo /usr/local/instantclient_10_2/ >> /etc/ld.so.conf [root@tubes instantclient]# cat /etc/ld.so.conf include ld.so.conf.d/*.conf /usr/local/instantclient_10_2/ [root@tubes instantclient]#
Build cache used by the operating system's run-time linker
Now, let's rebuild the ldconfig cache, and verify that the library's are available system wide.[root@tubes instantclient]# ldconfig [root@tubes instantclient]# ldconfig -v|grep libclntsh libclntsh.so.10.1 -> libclntsh.so.10.1 [root@tubes instantclient]# ldconfig -v|grep instant /usr/local/instantclient_10_2: [root@tubes instantclient]#
Identify version of libclntsh.so that is included with downloaded Oracle Instant Client bundle
APPX needs to know the name of the Oracle libclntsh.so file on your system. This file name changes from version to version. We must now identify the libclntsh file name that was distributed in the Oracle Instant Client bundle. Look inside the instantclient directory for a file that begins with libclntsh. To show you examples of Oracle Instant Client 10.2 and Oracle Instant Client 11.1, I have installed both versions in /usr/local/.[joe@tubes instantclient_10_2]$ ls -la /usr/local/instantclient_1*/libclnt* -rwxrwxrwx 1 root root 19076649 Feb 17 03:57 /usr/local/instantclient_10_2/libclntsh.so.10.1 -rwxrwxrwx 1 root root 35295891 Aug 1 2007 /usr/local/instantclient_11_1/libclntsh.so.11.1 [joe@tubes instantclient_10_2]$As you can see my libclntsh files are libclntsh.so.10.1, which came bundled with the Oracle Instant Client 10.2 Basic bundle, and libclntsh.so.11.1, which came bundled with the Oracle Instant Client 11.1 Basic bundle.
To let APPX know the version of the Instant client you have installed, perform just one of the following two options:
Create libclntsh.so symbolic link and set the APPX_OCI_DIR environment variable
- I can now either create a symbolic link named libclntsh.so that points to the version I want to use and set the APPX_OCI_DIR environment variable equal to the location of the Oracle Instant Client files:
[root@tubes appx]# cd /usr/local/instantclient_10_2/
[root@tubes instantclient_10_2]# ln -s /usr/local/instantclient_10_2/libclntsh.so.10.1 /usr/local/instantclient_10_2/libclntsh.so
[root@tubes appx]# ls -la /usr/local/instantclient_10_2/libclntsh.so
lrwxrwxrwx 1 root root 47 Jun  5 15:56 libclntsh.so -> /usr/local/instantclient_10_2/libclntsh.so.10.1
[root@tubes instantclient_10_2]#
[root@tubes appx]# grep APPX_OCI_DIR /usr/local/appx/data/appx.env
[root@tubes instantclient_10_2]#
[root@tubes appx]# echo APPX_OCI_DIR=/usr/local/instantclient_10_2/ >> /usr/local/appx/data/appx.env
[root@tubes appx]# grep APPX_OCI_DIR /usr/local/appx/data/appx.env
APPX_OCI_DIR=/usr/local/instantclient_10_2/
[root@tubes appx]#
Set APPX_OCI_LIB
- Or I can set an APPX environment variable equal to the name of the file. First let's see if it is set in the %APPXPATH%/appx.env file:
[root@tubes appx]#
[root@tubes appx]# grep APPX_OCI_LIB /usr/local/appx/data/appx.env
[root@tubes appx]#
[root@tubes appx]# echo APPX_OCI_LIB=libclntsh.so.10.1 >> /usr/local/appx/data/appx.env
[root@tubes appx]#
[root@tubes appx]# grep APPX_OCI_LIB /usr/local/appx/data/appx.env
APPX_OCI_LIB=libclntsh.so.10.1
[root@tubes appx]#
Use the Oracle Instant Client's version of SQL*Plus to verify connectify to Oracle.
Now let's verify that we can connect to Oracle using Oracle's SQL*Plus tool. I'm going to use the following parameters for my example, be sure and use values that are correct for your Oracle instance. user=scott, password=password, server=tubes, port=1521, and Oracle Instance=appx.[root@tubes instantclient_10_2]# /usr/local/instantclient_10_2/sqlplus scott/password@tubes:1521/appx SQL*Plus: Release 10.2.0.4.0 - Production on Wed Jun 4 09:17:55 2008 Copyright (c) 1982, 2007, Oracle. All Rights Reserved. Connected to: Oracle Database 10g Enterprise Edition Release 10.2.0.1.0 - Production With the Partitioning, OLAP and Data Mining options SQL> show all appinfo is OFF and set to "SQL*Plus" arraysize 15 autocommit OFF autoprint OFF autorecovery OFF autotrace OFF blockterminator "." (hex 2e) btitle OFF and is the first few characters of the next SELECT statement cmdsep OFF colsep " " compatibility version NATIVE concat "." (hex 2e) copycommit 0 COPYTYPECHECK is ON define "&" (hex 26) describe DEPTH 1 LINENUM OFF INDENT ON echo OFF editfile "afiedt.buf" embedded OFF escape OFF escchar OFF FEEDBACK ON for 6 or more rows flagger OFF flush ON heading ON headsep "|" (hex 7c) instance "local" linesize 80 lno 14 loboffset 1 logsource "" long 80 longchunksize 80 markup HTML OFF HEAD "" BODY "" TABLE "border='1' width='90%' align='center' summary='Script output'" SPOOL OFF ENTMAP ON PREFORMAT OFF newpage 1 null "" numformat "" numwidth 10 pagesize 14 PAUSE is OFF pno 0 recsep WRAP recsepchar " " (hex 20) release 1002000100 repfooter OFF and is NULL repheader OFF and is NULL serveroutput OFF shiftinout INVISIBLE showmode OFF spool OFF sqlblanklines OFF sqlcase MIXED sqlcode 0 sqlcontinue "> " sqlnumber ON sqlpluscompatibility 10.2.0 sqlprefix "#" (hex 23) sqlprompt "SQL> " sqlterminator ";" (hex 3b) suffix "sql" tab ON termout ON timing OFF trimout ON trimspool OFF ttitle OFF and is the first few characters of the next SELECT statement underline "-" (hex 2d) USER is "SCOTT" verify ON wrap : lines will be wrapped SQL> quit Disconnected from Oracle Database 10g Enterprise Edition Release 10.2.0.1.0 - Production With the Partitioning, OLAP and Data Mining options [root@tubes instantclient_10_2]#
Configure APPX FMS settings
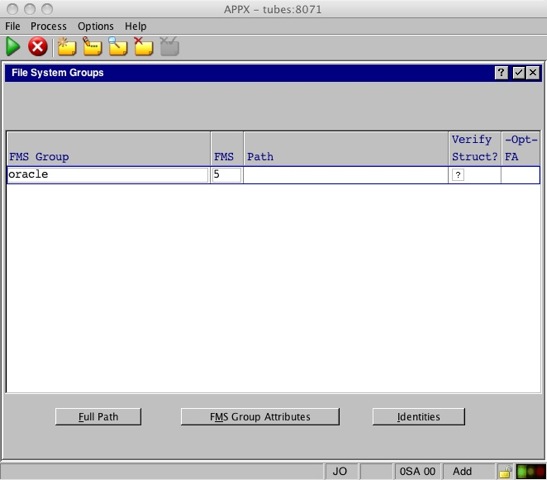
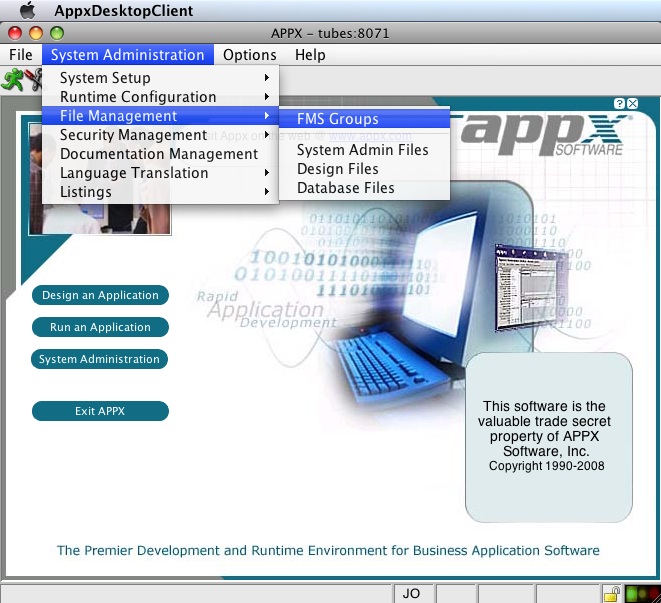
Well, that looks good. Let's configure our FMS settings inside APPX and make a connection!- In APPX, Go to System Administration, then File Management, then FMS Groups.

- Create an FMS group with an appropriate name, and specify type 5.
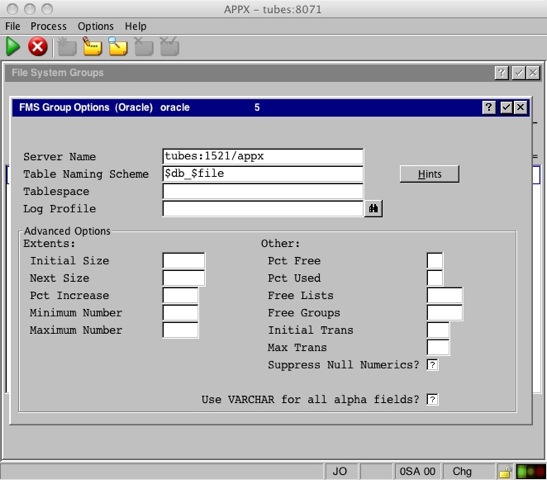
- File in the Server Name and Table Naming Scheme in the FMS Group Attributes of your new FMS group. The Server Name field has a format of ORACLE-HOST-NAME:ORACLE-PORT/ORACLE-SID. The Table Naming Scheme could be picked from the suggestions shown when clicking on the Hints button.
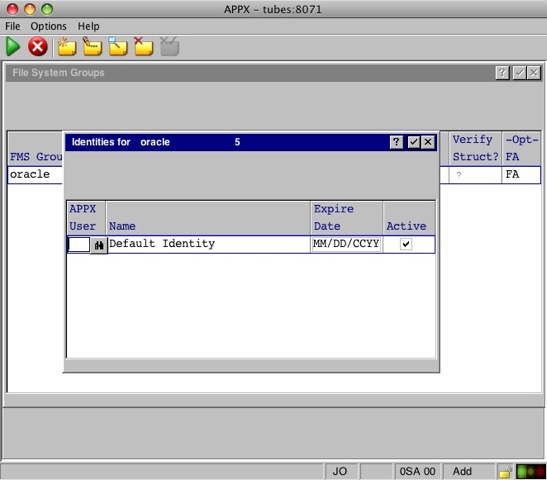
- Under Identities, define at least a default identity.
- Enter the Oracle account to use for the Default Identity, leave Realm empty.
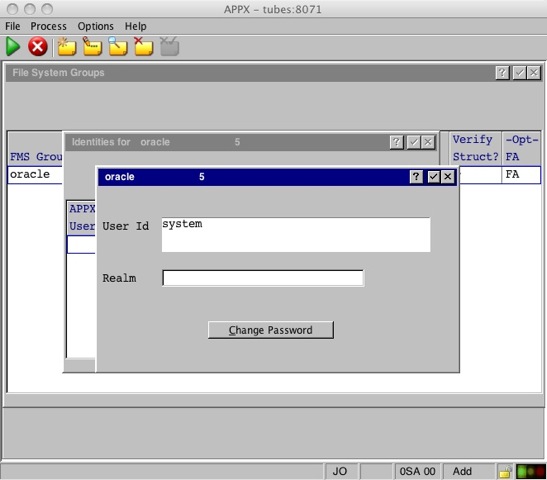
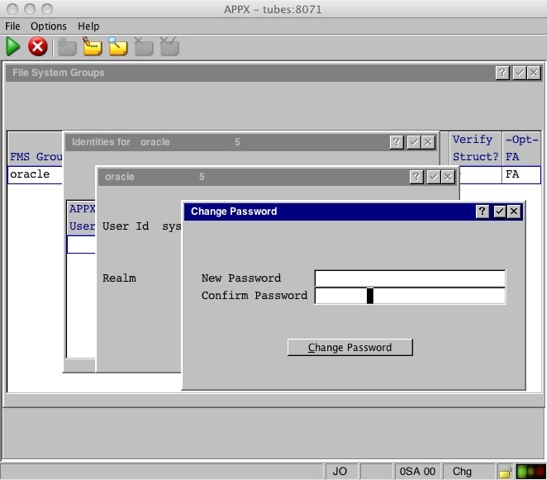
- Enter the Oracle account's password.
ODBC
MySQL 5.0.22
Quick installation steps of the APPX to MySQL connection:
- Install MySQL.
- Install UnixODBC
- Install mysql-connector-odbc (version 3.51.22 or newer)
- Define DSN files, odbc.ini and odbcinst.ini.
- Set, in either the APPX Login Manager's daemon environment or the appx.env file, the APPX environment variable APPX_ODBC_LIB equal to the file name of the unixodbc shared library file from the UnixODBC install. (For example APPX_ODBC_LIB=/usr/lib/libodbc.so).
- Define APPX FMS settings.
Detailed installation example of the APPX to MySQL connection:
Here are the steps I used to make connection with APPX 4.3.0 and MySQL 5.0.22 with both installed on the same Red Hat Enterprise 5.1, 32 bit server. The MySQL and UnixODBC will be provided by Red Hat, and the mysql-connector-odbc will be provided by MySQL. Red Hat's Yum repositories do contain mysql-connector-odbc, but at the time of this test, it was 3.51.12 (too old). For this connection we need 3.51.22 or newer. We'll get this component from the MySQL.com website.Download mysql-connector-odbc from MySQL.com website.
You should go to MySQL.com's ODBC Connector download site and get the mysql-connector-odbc in the format that is right for your platform. My test server is Red Hat 5.1 32 bit, so I'll download the RPM format for x86 Red Hat.[root@tubes ~]# cd /usr/local/src [root@tubes src]# mkdir mysql-connector-odbc.from.mysql.com [root@tubes src]# cd mysql-connector-odbc.from.mysql.com/ [root@tubes mysql-connector-odbc.from.mysql.com]# wget http://mirror.trouble-free.net/mysql_mirror/Downloads/Connector-ODBC/3.51/mysql-connector-odbc-3.51.25-0.i386.rpm Resolving mirror.trouble-free.net... 66.45.230.130 Connecting to mirror.trouble-free.net|66.45.230.130|:80... connected. 15:35:31 (158 KB/s) - `mysql-connector-odbc-3.51.25-0.i386.rpm' saved [1862076/1862076]
Install MySQL, MySQL-Server, and UnixODBC
We will now install MySQL 5.0.22 (MySQL client programs and shared libraries.), MySQL-Server 5.0.22-2.2 (The MySQL server and related files.) and UnixODBC 2.2.11-7.1 (includes low-level drivers for MySQL, PostgreSQL, and local files.)[root@tubes mysql-connector-odbc.from.mysql.com]# yum install mysql mysql-server unixODBC Loading "installonlyn" plugin Setting up Install Process Setting up repositories Reading repository metadata in from local files Parsing package install arguments Resolving Dependencies --> Populating transaction set with selected packages. Please wait. ---> Package mysql.i386 0:5.0.22-2.2.el5_1.1 set to be updated ---> Downloading header for mysql-server to pack into transaction set. mysql-server-5.0.22-2.2.e 100% |=========================| 33 kB 00:00 ---> Package mysql-server.i386 0:5.0.22-2.2.el5_1.1 set to be updated ---> Downloading header for unixODBC to pack into transaction set. unixODBC-2.2.11-7.1.i386. 100% |=========================| 28 kB 00:00 ---> Package unixODBC.i386 0:2.2.11-7.1 set to be updated --> Running transaction check --> Processing Dependency: perl-DBD-MySQL for package: mysql-server --> Restarting Dependency Resolution with new changes. --> Populating transaction set with selected packages. Please wait. ---> Downloading header for perl-DBD-MySQL to pack into transaction set. perl-DBD-MySQL-3.0007-1.f 100% |=========================| 8.3 kB 00:00 ---> Package perl-DBD-MySQL.i386 0:3.0007-1.fc6 set to be updated --> Running transaction check Dependencies Resolved ============================================================================= Package Arch Version Repository Size ============================================================================= Installing: mysql i386 5.0.22-2.2.el5_1.1 updates 3.0 M mysql-server i386 5.0.22-2.2.el5_1.1 updates 10 M unixODBC i386 2.2.11-7.1 base 832 k Installing for dependencies: perl-DBD-MySQL i386 3.0007-1.fc6 base 147 k Transaction Summary ============================================================================= Install 4 Package(s) Update 0 Package(s) Remove 0 Package(s) Total download size: 14 M Is this ok [y/N]: y Downloading Packages: (1/3): perl-DBD-MySQL-3.0 100% |=========================| 147 kB 00:01 (2/3): mysql-server-5.0.2 100% |=========================| 10 MB 01:20 (3/3): unixODBC-2.2.11-7. 100% |=========================| 832 kB 00:05 Running Transaction Test Finished Transaction Test Transaction Test Succeeded Running Transaction Installing: mysql ######################### [1/4] Installing: perl-DBD-MySQL ######################### [2/4] Installing: mysql-server ######################### [3/4] Installing: unixODBC ######################### [4/4] Installed: mysql.i386 0:5.0.22-2.2.el5_1.1 mysql-server.i386 0:5.0.22-2.2.el5_1.1 unixODBC.i386 0:2.2.11-7.1 Dependency Installed: perl-DBD-MySQL.i386 0:3.0007-1.fc6 Complete! [root@tubes mysql-connector-odbc.from.mysql.com]#
Install mysql-connector-odbc version 3.51.22 or newer.
We need to install mysql-connector-odbc version 3.51.22 or newer. We already downloaded it in an earlier step.[root@tubes mysql-connector-odbc.from.mysql.com]# rpm -ivh mysql-connector-odbc-3.51.25-0.i386.rpm error: Failed dependencies: libltdl.so.3 is needed by mysql-connector-odbc-3.51.25-0.i386As you can see, my server is missing libltdl.so.3. That file is found in the libtool-ltdl package. Let's install it now.
[root@tubes mysql-connector-odbc.from.mysql.com]# yum install libtool-ltdl
Loading "installonlyn" plugin
Setting up Install Process
Setting up repositories
Reading repository metadata in from local files
Parsing package install arguments
Resolving Dependencies
--> Populating transaction set with selected packages. Please wait.
---> Downloading header for libtool-ltdl to pack into transaction set.
libtool-ltdl-1.5.22-6.1.i 100% |=========================|  15 kB    00:00
---> Package libtool-ltdl.i386 0:1.5.22-6.1 set to be updated
--> Running transaction check

Dependencies Resolved

=============================================================================
 Package                 Arch       Version          Repository        Size
=============================================================================
Installing:
 libtool-ltdl            i386       1.5.22-6.1       base               37 k

Transaction Summary
=============================================================================
Install      1 Package(s)
Update       0 Package(s)
Remove       0 Package(s)

Total download size: 37 k
Is this ok [y/N]: y
Downloading Packages:
(1/1): libtool-ltdl-1.5.2 100% |=========================|  37 kB    00:00
Running Transaction Test
Finished Transaction Test
Transaction Test Succeeded
Running Transaction
  Installing: libtool-ltdl                 ######################### [1/1]

Installed: libtool-ltdl.i386 0:1.5.22-6.1
Complete!
[root@tubes mysql-connector-odbc.from.mysql.com]#
Success! Now let's resume our installation of mysql-connector-odbc.
[root@tubes mysql-connector-odbc.from.mysql.com]# rpm -ivh mysql-connector-odbc-3.51.25-0.i386.rpm
Preparing...                ########################################### [100%]
   1:mysql-connector-odbc   ########################################### [100%]
[myodbc3i.c][589][INFO] Driver registered. Usage count is 1. Location "/etc"
[root@tubes mysql-connector-odbc.from.mysql.com]#
Create MySQL database and database user.
If you don't already have a MySQL database created along with a MySQL database user, you need to create one. Our example will use a database named appx. The MySQL user name will be appx, which is a preexisting OS user. Substitute your own values for database name and database/OS user.[root@tubes mysql-connector-odbc.from.mysql.com]# mysql -uroot -p Enter password: Welcome to the MySQL monitor. Commands end with ; or \g. Your MySQL connection id is 3 to server version: 5.0.22 Type 'help;' or '\h' for help. Type '\c' to clear the buffer. mysql> create database appx; Query OK, 1 row affected (0.00 sec) mysql> grant all on appx.* to appx@localhost identified by "password"; Query OK, 0 rows affected (0.00 sec) mysql> flush privileges; Query OK, 0 rows affected (0.00 sec) mysql> quit Bye [root@tubes mysql-connector-odbc.from.mysql.com]#
Configure /etc/odbc.ini
We need to build the odbc.ini file. The odbc.ini file content is driver specific (MySQL, PostgreSQL, FreeTDS, MiniSQL etc...). My file looks like this:[root@tubes tools]# [root@tubes tools]# cat /etc/odbc.ini [mysql] Driver = mysql Database = appx Description = mysql odbc connection for appx Pwd = password Port = 3306 Server = localhost UID = appx [root@tubes tools]#The Driver field is referenced in the APPX FMS settings, and in the odbcinst.ini file. The Database field is the name of the database that you want APPX to store data in. This database was created in an earlier step. The Description is informational only. The Pwd field contains the password for the MySQL user. Port is the port that MySQL is configured to listen on. The default is 3306. If it is something else, it would be listed in /etc/my.cnf. Server is the servername containing the MySQL instance we are connecting to. UID is the DSN's user account to connect to MySQL.
Configure /etc/odbcinst.ini
Verify DSNs are working.
We will use the isql command to make a connection to our DSN named mysql.[root@tubes mysql-connector-odbc.from.mysql.com]# isql -v mysql +---------------------------------------+ | Connected! | | | | sql-statement | | help [tablename] | | quit | | | +---------------------------------------+ SQL> show databases; +-----------------------------------------------------------------+ | Database | +-----------------------------------------------------------------+ | information_schema | | appx | | test | +-----------------------------------------------------------------+ SQLRowCount returns 3 3 rows fetched SQL> quit [root@tubes mysql-connector-odbc.from.mysql.com]#
Set the APPX_ODBC_LIB environment variable
Configure APPX FMS parameters.
PostgreSQL 8.1.9
IBM DB/2
Microsoft SQL-Server
SQL Server 2000
SQL Server 2005
SQL Server 2008
SQL Server Express
Database connectivity debug tools
APPX Environment Variables
APPX_OCI_DIR
APPX_OCI_LIB
APPX_OCI_LIB
APPX_OCI_LIBS
APPX_SS_LOG
APPX_SS_CODE
APPX_SQL_CMD=/usr/local/appx/appx_sql_cmd.log
APPX_DBG_CODE=0xFFFFFFFF
Oracle
ORACLE_SID
ORACLE_HOME
TNS_ADMIN
Some OS tools to aid in debugging
strace
ldd
Bugs:
- Fixed - Bug Description 1.
- OPEN - Bug 2209 - Lengthen field FMS Group Options - Server Name.
Comments:
Read what other users have said about this page or add your own comments.-- AlKalter - 04 Apr 2008


| I | Attachment | History | Action | Size |
Date | Who | Comment |
|---|---|---|---|---|---|---|---|
| |
oracle-fms-01.jpg | r2 r1 | manage | 78.2 K | 2008-06-05 - 21:10 | JoeOrtagus | APPX System Administration, File Management, FMS Groups. |
| |
oracle-fms-03.jpg | r1 | manage | 62.0 K | 2008-06-05 - 21:14 | JoeOrtagus | Oracle server name, port and SID followed by Table naming scheme. |
| |
oracle-fms-06.jpg | r1 | manage | 50.1 K | 2008-06-05 - 21:17 | JoeOrtagus | Enter the Oracle password here. |
| |
oracle-fms-04.jpg | r1 | manage | 47.5 K | 2008-06-05 - 21:16 | JoeOrtagus | Specify Identity or the Oracle account to login as. |
| |
oracle-fms-05.jpg | r1 | manage | 46.0 K | 2008-06-05 - 21:16 | JoeOrtagus | Enter the Oracle user ID here. |
| |
oracle-fms-02.jpg | r1 | manage | 39.5 K | 2008-06-05 - 21:13 | JoeOrtagus | Create FMS group name, and specify type of 5. |
Topic revision: r11 - 2008-06-11 - JoeOrtagus

Ideas, requests, problems regarding TWiki? Send feedback