Access Control List - Files/Fields
This process allows you to assign security to the files and fields in your applications.Overview:
This process allows you to assign security (the 'Access Control List' or ACL) to the files and fields in your applications. This is the 'Access Control List - Files/Fields' option on the 'Security' tab of the RBS menu. You assign security to a file and to the individual fields in a file. You can assign security at the Database, Department, Workgroup, Role and User levels. Settings at lower levels take priority over higher levels, ie, a setting at an individual user level will override the everything else, or a setting at the Role level will override a setting at the Workgroup, Department or Database level. When a user runs a process that accesses a file or field within a file, RBS follows these steps to evaluate their access:- If a User belongs to multiple Roles and Multi-Role setting on the configuration file is set to 'Select', then the first time they run a process they will be prompted for the Role they want to use. This Role will be used for the rest of the session.
- If this file or field was previously used in the session, then the cached ACL is used and no further processing needs to occur.
- Otherwise, the system checks for an ACL for the file at the User, Role, Workgroup, Department and Database levels. If a setting is undefined or the ACL is not present, then the setting on the next highest level is used.
- If file access is allowed, it then repeats the check for the specific field in the file.
- If no ACL records were found, then the system defaults from the configuration file are used.
- Finally, the result of this check is cached so that it doesn't have to be repeated in the current session.
- If any Role allows access, then access is granted
Description:
When you choose this option, you will be presented with a screen that allows you to enter the Version number of the applications you want to work with. Once you press Enter, the screen will fill in with the applications in that version: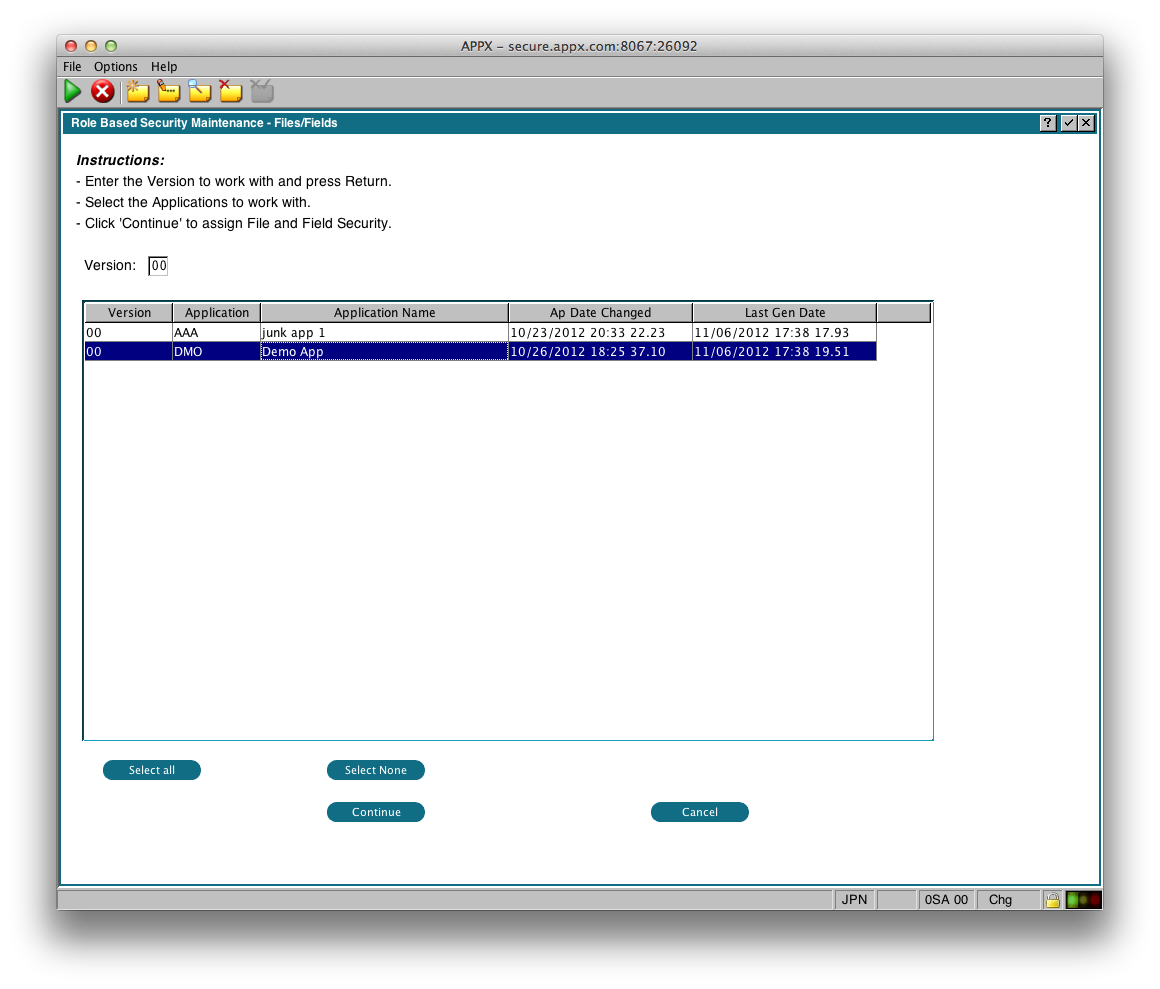 Select the Applications you want to work with, then click 'Continue'.
The buttons have the following functions:
Select the Applications you want to work with, then click 'Continue'.
The buttons have the following functions:
- Select All - Selects all the applications (same as using Control+A)
- Select None - Deselects all applications
- Continue - continue with managing the ACL for the files and fields in the selected applications.
- Cancel - Do nothing & return to the menu
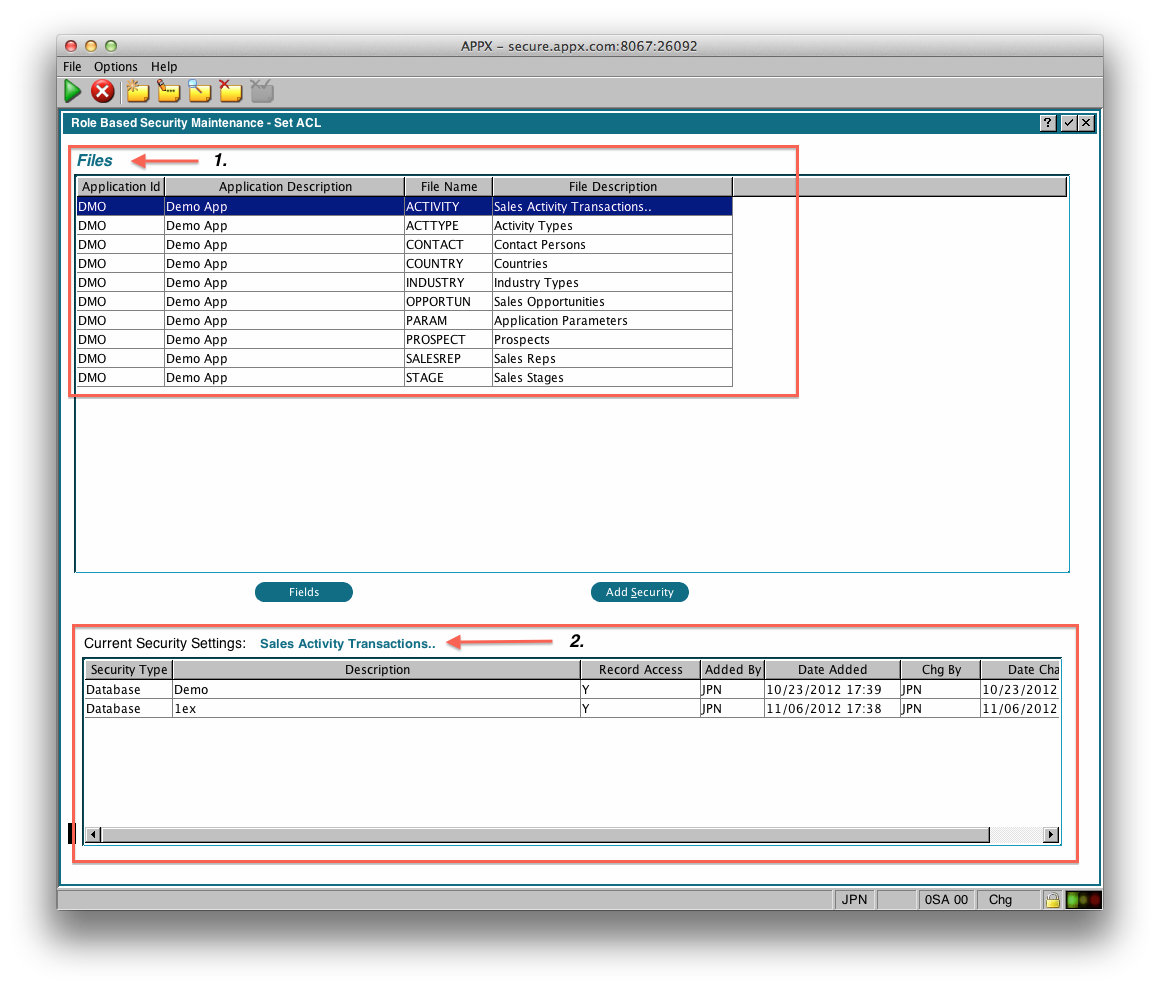 There are 2 main sections to this screen:
- File Window which shows the Files in the selected applications
- ACL Window that shows you the current ACL settings for the File you have selected in the File Window. The contents and title of this window will change as you select different files. You can double click any row in this window to change the settings.
File Window
This is where you choose which File to manage. The buttons have the following function:- Fields - Shows you the fields in the selected file. From there you can manage the ACL for fields in the file. You can also double click any File to display the Fields.
- Add Security - Allows you to add an ACL record for the currently selected row.
Add Security
This button allows you to add an ACL record for the currently selected File. First you will be prompted for what level of security you want to add (Database, Department, Workgroup, Role, or User), then the following image will be displayed: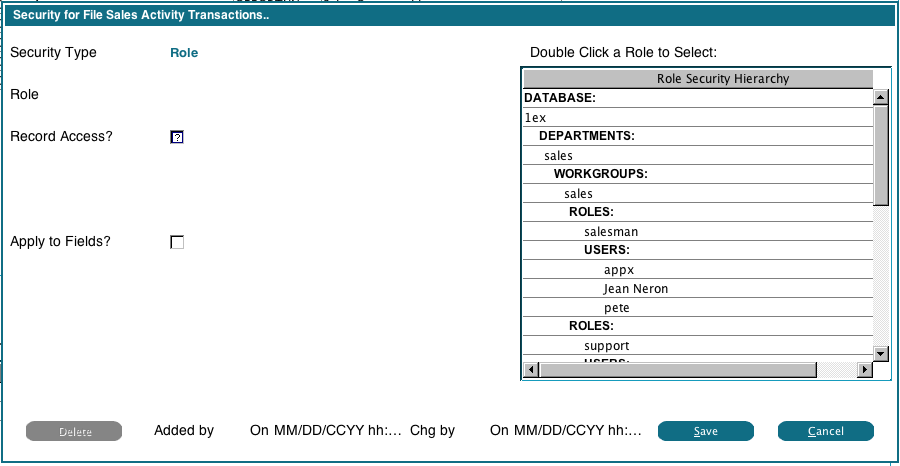 In this example, we chose 'Role'. On the right the system displays our Security Hierarchy, and we can double click any displayed Role to choose it. Then we set the Record Access flag as desired for that Role.
The 'Apply to Fields' flag, if checked, will use the current settings to add an ACL record for every field in the file. If 'Record Access?' is checked, then 'Field Access' and 'Field Change' will also be checked. If unchecked, then 'Field Access' and 'Field Change' will also be unchecked.
If 'Record Access' is unchecked, then none of the fields in the file will be visible to the user. This affects reports, inquires and input processes.
In this example, we chose 'Role'. On the right the system displays our Security Hierarchy, and we can double click any displayed Role to choose it. Then we set the Record Access flag as desired for that Role.
The 'Apply to Fields' flag, if checked, will use the current settings to add an ACL record for every field in the file. If 'Record Access?' is checked, then 'Field Access' and 'Field Change' will also be checked. If unchecked, then 'Field Access' and 'Field Change' will also be unchecked.
If 'Record Access' is unchecked, then none of the fields in the file will be visible to the user. This affects reports, inquires and input processes.
Changing/Deleting File ACL
To change or delete an existing ACL record, just double click it. You will see the the following display: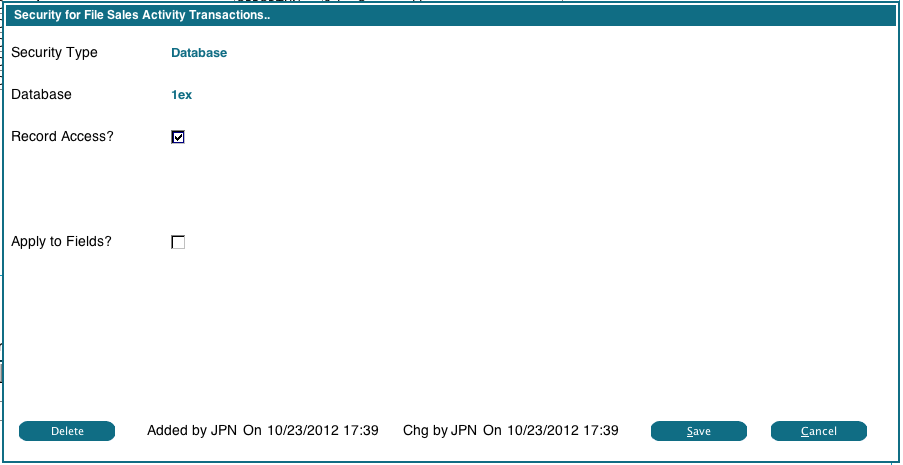 You can change 'Record Access' flag as required. If you check the 'Apply to Fields' flag, the change will be applied to all the fields in the file.
To Delete an ACL record, click the Delete button. It will change to 'Ack Del', click it again to confirm the deletion. If the 'Apply to Fields' flag is checked, the ACL will be removed from all the fields in the current file.
You can change 'Record Access' flag as required. If you check the 'Apply to Fields' flag, the change will be applied to all the fields in the file.
To Delete an ACL record, click the Delete button. It will change to 'Ack Del', click it again to confirm the deletion. If the 'Apply to Fields' flag is checked, the ACL will be removed from all the fields in the current file.
Field Window
If you double click a File in the File Window, or click the 'Fields' button, you'll see a list of fields in the file: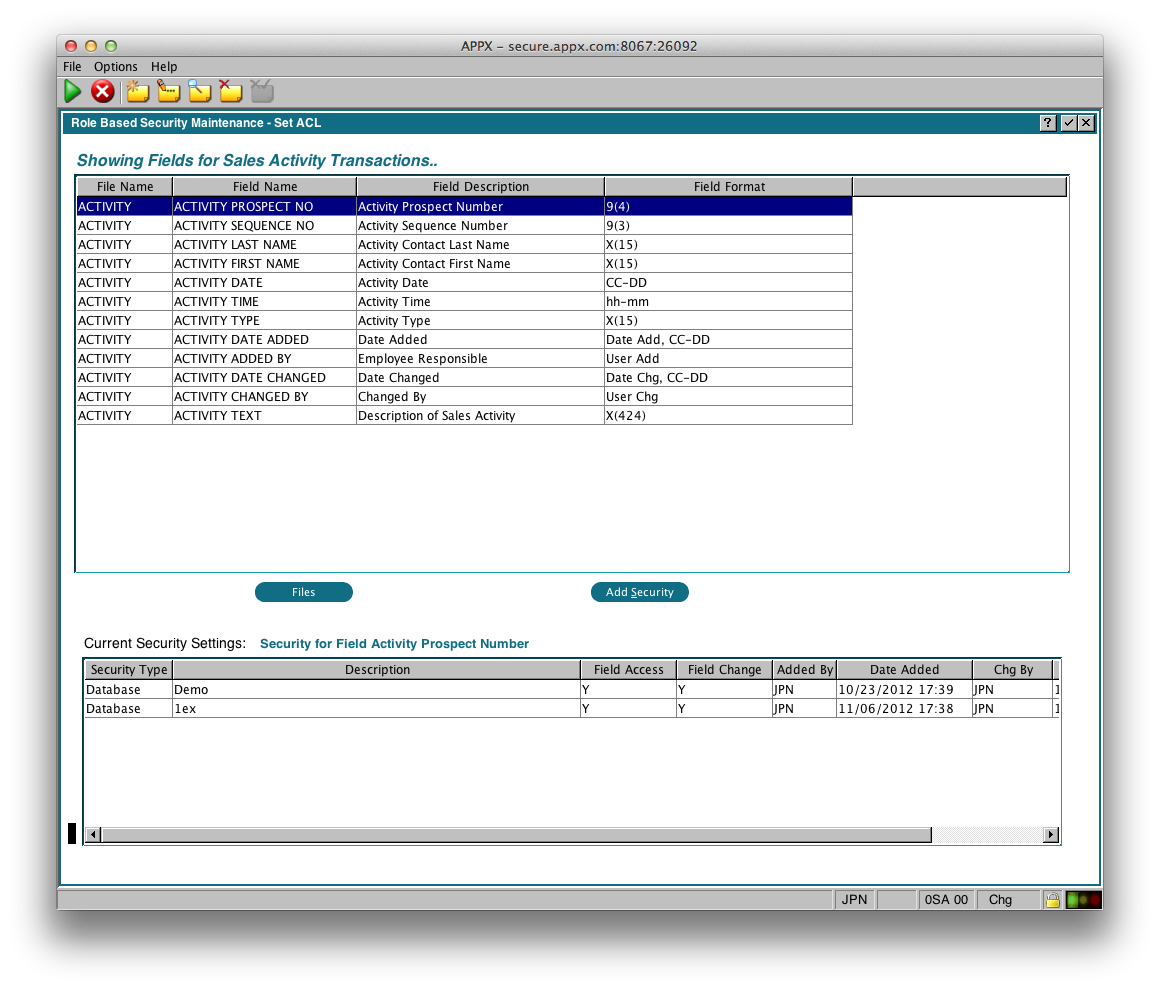
Add Field Security
As with the File Window, you can click the 'Add Security' button to add an ACL to the selected field. First you will be prompted for what level of security you want to add (Database, Department, Workgroup, Role, or User), then the following image will be displayed: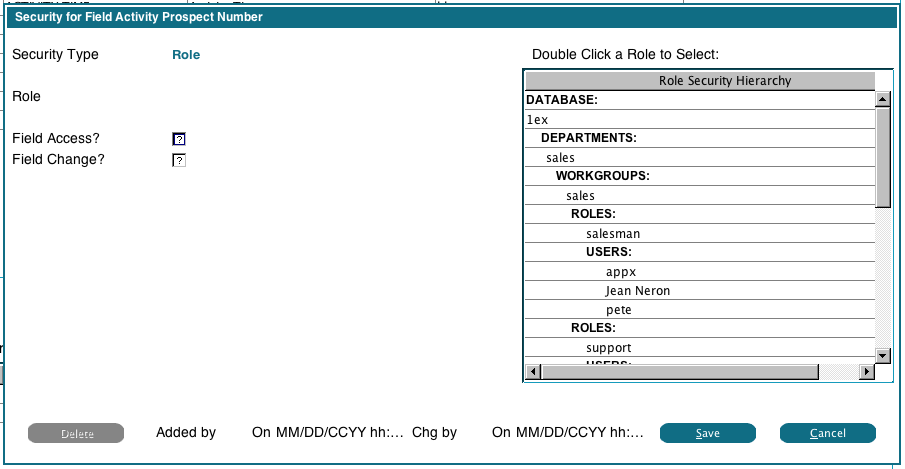 In this example, we chose 'Role'. On the right the system displays our Security Hierarchy, and we can double click any displayed Role to choose it. Then we set the Field Access flags as desired for that Role.
If 'Field Access' is unchecked, then this field will not be visible to the user. This affects reports, inquires and input processes.
If 'Field Change' is unchecked, then the user will not be able to change the field on an input process, but they will see it's contents on screens, reports and inquiries.
In this example, we chose 'Role'. On the right the system displays our Security Hierarchy, and we can double click any displayed Role to choose it. Then we set the Field Access flags as desired for that Role.
If 'Field Access' is unchecked, then this field will not be visible to the user. This affects reports, inquires and input processes.
If 'Field Change' is unchecked, then the user will not be able to change the field on an input process, but they will see it's contents on screens, reports and inquiries.
Change Field Security
To change or delete an existing ACL record, just double click it. You will see the the following display: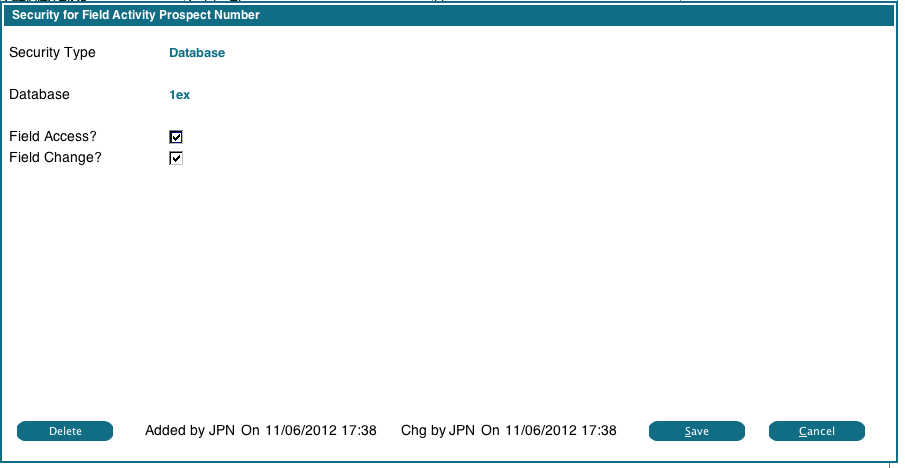 You can change the flags as required.
To Delete an ACL record, click the Delete button. It will change to 'Ack Del', click it again to confirm the deletion.
You can change the flags as required.
To Delete an ACL record, click the Delete button. It will change to 'Ack Del', click it again to confirm the deletion.
Comments:
Read what other users have said about this page or add your own comments.-- JeanNeron - 2012-11-06

Ideas, requests, problems regarding TWiki? Send feedback