APPX 5.5.0 Features - Runtime
This page describes the new features for the runtime environment in APPX 5.5.0.Overview
The runtime environment received a facelift. The various runtime screens the end users sees and interacts with have been updated to be more contemporary and functional. Some of the new screens require a minimum size of 25 rows, 100 columns. If these criteria are not met, the user will continue to see the old screens. The runtime programs will respect any theme set by .WIDGET APPLY THEME. If no theme is set, then APPX will use its default theme (pictured).Updated Client Defaults
The client defaults have been changed as follows:- Screen Size: 35 x 144
- useNewScanButton: True
- resizeMainWindowPane: True
- ie11fix: True
- toolbarStyle: Both
- useTableForScan: False. This is a new preference that controls whether or not Tables will be used for SCANs.
New Disposition
The Disposition screen has been redesigned: Printer and Form selection is now Table driven. To select a different Printer or Form, you can just single click on the appropriate row. Obscure print parameters that most users don't use have been moved to the 'Advanced' tab. System Administrators can still access the Printer and Form files via the gearbox icons in the Printer and Form table titles. If you are not a System Administrator, those icons are not present.
To print the report, you simply click the 'Print' button. If you want to view it on the screen, click the 'View' button. There are additional buttons for viewing/printing/emailing. These can be displayed by clicking the '...' button:
Printer and Form selection is now Table driven. To select a different Printer or Form, you can just single click on the appropriate row. Obscure print parameters that most users don't use have been moved to the 'Advanced' tab. System Administrators can still access the Printer and Form files via the gearbox icons in the Printer and Form table titles. If you are not a System Administrator, those icons are not present.
To print the report, you simply click the 'Print' button. If you want to view it on the screen, click the 'View' button. There are additional buttons for viewing/printing/emailing. These can be displayed by clicking the '...' button:
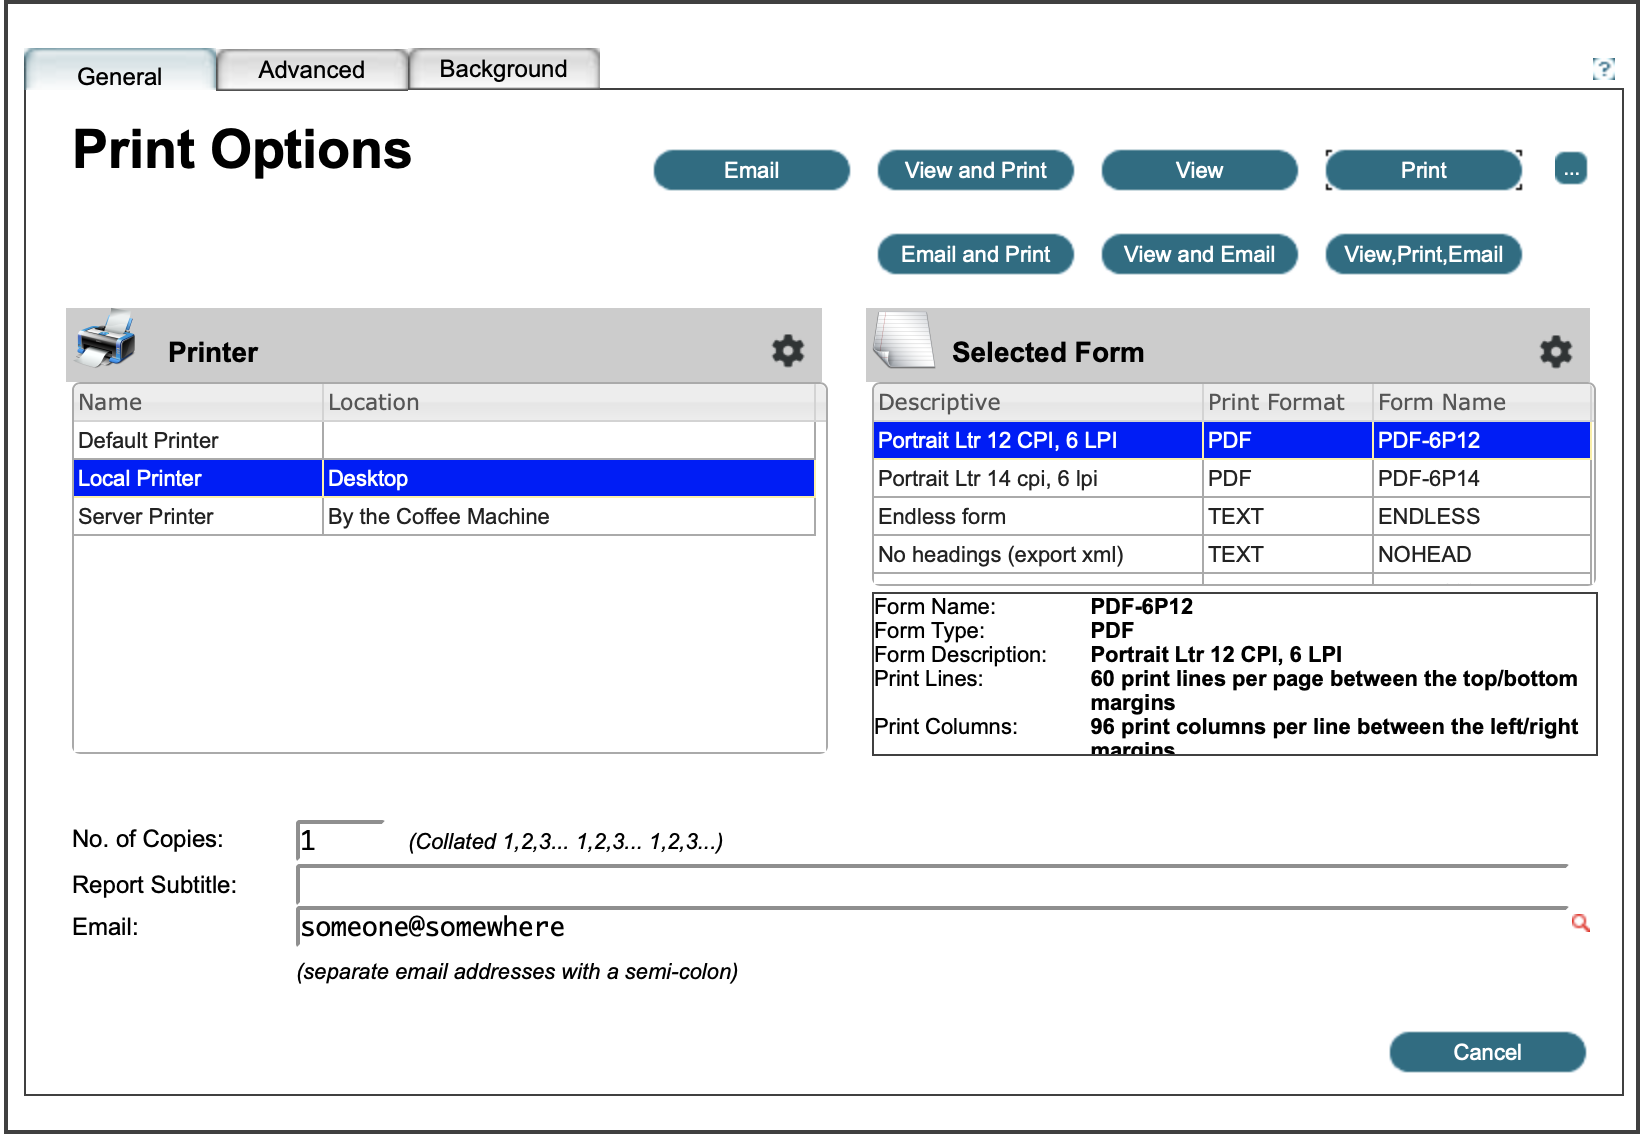 To email a report, you can enter an Email address or Distribution List in the Email field at the bottom of the form. Once you begin entering data in that field, the various 'Email' buttons will become enabled.
The 'Advanced' tab has the following fields:
To email a report, you can enter an Email address or Distribution List in the Email field at the bottom of the form. Once you begin entering data in that field, the various 'Email' buttons will become enabled.
The 'Advanced' tab has the following fields:
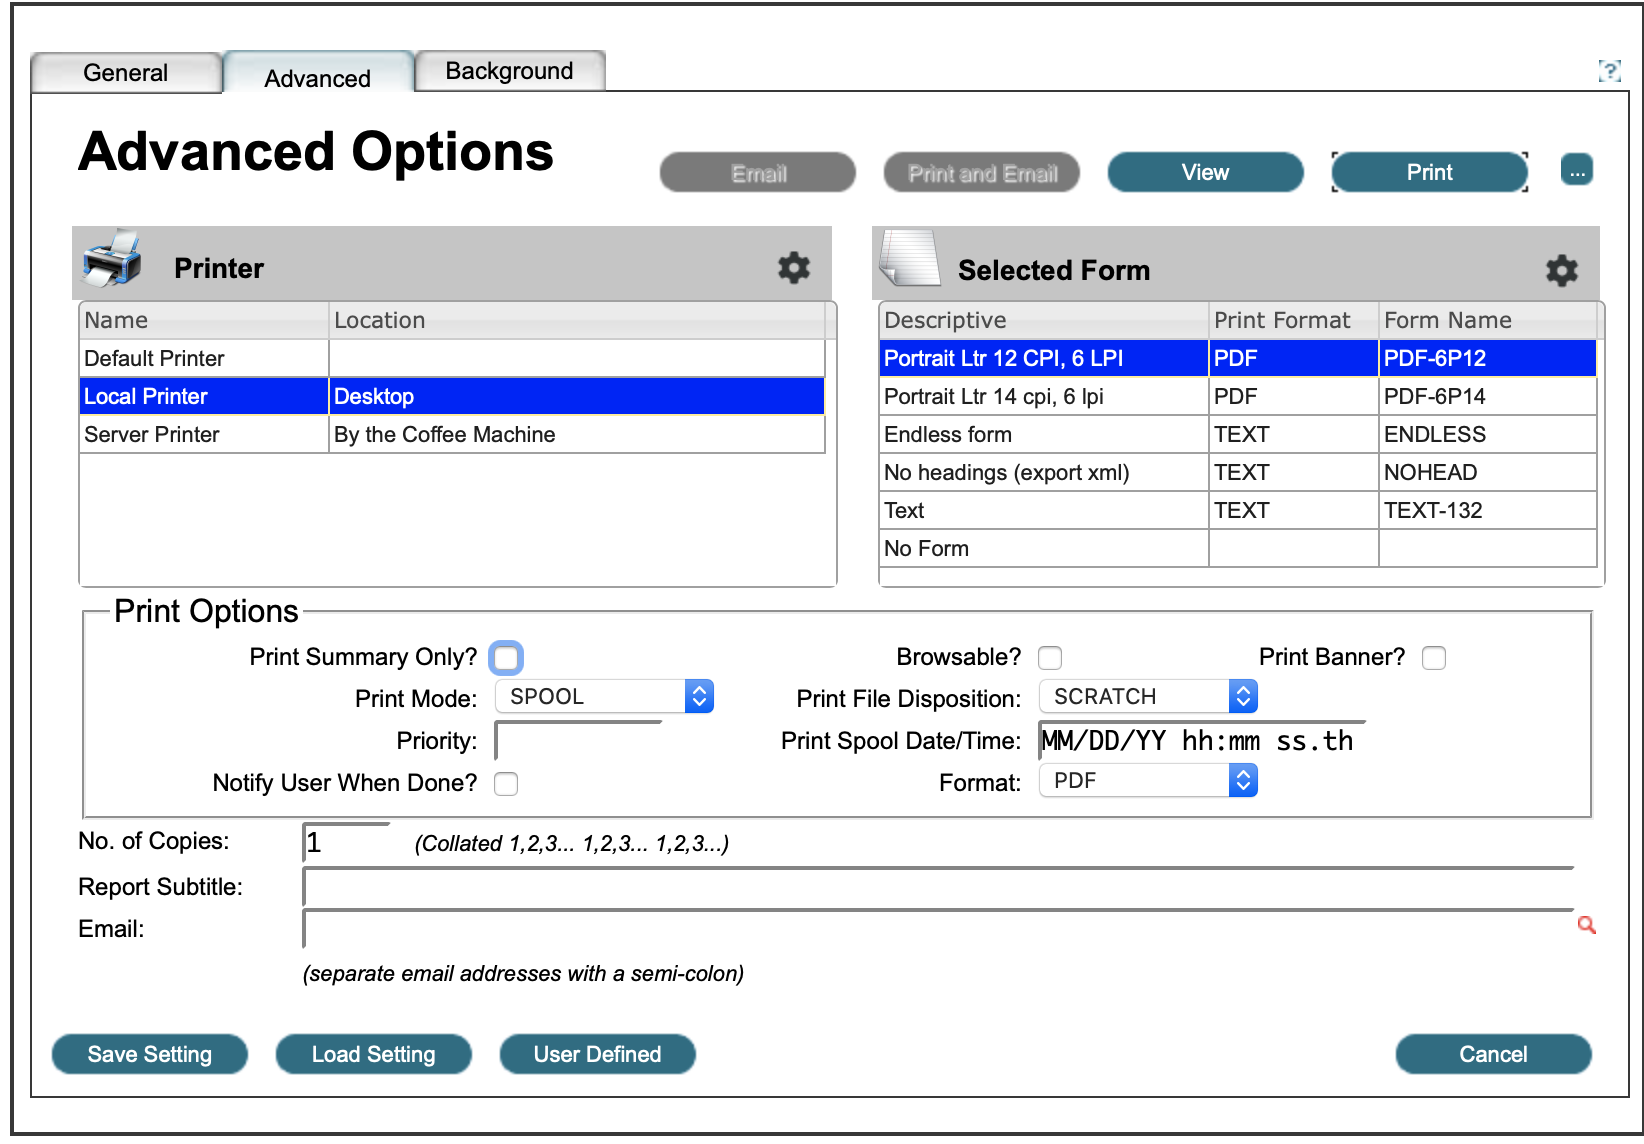 For ease of use, the Printer and Form tables are the same as on the General tab and can be changed here or on any other tab. The 'Print Options' box contains the print options that are not typically used by APPX but might be used by a third party print spooler.
This is also the tab where you can save or recall any saved Disposition settings.
To submit a job to background, you can click the 'Background' tab:
For ease of use, the Printer and Form tables are the same as on the General tab and can be changed here or on any other tab. The 'Print Options' box contains the print options that are not typically used by APPX but might be used by a third party print spooler.
This is also the tab where you can save or recall any saved Disposition settings.
To submit a job to background, you can click the 'Background' tab:
 As with the 'Advanced' tab, the Printer and Form tables are here and can be changed. To submit the job to background, you can click the 'Submit' button. If an Email address or Distribution List is entered, the 'Email' and 'Submit & Email' buttons will be enabled.
If any settings are not changeable because a saved Disposition Definition has been used, then those fields will not appear on the image. If all the fields for a particular Tab are not changeable, then that tab will not be enabled.
As with the 'Advanced' tab, the Printer and Form tables are here and can be changed. To submit the job to background, you can click the 'Submit' button. If an Email address or Distribution List is entered, the 'Email' and 'Submit & Email' buttons will be enabled.
If any settings are not changeable because a saved Disposition Definition has been used, then those fields will not appear on the image. If all the fields for a particular Tab are not changeable, then that tab will not be enabled.
New Record Selection / Sort Order screens
These screens have been substantially enhanced and you now have the ability to save or recall the Query parameters. The Record Selection screen now uses plain English for the selection criteria: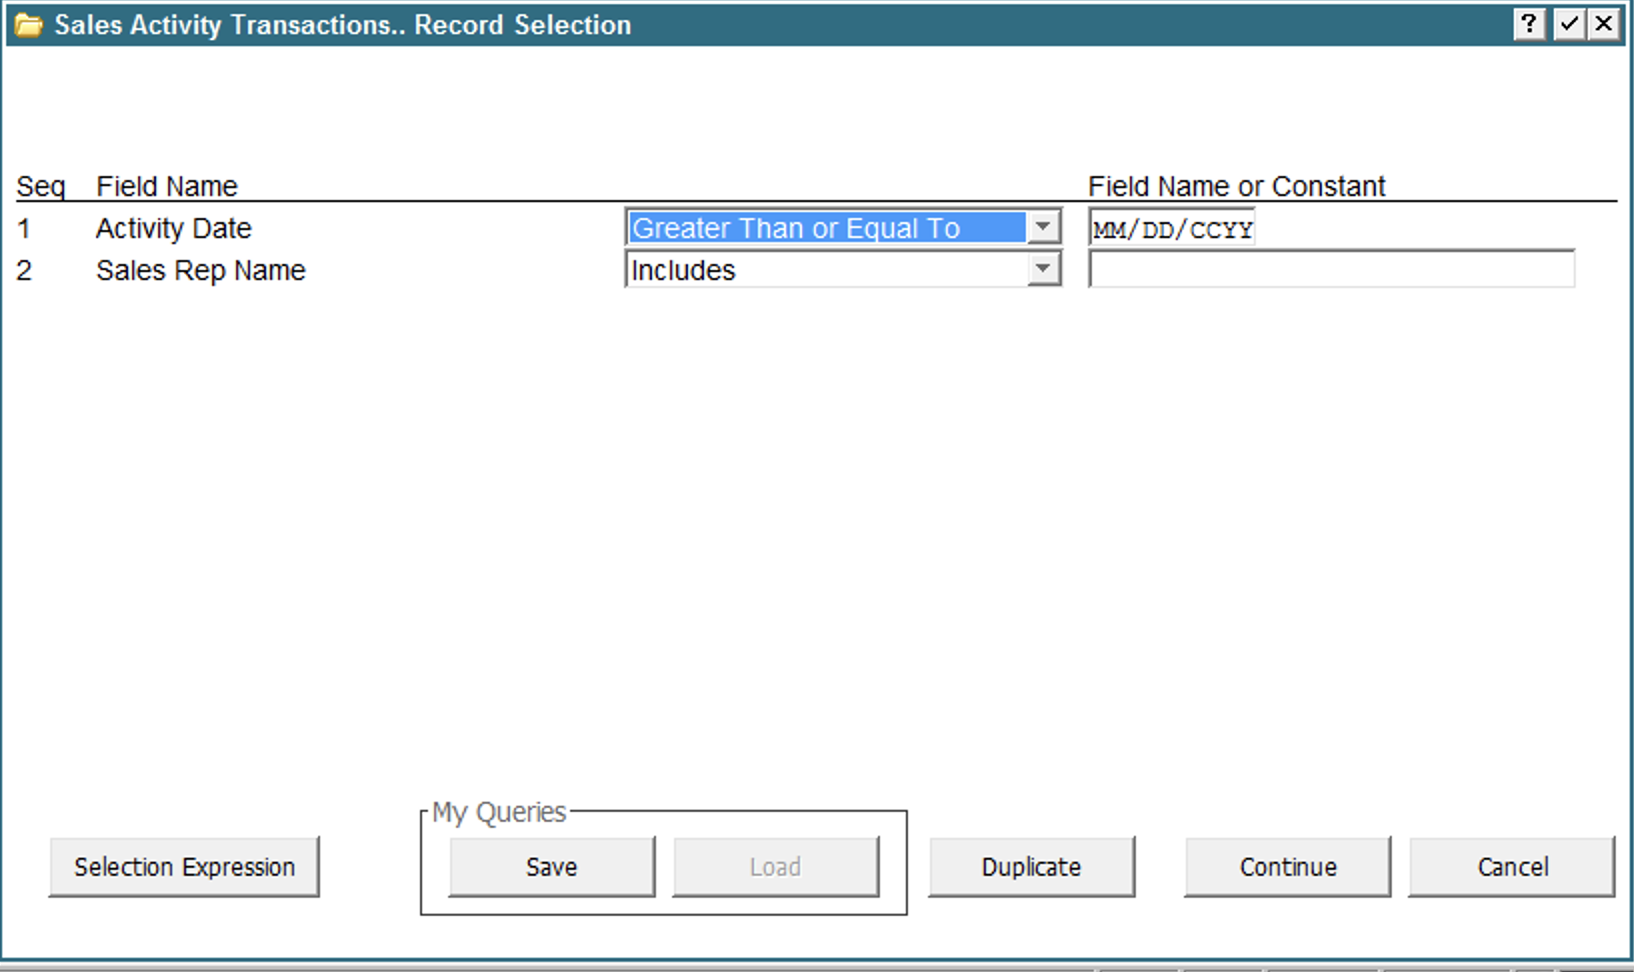 In addition to the standard operators, there is now 'Is Blank' or 'Is Not Blank'. The 'RI', 'RS' operators are now 'Case Insensitive Match' and 'Case Sensitive Match' respectively.
If there were any saved queries for this report, the 'Load' button would be enabled. To save the query parameters, you can click 'Save':
In addition to the standard operators, there is now 'Is Blank' or 'Is Not Blank'. The 'RI', 'RS' operators are now 'Case Insensitive Match' and 'Case Sensitive Match' respectively.
If there were any saved queries for this report, the 'Load' button would be enabled. To save the query parameters, you can click 'Save':
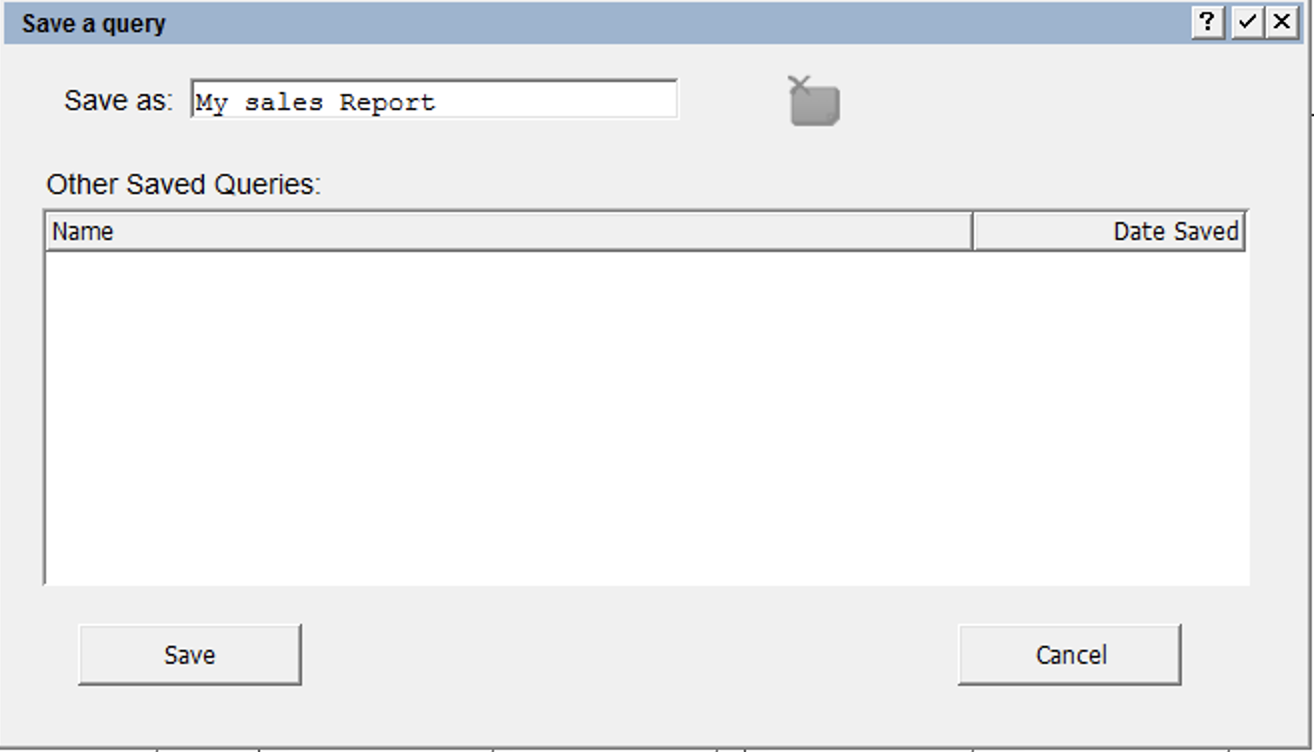 You simply enter a name & click 'Save'. If you use an existing name, the query parameters will be overwritten.
Any other saved query parameters for this report would be listed. To delete a saved query parameter, click on the one to delete, then click the delete icon (beside the name).
If you save the parameters at this point, APPX will also save the sort order but since you haven't seen that yet, it will be the default sort order the designer specified. If you want to save both your record selection and your sort order, you should click 'Save' on the Sort Order screen.
The Sort Order screen is much different and easier to use:
You simply enter a name & click 'Save'. If you use an existing name, the query parameters will be overwritten.
Any other saved query parameters for this report would be listed. To delete a saved query parameter, click on the one to delete, then click the delete icon (beside the name).
If you save the parameters at this point, APPX will also save the sort order but since you haven't seen that yet, it will be the default sort order the designer specified. If you want to save both your record selection and your sort order, you should click 'Save' on the Sort Order screen.
The Sort Order screen is much different and easier to use:
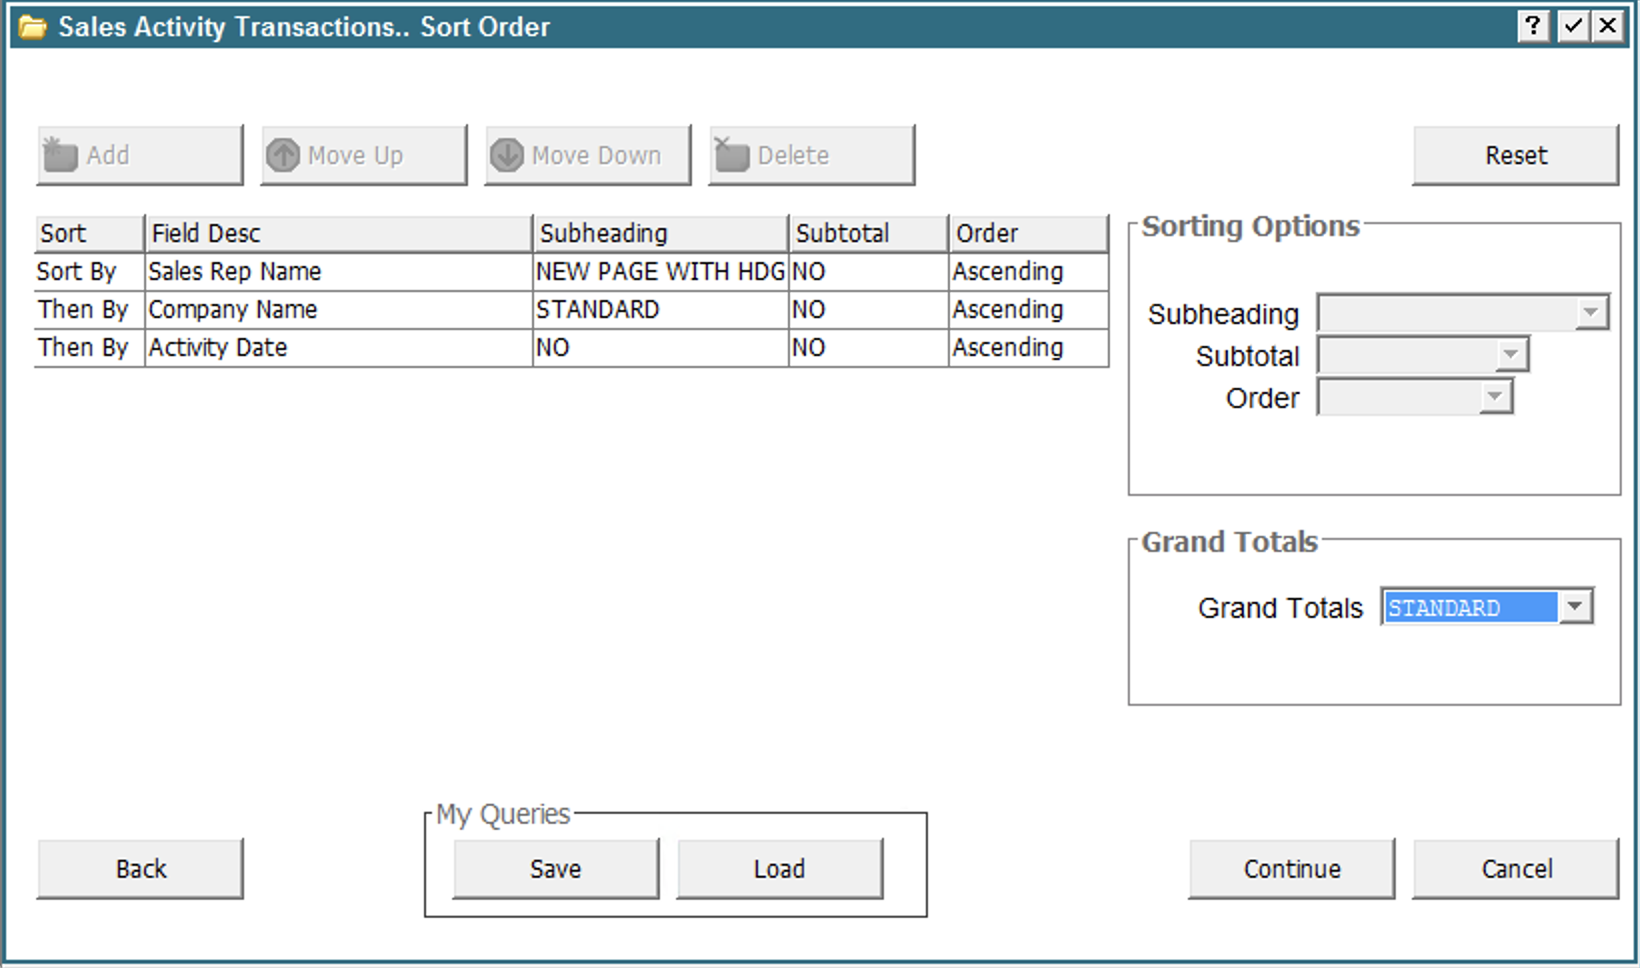 The numeric 'Sort Levels' are gone, replaced with the easier to understand 'Sort by', 'Then By', etc. To change the sort order, just click on the desired row. The 'Move Up' and 'Move Down' buttons will be enabled, then click the desired button to move the sort order up or down. The 'Move Up' button will not be enabled if you select the first row, and the 'Move Down' button will not be enabled if you select the last row. Multiple rows can be selected and moved up/down at once.
When you select a row, the 'Sorting Options' on the right hand side will be enabled, and you can change any of those parameters. The 'Delete' button will also be enabled to allow you to remove a field from the sort sequence.
The 'Add' button is only enabled if the designer has included optional sort fields, or if you deleted a sort sequence. Previously, optional sort fields would be displayed, but without a Sort Level. When you click 'Add', a list of fields that can be added will be displayed:
The numeric 'Sort Levels' are gone, replaced with the easier to understand 'Sort by', 'Then By', etc. To change the sort order, just click on the desired row. The 'Move Up' and 'Move Down' buttons will be enabled, then click the desired button to move the sort order up or down. The 'Move Up' button will not be enabled if you select the first row, and the 'Move Down' button will not be enabled if you select the last row. Multiple rows can be selected and moved up/down at once.
When you select a row, the 'Sorting Options' on the right hand side will be enabled, and you can change any of those parameters. The 'Delete' button will also be enabled to allow you to remove a field from the sort sequence.
The 'Add' button is only enabled if the designer has included optional sort fields, or if you deleted a sort sequence. Previously, optional sort fields would be displayed, but without a Sort Level. When you click 'Add', a list of fields that can be added will be displayed:
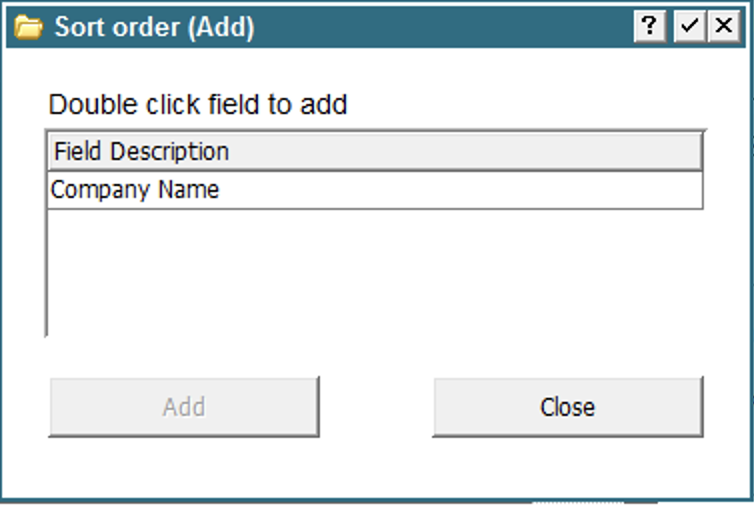 If you had selected a row before clicking the 'Add' button, the new field would be inserted at that point and the existing field pushed down the list. If no row was selected, then the new field will be added to the end of the sort sequence.
Note that list will include the optional sort sequences set up by the designer as well as any fields you removed from the sort order.
The 'Reset' button will reset the parameters to the last saved settings, or if the parameters have not been saved, it will be reset to the designer's specifications.
As with the Record Selection screen, there are 'Load' and 'Save' buttons. If you save the parameters at this point, then both your custom record selection and sort order will be saved. Similarly, if you load a saved parameter, then both the Record Selection and Sort Order will be loaded. Saving and Loading query parameters always loads/saves both the Record Selection and Sort Order, regardless of which screen you are on when you select that option.
If you had selected a row before clicking the 'Add' button, the new field would be inserted at that point and the existing field pushed down the list. If no row was selected, then the new field will be added to the end of the sort sequence.
Note that list will include the optional sort sequences set up by the designer as well as any fields you removed from the sort order.
The 'Reset' button will reset the parameters to the last saved settings, or if the parameters have not been saved, it will be reset to the designer's specifications.
As with the Record Selection screen, there are 'Load' and 'Save' buttons. If you save the parameters at this point, then both your custom record selection and sort order will be saved. Similarly, if you load a saved parameter, then both the Record Selection and Sort Order will be loaded. Saving and Loading query parameters always loads/saves both the Record Selection and Sort Order, regardless of which screen you are on when you select that option.
Experimental - Use tables in scan
A new feature is the ability to use Tables for scanning. As this is somewhat experimental, it has to be explicitly enabled via the client preference 'useTableForScan'. By default, this is set to 'false'. Change it to 'true' to use tables. This can be changed anytime during the session and will take affect the next time the user presses F2 or clicks the scan icon. There are a number of advantages with using tables for scan: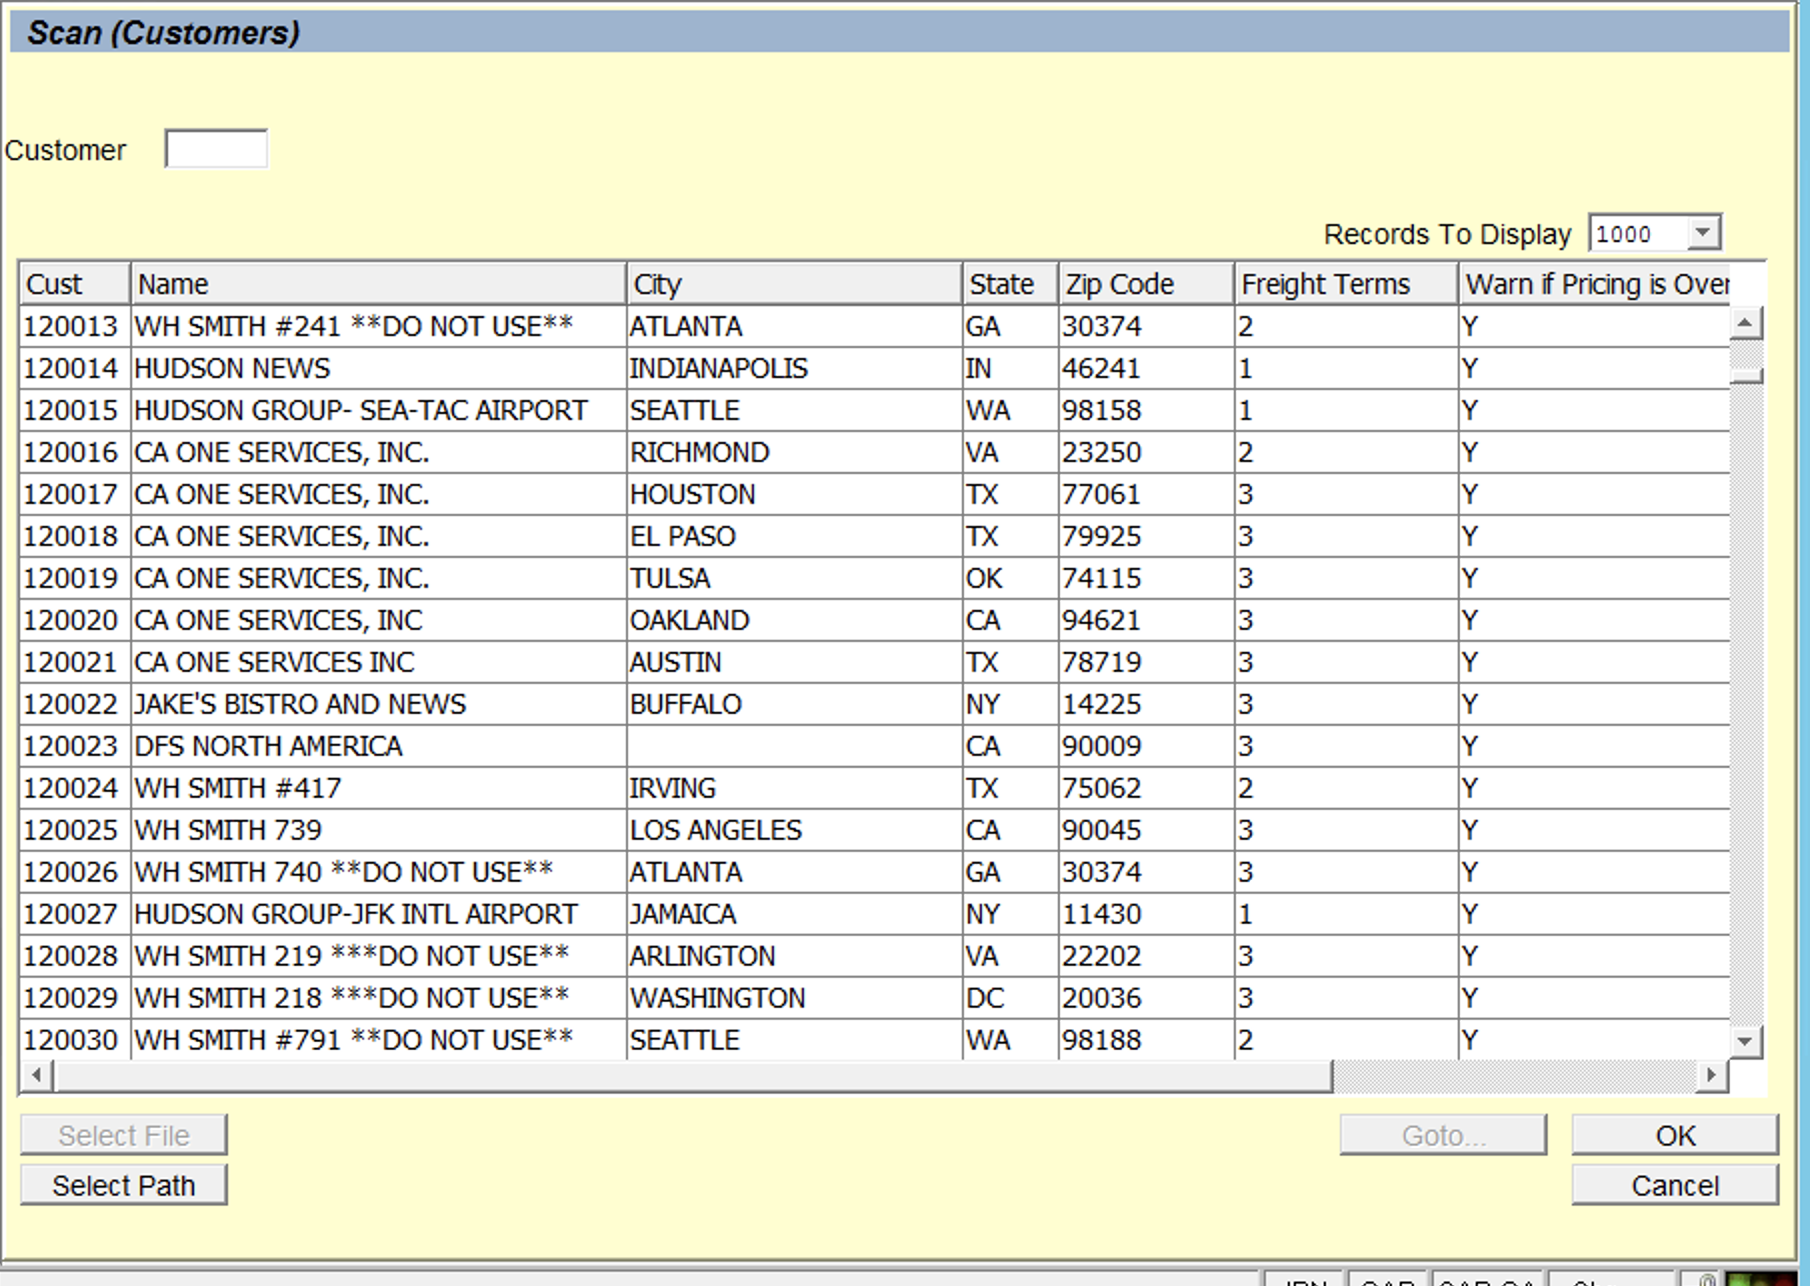 Since this is a table, you can rearrange the columns or sort by any column. If there are more fields than will fit on the table, a horizontal scroll bar will appear instead of just cutting off the data that does not fit. This gives the designer more flexibility on what fields to include in a scan.
The 'Records to Display' field controls how many records from the source file will be loaded into the table. If you are scanning into a file that contains 100's of thousands of records, or more, we do not want to load all that data into the table. The 'Records to Display' limits this. You can choose a different value and the table will be reloaded accordingly. This also means that when you sort this table, you may not be sorting the entire file, only the number of records you included.
The HTML client has options for filtering a table, which can also be used when scanning for records.
Since this is a table, you can rearrange the columns or sort by any column. If there are more fields than will fit on the table, a horizontal scroll bar will appear instead of just cutting off the data that does not fit. This gives the designer more flexibility on what fields to include in a scan.
The 'Records to Display' field controls how many records from the source file will be loaded into the table. If you are scanning into a file that contains 100's of thousands of records, or more, we do not want to load all that data into the table. The 'Records to Display' limits this. You can choose a different value and the table will be reloaded accordingly. This also means that when you sort this table, you may not be sorting the entire file, only the number of records you included.
The HTML client has options for filtering a table, which can also be used when scanning for records.
HTML client Download Data as CSV
The HTML client has the ability to download a Table in CSV format: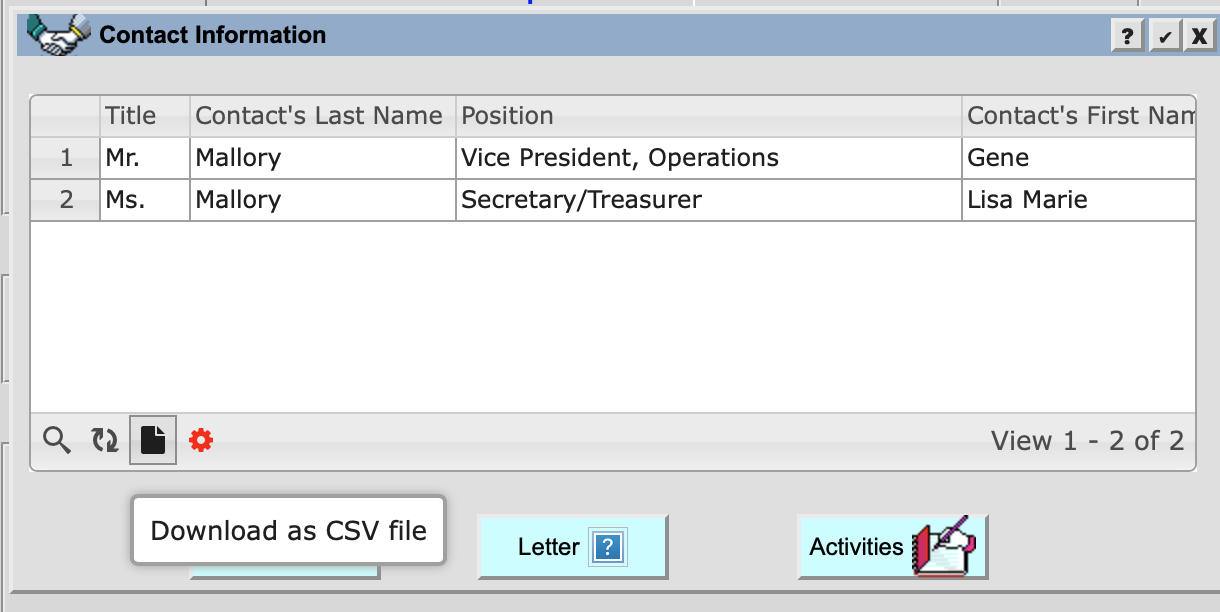 When selected, the current table will be exported to CSV in the Downloads folder (or whatever the default download folder is for the browser). From there, it can be opened with Excel or other compatible program.
--
When selected, the current table will be exported to CSV in the Downloads folder (or whatever the default download folder is for the browser). From there, it can be opened with Excel or other compatible program.
-- Comments
This topic: Main > Appx550Features > Appx550FeaturesRunTime
Topic revision: r3 - 2020-03-12 - JeanNeron
Ideas, requests, problems regarding TWiki? Send feedback