Difference: MedicaidPaymentReconciliationManual (8 vs. 9)
Revision 92010-03-19 - JeffPrentice
| Line: 1 to 1 | ||||||||
|---|---|---|---|---|---|---|---|---|
Appx Medicaid ReconciliationOverview | ||||||||
| Line: 184 to 184 | ||||||||
 | ||||||||
| Changed: | ||||||||
| < < | To delete a per diem semester (period) see Delete a Per Diem Data Period on the Special Functions Menu | |||||||
| > > | To delete a per diem semester (period) see Delete a Per Diem Data Period on the Special Functions Menu#test. | |||||||
Verify Per Diem File (Future Release)This process will use the current date and check for all the semesters that should be in the per diem file. | ||||||||
| Line: 396 to 395 | ||||||||
Edit Payment Records/Change Payment CodeThis function lets you go to any record in the bill, including records that were not listed on the exception list. If for any reason you need to override the P00 on a record that was pre-approved you can change it using this function. | ||||||||
| Changed: | ||||||||
| < < | Trail Balance (Available Soon) | |||||||
| > > | Trail Balance (Future Release) | |||||||
This process will display a summary of the current cycle bill. The report shows each billing category and the number and amount of approved and denied payments. Use this to evaluate the status of your current reconciliation cycle. The trial balance is not intended to be printed on paper, just displayed on the screen.
Post Reconciled Bill | ||||||||
| Line: 408 to 407 | ||||||||
| The download and upload steps are performed using your internet browser, not the Appx system. Downloading and Uploading as well as Internet access may be restricted depending on your county’s policy. After posting the MPR system resets itself in preparation for the next cycle. | ||||||||
| Changed: | ||||||||
| < < | How to upload the reconciled bill | |||||||
| > > | How to upload the reconciled bill | |||||||
| After the summary letter gets approved for payment you need to send the reconciled bill back to the State. The reconciled bill has been created by the Appx system and is residing in the Upload directory under the Appx folder on your server. The file name will be the same name you gave the bill when you Downloaded it, for example; OCT08P.txt. As you would expect, the upload process is similar to the download process. You are just selecting the file from the Upload directory rather than the Download. If you upload the file in the Download directory then what ACHA receives is the same data you downloaded. Nothing will be changed. If you get a call to that effect, chances are you’ve made this mistake. All that you need to do is upload the file from the proper directory, you do not need to reconcile again. If the file size is greater than 3 megabytes it will have to be compressed before uploading it. Invoke the compression utility that is available on you computer and compress the file. Your IT folks should be able to help you with this process. As of this writing, all files have been under 3 megabytes. Log into the Florida Medicaid website and select “upload” from the Web Portal > Trade files page. Click on the browse button and navigate to the compressed file and select it. Once selected complete any other information on the web page and click the upload button. The file you selected for uploading will still be in the Upload directory on your computer after the transfer. If you need to send this file again, simply repeat the upload process. It is a good idea to keep these files because they can be used to recreate your history files if necessary. | ||||||||
| Added: | ||||||||
| > > | Special Functions MenuThe Special Functions menu contains processes to assist you in maintaining your system or to perform batch data processing.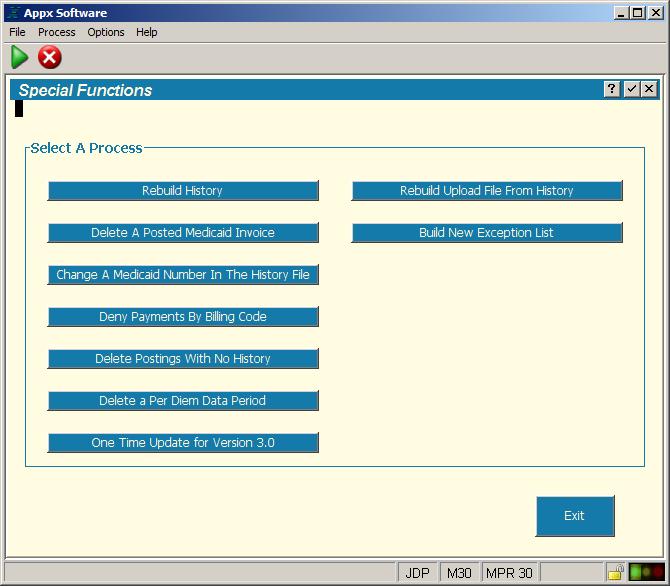
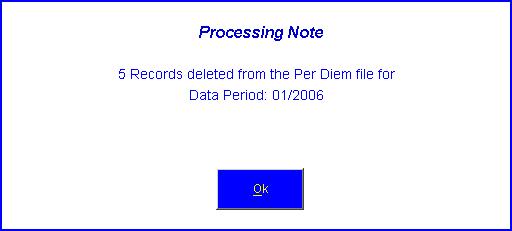
Rebuild HistoryThis function will rebuild the history file from the reconciled billing files in the Upload directory.Delete A Posted Medicaid InvoiceIf you imported the wrong billing file (invoice) by mistake, you can delete the batch with this function and start over.Change A Medicaid Number In The History FileIf a client has their Medicaid ID number changed, this process will update the history file with the new ID number. Normally the history file is not modifiable.Deny Payments By Billing CodeThis is a handy tool that will let you deny an entire group of billing records. For example, if you wish to deny all HMO records in the current cycle, you can use this function to select HMO records and then identify the denial code you wish to put on these records. This only affects the currently imported batch.Delete Posting With No HistoryUse this to remove batches that were started and never posted.Delete a Per Diem Data PeriodUse this function to delete a per diem semester. From the Special Functions menu, click on Delete a Per Diem Data Period. The following screen will be displayed.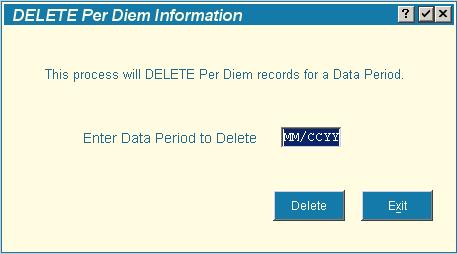 Enter the two digit month (MM) and the four digits century and year (CCYY) and click the Delete button. The month entered must be 01 or 07. If you enter a data period that does not exist on the Per Diem file an error message will be displayed. You must click the Delete button to execute this function. Pressing ENTER or the Exit button will not delete the records. If the delete is successful you will see a message indicating how many records were deleted, see example. You can only delete one period at a time.
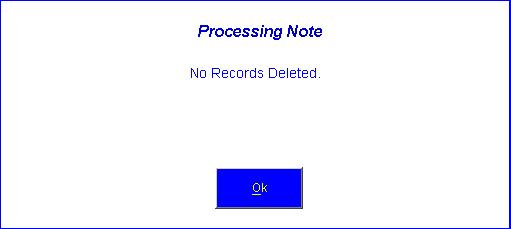
 If no records were deleted, the following message will be displayed. You will see this message if you click the Exit button or pressed the ENTER key on the application screen.
Rebuild Upload From HistoryUsing the history file in the MPR system this process can rebuild the file(s) in the Upload directory.Build New Exception ListIf you import a bill and then realize that the COR file needs to be updated to reduce the number of exceptions you can invoke this special process. Please note any changes to this batch will be lost if you invoke this process. One handy way of using this function is to import a bill, go thru it and create COR’s for all the relevant records. Then invoke this process and the system will use the new records in the COR to reduce the number exceptions . The Exit button will take you back to the MPR main menu. | |||||||
TerminologyNon-payment code | ||||||||
| Line: 451 to 493 | ||||||||
PostingWhen a bill has been completely reconciled the bill must be posted. Posting will create the billing file that you will upload to the State. Posting also updates the Payment History file in the system with the current records that have been processed. After posting a new reconciliation cycle can begin. | ||||||||
| Changed: | ||||||||
| < < | Exception Reasons | |||||||
| > > | Exception Reasons | |||||||
These messages are printed on the exception report and indicate why that client is listed.
Not this county | ||||||||
| Line: 459 to 501 | ||||||||
The county code in the Download data file for this record does not match the county code in your Agency Options parameters.
No COR on file. -- NP code updated | ||||||||
| Changed: | ||||||||
| < < | There is no Certificate of Residency record (COR) on file for this nursing home client. The NP Code is set to the code you defined on the Parameter screen in the field “No COR NP Code”. | |||||||
| > > | There is no Certificate of Residency record (COR) on file for this nursing home client. The NP Code is set to the code defined on the Parameter screen in the field “No COR NP Code”. | |||||||
Resident record not set for NHA Certificate of Residency record (COR) exists for this nursing home client but the “Nursing Home COR?” field is not checked. When this field is not checked the COR exists but is inactive. | ||||||||
View topic | History: r18 < r17 < r16 < r15 | More topic actions...
Ideas, requests, problems regarding TWiki? Send feedback