Difference: MedicaidPaymentReconciliationManual (13 vs. 14)
Revision 142010-04-07 - JeffPrentice
| Line: 1 to 1 | ||||||||
|---|---|---|---|---|---|---|---|---|
Appx Medicaid Payment ReconciliationOverview | ||||||||
| Line: 112 to 112 | ||||||||
| Caution should be taken before changing any settings on this screen. | ||||||||
| Changed: | ||||||||
| < < | The Payment Posting Information section contains information about the reconciliation cycle (batch). Reconciliation is a multi-step process. Steps need to completed in order. The Current Status field is an internal pointer indicating which step you are currently in. The MPR system will automatically change as you proceed through reconciling your monthly bill. Please do not change this number unless someone from Appx asks you to do so. The Last File Imported is the name of the bill that you are either working on just finished. Last Batch ID Created is the internal name the MPR system gave the batch you imported. A digit is added to provide uniqueness if another batch for the month is reconcilied. | |||||||
| > > | The Payment Posting Information section contains information about the reconciliation cycle (batch). Reconciliation is a multi-step process. Steps need to completed in order. The Current Status field is an internal pointer indicating which step you are currently in. The MPR system will automatically change as you proceed through reconciling your monthly bill. Please do not change this number unless someone from Appx asks you to do so. The Last File Imported is the name of the bill that you are either working on just finished. Last Batch ID Created is the internal name the MPR system gave the batch you imported. A digit is added to provide uniqueness if another batch for the month is reconcilied. | |||||||
| Changed: | ||||||||
| < < | Per Diem Control. This section enables or disables the per diem editing feature of the MPR system. Per diem checking is optional and by defualt is disabled. To use this feature you must import all the available per diem files from the State (see below for details), also, as new per diem files become available you must import them as well. | |||||||
| > > | Per Diem Control. This section enables or disables the per diem editing feature of the MPR system. Per diem checking is optional and by defualt is disabled. To use this feature you must set these fields then import all the available per diem files from the State (see below for details), also, as new per diem files become available you must import them as well. | |||||||
| Changed: | ||||||||
| < < | To enable per diem you check the boxes; Validate Host Per Diem and Validate HMO Per Diem on this screen. To check a field all you need to do is place your mouse pointer on the box next to the field name and click (or press the space bar). A check mark will appear. The Allow Amounts Less Than Per Diem can be checked if you wish to allow the billed amount to be less than the pre-determined per diem value. System Settings. Fiscal Year Start Month can be set to your fiscal period starting month. There are a few reports that can be sorted by fiscal year. No COR NP Code, identifies the default denial code the MPR system puts on incoming billing records that do not have a COR record on file. Import Eligibility Code is the default eligibility code you wish to have placed on imported COR records. The Server OS Type is for identifying the operating system (OS) type. The MPR system needs this to determine the OS command structure syntax. Import/Export File Path is the complete OS path to your MPR system data directory. If the Appx system is moved to another location on the current server or move to a different location on another server this path must be changed. | |||||||
| > > | System Settings. Fiscal Year Start Month can be set to your fiscal period starting month. There are a few reports that can be sorted by fiscal year. No COR NP Code, identifies the default denial code the MPR system puts on incoming billing records that do not have a COR record on file. Import Eligibility Code is the default eligibility code you wish to have placed on imported COR records. The Server OS Type is for identifying the operating system (OS) type. The MPR system needs this to determine the OS command structure syntax. Import/Export File Path is the complete OS path to your MPR system data directory. If the Appx system is moved to another location on the current server or move to a different location on another server this path must be changed. | |||||||
Add Payment History RecordsThis input process allows you to enter data into the history files. Use this function to add billing history from bills that were not reconciled using the MPR system. MPR will automatically maintain a history for each batch processed.Reporting Functions | ||||||||
| Changed: | ||||||||
| < < | Most reports comprise a multi-process step. Depending on the design of the report some of these steps may not exist. The first step is to obtain the constraints of the data. The second step will allow you to control sort order. Step three asks you for print characteristics such as printer name, form name, etc. By default reports are displayed on your screen prior to physically printing the report on a printer. | |||||||
| > > | Most reports comprise a multi-process step. Depending on the design of the report some of these steps may be bypassed. The first step is to obtain the constraints of the data. The second step will allow you to control sort order. Step three lets you define print characteristics such as printer name, form name, etc. By default reports are displayed on your screen prior to physically printing the report on a printer. | |||||||
List Medicaid Clients With No ActivityList’s clients with COR records that have no billing history. If you added a COR and there is no history something might be wrong with the COR record keys. Us this report to check for this condition and investigate the reason why no billing records have accessed this history information. | ||||||||
| Line: 145 to 143 | ||||||||
List the count of clients assisted within a date range. Also totals the amount paid or denied for the period defined.
Other Menus | ||||||||
| Changed: | ||||||||
| < < | The large button, Medicaid Payment Processing Menu, will invoke the reconciliation menu. The Special Functions Menu is for performing unique task. | |||||||
| > > | The large button, Medicaid Payment Processing Menu, will invoke the reconciliation menu. The Special Functions Menu is for performing unique task. | |||||||
|
| ||||||||
| Line: 172 to 170 | ||||||||
| ||||||||
| Changed: | ||||||||
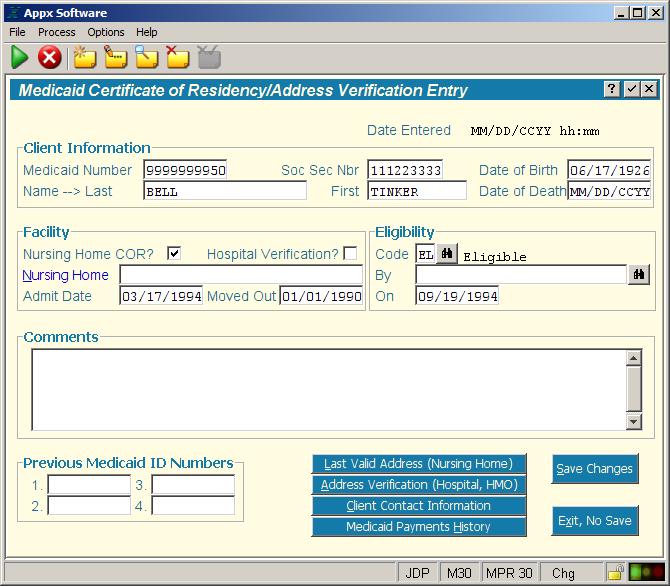
| < < | You can add or change COR record information on this screen. The COR file can be updated with live records from the bill. This might be the easiest and fastest way to keep your COR file up to date. While processing the bill you can have the MPR system create a COR record for you. Most of the information in the COR record is populated with the data from the billing record. All you need to do is mark the eligibility status. The MPR system will not alter the eligibility status automatically from the billing record. | |||||||
| > > | You can add or change COR record information on this screen. The COR file can be updated with live records from the bill. This might be the easiest and fastest way to keep your COR file up to date. While processing the bill you can have the MPR system create a COR record for you. Most of the information in the COR record is populated with the data from the billing record. All you need to do is mark the eligibility status. | |||||||
| Changed: | ||||||||
| < < | Also from this screen you can invoke other process. Last Valid Address (Nursing Home) is where you can record the clients last known address prior to entering the nursing home. Address Verification (Hospital, HMO) for entering the hospital address. Client Contact Information for storing the clients’ legal representative and public assistance case worker. Medicaid Payments History shows prior activity for this client. | |||||||
| > > | Also from this screen you can invoke other process. Last Valid Address (Nursing Home) is where you can record the clients last known address prior to entering the nursing home. Address Verification (Hospital, HMO) for entering the hospital address. Client Contact Information for storing the clients’ legal representative and public assistance case worker. Medicaid Payments History shows prior activity for this client. | |||||||
| Changed: | ||||||||
| < < | A COR record must be identified as being a nursing home COR and/or a Hospital COR. There are two check boxes in the Facility section of this screen for identifying the type of COR verification intended for this client. Nursing home COR are common and will be the predominate type of COR records in your COR file. Hospital COR’s are different. Because of the high dollar amount of hospital and HMO bills you may want to review each record individually each month. In that case you would not define a hospital COR, however, if you wish, you can create a hospital COR and mark it eligible. As with nursing home, hospital and HMO billing records matching and eligible COR will not be listed on the exception list. A COR can be both a nursing home and hospital COR. | |||||||
| > > | A COR record must be identified as being a nursing home COR and/or a Hospital COR. There are two check boxes in the Facility section of this screen for identifying the type of COR verification intended for this client. Nursing home COR's are common and will be the predominate type of COR records in your COR file. Hospital COR’s are different. Because of the high dollar amount of hospital and HMO bills you may want to review each record individually each month. In that case you would not define a hospital COR, however, if you wish, you can create a hospital COR and mark it eligible. As with nursing home, hospital and HMO billing records matching and eligible COR will not be listed on the exception list. A COR can be both a nursing home and hospital COR. | |||||||
Import State COR File | ||||||||
| Changed: | ||||||||
| < < | Use this function to import the electronic State COR file. Currently the State does not produce a importable COR file. | |||||||
| > > | Currently the State does not produce a importable COR file. | |||||||
Review New COR Information | ||||||||
| Changed: | ||||||||
| < < | This process lists all the newly imported COR records from the State. Each COR must be reviewed for eligibility. The COR file will be updated with the incoming record if the COR is accepted. This process is tied to the Import State COR File which is currently not being used. | |||||||
| > > | This process lists all the newly imported COR records from the State. Each COR must be reviewed for eligibility. The COR file will be updated with the incoming record if the COR is accepted. This process is tied to the Import State COR File which is currently not being used. This function is currently not used since there is no importable file from the State. | |||||||
|
| ||||||||
| Line: 205 to 203 | ||||||||
| The Appx Medicaid Reconciliation system can import the Medicaid Reimbursement Rates and optionally check the hospital/HMO billing records to ensure the amount charged matches the pre-set per diem rate. If the rate does not match then the record will be listed on the exception report with an appropriate message. You then decide to pay or not pay (reimburse) based on your county‘s criteria. | ||||||||
| Changed: | ||||||||
| < < | Please take note that Per Diem editing is an optional feature. By default the MPR system will not validate Per Diem. See the detailed instructions below on how to activate this feature. | |||||||
| > > | Please take note that Per Diem editing is an optional feature. By default the MPR system will not validate Per Diem. See the detailed instructions Activating Per Diem Editing below to activate this feature. If Per Diem checking is active on your system ensure that all the relevant files have been processed before importing your monthly bill to avoid unnecessary records and messages on the exception list. | |||||||
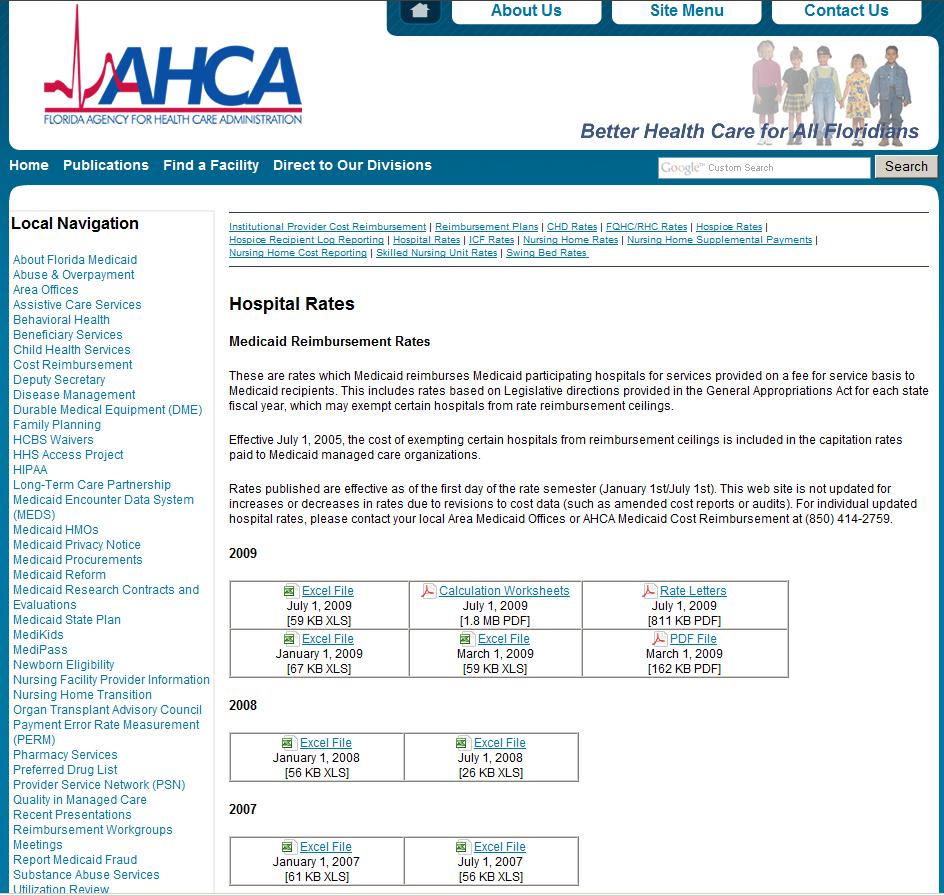
Downloading the Hospital Per DiemDownload the Per Diem import data file at; | ||||||||
| Line: 217 to 215 | ||||||||
| ||||||||
| Changed: | ||||||||
| < < | Per Diem files are under the heading Hospital Rates on this web site. The file you download includes all the providers within Florida. There are not specific files for each county as with the bill. The file will download as a spreadsheet (xls, Excel). Open this file with Excel and save it as a tab delimited text file to the /Download directory. Name the file using the standard MMMYYx format. For example, JAN05H. Use H to identify this file as a hospital per diem file. | |||||||
| > > | Per Diem files are under the heading Hospital Rates on this web site. The file you download includes all the providers within Florida. There are not specific files for each county as with the bill. The file will download as a spreadsheet (xls, Excel). Open this file with Excel and save it as a tab delimited text file to the /Download directory. Name the file using the standard MMMYYx format. For example, JAN05H . Use H to identify this file as a hospital per diem file. | |||||||
Important note: There are several years/semesters available for downloading. You will need to download files to cover the anticipated service dates for the billing records you are currently receiving from the State.
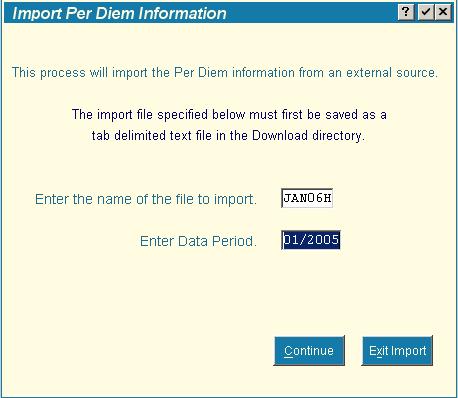
Import State Per Diem File | ||||||||
| Changed: | ||||||||
| < < | The file you downloaded from the internet and saved in the /Download directory needs to be imported into the Medicaid Reconciliation system. The import process reads each record in the downloaded file and saves the information to a file in the Appx Medicaid system. Click the Import State Per Diem File. The following screen pops up. | |||||||
| > > | The file you downloaded from the internet and saved in the /Download directory needs to be imported into the Medicaid Reconciliation system. The import process reads each record in the downloaded file and saves the information to a file in the MPR system. Click the Import State Per Diem File. The following screen pops up. | |||||||
 | ||||||||
| Line: 242 to 240 | ||||||||
| The message will tell how many records were imported and reminds you to set the Validate Per Diem box(s), either Hospital and/or HMO to Yes (checked) on the Parameter File Maintence screen. See Activating Per Diem Editing below for instructions on setting these fields on the parameter screen. | ||||||||
| Changed: | ||||||||
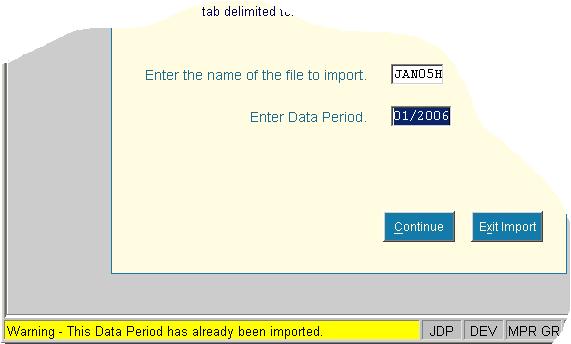
| < < | You may import the same period again if the State has sent a new or corrected file. Simply follow the same instructions except when the system detects the same period on file a warning message will be displayed, see following example. If you click the Continue button, the system will replace the existing data with the new file. | |||||||
| > > | You may import the same period again if the State has sent a new or corrected file. Simply follow the same instructions except when the system detects the same period on file a warning message will be displayed, see following example. If you click the Continue button, the system will replace the existing data with the new file. | |||||||
 | ||||||||
| Line: 262 to 260 | ||||||||
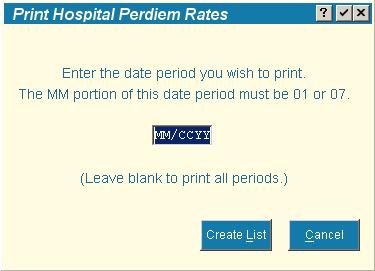
Per Diem List | ||||||||
| Changed: | ||||||||
| < < | This function will list the per diem data that is stored in your system. Enter the Data Period you wish to print and click Create List. Leave the Data Period blank to get a listing of the entire Per Diem file. After clicking Create List, the standard Appx Print Disposition screen will appear. Enter any specific instructions for the printed output and continue. | |||||||
| > > | This function will list the per diem data that is stored in your system. Enter the Data Period you wish to print and click Create List. Leave the Data Period blank to get a listing of the entire Per Diem file. After clicking Create List, the standard Appx Print Disposition screen will appear. Enter any specific instructions for the printed output and continue. | |||||||
 | ||||||||
| Changed: | ||||||||
| < < | The data on the Per Diem file is a combination of the actual data from the import file (Provider Number, Inpatient Rate, and Provider Name) and data the system has added (Data Period and 35% of Inpatient Rate). The 35% rate is calculated during importing and is not present in the download file from the State. The amount on the bill is compared to 35% of the inpatient rate. | |||||||
| > > | The data on the Per Diem file is a combination of the actual data from the import file (Provider Number, Inpatient Rate, and Provider Name) and data the MPR system has added (Data Period and 35% of Inpatient Rate). The 35% rate is calculated during importing and is not present in the download file from the State. The amount on the bill is compared to 35% of the inpatient rate. | |||||||
Activating Per Diem Editing | ||||||||
| Changed: | ||||||||
| < < | After you have completed importing the Per Diem data for the appropriate range of dates the Medicaid Reconciliation system needs to be instructed to start editing incoming hospital/HMO records while creating the exception list. This is accomplished on the Parameter File Maintence screen. Three new yes/no fields control how Per Diem is edited on the incoming bill. Validate Hosp Per Diem and Validate HMO Per Diem. You can set either or both. If neither is checked then incoming billing records will not be checked for Per Diem violations. | |||||||
| > > | After you have completed importing the Per Diem data for the appropriate range of dates the Medicaid Reconciliation system needs to be instructed to start editing incoming hospital/HMO records while creating the exception list. This is accomplished on the Parameter File Maintence screen. There are two fields which control if Per Diem is edited on the incoming bill, Validate Hosp Per Diem and/or Validate HMO Per Diem. You can set either or both. If neither is checked then incoming billing records will not be checked for Per Diem violations. | |||||||
| Changed: | ||||||||
| < < | If Per Diem is activated and the calculated Per Diem on the bill is not equal to the stored Per Diem value the billing record will be listed on the exception report. You can have the system not list billing records as exceptions when the calculated Per Diem is less than the set Per Diem rate. Check Allow Amounts Less Than Per Diem to apply this edit. | |||||||
| > > | If Per Diem is activated and the calculated Per Diem on the bill is not equal to the stored Per Diem value the billing record will be listed on the exception report. You can have the system not list billing records as exceptions when the calculated Per Diem is less than the set Per Diem rate. Check Allow Amounts Less Than Per Diem to apply this edit. | |||||||
| The following example shows the new flags on the Parameter File Maintence screen. For illustration purposes the flags are all set to Yes (checked means yes). Initially theses flags will be set to No (blank, not checked). | ||||||||
| Line: 422 to 420 | ||||||||
When Windows Explorer is re-displayed you will see the extract file. Make certain the file is in the Appx Download directory.
Name and save the bill in the Download Folder | ||||||||
| Changed: | ||||||||
| < < | Now rename the uncompressed file. Use the MMMYYP.txt format. Since we downloaded the file into the Download directory everything stayed within that directory. You may have to move the file from a sub-folder that the Extraction Wizard created. The MMMYYP.txt file must be in the Download directory. | |||||||
| > > | Now rename the uncompressed file. Use the MMMYYP.txt format where P indicate this is the Primary bill. Since we downloaded the file into the Download directory everything stayed within that directory. You may have to move the file from a sub-folder that the Extraction Wizard created. The MMMYYP.txt file must be in the Download directory. | |||||||
| At this point you can go back to the Florida Medicaid page and download another file and repeat this step for the next file if you wish. | ||||||||
| Line: 461 to 459 | ||||||||
 | ||||||||
| Changed: | ||||||||
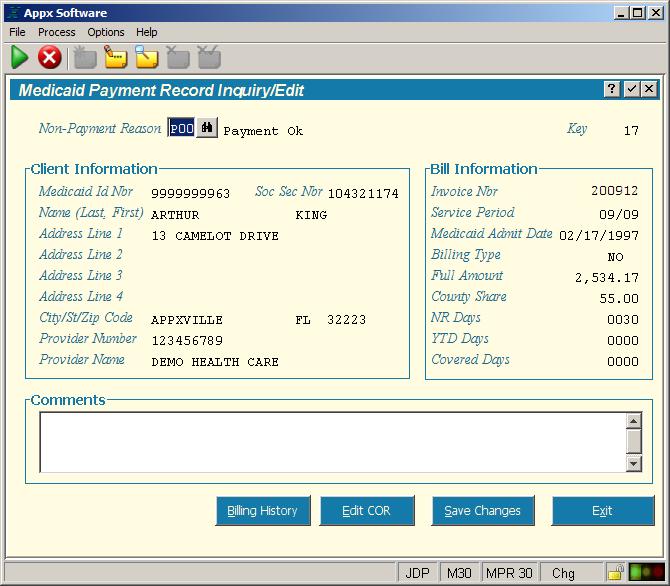
| < < | From the detail screen you can review the data to and change the Payment Code if needed. Click the Save Changes to save the altered Payment Code. You will return to the Exception List screen and will be on the next record. Determining whether a client is eligible or not, is completely under your control. | |||||||
| > > | From the detail screen you can review the data to and change the Payment Code if needed. Click Save Changes to save the altered Payment Code. You will return to the Exception List screen and will be on the next record. Determining whether a client is eligible or not, is completely under your control. | |||||||
| Changed: | ||||||||
| < < | From the detail screen you can review the COR record you have on file for this client by clicking the Edit COR button. If this client does not have a COR, you can click Add COR (Nursing Home or Hospital) and the MPR system will take you to the COR entry screen where you can change the eligibility status. The advantage to adding COR’s at this point, is that most of the fields are populated from the billing record. This will save you a lot of time and since you have to determine if this person is eligible right now, the new COR can be updated at the same time. | |||||||
| > > | From the detail screen you can review the COR record you have on file for this client by clicking the Edit COR button. If this client does not have a COR, you can click Add COR (Nursing Home or Hospital) and the MPR system will take you to the COR entry screen where you can change the eligibility status. The advantage to adding COR’s at this point, is that most of the fields are populated from the billing record. This will save you a lot of time and since you have to determine if this person is eligible right now, the new COR can be updated at the same time. | |||||||
| Changed: | ||||||||
| < < | On the COR there is a place for Comments. Enter anything you like. This information is saved in the COR which is a permanent file. The billing detail file also has a place for Comments. Anything entered in the Comments section on the billing record will be saved in history but will not be displayed if this client records appears in the next billing cycle. | |||||||
| > > | On the COR there is a place for Comments. Enter up to 180 characters. This information is saved in the COR which is a permanent file. The billing detail file also has a place for Comments. Anything entered in the Comments section on the billing record will be saved in history but will not be displayed if this client records appears in the next billing cycle. | |||||||
| Continue to review each record on the exception list. When you are finished with all the records, proceed to the next category of data or next step. | ||||||||
| Line: 475 to 473 | ||||||||
 | ||||||||
| Changed: | ||||||||
| < < | To ‘tag’ a record location on the exception list, press the Save Location and Exit button instead of clicking the Exit button. The system will remember the current record. When you return to the exception list and wish to ‘jump’ to where you left off, click Go to Saved Location. Note: the Go to Saved Location button will only be displayed if you have previously exited by clicking Save Location and Exit. The system will remember this tagged record until you tag another or start a new bill. You can tag one record per billing category, all, nursing home, hospital, or HMO. | |||||||
| > > | To ‘tag’ a record location on the exception list, press the Save Location and Exit button instead of clicking the Exit button. The system will remember the current record. When you return to the exception list and wish to ‘jump’ to where you left off, click Go to Saved Location. Note: the Go to Saved Location button will only be displayed if you have previously exited by clicking Save Location and Exit. The system will remember this tagged record until you tag another or start a new bill. You can tag one record per billing category, all, nursing home, hospital, or HMO. | |||||||
The buttons in this section will remain active throughout the rest of the reconciliation cycle. This allows you to start reconciling, leave Appx and return later to continue working. Once you view any exception list the Post Reconciled Bill button becomes active. Make sure you have reconciled the entire bill before posting.
Edit Payment Records/Change Payment Code | ||||||||
| Line: 495 to 493 | ||||||||
After posting the MPR system resets itself in preparation for the next cycle.
How to upload the reconciled bill | ||||||||
| Changed: | ||||||||
| < < | After the summary letter gets approved for payment you need to send the reconciled bill back to the State. The reconciled bill has been created by the Appx system and is residing in the Upload directory under the Appx folder on your server. The file name will be the same name you gave the bill when you Downloaded it, for example; OCT08P.txt. As you would expect, the upload process is similar to the download process. You are just selecting the file from the Upload directory rather than the Download. If you upload the file in the Download directory then what ACHA receives is the same data you downloaded. Nothing will be changed. If you get a call to that effect, chances are you’ve made this mistake. All that you need to do is upload the file from the proper directory, you do not need to reconcile again. | |||||||
| > > | After the summary letter gets approved for payment you need to send the reconciled bill back to the State. The reconciled bill has been created by the Appx system and is residing in the Upload directory under the Appx folder on your server. The file name will be the same name you gave the bill when you Downloaded it, for example; OCT08P .txt. As you would expect, the upload process is similar to the download process. You are just selecting the file from the Upload directory rather than the Download. If you upload the file in the Download directory then what ACHA receives is the same data you downloaded. Nothing will be changed. If you get a call to that effect, chances are you’ve made this mistake. All that you need to do is upload the file from the proper directory, you do not need to reconcile again. | |||||||
| If the file size is greater than 3 megabytes it will have to be compressed before uploading it. Invoke the compression utility that is available on you computer and compress the file. Your IT folks should be able to help you with this process. As of this writing, all files have been under 3 megabytes. Log into the Florida Medicaid website and select “upload” from the Web Portal > Trade files page. Click on the browse button and navigate to the compressed file and select it. Once selected complete any other information on the web page and click the upload button. | ||||||||
View topic | History: r18 < r17 < r16 < r15 | More topic actions...
Ideas, requests, problems regarding TWiki? Send feedback