Difference: MedicaidPaymentReconciliationManual (12 vs. 13)
Revision 132010-04-06 - JeffPrentice
| Line: 1 to 1 | ||||||||
|---|---|---|---|---|---|---|---|---|
Appx Medicaid Payment ReconciliationOverview | ||||||||
| Line: 39 to 39 | ||||||||
|
The MPR system operates in the Appx runtime environment. Instructions on how to use and operate applications in the Appx runtime environment can be found here | ||||||||
| Changed: | ||||||||
| < < | To start Appx double click the Appx icon on your desktop | |||||||
| > > | To start Appx double click the Appx icon on your desktop | |||||||
Figure: Appx Client Login Screen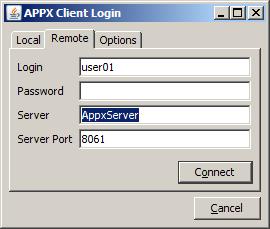
| ||||||||
| Changed: | ||||||||
| < < | On the Remote tab you must enter your Desktop user id in the Login field, your desktop Password, the name of the Appx server, and the port. The Appx Client software remembers your user id, server name, and port, but you must enter your password every time you attempt to log in to Appx. All of these fields are required. Click Connect after entering all the login information and Appx will start. | |||||||
| > > | On the Remote tab you must enter your Desktop user id in the Login field, your desktop Password, the name of the Appx server, and the port. The Appx Client software remembers your user id, server name, and port, but you must enter your password every time you wish to log in to Appx. All of these fields are required. Click Connect after entering all the login information and Appx will start. | |||||||
| Changed: | ||||||||
| < < | The Local tab is used to connect to a copy of Appx that is installed on a local computer. The Options tab has settings for controlling the visual effects of the Appx Client display. | |||||||
| > > | The Local tab is used to connect to a copy of Appx that is installed on a local computer. The Options tab has settings for controlling the visual effects of the Appx Client display. Please call support at 1-800-879-2779 for more information regarding the Options and Local tabs. | |||||||
When Appx starts one of the following screens will appear depending on the version of Appx you are using.
Figure: Appx Menu, Version 4.2 and Above | ||||||||
| Line: 112 to 112 | ||||||||
| Caution should be taken before changing any settings on this screen. | ||||||||
| Changed: | ||||||||
| < < | The Payment Posting Information section contains information about the reconciliation cycle (batch). Reconciliation is a multi-step process. Steps need to completed in order. The Current Status field is an internal pointer indicating which step you are presently in the reconciliation cycle. The MPR system will automatically change as you proceed through reconciling your monthly bill. Please do not change this number unless someone from Appx asks you to do so. The Last File Imported is the name of the bill that you are either working on just finished. Last Batch ID Created is the internal name the MPR system gave the batch you imported. | |||||||
| > > | The Payment Posting Information section contains information about the reconciliation cycle (batch). Reconciliation is a multi-step process. Steps need to completed in order. The Current Status field is an internal pointer indicating which step you are currently in. The MPR system will automatically change as you proceed through reconciling your monthly bill. Please do not change this number unless someone from Appx asks you to do so. The Last File Imported is the name of the bill that you are either working on just finished. Last Batch ID Created is the internal name the MPR system gave the batch you imported. A digit is added to provide uniqueness if another batch for the month is reconcilied. | |||||||
| Changed: | ||||||||
| < < | Per Diem Control. This section enables or disables the per diem editing feature of the MPR system. Per diem checking is optional and by defualt is disabled. To use this feature you must import all the available per diem files from the State (see below for details). As new per diem files become available you must import them as well. You must also check the boxes; Validate Host Per Diem and Validate HMO Per Diem on this screen. To check a field all you need to do is point your mouse to the box next to the field name and click or press the space bar. A check mark will appear. The Allow Amounts Less Than Per Diem can be checked if you wish to allow the billed amount to be less than the pre-determined per diem value. | |||||||
| > > | Per Diem Control. This section enables or disables the per diem editing feature of the MPR system. Per diem checking is optional and by defualt is disabled. To use this feature you must import all the available per diem files from the State (see below for details), also, as new per diem files become available you must import them as well. To enable per diem you check the boxes; Validate Host Per Diem and Validate HMO Per Diem on this screen. To check a field all you need to do is place your mouse pointer on the box next to the field name and click (or press the space bar). A check mark will appear. The Allow Amounts Less Than Per Diem can be checked if you wish to allow the billed amount to be less than the pre-determined per diem value. | |||||||
System Settings. Fiscal Year Start Month can be set to your fiscal period starting month. There are a few reports that can be sorted by fiscal year. No COR NP Code, identifies the default denial code the MPR system puts on incoming billing records that do not have a COR record on file. Import Eligibility Code is the default eligibility code you wish to have placed on imported COR records. The Server OS Type is for identifying the operating system (OS) type. The MPR system needs this to determine the OS command structure syntax. Import/Export File Path is the complete OS path to your MPR system data directory. If the Appx system is moved to another location on the current server or move to a different location on another server this path must be changed.
Add Payment History Records | ||||||||
| Line: 238 to 240 | ||||||||
 | ||||||||
| Changed: | ||||||||
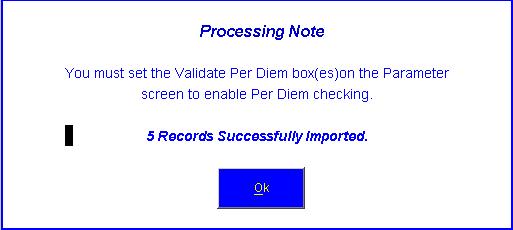
| < < | The message will tell how many records were imported and reminds you to set the Validate Per Diem box(s), either Hospital and/or HMO to Yes (checked) on the Parameter File Maintence screen. See [[#Activating_Per_Diem_Editing][Activating Per Diem Editing] below for instructions on setting these fields on the parameter screen. | |||||||
| > > | The message will tell how many records were imported and reminds you to set the Validate Per Diem box(s), either Hospital and/or HMO to Yes (checked) on the Parameter File Maintence screen. See Activating Per Diem Editing below for instructions on setting these fields on the parameter screen. | |||||||
| You may import the same period again if the State has sent a new or corrected file. Simply follow the same instructions except when the system detects the same period on file a warning message will be displayed, see following example. If you click the Continue button, the system will replace the existing data with the new file. | ||||||||
View topic | History: r18 < r17 < r16 < r15 | More topic actions...
Ideas, requests, problems regarding TWiki? Send feedback