Difference: WebHome (30 vs. 31)
Revision 312010-08-31 - JeffPrentice
| Line: 1 to 1 | ||||||||
|---|---|---|---|---|---|---|---|---|
| Added: | ||||||||
| > > | ||||||||
Welcome to the APPX Medicaid Reconciliation WIKI webThis web site is dedicated to Medicaid Reconciliation in the State of Florida. | ||||||||
| Line: 10 to 13 | ||||||||
| ||||||||
| Added: | ||||||||
| > > | ||||||||
| Changed: | ||||||||
| < < | ||||||||
| > > | Appx Medicaid Payment ReconciliationTable of Contents | |||||||
| Line: 39 to 45 | ||||||||
| To find out more about Appx, please go to our web site, http://www.appx.com, or call us at (800) TRY-APPX, (879-2779). | ||||||||
| Added: | ||||||||
| > > | ||||||||
Starting Appx and the Reconciliation System | ||||||||
| Changed: | ||||||||
| < < | Appx is a computer programming tool for developing business application software. The MPR system operates in the Appx runtime environment. Instructions on how to use and operate applications in the Appx runtime environment can be found in the Appx Users Guide. There are also tutorials available to help you understand using Appx applications here. For information regarding technical support levels available from Appx are on the Appx web page here. | |||||||
| > > | Appx is a computer programming tool for developing business application software. The MPR system operates in the Appx runtime environment. Instructions on how to use and operate applications in the Appx runtime environment can be found in the Appx Users Guide | |||||||
| The MPR system is designed to work with an electronic copy of the bill which is available from the State. As such, the version of MPR you are using must always be able to process the current format of the download file. | ||||||||
| Line: 49 to 56 | ||||||||
| See Chapter 2 of the Appx System Administration Manual for details on adding a new user to Appx. | ||||||||
| Changed: | ||||||||
| < < | Add the new user in the application using the Billing Worker Code Maintenance function located on the Administration Tab. | |||||||
| > > | Add the new user in the application using the Billing Worker Code Maintenance function located on the Menu-Administration Tab. | |||||||
Figure: Appx Client Login Screen | ||||||||
| Line: 72 to 79 | ||||||||
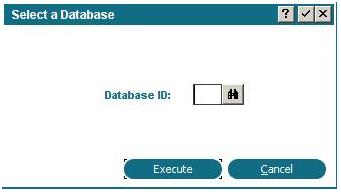 After entering or selecting the Database ID press enter or click Execute and the MPR system will start and the MPR Medicaid Payment Reconciliation Administration Menu will appear.
 | ||||||||
| Changed: | ||||||||
| < < | Medicaid Payment Reconciliation Menu | |||||||
| > > | Medicaid Payment Reconciliation Menu System | |||||||
| The MPR menu is organized into five tabs, Current Status, Administration, Reconciliation, Reporting, and Special Functions. Clicking on a Tab will take you that particular menu. Clicking on the work Exit will close the application and end your Appx session. | ||||||||
| Line: 83 to 90 | ||||||||
| The illustration above shows the Current Status Menu. This is the starting point for the MPR system. The large Appx icon shown can be replaced with your counties logo. The status menu shows your current status in the reconciliation cycle, the last billing file you imported and the batch name created for that file. | ||||||||
| Changed: | ||||||||
| < < | You can conveniently get to the online manuals. The Appx User Guild and the Medicaid Payment Reconciliation Manual (this manual) from the Status screen by clicking on the WWW icon or on the manual title itself. | |||||||
| > > | You can conveniently get to the online manuals. The Appx Users Guide | |||||||
| Changed: | ||||||||
| < < | The Appx User Guild is a general guide for using any Appx application. Some of the User Guild is in a movie format that you can view here. (http://www.appx.com/assets/asp/dynamic_generator.asp?pageid=939 | |||||||
| > > | The Appx Users Guide | |||||||
How to Add a County LogoThe logo is a picture file and must be named CountyLogo.PNG (PNG is the required file format. Appx also support jpg and gif file formats. Please call for help in using one of these formats if you cannot convert to PNG. Replace the file in the Appx\data\40\Mpr\Resource named similarly and you will see your image on this menu as well as other places the Logo file is used the next time you log in to Appx. | ||||||||
| Changed: | ||||||||
| < < | Menu Administration Tab | |||||||
| > > |
Menu-Administration Tab | |||||||
Figure: Administration Tab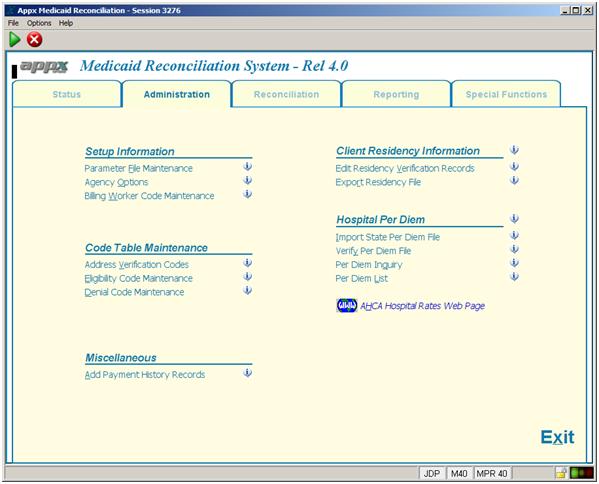 | ||||||||
| Changed: | ||||||||
| < < | The illustration above shows the Administration Menu. The functions on this menu are used to access files and records that control how the monthly billing file is processed. Items on this menu are grouped into five categories. Setup Information is used for general reconciliation cycle control. Code Table Maintenance is used for specific codes referenced within the system. Client Residency Information is for entering and maintaining residency record information on clients. Hospital Per Diem is used to maintain Per Diem rates. | |||||||
| > > | The illustration above shows the Administration Menu. The functions on this menu are used to access files and records that control how the monthly billing file is processed. Items on this menu are grouped into five categories. Setup Information is used for general reconciliation cycle control. Code Table Maintenance is used for specific codes referenced within the system. Client Residency Information is for entering and maintaining Residency record information on clients. Hospital Per Diem is used to maintain Per Diem rates. | |||||||
| The exclamation point in the bubble to the right of the functions on this and other menus is a direct link to the associated topic in the Medicaid Reconciliation manual. | ||||||||
| Line: 113 to 122 | ||||||||
| The Last File Imported is the name of the bill that you are either working on just finished. Last Batch ID Created is the internal name the MPR system gave the batch you imported. A digit is added to provide uniqueness if another batch for the month is imported. | ||||||||
| Changed: | ||||||||
| < < | Per Diem Control. This section enables or disables the per diem editing feature of the MPR system. Read more about per diem and the function of these settings below. | |||||||
| > > | Per Diem Control. This section enables or disables the per diem editing feature of the MPR system. Read more about per diem and the function of these settings below. | |||||||
| Changed: | ||||||||
| < < | System Settings. Fiscal Year Start Month can be set to your fiscal period starting month. There are a few reports that can be sorted by fiscal year. Show SSN on Reports instructs the system to not show social security numbers on printed reports. The SSN will still be displayed on input screens for you to use for client verification. Default Eligibility Code is the default eligibility code you wish to have placed on residency records that you create from the monthly bill. Use District Processing, if your county uses district level processing set this field to yes, otherwise it should be set to no (unchecked). The Server OS Type is for identifying the operating system (OS) type. The MPR system needs this to determine the OS command structure syntax. Import/Export File Path is the complete OS path to your MPR system data directory. If the Appx system is moved to another location on the current server or move to a different location on another server this path must be changed. | |||||||
| > > | System Settings. Fiscal Year Start Month can be set to your fiscal period starting month. There are a few reports that can be sorted by fiscal year. Show SSN on Reports instructs the system to not show social security numbers on printed reports. The SSN will still be displayed on input screens for you to use for client verification. Default Eligibility Code is the default eligibility code you wish to have placed on Residency records that you create from the monthly bill or that are imported into the system. Use District Processing, if your county uses district level processing set this field to yes, otherwise it should be set to no (unchecked). The Server OS Type is for identifying the operating system (OS) type. The MPR system needs this to determine the OS command structure syntax. Import/Export File Path is the complete OS path to your MPR system data directory. If the Appx system is moved to another location on the current server or move to a different location on another server this path must be changed. | |||||||
Please call Appx before changing any of these fields. The MPR system will not function if the settings on the Parameter File screen do not match your computing environment.
Agency Options | ||||||||
| Line: 144 to 153 | ||||||||
 | ||||||||
| Changed: | ||||||||
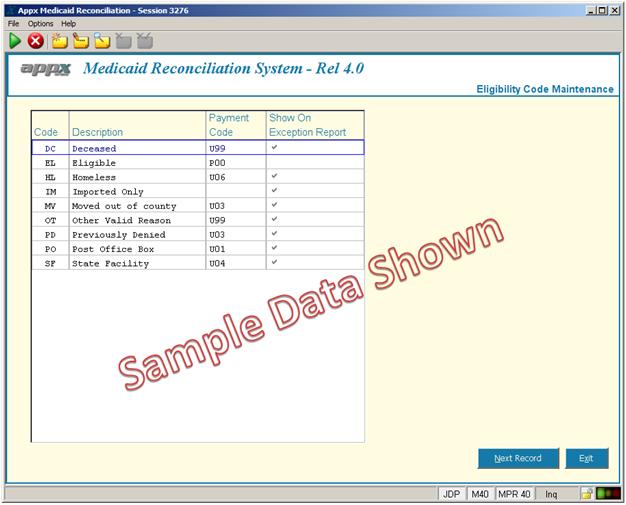
| < < | Maintain the code(s) for designating the client’s eligibility. Eligibility is assigned on the Residency Record maintenance screen. Defining Residency records and identifying eligibility is the cornerstone of the MPR system. You can have multiple codes for eligibility, check the Auto Except box if this eligibility code designates and exception record that must be reviewed. | |||||||
| > > | Maintain the code(s) for designating the client’s eligibility. Eligibility is assigned on the Residency record maintenance screen. Defining Residency records and identifying eligibility is the cornerstone of the MPR system. You can have multiple codes for eligibility, check the Auto Except box if this eligibility code designates and exception record that must be reviewed. | |||||||
| Changed: | ||||||||
| < < | With eligibility code you can specify a default Payment Code. When the monthly bill is imported, the MPR system checks for a Residency Record for each client. If a match is found and the eligibility is coded on the Residency Record, the default Payment Code will be used on the incoming billing record. Notice in the example below that we still want to see these “automatically coded” records on the Exception Report (Show On Exception Report is checked). | |||||||
| > > | With eligibility code you can specify a default Payment Code. When the monthly bill is imported, the MPR system checks for a Residency record for each client. If a match is found and the eligibility is coded on the Residency record, the default Payment Code will be used on the incoming billing record. Notice in the example below that we still want to see these “automatically coded” records on the Exception Report (Show On Exception Report is checked). | |||||||
Figure: Example of Eligibility Code Table (Examples)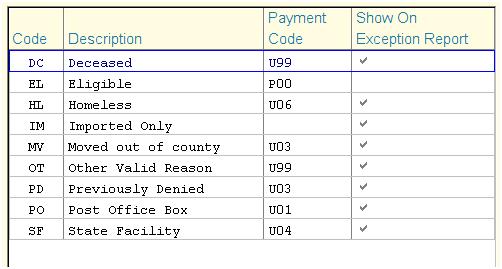 | ||||||||
| Line: 162 to 171 | ||||||||
Edit Residency Verification Records | ||||||||
| Changed: | ||||||||
| < < | Residency Records are the cornerstone of saving you time with the MPR system. As each client record in the monthly bill is processed by the MPR system, it is cross referenced to the Residency file. If a matching Residency Record is found, the Eligibility code will determine what will happen to that billing record. If a Residency Record is not found then the billing record will be listed on the Exception List. | |||||||
| > > | Residency records are the cornerstone of saving you time with the MPR system. As each client record in the monthly bill is processed by the MPR system, it is cross referenced to the Residency file. If a matching Residency record is found, the Eligibility code will determine what will happen to that billing record. If a Residency record is not found then the billing record will be listed on the Exception List. | |||||||
| Changed: | ||||||||
| < < | When reconciling a bill you are looking at the Exception List. These are billing records that basically have not been pre-approved. Pre-approval is the function the Residency Record. You can add a Residency Record directly from the Exception List, then examine the clients address information and assign an Eligibility Code. There are two addresses that you need to be concerned about, the Legal Address and the Hospital Address. A single Residency Record will store both address and the MPR system will alert you if the billing record address has changed from the Residency Record address. Next month, and each month after that, when the bill is processed the system will find the Residency Record you added and use it to automatically code the billing record. You maintain complete control of what is automatically coded and can override what the system does on any billing record. | |||||||
| > > | When reconciling a bill you are looking at the Exception List. These are billing records that basically have not been pre-approved. Pre-approval is the function the Residency record. You can add a Residency record directly from the Exception List, then examine the clients address information and assign an Eligibility Code. There are two addresses that you need to be concerned about, the Legal Address and the Hospital Address. A single Residency record will store both address and the MPR system will alert you if the billing record address has changed from the Residency record address. Next month, and each month after that, when the bill is processed the system will find the Residency record you added and use it to automatically code the billing record. You maintain complete control of what is automatically coded and can override what the system does on any billing record. | |||||||
Figure: Residency Address Verification Screen | ||||||||
| Changed: | ||||||||
| < < | Above is the Residency Record screen. Notice the two areas for address information. Click on the button Show Address On Bill to see the address that is on the exception report. Any differences will be highlighted in red. For this reason is it not recommended that you alter these address other than to correct them from changes made on the bill. Below is an example of this same Residency Record with a correction noted from the bill. Notice the apartment number is missing on the billing record. | |||||||
| > > | Above is the Residency record screen. Notice the two areas for address information. Click on the button Show Address On Bill to see the address that is on the exception report. Any differences will be highlighted in red. For this reason is it not recommended that you alter these address other than to correct them from changes made on the bill. Below is an example of this same Residency record with a correction noted from the bill. Notice the apartment number is missing on the billing record. | |||||||
Figure: Address Verification Screen With Billing Address Overlay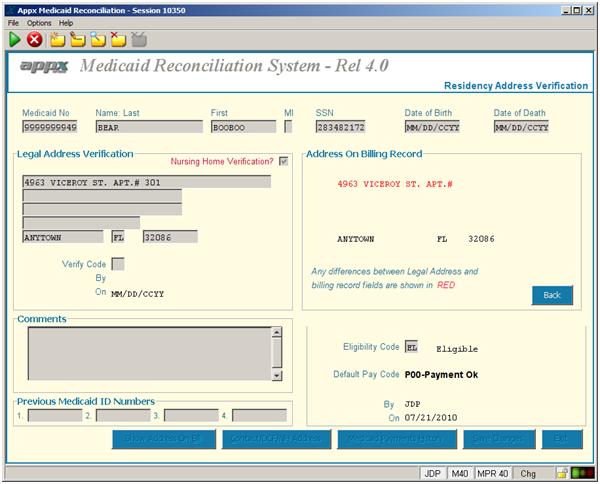 | ||||||||
| Changed: | ||||||||
| < < | From the Residency Record screen you can invoke other process. Client Contact Information for storing the clients’ legal representative public assistance case worker, and Nursing Home information. Medicaid Payments History shows prior activity for this client. | |||||||
| > > | From the Residency record screen you can invoke other process. Client Contact Information for storing the clients’ legal representative public assistance case worker, and Nursing Home information. Medicaid Payments History shows prior activity for this client. | |||||||
| Changed: | ||||||||
| < < | A Residency Record must be identified for nursing home verification and/or Hospital verification. There are two check boxes for identifying the type of Residency Record verification intended for this client. Nursing Home Verification Residency Records are common, perhaps one for each client on the bill. | |||||||
| > > | A Residency record must be identified for nursing home verification and/or Hospital verification. There are two check boxes for identifying the type of Residency record verification intended for this client. Nursing Home Verification Residency records are common, perhaps one for each client on the bill. | |||||||
Hospital Per Diem | ||||||||
| Line: 193 to 202 | ||||||||
| The Appx Medicaid Reconciliation system can import the Medicaid Reimbursement Rates and optionally check the hospital/HMO billing records to ensure the amount charged matches the pre-set per diem rate. If the rate does not match then the record will be listed on the exception report with an appropriate message. You then decide to pay or not pay (reimburse) based on your county‘s criteria. | ||||||||
| Changed: | ||||||||
| < < | Please take note that Per Diem editing is an optional feature. By default the MPR system will not validate Per Diem. See the detailed instructions Activating Per Diem Editing below to activate this feature. If Per Diem checking is active on your system ensure that all the relevant files have been processed before importing your monthly bill to avoid unnecessary records and messages on the exception list. | |||||||
| > > | Please take note that Per Diem editing is an optional feature. By default the MPR system will not validate Per Diem. See the detailed instructions Activating Per Diem Editing below to activate this feature. If Per Diem checking is active on your system ensure that all the relevant files have been processed before importing your monthly bill to avoid unnecessary records and messages on the exception list. | |||||||
Downloading the Hospital Per Diem | ||||||||
| Changed: | ||||||||
| < < | Click on the WWW icon or the words AHCA Hospital Rates Web Page to link to the download site (http://www.fdhc.state.fl.us/Medicaid/cost_reim/hospital_rates.shtml) | |||||||
| > > | Click on the WWW icon or the words AHCA Hospital Rates Web Page | |||||||
Figure: AHCA Web Site for Downloading Per Diem | ||||||||
| Line: 226 to 235 | ||||||||
 | ||||||||
| Changed: | ||||||||
| < < | When the file is successfully imported into the Medicaid Reconciliation system, a message will confirm the import completed and report the number of records processed. The message also will remind you to set the Validate Per Diem box(s), either Hospital and/or HMO to Yes (checked) on the Parameter File Maintenance screen. See Activating Per Diem Editing for instructions on setting these fields on the parameter screen. | |||||||
| > > | When the file is successfully imported into the Medicaid Reconciliation system, a message will confirm the import completed and report the number of records processed. The message also will remind you to set the Validate Per Diem box(s), either Hospital and/or HMO to Yes (checked) on the Parameter File Maintenance screen. See Activating Per Diem Editing for instructions on setting these fields on the parameter screen. | |||||||
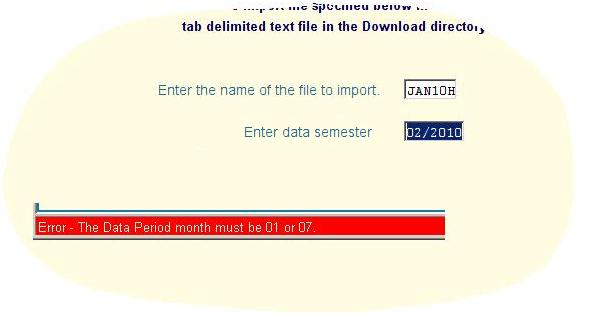
You may import the same period again if the State has sent a new or corrected file. Simply follow the same instructions except when the system detects the same period on file a warning message will be displayed, see following example. If you click the Continue button, the system will replace the existing data with the new file.
Figure: Per Diem Data Import Warning Message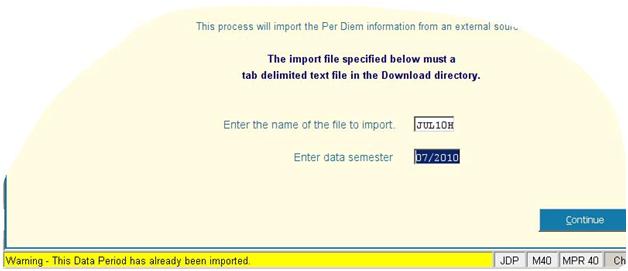 | ||||||||
| Changed: | ||||||||
| < < | To delete a per diem semester (period) see Delete a Per Diem Data Period on the Special Functions Menu. | |||||||
| > > | To delete a per diem semester (period) see Delete a Per Diem Data Period on the Menu-Special Functions Tab. | |||||||
Verify Per Diem FileIf Per Diem is activated, see Parameter File Maintenance, the Per Diem file must be up to date to reconcile a bill. The Verify Per Diem File routine will check for a least one record from each semester starting in 07/2001 and ending in the whatever the semester is today. If the file contains a record for each semester it is presumed up to date and the following message is displayed. | ||||||||
| Line: 264 to 273 | ||||||||
The data on the Per Diem file is a combination of the actual data from the import file (Provider Number, Inpatient Rate, and Provider Name) and a calculate amount equal to 35% of the Inpatient Rate. The 35% rate is calculated during importing and is not present in the download file from the State. The amount on the bill is compared to the 35% rate to determine if there is a billing error.
Activating Per Diem Editing | ||||||||
| Changed: | ||||||||
| < < | After you have completed importing the Per Diem data for the appropriate range of dates the Medicaid Reconciliation system needs to be instructed to start editing incoming hospital/HMO records while creating the exception list. This is accomplished on the Parameter File Maintenance screen. There are two fields which control if Per Diem is edited on the incoming bill, Validate Hosp Per Diem and Validate HMO Per Diem. You can set either or both. If neither is checked then incoming billing records will not be edited for Per Diem violations. | |||||||
| > > | After you have completed importing the Per Diem data for the appropriate range of dates the Medicaid Reconciliation system needs to be instructed to start editing incoming hospital/HMO records while creating the exception list. This is accomplished on the Parameter File Maintenance screen. There are two fields which control if Per Diem is edited on the incoming bill, Validate Hosp Per Diem and Validate HMO Per Diem. You can set either or both. If neither is checked then incoming billing records will not be edited for Per Diem violations. | |||||||
| If Per Diem is activated and the calculated Per Diem on the bill is not equal to the established Per Diem value, the billing record will be listed on the exception report. You can have the system not list billing records as exceptions when the calculated Per Diem is less than the set Per Diem rate. Check Allow Amounts Less Than Per Diem to apply this edit. | ||||||||
| Changed: | ||||||||
| < < | The following example shows the new flags on the Parameter File Maintenance screen. For illustration purposes the flags are all set to Yes (checked means yes). Initially theses flags will be set to No (blank, not checked). | |||||||
| > > | The following example shows the new flags on the Parameter File Maintenance screen. For illustration purposes the flags are all set to Yes (checked means yes). Initially theses flags will be set to No (blank, not checked). | |||||||
Figure: Activation Flags on the Parameter Screen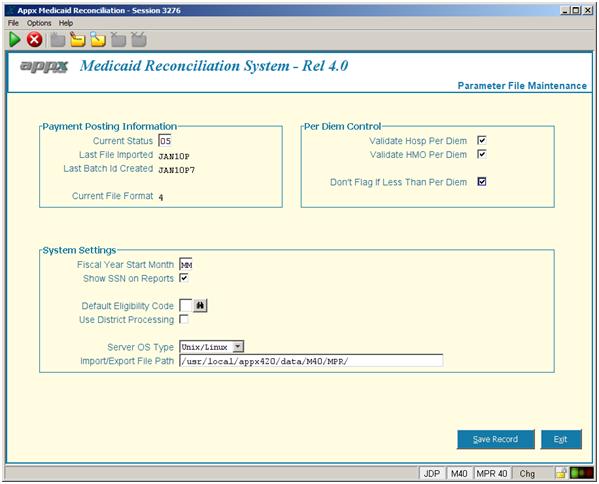 | ||||||||
| Changed: | ||||||||
| < < | Menus, Reconciliation Tab | |||||||
| > > |
Menu-Reconciliation Tab | |||||||
Figure: Reconciliation Menu Screen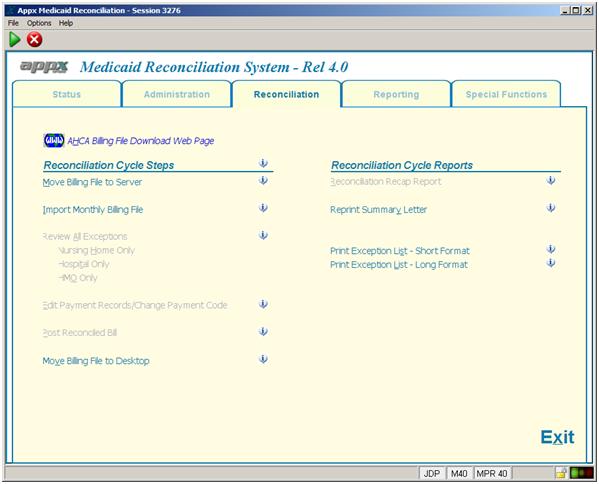 | ||||||||
| Line: 308 to 319 | ||||||||
| U04 – Recipient in State Owned Facility | ||||||||
| Changed: | ||||||||
| < < | U05 – No Residency Record on File | |||||||
| > > | U05 – No Residency record on File | |||||||
| U06 – Homeless | ||||||||
| Line: 316 to 327 | ||||||||
| The monthly bill may contain hundreds and hundreds of client records. With the Appx MPR system you can pre-approve/deny clients and save their eligibility status (and default payment code). When the next bill is imported the list of pre-approved/denied clients is checked against the incoming bill. If the client has been pre-approved the MPR system will pass this record on to the final step, you don’t have to do anything with these records. The remaining records, including pre-denied, are exceptions. These exception records are displayed on your computer during reconciliation for you to review. | ||||||||
| Changed: | ||||||||
| < < | The more clients you have pre-approved/deny the fewer exception records you will have to review. The fewer the records, the faster you can reconcile the bill each month. This is particularly important with nursing home records since they make up the majority of the records in the bill and because they typically re-occur each month. There are two ways of pre-approving/denying a client. Both methods involve creating a Residency Record in the MPR system and selecting an eligibility code. See below for details on how to create a Residency Record. | |||||||
| > > | The more clients you have pre-approved/deny the fewer exception records you will have to review. The fewer the records, the faster you can reconcile the bill each month. This is particularly important with nursing home records since they make up the majority of the records in the bill and because they typically re-occur each month. There are two ways of pre-approving/denying a client. Both methods involve creating a Residency record in the MPR system and selecting an eligibility code. See below for details on how to create a Residency record. | |||||||
| Changed: | ||||||||
| < < | As you review each exception record, you determine the clients’ eligibility per your counties requirements. If the client is not eligible then you change the Payment Code accordingly, and then create a Residency Record. Next month when the exception list is built this client will be automatically set to the payment code established for that eligibility code. Although the Payment Code has been changed, these records are still displayed on the exception list for your review (if that parameter is checked in the Eligibility table). | |||||||
| > > | As you review each exception record, you determine the clients’ eligibility per your counties requirements. If the client is not eligible then you change the Payment Code accordingly, and then create a Residency record. Next month when the exception list is built this client will be automatically set to the payment code established for that eligibility code. Although the Payment Code has been changed, these records are still displayed on the exception list for your review (if that parameter is checked in the Eligibility table). | |||||||
Download the monthly billMonthly billing files must be downloaded and imported into the MPR system. Once the file is imported into the APPX system, the billing reconciliation process can begin. In order to gain access to the Florida Medicaid internet site you must have a valid Username and Password. To obtain a Username and Password please call AHCA at 1-850-298-7123. Appx Software does not provide access to this web site. | ||||||||
| Changed: | ||||||||
| < < | When you have a username and password, Click on either the WWW icon or the words AHCA Billing File Download Web Page to link to the States site or go to https://home.flmmis.com using your internet browser. You should see the “Sign in to the Florida Medicaid” page. | |||||||
| > > | When you have a username and password, Click on either the WWW icon or the words AHCA Billing File Download Web Page | |||||||
Figure: AHCA Login Screen | ||||||||
| Line: 374 to 385 | ||||||||
 | ||||||||
| Changed: | ||||||||
| < < | At the beginning of a reconciliation cycle the menu should look as it does in the above example. The teal colored selections are active and the grayed selections are inactive. As you proceed through the various steps, these selections will become active or inactive to guild you through the entire process. Notice you can get to the AHCA web portal to download the file. | |||||||
| > > | At the beginning of a reconciliation cycle the menu should look as it does in the above example. The teal colored selections are active and the grayed selections are inactive. As you proceed through the various steps, these selections will become active or inactive to guide you through the entire process. Notice you can get to the AHCA web portal to download the file. | |||||||
Move Billing File to ServerThis optional function will copy the file you saved in the previous step and place it in the proper directory (Download) on the application server. Click on Move Billing File To Server and the follow screen will be displayed. | ||||||||
| Line: 434 to 445 | ||||||||
After you close the on-screen list the exception list is created and the Review Exception section is activated. MPR builds a batch file name for this billing cycle. The name of the batch is displayed in the tile area of the reconciliation processes. Once a reconciliation cycle has started, then it must be processed (posted) before another bill can be imported. Although many users can access the MPR system, only one user at a time should be reconciling a batch. If you import a file and need to delete and reset the system, please call Appx support at 1-800-879-2779 for assistance.
Reconcile Exception List | ||||||||
| Changed: | ||||||||
| < < | What’s happened? When the file was imported each client was cross checked with the Residency file. If a client record exists on the Residency file then the eligibility code on the Residency Record is used to code this billing record. A billing record will fall into two categories, payment okay and exceptions. The Residency Record is used to determine which category to put a billing file record. Payment okay records are passed through the system and you don’t necessarily have to look at them, although you can if you wish. Exceptions are the records you must reconcile. | |||||||
| > > | What’s happened? When the file was imported each client was cross checked with the Residency file. If a client record exists on the Residency file then the eligibility code on the Residency record is used to code this billing record. A billing record will fall into two categories, payment okay and exceptions. The Residency record is used to determine which category to put a billing file record. Payment okay records are passed through the system and you don’t necessarily have to look at them, although you can if you wish. Exceptions are the records you must reconcile. | |||||||
| Changed: | ||||||||
| < < | New with release 4.0 comes the ability to have the MPR system automatically mark the Payment Code on exception records based on the Residency Record. See Edit Residency Verification Records. Since these records have been pre-denied sort-a-speak you have the option listing them on the exception list or not. | |||||||
| > > | New with release 4.0 comes the ability to have the MPR system automatically mark the Payment Code on exception records based on the Residency record. See Edit Residency Verification Records. Since these records have been pre-denied sort-a-speak you have the option listing them on the exception list or not. | |||||||
Figure: Exception List Filter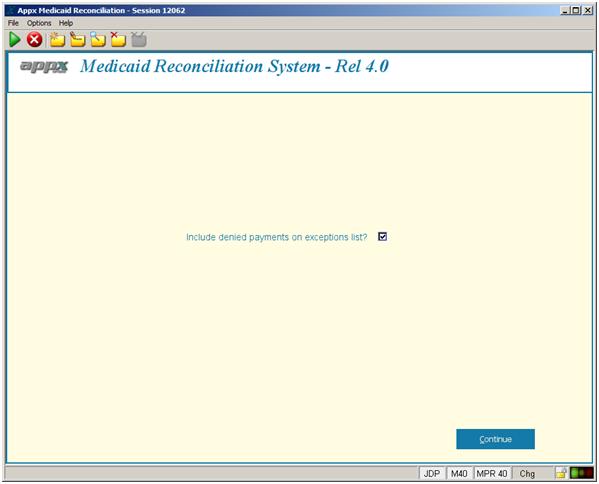 | ||||||||
| Changed: | ||||||||
| < < | It the box on the “Include denied payments” is checked then all exceptions will be listed for you to review. If you uncheck the box, then the records already denied, either by you or the Residency Record will not be listed. You have this ability to choose which way you want to see the exception list each time you view the list. | |||||||
| > > | It the box on the “Include denied payments” is checked then all exceptions will be listed for you to review. If you uncheck the box, then the records already denied, either by you or the Residency record will not be listed. You have this ability to choose which way you want to see the exception list each time you view the list. | |||||||
| Changed: | ||||||||
| < < | There are four functions for reconciling the exception file, Review All Exceptions, Nursing Home Only, Hospital Only, and HMO Only. Note the exception list category is displayed in the window title bar, example below. The list shows basic information for each client and the reason(s) this record is on the exception list. | |||||||
| > > | There are four functions for reconciling the exception file, Review All Exceptions, Nursing Home Only, Hospital Only, and HMO Only. Note the exception list category is displayed in the window title bar, example below. The list shows basic information for each client and the reason(s) this record is on the exception list. | |||||||
Figure: Exception List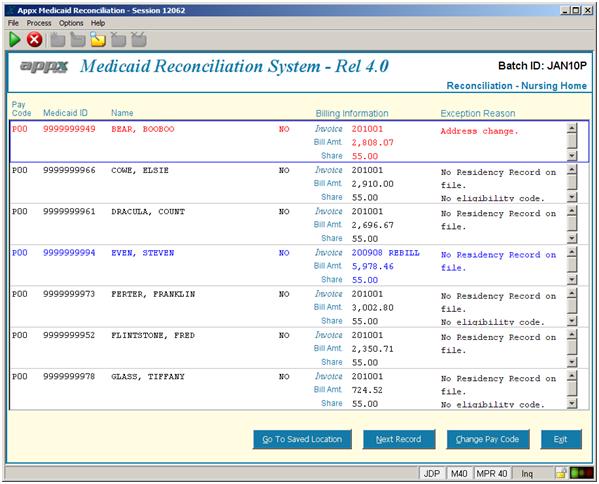 | ||||||||
| Line: 465 to 476 | ||||||||
| From this detail screen you can review the data on the billing record and change the Payment Code if you deem necessary. Notice that the exception reason is displayed. This is why the MPR system put this record on the exception list for you to review. There is a button to view the billing history for this client so you can see what has been done in the past. | ||||||||
| Changed: | ||||||||
| < < | Billing records with either have an associated Residency record or not. In the example above there is a Residency Record for this client as indicated by the button Edit Residency. If there wasn’t a Residency Record the button will say Add Residency. Normally you will want to always add a Residency Record and set the eligibility status. Adding a Residency Record for every person on the bill and setting the eligibility code will automatically set the pay code for the next bill you process. This will reduce the number of records you have to reconcile each month thus saving time. You do need to specify the pay code by clicking one of the Payment Code buttons for the current bill you are processing though. | |||||||
| > > | Billing records with either have an associated Residency record or not. In the example above there is a Residency record for this client as indicated by the button Edit Residency. If there wasn’t a Residency record the button will say Add Residency. Normally you will want to always add a Residency record and set the eligibility status. Adding a Residency record for every person on the bill and setting the eligibility code will automatically set the pay code for the next bill you process. This will reduce the number of records you have to reconcile each month thus saving time. You do need to specify the pay code by clicking one of the Payment Code buttons for the current bill you are processing though. | |||||||
| There are only two things you can do on this screen. You can change the pay code which, will automatically save the record and return to the exception list, or you can add comments and click Save Changes (or click a Payment Code button). Comments are saved in the history file but will not appear on this record again next month. When you return to the exception list you will still be on the same record. All you need to do is click on the Next Record button on the bottom of the exception list to proceed to the next record. | ||||||||
| Line: 545 to 556 | ||||||||
| Special Note: If the upload billing file size is greater than 3 megabytes it will have to be compressed before uploading it. Invoke the compression utility that is available on your computer and compress the file. Your IT folks should be able to help you with this process. As of this writing, all files have been less than 3 megabytes for all counties. The file you downloaded and moved to the server as well as the reconciled bill are still on your server in the Download and Upload directories. It is a good idea to keep these files because they can be used to recreate your history files if necessary. | ||||||||
| Changed: | ||||||||
| < < | Menus, Reporting Tab | |||||||
| > > |
Menu-Reporting Tab | |||||||
Figure: Reporting Tab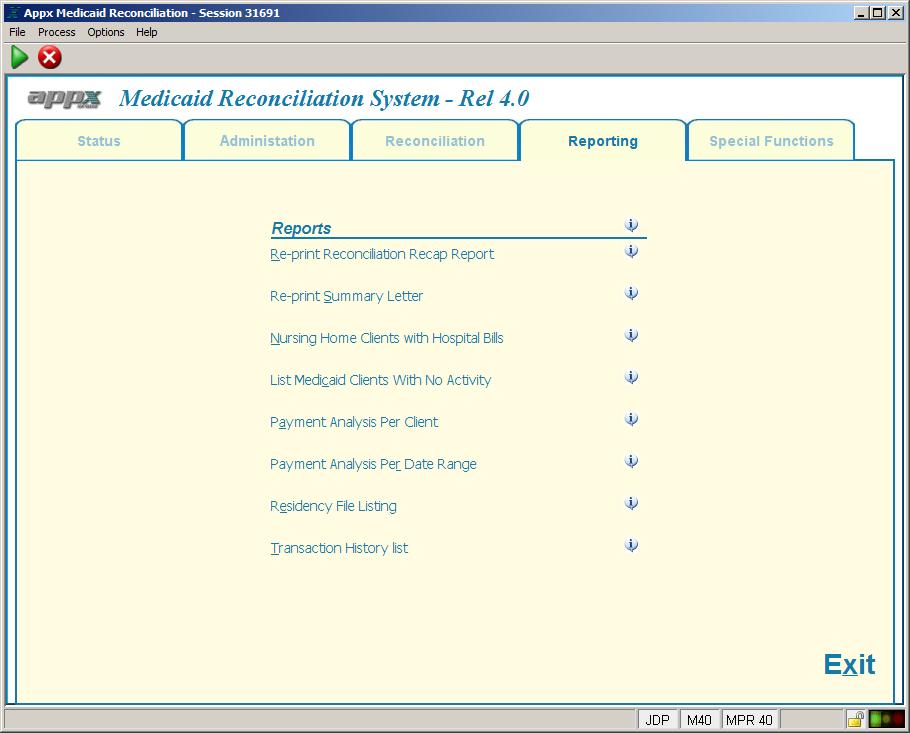 | ||||||||
| Line: 570 to 583 | ||||||||
List Medicaid Clients With No Activity | ||||||||
| Changed: | ||||||||
| < < | Report lists Residency Records (clients) that have no billing history. Us this report to check for this condition and investigate the reason why no billing history records exist. Maybe you added a Residency Record and the Medicaid ID is keyed incorrectly. You should have a least one history record for any given client. | |||||||
| > > | Report lists Residency records (clients) that have no billing history. Us this report to check for this condition and investigate the reason why no billing history records exist. Maybe you added a Residency record and the Medicaid ID is keyed incorrectly. You should have a least one history record for any given client. | |||||||
Payment Analysis Per ClientThis report will combines batches from history and provides a paid/denied dollar total as well as the number of Medicaid clients assisted during the selected period. History records can be filtered by billing type. | ||||||||
| Line: 580 to 593 | ||||||||
When the report runs you will select the starting and ending batches. The report is inclusive of the ending batch. You will also select the type of billing record you wish to report on. You have the option to print a detailed report or a summary only. The detailed report will list all client records and can be a rather long listing. The summary sub-totals each billing type and provides an overall grand total for the entire period.
Residency File Listing | ||||||||
| Changed: | ||||||||
| < < | List the Residency Record file. | |||||||
| > > | List the Residency record file. | |||||||
Transaction History ListThis function lists a specified client’s payment history. | ||||||||
| Changed: | ||||||||
| < < | Menus, Special Functions Tab | |||||||
| > > | Menu-Special Functions Tab | |||||||
Figure: Special Functions Tab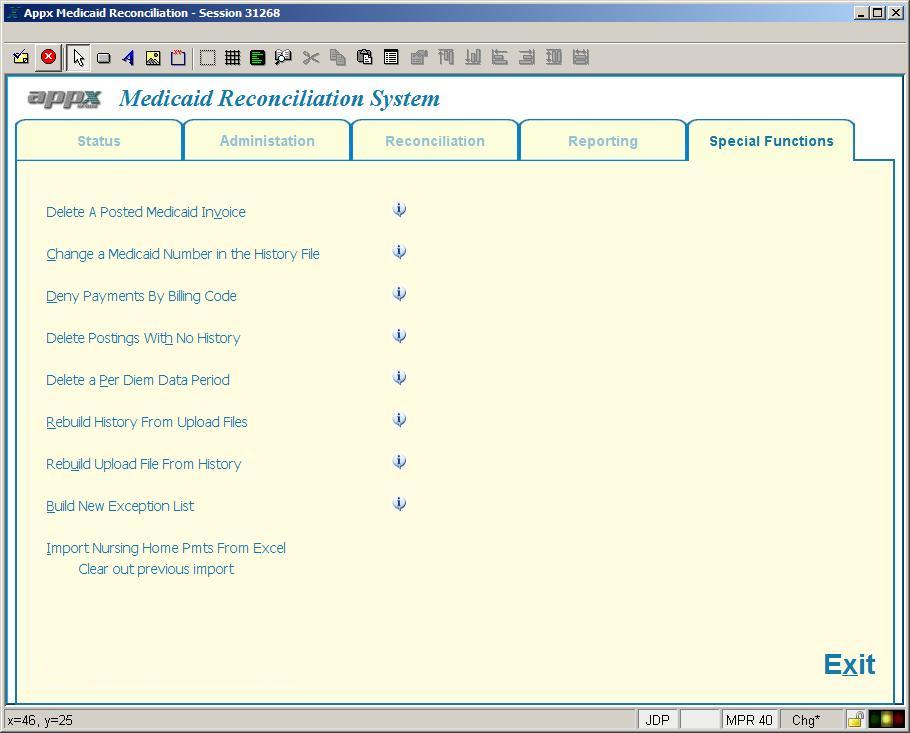 | ||||||||
| Line: 626 to 639 | ||||||||
Using the history file in the MPR system this process can rebuild the file(s) in the Upload directory.
Build New Exception List | ||||||||
| Changed: | ||||||||
| < < | If you import a bill and then realize that the Residency file needs to be updated to reduce the number of exceptions, you can invoke this special process. Please note that any changes to this batch will be lost if you invoke this process. One handy way of using this function is to import a bill, go thru it and create Residency Record’s for all the relevant records. Then invoke this process and the system will use the new records in the Residency file to reduce the number exceptions . | |||||||
| > > | If you import a bill and then realize that the Residency file needs to be updated to reduce the number of exceptions, you can invoke this special process. Please note that any changes to this batch will be lost if you invoke this process. One handy way of using this function is to import a bill, go thru it and create Residency record’s for all the relevant records. Then invoke this process and the system will use the new records in the Residency file to reduce the number exceptions . | |||||||
TerminologyNon-payment code | ||||||||
| Line: 640 to 653 | ||||||||
| U04 = Recipient in State Owned Facility | ||||||||
| Changed: | ||||||||
| < < | U05 = No Residency Record on File | |||||||
| > > | U05 = No Residency record on File | |||||||
| U06 = Homeless U99 = Other | ||||||||
| Changed: | ||||||||
| < < | AHCA no longer distributes Certificate of Residency’s. As such, the U05 should not normally be used. Instead, you should determine their residency status, and code their eligibility in a Residency Record. | |||||||
| > > | AHCA no longer distributes Certificate of Residency’s (COR's) for Medicaid Clients. As such, the U05 should not normally be used. Instead, you should create a Residency record, determine residency status, and code the client's eligibility in a Residency record. | |||||||
Exception list | ||||||||
| Changed: | ||||||||
| < < | The exception list is an on-line display of monthly billing records that failed the exception processing logic. The goal of the Medicaid Reconciliation system is to automatically accept pre-verified Medicaid clients and to list only those records that need manual verification. The key to the pre-verification process is having a Residency Recordor Residency record on file. | |||||||
| > > | The exception list is an on-line display of monthly billing records that failed the exception processing logic. The goal of the Medicaid Reconciliation system is to automatically accept pre-verified Medicaid clients and to list only those records that need manual verification. The key to the pre-verification process is having a Residency recordor Residency record on file. | |||||||
Exception reasonThe APPX Medicaid reconciliation system will read each record from the imported monthly billing file and check the record for several criteria. If the record fails verification it will be listed on the exception report along with the reason. | ||||||||
| Deleted: | ||||||||
| < < | Residency Record- Certificate of ResidencyCertificate of residency records are distributed by ACHA for eligible Medicaid recipients. These records are imported into the APPX Medicaid Reconciliation System. After they are are imported, the system list new records for you to approve or deny. You must look at each Residency Recordto ensure it is a valid county resident. If a Residency Recordexist for a billing record and is coded as eligible, the monthly billing payment record will not be listed as an exception (barring any other errors). | |||||||
Residency record | ||||||||
| Changed: | ||||||||
| < < | A record that is manually entered into the Residency Recordfile for a service provider. ACHA does not distribute Residency Recordtype records for providers, however, you can manually enter a Residency record or “hospital COR”. If a residency record is on file and the billing information matches, the billing record will not be listed on the exception report. | |||||||
| > > | Residency records store the clients last know address, nursing home information, contact information and most importantly, the eligibility code that you establish after researching the given address. Normally you will create a Residency record while you are reconciling the monthly bill. There is an automated process that transfers the information from the bill into the new Residency record thus saving you time and eliminating any key stroke errors. Having a robust, up to date Residency File is the single most import factor in quickly reconciling bills each month. | |||||||
Reconciliation CycleA Reconciliation Cycle begins when a file that you have downloaded is imported into the MPR system for processing. Each bill will be assigned a unique batch id. Reconciliation is a series of processing steps. Only one Reconciliation Cycle can be active at a time and must be completed (Posted) to begin a new cycle. | ||||||||
| Line: 680 to 691 | ||||||||
Not this countyThe county code in the Download data file for this record does not match the county code in your Agency Options parameters. | ||||||||
| Changed: | ||||||||
| < < | No Residency Recordon file. -- NP code updated | |||||||
| > > | No Residency recordon file. -- NP code updated | |||||||
| Changed: | ||||||||
| < < | There is no Certificate of Residency record (COR) on file for this nursing home client. The NP Code is set to the code defined on the Parameter File Maintence screen in the field “No Residency RecordNP Code”. | |||||||
| > > | There is no Residency record on file for this nursing home client. The Non-Payment Code is set to the Eligibility code defined on the Parameter File Maintence screen in the field “Default Eligibility Code”. | |||||||
Resident record not set for NH | ||||||||
| Changed: | ||||||||
| < < | A Certificate of Residency record (COR) exists for this nursing home client but the “Nursing Home COR?” field is not checked. When this field is not checked the Residency Recordexists but is inactive. | |||||||
| > > | A Residency record exists for this nursing home client but the “Nursing Home Verification?” field is not checked. When this field is not checked the Residency recordexists but is inactive. | |||||||
Missing required value(s) | ||||||||
| Changed: | ||||||||
| < < | For this Hospital or HMO client either the Covered Days or County Share is missing (zero). These two items are required to calculate Per Diem. This error will only occur if “Validate Hosp Per Diem” and/or Validate HMO Per Diem” is checked on the Parameter File Maintence screen. | |||||||
| > > | For this Hospital or HMO client either the Covered Days or County Share is missing (zero). These two items are required to calculate Per Diem. This error will only occur if “Validate Hosp Per Diem” and/or Validate HMO Per Diem” is checked on the Parameter File Maintence screen. | |||||||
Per Diem values not found | ||||||||
| Changed: | ||||||||
| < < | For this Hospital or HMO client the system could not find a Per Diem record for the given provider and/or for the specified service period. This error will only occur if “Validate Hosp Per Diem” and/or Validate HMO Per Diem” is checked on the Parameter File Maintence screen. | |||||||
| > > | For this Hospital or HMO client the system could not find a Per Diem record for the given provider and/or for the specified service period. This error will only occur if “Validate Hosp Per Diem” and/or Validate HMO Per Diem” is checked on the Parameter File Maintence screen. | |||||||
Per Diem mismatch | ||||||||
| Changed: | ||||||||
| < < | The calculated Per Diem rate for this Hospital or HMO client during the given service period does not equal the value specified in the Per Diem file for this provider. This error will only occur if “Validate Hosp Per Diem” and/or Validate HMO Per Diem” is checked on the Parameter File Maintence screen. There is a button on the exception list screen that will display the valid per deim values for this provider. | |||||||
| > > | The calculated Per Diem rate for this Hospital or HMO client during the given service period does not equal the value specified in the Per Diem file for this provider. This error will only occur if “Validate Hosp Per Diem” and/or Validate HMO Per Diem” is checked on the Parameter File Maintence screen. There is a button on the exception list screen that will display the valid per deim values for this provider. | |||||||
Resident hospital flag not set | ||||||||
| Changed: | ||||||||
| < < | For this Hospital or HMO client there is a Resident record on file (referred to as a Hospital COR) but the “Address Verification” field is not checked. When this field is not checked the Resident record exists but is inactive. | |||||||
| > > | For this Hospital or HMO client there is a Resident record on file but the “Hospital Verification” field is not checked. When this field is not checked the Resident record exists but is inactive. | |||||||
Address does not match | ||||||||
| Changed: | ||||||||
| < < | The Hospital or HMO provider address did not match the address in the Resident (COR) file. The address must exactly match all four lines of the address, the city and state to pass verification. | |||||||
| > > | The Hospital or HMO provider address did not match the address in the Resident file. The address must exactly match all four lines of the address, the city and state to pass verification. | |||||||
No address record | ||||||||
| Changed: | ||||||||
| < < | There was no Resident record (Hospital COR) on file for this Hospital or HMO client. | |||||||
| > > | There was no Resident Record on file for this Hospital or HMO client. | |||||||
County share is more than the bill amountThe specified County share for this record is greater than the specified bill amount. This exception can occur on all record types. | ||||||||
| Line: 718 to 729 | ||||||||
All adjustment records are listed as exceptions. This message is printed as a reminder to check for a matching credit/debit transaction.
No eligibility code | ||||||||
| Changed: | ||||||||
| < < | The “Eligibility Code” is not set in the Residency Recordfile for this client. | |||||||
| > > | The “Eligibility Code” is not set in the Residency recordfile for this client. | |||||||
Coded as ineligibleThis client is coded as being ineligible for benefits and you have specified to list all records that have this Eligibility code (see Eligibility Code Maintenance function, Auto Except check box). | ||||||||
| Line: 730 to 741 | ||||||||
This non-rebill payment has already been paid for this service period.
Service date is prior to medicaid admit date | ||||||||
| Changed: | ||||||||
| < < | The service date specified is before the “Admit Date” on the Residency Recordfor this client. | |||||||
| > > | The service date specified is before the “Admit Date” on the Residency recordfor this client. | |||||||
Service date is later than date of death | ||||||||
| Changed: | ||||||||
| < < | The service date specified is after the “Date of Death” on the Residency Recordfor this client. | |||||||
| > > | The service date specified is after the “Date of Death” on the Residency recordfor this client. | |||||||
Service date is later than date moved out | ||||||||
| Changed: | ||||||||
| < < | The service date specified is after the “Moved Out” date on the Residency Recordfor this client. | |||||||
| > > | The service date specified is after the “Moved Out” date on the Residency recordfor this client. | |||||||
Tips and TechniquesKnown Bugs | ||||||||
View topic | History: r48 < r47 < r46 < r45 | More topic actions...
Ideas, requests, problems regarding TWiki? Send feedback