Difference: DatabaseInterfaceUpgradesEs (1 vs. 2)
Revision 22010-01-31 - RayPelegrino
| Line: 1 to 1 | ||||||||
|---|---|---|---|---|---|---|---|---|
Database Interface Upgrades | ||||||||
| Changed: | ||||||||
| < < | Compatibility with newer versions of popular databases is among the many features of APPX 5.0.
| |||||||
| > > | Compatilidad con las versiones nuevas de banco de dados populares es una de las características de APPX 5.0.
| |||||||
Oracle
| ||||||||
| Changed: | ||||||||
| < < | The Oracle connectivity is provided by the Oracle Instant Client | |||||||
| > > | Oracle connectivity esta proporcioando por Oracle Instant Client | |||||||
| Changed: | ||||||||
| < < | APPX to Oracle quick installation steps, with the assumption that you have a working install of Oracle 10g R2:
| |||||||
| > > | APPX para Oracle proceso de instalacion, en una version que esta rodando en Oracle 10g R2:
| |||||||
APPX to Oracle detailed installation example: | ||||||||
| Changed: | ||||||||
| < < | Here are the steps I used to make connection with APPX 4.3.0 and Oracle 10gR2 with both installed on the same Red Hat Enterprise 5.1, 32 bit server. I assume that you already have a working installation of Oracle 10g R2. | |||||||
| > > | Aca algunos pasos para hacer una coneccion con APPX 4.3.0 y Oracle 10gR2 los dos instalados en el mismo Red Hat Enterprise 5.1, 32 bit server. Estamos asumindo que usted tenga una version de Oracle 10g R2 rodando en el sistema. | |||||||
Create directory for Oracle Instant Client bundle to download to. | ||||||||
| Changed: | ||||||||
| < < | I'm going to create a directory to place the zipped bundled Oracle Instant Client files. For my example, I'm going to use /usr/local/src/oracle/instantclient/.
[root@tubes /]# *mkdir -p /usr/local/src/oracle/instantclient/* | |||||||
| > > | Voy crear un directorio y poner un zipped de los archivos de Oracle Instant Client. Por ejemplo, voy usar /usr/local/src/oracle/instantclient/. [root@tubes /]# *mkdir -p /usr/local/src/oracle/instantclient/* | |||||||
[root@tubes /]# cd /usr/local/src/oracle/instantclient/
[root@tubes instantclient]#
Download the Oracle Instant Client files for Linux. | ||||||||
| Changed: | ||||||||
| < < | APPX requires at least the Basic package, but it is recommended that you grab the SQL*Plus package too for debugging. <a href=http://www.oracle.com/technology/tech/oci/instantclient/index.html>http://www.oracle.com/technology/tech/oci/instantclient/index.html</a> | |||||||
| > > | APPX requiere por lo menos un paquete basico, pero es mejor tener un tambien SQL*Plus para poder hacer un debugging. <a href=http://www.oracle.com/technology/tech/oci/instantclient/index.html>http://www.oracle.com/technology/tech/oci/instantclient/index.html</a> | |||||||
For 10gR2 | ||||||||
| Changed: | ||||||||
| < < | If you are running Oracle 10gR2, then use the 10gR2 Instant Client. At the time this document was created, the current version for Linux X86 is 10.2.0.4, oracle-instantclient-basic-10.2.0.4-1.i386.zip (34,687,861 bytes), and oracle-instantclient-sqlplus-10.2.0.4-1.i386.zip (744,730 bytes). Place the downloaded files in the /usr/local/src/oracle/instantclient/ directory. | |||||||
| > > | Si usted esta usando Oracle 10gR2, puedes usar 10gR2 Instant Client. Al termino deso documento, la version atual es Linux X86 is 10.2.0.4, oracle-instantclient-basic-10.2.0.4-1.i386.zip (34,687,861 bytes), and oracle-instantclient-sqlplus-10.2.0.4-1.i386.zip (744,730 bytes). Hay que poner los archivos bajados en /usr/local/src/oracle/instantclient/ directory. | |||||||
For 11g | ||||||||
| Changed: | ||||||||
| < < | If you are running Oracle 11g, then use the 11g Instant Client. At the time this document was created, the current version is 11.1.0.6.0 , basic.zip (42,285,643 bytes), and sqlplus.zip (784,417 bytes). Place the downloaded files in the /usr/local/src/oracle/instantclient/ directory, then unzip them. | |||||||
| > > | Si usted esta usando el Oracle 11g, entonces hay un 11g Instant Client. Al termino deso documento, la version atual es 11.1.0.6.0 , basic.zip (42,285,643 bytes), and sqlplus.zip (784,417 bytes). Hay que poner los archivos bajados en /usr/local/src/oracle/instantclient/ directory, y despues unzip. | |||||||
Place the basic and sqlplus zipped files into /usr/local/src/oracle/instantclient/, and unzip them: | ||||||||
| Line: 97 to 96 | ||||||||
Place unzipped Oracle Instant Client files into permanent installation target directory. | ||||||||
| Changed: | ||||||||
| < < | Now move the unzipped directory (instantclient_10_2) that contains both the basic and SQL*Plus files from the Oracle Instant Client, into the desired permanent directory. In my example, I'm using /usr/local/, so that the Oracle files will be in a directory /usr/local/instantclient_10_2/.
[root@tubes instantclient]# *pwd* | |||||||
| > > | Ahora hay que cambiar el directorio unzipped (instantclient_10_2) que contiene los archivos basicos y SQL*Plus de Oracle Instant Client, en un directorio permanente. En mi ejemplo, voy usar /usr/local/, para que los archivos de Oracle estean en /usr/local/instantclient_10_2/. [root@tubes instantclient]# *pwd* | |||||||
| /usr/local/src/oracle/instantclient [root@tubes instantclient]# ls -la total 34660 | ||||||||
| Line: 117 to 115 | ||||||||
Configure the operating system's dynamic linker run time bindings | ||||||||
| Changed: | ||||||||
| < < | Now we must register the Oracle Instant Client library files with the system to make the shared library's path known. I'm going to use ldconfig.
[root@tubes instantclient]# *ldconfig -v|grep libclntsh* | |||||||
| > > | Ahora hay que registrar los archivos Oracle Instant Client library con el sistema para hacer el path de la library conocido. Voy usar ldconfig. [root@tubes instantclient]# *ldconfig -v|grep libclntsh* | |||||||
| [root@tubes instantclient]# ldconfig -v|grep instant [root@tubes instantclient]# [root@tubes instantclient]# cat /etc/ld.so.conf | ||||||||
| Line: 132 to 129 | ||||||||
Build cache used by the operating system's run-time linker | ||||||||
| Changed: | ||||||||
| < < | Now, let's rebuild the ldconfig cache, and verify that the library's are available system wide.
[root@tubes instantclient]# *ldconfig* | |||||||
| > > | Ahora, vamos reconstruir el cache de ldconfig, que la library esta disponible en todo el sistema. [root@tubes instantclient]# *ldconfig* | |||||||
| [root@tubes instantclient]# ldconfig -v|grep libclntsh libclntsh.so.10.1 -> libclntsh.so.10.1 [root@tubes instantclient]# ldconfig -v|grep instant | ||||||||
| Line: 143 to 139 | ||||||||
Identify version of libclntsh.so that is included with downloaded Oracle Instant Client bundle | ||||||||
| Changed: | ||||||||
| < < | APPX needs to know the name of the Oracle libclntsh.so file on your system. This file name changes from version to version. We must now identify the libclntsh file name that was distributed in the Oracle Instant Client bundle. Look inside the instantclient directory for a file that begins with libclntsh. To show you examples of Oracle Instant Client 10.2 and Oracle Instant Client 11.1, I have installed both versions in /usr/local/.
[joe@tubes instantclient_10_2]$ *ls -la /usr/local/instantclient_1*/libclnt** | |||||||
| > > | APPX necesita saber el nombre del archivo de Oracle libclntsh.so en su sistema. Eso archivo cambia de nombre de version en version. Necesitamos identificar o nombre del archivo de libclntsh que fue distribuido en el bundle de Oracle Instant Client. Mire dentro del directorio de instantclient para el nombre del archivo que empeza con libclntsh. Para mostrar ejemplos de Oracle Instant Client 10.2 y Oracle Instant Client 11.1, instale las versiones de los dos en /usr/local/. [joe@tubes instantclient_10_2]$ *ls -la /usr/local/instantclient_1*/libclnt** | |||||||
| -rwxrwxrwx 1 root root 19076649 Feb 17 03:57 /usr/local/instantclient_10_2/libclntsh.so.10.1 -rwxrwxrwx 1 root root 35295891 Aug 1 2007 /usr/local/instantclient_11_1/libclntsh.so.11.1 [joe@tubes instantclient_10_2]$ | ||||||||
| Changed: | ||||||||
| < < | As you can see my libclntsh files are libclntsh.so.10.1, which came bundled with the Oracle Instant Client 10.2 Basic bundle, and libclntsh.so.11.1, which came bundled with the Oracle Instant Client 11.1 Basic bundle. | |||||||
| > > | Como usted puede ver los archivos libclntsh son libclntsh.so.10.1, que vieron de Oracle Instant Client 10.2 Basic, y libclntsh.so.11.1, que vieron de Oracle Instant Client 11.1 Basic. | |||||||
| Changed: | ||||||||
| < < | To let APPX know the version of the Instant client you have installed, perform just one of the following two options:Create libclntsh.so symbolic link and set the APPX_OCI_DIR environment variable | |||||||
| > > | Para que APPX sepa la version del Instant client que usted instalo, hay que hacer una de las dos opciones abajo:Crear un link simbolico de libclntsh.so para poner una variable de ambiante en APPX_OCI_DIR | |||||||
| Changed: | ||||||||
| < < |
| |||||||
| > > |
| |||||||
[root@tubes appx]# *cd /usr/local/instantclient_10_2/* [root@tubes instantclient_10_2]# *ln -s /usr/local/instantclient_10_2/libclntsh.so.10.1 /usr/local/instantclient_10_2/libclntsh.so* [root@tubes appx]# *ls -la /usr/local/instantclient_10_2/libclntsh.so* | ||||||||
| Line: 170 to 165 | ||||||||
| [root@tubes appx]# | ||||||||
| Changed: | ||||||||
| < < | Set APPX_OCI_LIB | |||||||
| > > | Fijar APPX_OCI_LIB | |||||||
| Changed: | ||||||||
| < < |
| |||||||
| > > |
| |||||||
[root@tubes appx]# [root@tubes appx]# *grep APPX_OCI_LIB /usr/local/appx/data/appx.env* | ||||||||
| Line: 186 to 181 | ||||||||
| Changed: | ||||||||
| < < | Use the Oracle Instant Client's version of SQL*Plus to verify connectify to Oracle. | |||||||
| > > | Use la version de Oracle Instant Client de SQL*Plus para verificar a coneccion para Oracle. | |||||||
| Changed: | ||||||||
| < < | Now let's verify that we can connect to Oracle using Oracle's SQL*Plus tool. I'm going to use the following parameters for my example, be sure and use values that are correct for your Oracle instance. user=scott, password=password, server=tubes, port=1521, and Oracle Instance=appx.
[root@tubes instantclient_10_2]# */usr/local/instantclient_10_2/sqlplus scott/password@tubes:1521/appx* | |||||||
| > > | Ahora vamos verificar si podemos conectar para Oracle usando la herramienta Oracle SQL*Plus. Vamos usar los parametros para mi ejemplo, estea cierto que usted use los valores correctos para su instance de Oracle. user=scott, password=password, server=tubes, port=1521, y Oracle Instance=appx. [root@tubes instantclient_10_2]# */usr/local/instantclient_10_2/sqlplus scott/password@tubes:1521/appx* | |||||||
| SQL*Plus: Release 10.2.0.4.0 - Production on Wed Jun 4 09:17:55 2008 Copyright (c) 1982, 2007, Oracle. All Rights Reserved. Connected to: | ||||||||
| Line: 274 to 268 | ||||||||
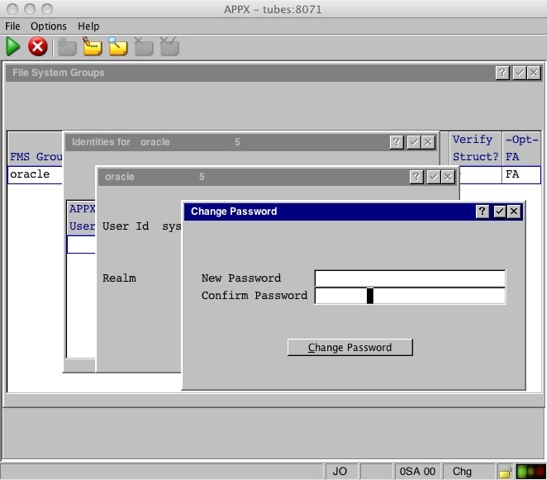
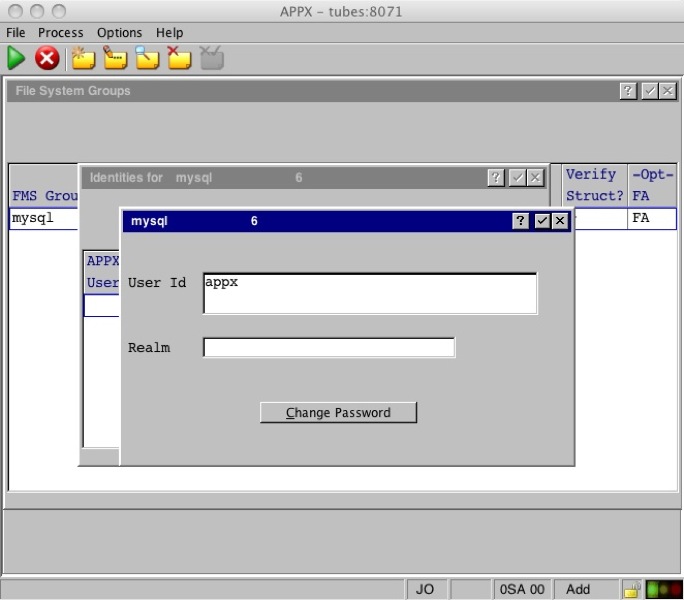
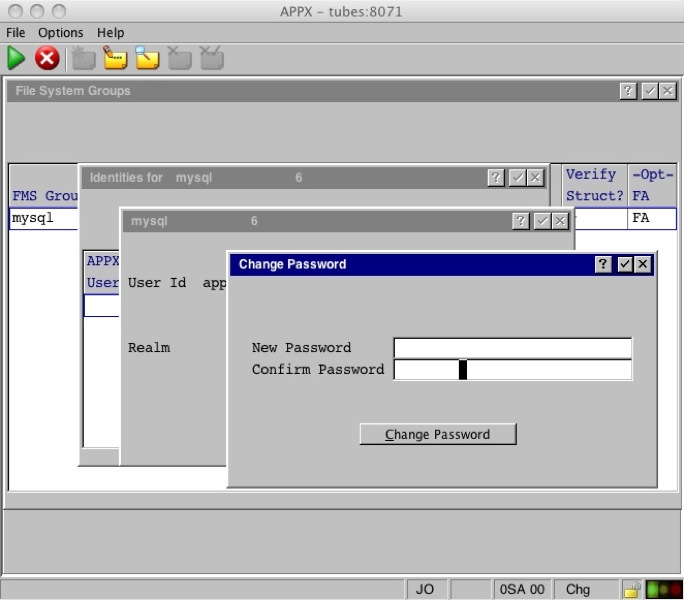
Configure APPX FMS settings | ||||||||
| Changed: | ||||||||
| < < | Well, that looks good. Let's configure our FMS settings inside APPX and make a connection! | |||||||
| > > | Ok, eso nos parece bien, Vamos configurar nuestros ajustes de FMS dentro de APPX y hacer una coneccion! | |||||||
| Changed: | ||||||||
| < < |
| |||||||
| > > |
| |||||||
 | ||||||||
| Changed: | ||||||||
| < < |
| |||||||
| > > |
| |||||||
 | ||||||||
| Changed: | ||||||||
| < < |
| |||||||
| > > |
| |||||||
 | ||||||||
| Changed: | ||||||||
| < < |
| |||||||
| > > |
| |||||||
 | ||||||||
| Changed: | ||||||||
| < < |
| |||||||
| > > |
| |||||||
 | ||||||||
| Changed: | ||||||||
| < < |
| |||||||
| > > |
| |||||||
ODBCMySQL 5.0.22 | ||||||||
| Changed: | ||||||||
| < < | Quick installation steps of the APPX to MySQL connection:
| |||||||
| > > | Instalacion rapidad de los pasos de APPX para la connecion MySQL:
| |||||||
| Changed: | ||||||||
| < < | Detailed installation example of the APPX to MySQL connection: | |||||||
| > > | Instalacion detallada de ejemplo de la connecion APPX para MySQL: | |||||||
| Changed: | ||||||||
| < < | Here are the steps I used to make connection with APPX 4.3.0 and MySQL 5.0.22 with both installed on the same Red Hat Enterprise 5.1, 32 bit server. The MySQL and UnixODBC will be provided by Red Hat, and the mysql-connector-odbc will be provided by MySQL. Red Hat's Yum repositories do contain mysql-connector-odbc, but at the time of this test, it was 3.51.12 (too old). For this connection we need 3.51.22 or newer. We'll get this component from the MySQL.com website. | |||||||
| > > | Los pasos que nosotros hiciemos para hacer la connecion con APPX 4.3.0 y MySQL 5.0.22 con los dos instalados en el mismo Red Hat Enterprise 5.1, 32 bit server. MySQL y UnixODBC estan disponibles de Red Hat, y el conector mysql-connector-odbc es provido de MySQL. Los repositorios de Red Hat's Yum contiene mysql-connector-odbc, pero al momento de eso teste, fue 3.51.12 (una version vieja). Para esa connecion necesitamos 3.51.22 o mas nuevo. Vamos tener eso componente del sition de MySQL. | |||||||
Download mysql-connector-odbc from MySQL.com website. | ||||||||
| Changed: | ||||||||
| < < | You should go to <a href=http://dev.mysql.com/downloads/connector/odbc/3.51.html>MySQL.com's ODBC Connector download site</a> and get the mysql-connector-odbc in the format that is right for your platform. My test server is Red Hat 5.1 32 bit, so I'll download the RPM format for x86 Red Hat.
[root@tubes ~]# *cd /usr/local/src* | |||||||
| > > | Usted deve ir al sitio de <a href=http://dev.mysql.com/downloads/connector/odbc/3.51.html>MySQL.com's ODBC Connector </a> y tener el mysql-connector-odbc en el formato que es mas correcto para su plataforma. Mi servidor de teste es Red Hat 5.1 32 bit, entoncs voy bajar RPM format para x86 Red Hat. [root@tubes ~]# *cd /usr/local/src* | |||||||
| [root@tubes src]# mkdir mysql-connector-odbc.from.mysql.com
[root@tubes src]# cd mysql-connector-odbc.from.mysql.com/
[root@tubes mysql-connector-odbc.from.mysql.com]# wget http://mirror.trouble-free.net/mysql_mirror/Downloads/Connector-ODBC/3.51/mysql-connector-odbc-3.51.25-0.i386.rpm | ||||||||
| Line: 329 to 322 | ||||||||
| 15:35:31 (158 KB/s) - `mysql-connector-odbc-3.51.25-0.i386.rpm' saved [1862076/1862076] | ||||||||
| Changed: | ||||||||
| < < | Install MySQL, MySQL-Server, and UnixODBC | |||||||
| > > | Instalar MySQL, MySQL-Server, y UnixODBC | |||||||
| Changed: | ||||||||
| < < | We will now install MySQL 5.0.22 (MySQL client programs and shared libraries.), MySQL-Server 5.0.22-2.2 (The MySQL server and related files.) and UnixODBC 2.2.11-7.1 (includes low-level drivers for MySQL, PostgreSQL, and local files.) | |||||||
| > > | Ahora vamos instalar MySQL 5.0.22 (MySQL con todos los programas y libraries.), MySQL-Server 5.0.22-2.2 ( MySQL server y los archivos relacioandos.) y UnixODBC 2.2.11-7.1 (incluye low-level drivers para MySQL, PostgreSQL,y archivos locales.) | |||||||
[root@tubes mysql-connector-odbc.from.mysql.com]# *yum install mysql mysql-server unixODBC* Loading "installonlyn" plugin | ||||||||
| Line: 396 to 389 | ||||||||
| [root@tubes mysql-connector-odbc.from.mysql.com]# | ||||||||
| Changed: | ||||||||
| < < | Install mysql-connector-odbc version 3.51.22 or newer. | |||||||
| > > | Instalar mysql-connector-odbc version 3.51.22 o mas nuevo. | |||||||
| Changed: | ||||||||
| < < | We need to install mysql-connector-odbc version 3.51.22 or newer. We already downloaded it in an earlier step. | |||||||
| > > | Necesitamos instalar mysql-connector-odbc version 3.51.22 o mas nuevo. Ya tenemos eso bajado en un paso que ya hicimos. | |||||||
[root@tubes mysql-connector-odbc.from.mysql.com]# *rpm -ivh mysql-connector-odbc-3.51.25-0.i386.rpm* error: Failed dependencies: libltdl.so.3 is needed by mysql-connector-odbc-3.51.25-0.i386 | ||||||||
| Changed: | ||||||||
| < < | As you can see, my server is missing libltdl.so.3. That file is found in the libtool-ltdl package. Let's install it now.
[root@tubes mysql-connector-odbc.from.mysql.com]# *yum install libtool-ltdl* | |||||||
| > > | Como podemos mirar, mi servidor no tiene libltdl.so.3. El archivo esta encontrado en el paquete libtool-ltdl. Vamos instalar ahora. [root@tubes mysql-connector-odbc.from.mysql.com]# *yum install libtool-ltdl* | |||||||
| Loading "installonlyn" plugin Setting up Install Process Setting up repositories | ||||||||
| Line: 448 to 440 | ||||||||
| [root@tubes mysql-connector-odbc.from.mysql.com]# | ||||||||
| Changed: | ||||||||
| < < | Success! Now let's resume our installation of mysql-connector-odbc.
[root@tubes mysql-connector-odbc.from.mysql.com]# *rpm -ivh mysql-connector-odbc-3.51.25-0.i386.rpm* | |||||||
| > > | éxito! Ahora vamos resumir nuestra instalacion de mysql-connector-odbc. [root@tubes mysql-connector-odbc.from.mysql.com]# *rpm -ivh mysql-connector-odbc-3.51.25-0.i386.rpm* | |||||||
Preparing... ########################################### [100%]
| ||||||||
| Changed: | ||||||||
| < < | Create MySQL database and database user. | |||||||
| > > | Crear el database de MySQL y database user. | |||||||
| Changed: | ||||||||
| < < | If you don't already have a MySQL database created along with a MySQL database user, you need to create one. Our example will use a database named appx. The MySQL user name will be appx, which is a preexisting OS user. Substitute your own values for database name and database/OS user. | |||||||
| > > | Si usted no tiene una base de datos de MySQL con MySQL database user, usted necesita crear una. Nustro ejemplo va usar una base de datos llamada appx. El user name de MySQL va ser appx, que es uno usuario existente de OS. Substituyer sus propios valores de base de datos y database/OS user. | |||||||
[root@tubes mysql-connector-odbc.from.mysql.com]# *mysql -uroot -p* Enter password: | ||||||||
| Line: 481 to 472 | ||||||||
| [root@tubes mysql-connector-odbc.from.mysql.com]# | ||||||||
| Changed: | ||||||||
| < < | Determine where UnixODBC expects odbc.ini and odbcinst.ini configuration files to be located. | |||||||
| > > | Determinar donde UnixODBC expect odbc.ini y odbcinst.ini configuration files to be located. | |||||||
| Changed: | ||||||||
| < < | The odbc.ini and odbcinst.ini configuration files can be located on various places in your server's file system. The safest way to make sure you are working on the correct location is to run odbcinst -j. Here is an example: | |||||||
| > > | El odbc.ini y los archivos de configuracion odbcinst.ini pueden ser colocados en varios lugares en su sistema de archivo de server. La mejor manera de saber si usted esta trabajando en el local correcto es rodar odbcinst -j. Un ejemplo: | |||||||
[root@tubes tools]# *odbcinst -j* unixODBC 2.2.11 | ||||||||
| Line: 493 to 484 | ||||||||
| [root@tubes tools]# | ||||||||
| Changed: | ||||||||
| < < | Here you can see that UnixODBC is expecting the two system configuration files to be located at /etc/odbc.ini and /etc/odbcinst.ini. Now that we know the location, let's configure the files. Both files can contain multiple sections or stanzas that are each identified by bracked values. Each bracked value is followed by property value definitions, one per line, in the format PROPERTY NAME=PROPERTY VALUE. | |||||||
| > > | Usted puede mirar donde los archivos de UnixODBC en los dos sistemas de configuracion pueden estar localizados en /etc/odbc.ini y /etc/odbcinst.ini. Ahora que sabemos la localizacion, vamos configurar los archivos. Los dos archivos tienen secciones multiples y stanzas que son identificadas en bracked values. Cada bracked value es seguido de una propiedade de valor definido, un por linea, en el formato PROPERTY NAME=PROPERTY VALUE. | |||||||
Configure /etc/odbc.ini | ||||||||
| Changed: | ||||||||
| < < | The odbc.ini file contains a list of Data Sources and any properties for each. There are two types of odbc.ini files; 1) System and 2) User. We will be working with the System DSN files only, and not the User DSN files. The System odbc.ini file usually exists at /etc/odbc.ini or /usr/local/etc/odbc.ini while the user usually exists at ~/.odbc.ini. | |||||||
| > > | El archivo odbc.ini tiene una lista de Data Sources y propiedades para cada. Hay dos tipos de archivo de odbc.ini; 1) System y 2) User. Vamos trabajar solamente con los archivos de System DSN, y no con los archivos de User DSN. El archivo System odbc.ini usualmente existe en /etc/odbc.ini o /usr/local/etc/odbc.ini y el user generalmente esta en ~/.odbc.ini. | |||||||
| Changed: | ||||||||
| < < | We need to build the odbc.ini file. The odbc.ini file can contain stanzas for different drivers. The content of each driver's stanza is driver specific (MySQL, PostgreSQL, FreeTDS, MiniSQL etc...). My /etc/odbc.ini file looks like this:
[root@tubes tools]# | |||||||
| > > | Necesitamos crear el archivo odbc.ini. El archivo odbc.ini puede tener stanzas para diferente drivers. El contenido para cada stanza del driver esta especificado en (MySQL, PostgreSQL, FreeTDS, MiniSQL etc...). Mi archivo es semejante a eso archivo /etc/odbc.ini: [root@tubes tools]# | |||||||
| [root@tubes tools]# cat /etc/odbc.ini [mysql] Driver = mysql | ||||||||
| Line: 513 to 503 | ||||||||
| [root@tubes tools]# | ||||||||
| Changed: | ||||||||
| < < | The [mysql] bracketed value is the Data Source Name. The Driver field is referenced in the APPX FMS settings, and in the odbcinst.ini file as a bracked value stanza header. The Database field is the name of the database that you want APPX to store data in. This database was created in an earlier step. The Description is informational only. The Pwd field contains the password for the MySQL user. Port is the port that MySQL is configured to listen on. The default is 3306. If it is something else, it would be listed in /etc/my.cnf. Server is the servername containing the MySQL instance we are connecting to. UID is the DSN's user account to connect to MySQL. | |||||||
| > > | El valor bracketed de [mysql] es Data Source Name. El campo Driver es referido en APPX FMS settings, y el archivo odbcinst.ini es bracked value stanza header. El campo de Database es el nombre del database que usted quiere APPX para poner los datos en eso. Eso database fue creado en un paso anterior. Description es para informacion solamente. El campo Pwd tiene la contrasena para el usuario de MySQL. Port es el port de MySQL es configurada para ouvir. El default es 3306. Eso es algo diferente, va se escuchar en /etc/my.cnf. Server es el servername contiendo MySQL instance nos estamos conectando. UID es DSN's user account para conectar MySQL. | |||||||
| Changed: | ||||||||
| < < | Configure /etc/odbcinst.ini | |||||||
| > > | Configurar /etc/odbcinst.ini | |||||||
| Changed: | ||||||||
| < < | This ini file simply lists all installed drivers. It is usually located in either /etc/odbcinst.ini, or /usr/local/etc/odbcinst.ini. | |||||||
| > > | El archivo ini simplemente lista todos los drivers instalados. Es normalmente localizado en /etc/odbcinst.ini, o /usr/local/etc/odbcinst.ini. | |||||||
| Changed: | ||||||||
| < < | We need to build the odbcinst.ini file. The odbc.ini file content is driver specific (MySQL, PostgreSQL, FreeTDS, MiniSQL etc...). My file looks like this:
[root@tubes tools]# *cat /etc/odbcinst.ini* | |||||||
| > > | Necesitamos construir el archivo odbcinst.ini. El archivo odbc.ini tiene el driver especifico (MySQL, PostgreSQL, FreeTDS, MiniSQL etc...). Mi archivo nos parece: [root@tubes tools]# *cat /etc/odbcinst.ini* | |||||||
| [PostgreSQL] Description = ODBC for PostgreSQL Driver = /usr/lib/libodbcpsql.so | ||||||||
| Line: 538 to 527 | ||||||||
| [root@tubes tools]# | ||||||||
| Changed: | ||||||||
| < < | We are only interested in the [mysql] stanza. The [mysql] value matches the Driver and [mysql] bracked stanza DSN name values from the odbc.ini file. The Description field is informational only. The Driver field is the name of the driver file that was provided by the mysql.com mysql-connector-odbc-3.51.25-0 RPM. The Pwd field contains the password for the MySQL user. Port is the port that MySQL is configured to listen on. The default is 3306. If it is something else, it would be listed in /etc/my.cnf. Server is the servername containing the MySQL instance we are connecting to. UID is the DSN's user account to connect to MySQL. | |||||||
| > > | Nosotros estamos interesado en una stanza en [mysql]. El valor de [mysql] el igual al Driver y [mysql] bracked stanza DSN nombre de os valores del archivo de odbc.ini. El campo de descripcion Description es solo para informacion. El campo Driver es el nombre para el archivo driver que fue proporcionado en mysql.com mysql-connector-odbc-3.51.25-0 RPM. El campo Pwd tiene la contrasena para el usuario de MySQL. Port es el port que MySQL esta configurado para escuchar. El default es 3306. Si es otro, va escuchar en /etc/my.cnf. Server es el servername que tien una instance de MySQL que estamos conectando con el. UID es DSN's user account para conectar con MySQL. | |||||||
| Changed: | ||||||||
| < < | The mysql-connector-odbc that we downloaded from mysql.com did not have a Setup library included, so we skipped that property. The Setup property points to a shared lib containing functions to be called by ODBC Config. By convention it usually has a capitol S towards the end of the file name such as libmyodbc3S.so. ODBC Config would call this library to get driver specific property names during data source configuration. If ODBC Config can not find or use this file it will assume some defaults.
Verify DSNs are working. | |||||||
| > > | El mysql-connector-odbc que bajamos de mysql.com no tenia una library de Setup incluyedo, entonces nosotros no hicimos esa propiedade. El Setup property aponta para una library compartida lib que tiene funciones que van ser llamadas por ODBC Config. Por convencion normalmente tiene un S en el final como el nombre libmyodbc3S.so. ODBC Config va llamar esa library para tener informacion especifica de nombres de propriedades durante la configuracion de data source. Si ODBC Config no encontra o no puede usar eso nombre del archivo va assumir los valores de defaults.
Verificar DSNs estan trabajando. | |||||||
| Changed: | ||||||||
| < < | Now that the configuration files are in place, and the DSN is defined, let's test it out. We will use the isql command to make a connection to our DSN named mysql. | |||||||
| > > | Ahora que la configuracion de los archivos estan en local, y el DSN es definido, vamos testar. Vamos usar el comando de isql para hacer la connecion con nuestro DSN named mysql. | |||||||
[root@tubes mysql-connector-odbc.from.mysql.com]# *isql -v mysql* +---------------------------------------+ | ||||||||
| Line: 568 to 557 | ||||||||
| [root@tubes mysql-connector-odbc.from.mysql.com]# | ||||||||
| Changed: | ||||||||
| < < | Troubleshoot isql problems. | |||||||
| > > | Troubleshoot isql problemas. | |||||||
| Changed: | ||||||||
| < < | If isql complains that it can't make a connection to the MySQL socket in /tmp/mysql.sock, then the MySQL configuration file /etc/my.cnf might be set to create the file in /var/lib/mysql/mysql.sock. You should change the my.cnf file to point to /tmp/mysql.sock, or create a symbolic link.
*isql -v mysql* | |||||||
| > > | Si isql no puede hacer una connecion con el MySQL socket en /tmp/mysql.sock, entonces la configuracion de los archivos MySQL /etc/my.cnf pueden ser creados los archivos en /var/lib/mysql/mysql.sock. Usted puede cambiar el archivo my.cnf para apuntar a /tmp/mysql.sock, o crear un link simbolico. *isql -v mysql* | |||||||
| [08S01][unixODBC][MySQL][ODBC 3.51 Driver]Can't connect to local MySQL server through socket '/tmp/mysql.sock' (2) [ISQL]ERROR: Could not SQLConnect [root@tubes mysql-connector-odbc.from.mysql.com]# updatedb | ||||||||
| Line: 579 to 567 | ||||||||
| /var/lib/mysql/mysql.sock [root@tubes mysql-connector-odbc.from.mysql.com]# ln -s /var/lib/mysql/mysql.sock /tmp/mysql.sock | ||||||||
| Added: | ||||||||
| > > | ||||||||
Set the APPX_ODBC_LIB environment variable | ||||||||
| Changed: | ||||||||
| < < | APPX needs to what and where the libodbc file is. libodbc is provided by unixODBC. On my system it is libodbc.so.1.0.0. For convenience, libodbc.so is a symbolic link to libodbc.so.1.0.0.
[root@tubes tools]# *updatedb* | |||||||
| > > | APPX necesita saber donde el archivo donde esta libodbc. libodbc es provido por unixODBC. En mi sistema es libodbc.so.1.0.0. Por conveniencia, libodbc.so es un link simbolico a libodbc.so.1.0.0. [root@tubes tools]# *updatedb* | |||||||
| [root@tubes tools]# locate libodbc.so /usr/lib/libodbc.so /usr/lib/libodbc.so.1 | ||||||||
| Line: 594 to 582 | ||||||||
| [root@tubes tools]# | ||||||||
| Changed: | ||||||||
| < < | The APPX environment variable APPX_ODBC_LIB can be set an many places. Where it is set is not so important just as long as it is present at the begining of the appx session. A common convention is to set it either in the /usr/local/appx/data/appx.env file, or in the service daemon file /usr/local/appx/tools/appxd-8060.env. I'm going to place it in the daemon configuration file, after verifing that it is not set in the appx.env file.
[root@tubes tools]# *grep APPX_ODBC_LIB /usr/local/appx/data/appx.env* | |||||||
| > > | El ambiente de APPX variable APPX_ODBC_LIB puede se fijar en varios locales. Donde esta fijado no es tan importante pero es importante estar en la seccion de APPX. Una convencion comun es fijar en el archivo /usr/local/appx/data/appx.env, o en el servicio de archivo daemon /usr/local/appx/tools/appxd-8060.env. Voy poner el archivo de configuracion de daemon, despues de verificar que no esta fijado en el archivo appx.env. [root@tubes tools]# *grep APPX_ODBC_LIB /usr/local/appx/data/appx.env* | |||||||
| [root@tubes tools]# [root@tubes tools]# ./appxLoginMgr -install -SockPort=8071 APPX_KEYMAP=WINDOWS APPX_ODBC_LIB=/usr/lib/libodbc.so APPX_SS_LOG=/usr/local/appx/appx_ss_log.txt APPX_SS_CODE=0xFFFFFFFF APPX_SQL_CMD=/usr/local/appx/appx_sql_cmd.txt APPX_DBG_CODE=0xFFFFFFFF Warning - the engine that you named has the setuid bit enabled, | ||||||||
| Line: 629 to 616 | ||||||||
| [root@tubes tools]# | ||||||||
| Changed: | ||||||||
| < < | The service installation completed successfully. I added some optional debug only arguments to the service that create log files. These log files can be very helpful in debugging connection failures. Remove the debug arguments though before turning the service over to production use. The arguments I used are APPX_SS_LOG=/usr/local/appx/appx_ss_log.txt APPX_SS_CODE=0xFFFFFFFF APPX_SQL_CMD=/usr/local/appx/appx_sql_cmd.txt APPX_DBG_CODE=0xFFFFFFFF. | |||||||
| > > | La instalacion del servicio fue completada con exito. Agrege una opcion para debug solamente los argumentos de servicio para crear los files de create log. Esos archivos de log pueden ser muy importantes en debugging problemas de connecion. Remover los argumentos de debug antes de mover el servicio a usuarios en produccion. Los argumentos que estamos usando son APPX_SS_LOG=/usr/local/appx/appx_ss_log.txt APPX_SS_CODE=0xFFFFFFFF APPX_SQL_CMD=/usr/local/appx/appx_sql_cmd.txt APPX_DBG_CODE=0xFFFFFFFF. | |||||||
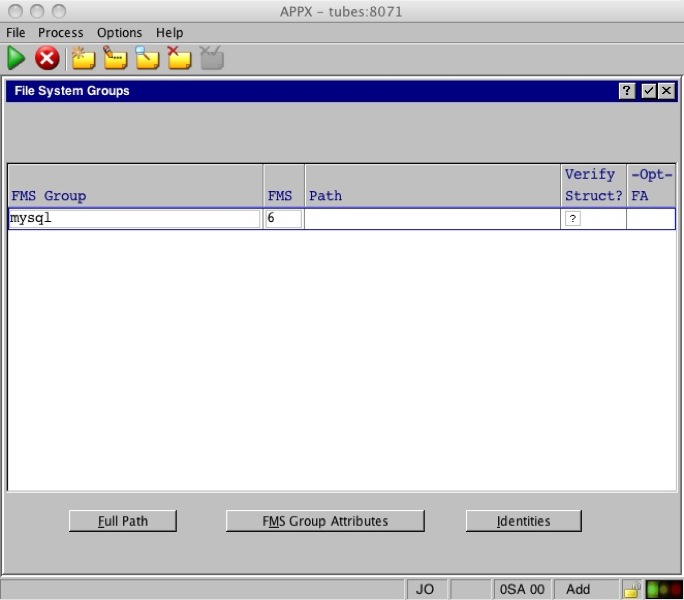
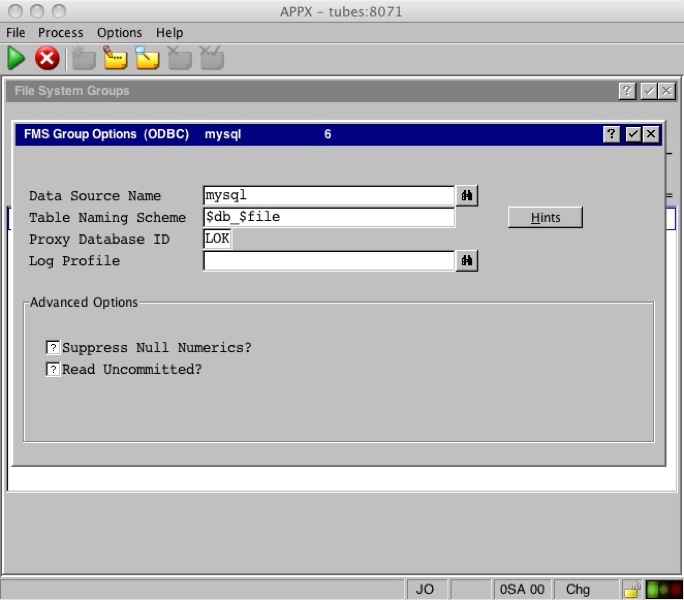
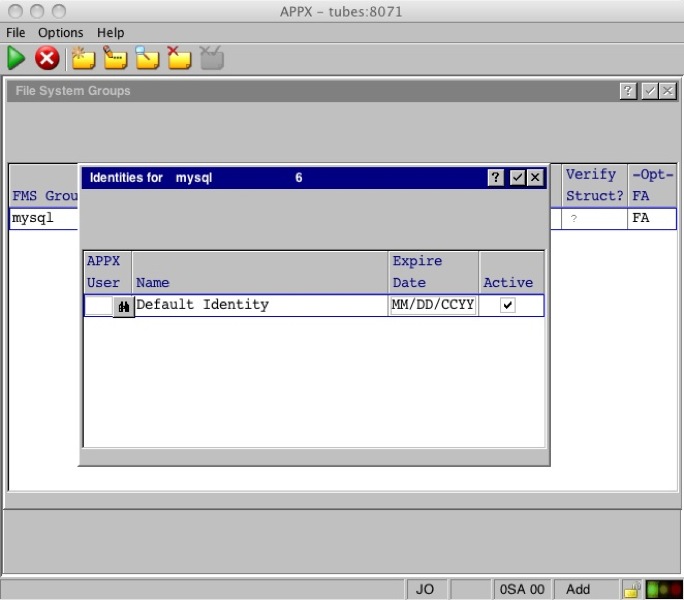
Configure APPX FMS parameters. | ||||||||
| Changed: | ||||||||
| < < | Well, MySQL is installed, configured to work with UnixODBC. Let's make the FMS settings in APPX to wrap up. | |||||||
| > > | Finalmente, MySQL esta instalado, configurado para trabajar con UnixODBC. Vamos hacer un FMS settings en APPX para acabar. | |||||||
| Changed: | ||||||||
| < < |
| |||||||
| > > |
| |||||||
|
| ||||||||
| Changed: | ||||||||
| < < |
| |||||||
| > > |
| |||||||
 | ||||||||
| Changed: | ||||||||
| < < |
| |||||||
| > > |
| |||||||
 | ||||||||
| Changed: | ||||||||
| < < |
| |||||||
| > > |
| |||||||
 | ||||||||
| Changed: | ||||||||
| < < |
| |||||||
| > > |
| |||||||
 | ||||||||
| Changed: | ||||||||
| < < |
| |||||||
| > > |
| |||||||
PostgreSQL 8.1.11 | ||||||||
| Changed: | ||||||||
| < < | Quick installation steps for the APPX to PostgreSQL connection:
| |||||||
| > > | Pasos de instalacion rapida de APPX a la connecion PostgreSQL:
| |||||||
Detailed installation example for the APPX to PostgreSQL connection: | ||||||||
| Changed: | ||||||||
| < < | Here are the steps I used to make connection with APPX 4.3.0 and PostgreSQL 8.1.11 with both installed on the same Red Hat Enterprise 5.1, 32 bit server. The PostgreSQL database and UnixODBC will be provided by Red Hat. UnixODBC will also be provided by Red Hat. | |||||||
| > > | Los pasos usados para conectar con APPX 4.3.0 y PostgreSQL 8.1.11 con los dos instaladoes en el mismo Red Hat Enterprise 5.1, 32 bit server. La base de datos de PostgreSQL y UnixODBC son proporcionados por Red Hat. UnixODBC tambien es proporcionado por Red Hat. | |||||||
Install PostgreSQL, PostgreSQL-Server, PostgreSQL-libs, PostgreSQL-ODBC and UnixODBC | ||||||||
Revision 12010-01-27 - RayPelegrino
| Line: 1 to 1 | ||||||||
|---|---|---|---|---|---|---|---|---|
| Added: | ||||||||
| > > |
Database Interface UpgradesCompatibility with newer versions of popular databases is among the many features of APPX 5.0.
Oracle
APPX to Oracle quick installation steps, with the assumption that you have a working install of Oracle 10g R2:
APPX to Oracle detailed installation example:Here are the steps I used to make connection with APPX 4.3.0 and Oracle 10gR2 with both installed on the same Red Hat Enterprise 5.1, 32 bit server. I assume that you already have a working installation of Oracle 10g R2.Create directory for Oracle Instant Client bundle to download to.I'm going to create a directory to place the zipped bundled Oracle Instant Client files. For my example, I'm going to use /usr/local/src/oracle/instantclient/.[root@tubes /]# *mkdir -p /usr/local/src/oracle/instantclient/* [root@tubes /]# *cd /usr/local/src/oracle/instantclient/* [root@tubes instantclient]# Download the Oracle Instant Client files for Linux.APPX requires at least the Basic package, but it is recommended that you grab the SQL*Plus package too for debugging. <a href=http://www.oracle.com/technology/tech/oci/instantclient/index.html>http://www.oracle.com/technology/tech/oci/instantclient/index.html</a>For 10gR2If you are running Oracle 10gR2, then use the 10gR2 Instant Client. At the time this document was created, the current version for Linux X86 is 10.2.0.4, oracle-instantclient-basic-10.2.0.4-1.i386.zip (34,687,861 bytes), and oracle-instantclient-sqlplus-10.2.0.4-1.i386.zip (744,730 bytes). Place the downloaded files in the /usr/local/src/oracle/instantclient/ directory.For 11gIf you are running Oracle 11g, then use the 11g Instant Client. At the time this document was created, the current version is 11.1.0.6.0 , basic.zip (42,285,643 bytes), and sqlplus.zip (784,417 bytes). Place the downloaded files in the /usr/local/src/oracle/instantclient/ directory, then unzip them.Place the basic and sqlplus zipped files into /usr/local/src/oracle/instantclient/, and unzip them:[root@tubes instantclient]# *pwd* /usr/local/src/oracle/instantclient [root@tubes instantclient]# *ls -la* total 34656 drwxr-xr-x 2 root root 4096 Jun 5 15:01 . drwxr-xr-x 3 root root 4096 Jun 5 14:59 .. -rw-r--r-- 1 root root 34687861 Jun 5 15:01 oracle-instantclient-basic-10.2.0.4-1.i386.zip -rw-r--r-- 1 root root 744730 Jun 5 15:01 oracle-instantclient-sqlplus-10.2.0.4-1.i386.zip [root@tubes instantclient]# *unzip oracle-instantclient-basic-10.2.0.4-1.i386.zip* Archive: oracle-instantclient-basic-10.2.0.4-1.i386.zip inflating: instantclient_10_2/BASIC_README inflating: instantclient_10_2/classes12.jar inflating: instantclient_10_2/genezi inflating: instantclient_10_2/libclntsh.so.10.1 inflating: instantclient_10_2/libnnz10.so inflating: instantclient_10_2/libocci.so.10.1 inflating: instantclient_10_2/libociei.so inflating: instantclient_10_2/libocijdbc10.so inflating: instantclient_10_2/ojdbc14.jar [root@tubes instantclient]# *unzip oracle-instantclient-sqlplus-10.2.0.4-1.i386.zip* Archive: oracle-instantclient-sqlplus-10.2.0.4-1.i386.zip inflating: instantclient_10_2/SQLPLUS_README inflating: instantclient_10_2/glogin.sql inflating: instantclient_10_2/libsqlplus.so inflating: instantclient_10_2/libsqlplusic.so inflating: instantclient_10_2/sqlplus [root@tubes instantclient]# *ls -la* total 34660 drwxr-xr-x 3 root root 4096 Jun 5 15:01 . drwxr-xr-x 3 root root 4096 Jun 5 14:59 .. drwxr-xr-x 2 root root 4096 Jun 5 15:01 instantclient_10_2 -rw-r--r-- 1 root root 34687861 Jun 5 15:01 oracle-instantclient-basic-10.2.0.4-1.i386.zip -rw-r--r-- 1 root root 744730 Jun 5 15:01 oracle-instantclient-sqlplus-10.2.0.4-1.i386.zip [root@tubes instantclient]# *ls -la instantclient_10_2/* total 102424 drwxr-xr-x 2 root root 4096 Jun 5 15:01 . drwxr-xr-x 3 root root 4096 Jun 5 15:01 .. -rw-rw-r-- 1 root root 238 Feb 17 03:57 BASIC_README -r--r--r-- 1 root root 1609607 Feb 17 03:57 classes12.jar -rwxrwxr-x 1 root root 67766 Feb 17 03:57 genezi -r--r--r-- 1 root root 1525 Feb 17 03:58 glogin.sql -rwxrwxr-x 1 root root 19076649 Feb 17 03:57 libclntsh.so.10.1 -r-xr-xr-x 1 root root 5656445 Feb 17 03:57 libnnz10.so -rwxrwxr-x 1 root root 1398244 Feb 17 03:57 libocci.so.10.1 -rwxrwxr-x 1 root root 72698427 Feb 17 03:57 libociei.so -r-xr-xr-x 1 root root 120443 Feb 17 03:57 libocijdbc10.so -r-xr-xr-x 1 root root 1434263 Feb 17 03:58 libsqlplusic.so -r-xr-xr-x 1 root root 1069221 Feb 17 03:58 libsqlplus.so -r--r--r-- 1 root root 1555682 Feb 17 03:57 ojdbc14.jar -r-xr-xr-x 1 root root 8903 Feb 17 03:58 sqlplus -rw-rw-r-- 1 root root 242 Feb 17 03:58 SQLPLUS_README [root@tubes instantclient]# Place unzipped Oracle Instant Client files into permanent installation target directory.Now move the unzipped directory (instantclient_10_2) that contains both the basic and SQL*Plus files from the Oracle Instant Client, into the desired permanent directory. In my example, I'm using /usr/local/, so that the Oracle files will be in a directory /usr/local/instantclient_10_2/.[root@tubes instantclient]# *pwd* /usr/local/src/oracle/instantclient [root@tubes instantclient]# *ls -la* total 34660 drwxr-xr-x 3 root root 4096 Jun 5 15:01 . drwxr-xr-x 3 root root 4096 Jun 5 14:59 .. drwxr-xr-x 2 root root 4096 Jun 5 15:01 instantclient_10_2 -rw-r--r-- 1 root root 34687861 Jun 5 15:01 oracle-instantclient-basic-10.2.0.4-1.i386.zip -rw-r--r-- 1 root root 744730 Jun 5 15:01 oracle-instantclient-sqlplus-10.2.0.4-1.i386.zip [root@tubes instantclient]# *ls /usr/local/* appx appx.tgz basic.zip bin etc games include lib libexec sbin share src [root@tubes instantclient]# *mv instantclient_10_2/ /usr/local/* [root@tubes instantclient]# *ls /usr/local/* appx appx.tgz basic.zip bin etc games include instantclient_10_2 lib libexec sbin share src [root@tubes instantclient]# Configure the operating system's dynamic linker run time bindingsNow we must register the Oracle Instant Client library files with the system to make the shared library's path known. I'm going to use ldconfig.[root@tubes instantclient]# *ldconfig -v|grep libclntsh* [root@tubes instantclient]# *ldconfig -v|grep instant* [root@tubes instantclient]# [root@tubes instantclient]# *cat /etc/ld.so.conf* include ld.so.conf.d/*.conf [root@tubes instantclient]# *echo /usr/local/instantclient_10_2/ >> /etc/ld.so.conf* [root@tubes instantclient]# *cat /etc/ld.so.conf* include ld.so.conf.d/*.conf /usr/local/instantclient_10_2/ [root@tubes instantclient]# Build cache used by the operating system's run-time linkerNow, let's rebuild the ldconfig cache, and verify that the library's are available system wide.[root@tubes instantclient]# *ldconfig* [root@tubes instantclient]# *ldconfig -v|grep libclntsh* libclntsh.so.10.1 -> libclntsh.so.10.1 [root@tubes instantclient]# *ldconfig -v|grep instant* /usr/local/instantclient_10_2: [root@tubes instantclient]# Identify version of libclntsh.so that is included with downloaded Oracle Instant Client bundleAPPX needs to know the name of the Oracle libclntsh.so file on your system. This file name changes from version to version. We must now identify the libclntsh file name that was distributed in the Oracle Instant Client bundle. Look inside the instantclient directory for a file that begins with libclntsh. To show you examples of Oracle Instant Client 10.2 and Oracle Instant Client 11.1, I have installed both versions in /usr/local/.[joe@tubes instantclient_10_2]$ *ls -la /usr/local/instantclient_1*/libclnt** -rwxrwxrwx 1 root root 19076649 Feb 17 03:57 /usr/local/instantclient_10_2/libclntsh.so.10.1 -rwxrwxrwx 1 root root 35295891 Aug 1 2007 /usr/local/instantclient_11_1/libclntsh.so.11.1 [joe@tubes instantclient_10_2]$As you can see my libclntsh files are libclntsh.so.10.1, which came bundled with the Oracle Instant Client 10.2 Basic bundle, and libclntsh.so.11.1, which came bundled with the Oracle Instant Client 11.1 Basic bundle. To let APPX know the version of the Instant client you have installed, perform just one of the following two options:Create libclntsh.so symbolic link and set the APPX_OCI_DIR environment variable
Set APPX_OCI_LIB
Use the Oracle Instant Client's version of SQL*Plus to verify connectify to Oracle.Now let's verify that we can connect to Oracle using Oracle's SQL*Plus tool. I'm going to use the following parameters for my example, be sure and use values that are correct for your Oracle instance. user=scott, password=password, server=tubes, port=1521, and Oracle Instance=appx.[root@tubes instantclient_10_2]# */usr/local/instantclient_10_2/sqlplus scott/password@tubes:1521/appx* SQL*Plus: Release 10.2.0.4.0 - Production on Wed Jun 4 09:17:55 2008 Copyright (c) 1982, 2007, Oracle. All Rights Reserved. Connected to: Oracle Database 10g Enterprise Edition Release 10.2.0.1.0 - Production With the Partitioning, OLAP and Data Mining options SQL> *show all* appinfo is OFF and set to "SQL*Plus" arraysize 15 autocommit OFF autoprint OFF autorecovery OFF autotrace OFF blockterminator "." (hex 2e) btitle OFF and is the first few characters of the next SELECT statement cmdsep OFF colsep " " compatibility version NATIVE concat "." (hex 2e) copycommit 0 COPYTYPECHECK is ON define "&" (hex 26) describe DEPTH 1 LINENUM OFF INDENT ON echo OFF editfile "afiedt.buf" embedded OFF escape OFF escchar OFF FEEDBACK ON for 6 or more rows flagger OFF flush ON heading ON headsep "|" (hex 7c) instance "local" linesize 80 lno 14 loboffset 1 logsource "" long 80 longchunksize 80 markup HTML OFF HEAD "" BODY "" TABLE "border='1' width='90%' align='center' summary='Script output'" SPOOL OFF ENTMAP ON PREFORMAT OFF newpage 1 null "" numformat "" numwidth 10 pagesize 14 PAUSE is OFF pno 0 recsep WRAP recsepchar " " (hex 20) release 1002000100 repfooter OFF and is NULL repheader OFF and is NULL serveroutput OFF shiftinout INVISIBLE showmode OFF spool OFF sqlblanklines OFF sqlcase MIXED sqlcode 0 sqlcontinue "> " sqlnumber ON sqlpluscompatibility 10.2.0 sqlprefix "#" (hex 23) sqlprompt "SQL> " sqlterminator ";" (hex 3b) suffix "sql" tab ON termout ON timing OFF trimout ON trimspool OFF ttitle OFF and is the first few characters of the next SELECT statement underline "-" (hex 2d) USER is "SCOTT" verify ON wrap : lines will be wrapped SQL> *quit* Disconnected from Oracle Database 10g Enterprise Edition Release 10.2.0.1.0 - Production With the Partitioning, OLAP and Data Mining options [root@tubes instantclient_10_2]# Configure APPX FMS settingsWell, that looks good. Let's configure our FMS settings inside APPX and make a connection!
ODBCMySQL 5.0.22Quick installation steps of the APPX to MySQL connection:
Detailed installation example of the APPX to MySQL connection:Here are the steps I used to make connection with APPX 4.3.0 and MySQL 5.0.22 with both installed on the same Red Hat Enterprise 5.1, 32 bit server. The MySQL and UnixODBC will be provided by Red Hat, and the mysql-connector-odbc will be provided by MySQL. Red Hat's Yum repositories do contain mysql-connector-odbc, but at the time of this test, it was 3.51.12 (too old). For this connection we need 3.51.22 or newer. We'll get this component from the MySQL.com website.Download mysql-connector-odbc from MySQL.com website.You should go to <a href=http://dev.mysql.com/downloads/connector/odbc/3.51.html>MySQL.com's ODBC Connector download site</a> and get the mysql-connector-odbc in the format that is right for your platform. My test server is Red Hat 5.1 32 bit, so I'll download the RPM format for x86 Red Hat.[root@tubes ~]# *cd /usr/local/src* [root@tubes src]# *mkdir mysql-connector-odbc.from.mysql.com* [root@tubes src]# *cd mysql-connector-odbc.from.mysql.com/* [root@tubes mysql-connector-odbc.from.mysql.com]# *wget http://mirror.trouble-free.net/mysql_mirror/Downloads/Connector-ODBC/3.51/mysql-connector-odbc-3.51.25-0.i386.rpm* Resolving mirror.trouble-free.net... 66.45.230.130 Connecting to mirror.trouble-free.net|66.45.230.130|:80... connected. 15:35:31 (158 KB/s) - `mysql-connector-odbc-3.51.25-0.i386.rpm' saved [1862076/1862076] Install MySQL, MySQL-Server, and UnixODBCWe will now install MySQL 5.0.22 (MySQL client programs and shared libraries.), MySQL-Server 5.0.22-2.2 (The MySQL server and related files.) and UnixODBC 2.2.11-7.1 (includes low-level drivers for MySQL, PostgreSQL, and local files.)[root@tubes mysql-connector-odbc.from.mysql.com]# *yum install mysql mysql-server unixODBC* Loading "installonlyn" plugin Setting up Install Process Setting up repositories Reading repository metadata in from local files Parsing package install arguments Resolving Dependencies --> Populating transaction set with selected packages. Please wait. ---> Package mysql.i386 0:5.0.22-2.2.el5_1.1 set to be updated ---> Downloading header for mysql-server to pack into transaction set. mysql-server-5.0.22-2.2.e 100% |=========================| 33 kB 00:00 ---> Package mysql-server.i386 0:5.0.22-2.2.el5_1.1 set to be updated ---> Downloading header for unixODBC to pack into transaction set. unixODBC-2.2.11-7.1.i386. 100% |=========================| 28 kB 00:00 ---> Package unixODBC.i386 0:2.2.11-7.1 set to be updated --> Running transaction check --> Processing Dependency: perl-DBD-MySQL for package: mysql-server --> Restarting Dependency Resolution with new changes. --> Populating transaction set with selected packages. Please wait. ---> Downloading header for perl-DBD-MySQL to pack into transaction set. perl-DBD-MySQL-3.0007-1.f 100% |=========================| 8.3 kB 00:00 ---> Package perl-DBD-MySQL.i386 0:3.0007-1.fc6 set to be updated --> Running transaction check Dependencies Resolved ============================================================================= Package Arch Version Repository Size ============================================================================= Installing: mysql i386 5.0.22-2.2.el5_1.1 updates 3.0 M mysql-server i386 5.0.22-2.2.el5_1.1 updates 10 M unixODBC i386 2.2.11-7.1 base 832 k Installing for dependencies: perl-DBD-MySQL i386 3.0007-1.fc6 base 147 k Transaction Summary ============================================================================= Install 4 Package(s) Update 0 Package(s) Remove 0 Package(s) Total download size: 14 M Is this ok [y/N]: y Downloading Packages: (1/3): perl-DBD-MySQL-3.0 100% |=========================| 147 kB 00:01 (2/3): mysql-server-5.0.2 100% |=========================| 10 MB 01:20 (3/3): unixODBC-2.2.11-7. 100% |=========================| 832 kB 00:05 Running Transaction Test Finished Transaction Test Transaction Test Succeeded Running Transaction Installing: mysql ######################### [1/4] Installing: perl-DBD-MySQL ######################### [2/4] Installing: mysql-server ######################### [3/4] Installing: unixODBC ######################### [4/4] Installed: mysql.i386 0:5.0.22-2.2.el5_1.1 mysql-server.i386 0:5.0.22-2.2.el5_1.1 unixODBC.i386 0:2.2.11-7.1 Dependency Installed: perl-DBD-MySQL.i386 0:3.0007-1.fc6 Complete! [root@tubes mysql-connector-odbc.from.mysql.com]# Install mysql-connector-odbc version 3.51.22 or newer.We need to install mysql-connector-odbc version 3.51.22 or newer. We already downloaded it in an earlier step.[root@tubes mysql-connector-odbc.from.mysql.com]# *rpm -ivh mysql-connector-odbc-3.51.25-0.i386.rpm* error: Failed dependencies: libltdl.so.3 is needed by mysql-connector-odbc-3.51.25-0.i386As you can see, my server is missing libltdl.so.3. That file is found in the libtool-ltdl package. Let's install it now. [root@tubes mysql-connector-odbc.from.mysql.com]# *yum install libtool-ltdl* Loading "installonlyn" plugin Setting up Install Process Setting up repositories Reading repository metadata in from local files Parsing package install arguments Resolving Dependencies --> Populating transaction set with selected packages. Please wait. ---> Downloading header for libtool-ltdl to pack into transaction set. libtool-ltdl-1.5.22-6.1.i 100% |=========================| 15 kB 00:00 ---> Package libtool-ltdl.i386 0:1.5.22-6.1 set to be updated --> Running transaction check Dependencies Resolved ============================================================================= Package Arch Version Repository Size ============================================================================= Installing: libtool-ltdl i386 1.5.22-6.1 base 37 k Transaction Summary ============================================================================= Install 1 Package(s) Update 0 Package(s) Remove 0 Package(s) Total download size: 37 k Is this ok [y/N]: y Downloading Packages: (1/1): libtool-ltdl-1.5.2 100% |=========================| 37 kB 00:00 Running Transaction Test Finished Transaction Test Transaction Test Succeeded Running Transaction Installing: libtool-ltdl ######################### [1/1] Installed: libtool-ltdl.i386 0:1.5.22-6.1 Complete! [root@tubes mysql-connector-odbc.from.mysql.com]#Success! Now let's resume our installation of mysql-connector-odbc. [root@tubes mysql-connector-odbc.from.mysql.com]# *rpm -ivh mysql-connector-odbc-3.51.25-0.i386.rpm* Preparing... ########################################### [100%] 1:mysql-connector-odbc ########################################### [100%] [myodbc3i.c][589][INFO] Driver registered. Usage count is 1. Location "/etc" [root@tubes mysql-connector-odbc.from.mysql.com]# Create MySQL database and database user.If you don't already have a MySQL database created along with a MySQL database user, you need to create one. Our example will use a database named appx. The MySQL user name will be appx, which is a preexisting OS user. Substitute your own values for database name and database/OS user.[root@tubes mysql-connector-odbc.from.mysql.com]# *mysql -uroot -p* Enter password: Welcome to the MySQL monitor. Commands end with ; or \g. Your MySQL connection id is 3 to server version: 5.0.22 Type 'help;' or '\h' for help. Type '\c' to clear the buffer. mysql> *create database appx;* Query OK, 1 row affected (0.00 sec) mysql> *grant all on appx.* to appx@localhost identified by "password";* Query OK, 0 rows affected (0.00 sec) mysql> *flush privileges;* Query OK, 0 rows affected (0.00 sec) mysql> *quit* Bye [root@tubes mysql-connector-odbc.from.mysql.com]# Determine where UnixODBC expects odbc.ini and odbcinst.ini configuration files to be located.The odbc.ini and odbcinst.ini configuration files can be located on various places in your server's file system. The safest way to make sure you are working on the correct location is to run odbcinst -j. Here is an example:[root@tubes tools]# *odbcinst -j* unixODBC 2.2.11 DRIVERS............: /etc/odbcinst.ini SYSTEM DATA SOURCES: /etc/odbc.ini USER DATA SOURCES..: /root/.odbc.ini [root@tubes tools]#Here you can see that UnixODBC is expecting the two system configuration files to be located at /etc/odbc.ini and /etc/odbcinst.ini. Now that we know the location, let's configure the files. Both files can contain multiple sections or stanzas that are each identified by bracked values. Each bracked value is followed by property value definitions, one per line, in the format PROPERTY NAME=PROPERTY VALUE. Configure /etc/odbc.iniThe odbc.ini file contains a list of Data Sources and any properties for each. There are two types of odbc.ini files; 1) System and 2) User. We will be working with the System DSN files only, and not the User DSN files. The System odbc.ini file usually exists at /etc/odbc.ini or /usr/local/etc/odbc.ini while the user usually exists at ~/.odbc.ini. We need to build the odbc.ini file. The odbc.ini file can contain stanzas for different drivers. The content of each driver's stanza is driver specific (MySQL, PostgreSQL, FreeTDS, MiniSQL etc...). My /etc/odbc.ini file looks like this:[root@tubes tools]# [root@tubes tools]# *cat /etc/odbc.ini* [mysql] Driver = mysql Database = appx Description = mysql odbc connection for appx Pwd = password Port = 3306 Server = localhost UID = appx [root@tubes tools]#The [mysql] bracketed value is the Data Source Name. The Driver field is referenced in the APPX FMS settings, and in the odbcinst.ini file as a bracked value stanza header. The Database field is the name of the database that you want APPX to store data in. This database was created in an earlier step. The Description is informational only. The Pwd field contains the password for the MySQL user. Port is the port that MySQL is configured to listen on. The default is 3306. If it is something else, it would be listed in /etc/my.cnf. Server is the servername containing the MySQL instance we are connecting to. UID is the DSN's user account to connect to MySQL. Configure /etc/odbcinst.iniThis ini file simply lists all installed drivers. It is usually located in either /etc/odbcinst.ini, or /usr/local/etc/odbcinst.ini. We need to build the odbcinst.ini file. The odbc.ini file content is driver specific (MySQL, PostgreSQL, FreeTDS, MiniSQL etc...). My file looks like this:[root@tubes tools]# *cat /etc/odbcinst.ini* [PostgreSQL] Description = ODBC for PostgreSQL Driver = /usr/lib/libodbcpsql.so Setup = /usr/lib/libodbcpsqlS.so FileUsage = 0 [MySQL ODBC 3.51 Driver] DRIVER = /usr/lib/libmyodbc3.so UsageCount = 0 [mysql] Description = mysql odbc connection for appx Driver = /usr/lib/libmyodbc3.so UsageCount = 1 [root@tubes tools]#We are only interested in the [mysql] stanza. The [mysql] value matches the Driver and [mysql] bracked stanza DSN name values from the odbc.ini file. The Description field is informational only. The Driver field is the name of the driver file that was provided by the mysql.com mysql-connector-odbc-3.51.25-0 RPM. The Pwd field contains the password for the MySQL user. Port is the port that MySQL is configured to listen on. The default is 3306. If it is something else, it would be listed in /etc/my.cnf. Server is the servername containing the MySQL instance we are connecting to. UID is the DSN's user account to connect to MySQL. The mysql-connector-odbc that we downloaded from mysql.com did not have a Setup library included, so we skipped that property. The Setup property points to a shared lib containing functions to be called by ODBC Config. By convention it usually has a capitol S towards the end of the file name such as libmyodbc3S.so. ODBC Config would call this library to get driver specific property names during data source configuration. If ODBC Config can not find or use this file it will assume some defaults. Verify DSNs are working.Now that the configuration files are in place, and the DSN is defined, let's test it out. We will use the isql command to make a connection to our DSN named mysql.[root@tubes mysql-connector-odbc.from.mysql.com]# *isql -v mysql* +---------------------------------------+ | Connected! | | | | sql-statement | | help [tablename] | | quit | | | +---------------------------------------+ SQL> *show databases;* +-----------------------------------------------------------------+ | Database | +-----------------------------------------------------------------+ | information_schema | | appx | | test | +-----------------------------------------------------------------+ SQLRowCount returns 3 3 rows fetched SQL> *quit* [root@tubes mysql-connector-odbc.from.mysql.com]# Troubleshoot isql problems.If isql complains that it can't make a connection to the MySQL socket in /tmp/mysql.sock, then the MySQL configuration file /etc/my.cnf might be set to create the file in /var/lib/mysql/mysql.sock. You should change the my.cnf file to point to /tmp/mysql.sock, or create a symbolic link.*isql -v mysql* [08S01][unixODBC][MySQL][ODBC 3.51 Driver]Can't connect to local MySQL server through socket '/tmp/mysql.sock' (2) [ISQL]ERROR: Could not SQLConnect [root@tubes mysql-connector-odbc.from.mysql.com]# *updatedb* [root@tubes mysql-connector-odbc.from.mysql.com]# *locate mysql.sock* /var/lib/mysql/mysql.sock [root@tubes mysql-connector-odbc.from.mysql.com]# *ln -s /var/lib/mysql/mysql.sock /tmp/mysql.sock* Set the APPX_ODBC_LIB environment variableAPPX needs to what and where the libodbc file is. libodbc is provided by unixODBC. On my system it is libodbc.so.1.0.0. For convenience, libodbc.so is a symbolic link to libodbc.so.1.0.0.[root@tubes tools]# *updatedb* [root@tubes tools]# *locate libodbc.so* /usr/lib/libodbc.so /usr/lib/libodbc.so.1 /usr/lib/libodbc.so.1.0.0 [root@tubes tools]# *ls -la /usr/lib/libodbc.so** lrwxrwxrwx 1 root root 16 Jun 11 15:37 /usr/lib/libodbc.so -> libodbc.so.1.0.0 lrwxrwxrwx 1 root root 16 Jun 11 15:37 /usr/lib/libodbc.so.1 -> libodbc.so.1.0.0 -rwxr-xr-x 1 root root 447700 Jan 7 2007 /usr/lib/libodbc.so.1.0.0 [root@tubes tools]#The APPX environment variable APPX_ODBC_LIB can be set an many places. Where it is set is not so important just as long as it is present at the begining of the appx session. A common convention is to set it either in the /usr/local/appx/data/appx.env file, or in the service daemon file /usr/local/appx/tools/appxd-8060.env. I'm going to place it in the daemon configuration file, after verifing that it is not set in the appx.env file. [root@tubes tools]# *grep APPX_ODBC_LIB /usr/local/appx/data/appx.env*
[root@tubes tools]#
[root@tubes tools]# *./appxLoginMgr -install -SockPort=8071 APPX_KEYMAP=WINDOWS APPX_ODBC_LIB=/usr/lib/libodbc.so APPX_SS_LOG=/usr/local/appx/appx_ss_log.txt APPX_SS_CODE=0xFFFFFFFF APPX_SQL_CMD=/usr/local/appx/appx_sql_cmd.txt APPX_DBG_CODE=0xFFFFFFFF*
Warning - the engine that you named has the setuid bit enabled,
you may not want that bit set for the authentication
method that you have chosen (OS-User)
To turn off the setuid bit, chmod u-s ../appx
Configuration written to: appxd-8071.ini
Environment written to: appxd-8071.env
Service script written to: /etc/init.d/appxd-8071
Configuration complete
Registering service
Starting appxd-8071: serviceName: appxd-8071
servicePath: /usr/local/appx/tools/
Looking for config file in appxd-8071.ini
Warning - the engine that you named has the setuid bit enabled,
you may not want that bit set for the authentication
method that you have chosen (OS-User)
To turn off the setuid bit, chmod u-s ../appx
Writing process ID to /var/run/appxd-8071.pid
running as process 2652 servicing port 8071
Warning - the engine that you named has the setuid bit enabled,
you may not want that bit set for the authentication
method that you have chosen (OS-User)
To turn off the setuid bit, chmod u-s ../appx
up and running (process 2652 servicing port 8071)
Installation Complete
[root@tubes tools]# License server started as process 2657, logging to /usr/local/appx/tools/../data/license.log
[root@tubes tools]#
The service installation completed successfully. I added some optional debug only arguments to the service that create log files. These log files can be very helpful in debugging connection failures. Remove the debug arguments though before turning the service over to production use. The arguments I used are APPX_SS_LOG=/usr/local/appx/appx_ss_log.txt APPX_SS_CODE=0xFFFFFFFF APPX_SQL_CMD=/usr/local/appx/appx_sql_cmd.txt APPX_DBG_CODE=0xFFFFFFFF.
Configure APPX FMS parameters.Well, MySQL is installed, configured to work with UnixODBC. Let's make the FMS settings in APPX to wrap up.
PostgreSQL 8.1.11Quick installation steps for the APPX to PostgreSQL connection:
Detailed installation example for the APPX to PostgreSQL connection:Here are the steps I used to make connection with APPX 4.3.0 and PostgreSQL 8.1.11 with both installed on the same Red Hat Enterprise 5.1, 32 bit server. The PostgreSQL database and UnixODBC will be provided by Red Hat. UnixODBC will also be provided by Red Hat.Install PostgreSQL, PostgreSQL-Server, PostgreSQL-libs, PostgreSQL-ODBC and UnixODBCIBM DB/2Microsoft SQL-ServerSQL Server 2000SQL Server 2005SQL Server 2008SQL Server ExpressDatabase connectivity debug toolsAPPX Environment VariablesAPPX_OCI_DIRAPPX_OCI_LIBAPPX_OCI_LIBAPPX_OCI_LIBSAPPX_SS_LOGAPPX_SS_CODEAPPX_SQL_CMD=/usr/local/appx/appx_sql_cmd.logAPPX_DBG_CODE=0xFFFFFFFFOracleORACLE_SIDORACLE_HOMETNS_ADMINSome OS tools to aid in debuggingstracelddBugs:
Comments:Read what other users have said about this page or add your own comments.-- AlKalter - 04 Apr 2008 | |||||||
View topic | History: r2 < r1 | More topic actions...
Ideas, requests, problems regarding TWiki? Send feedback