Difference: APPX500LinuxNewInstallation (1 vs. 23)
Revision 232020-07-02 - JoeOrtagus
| Line: 1 to 1 | ||||||||
|---|---|---|---|---|---|---|---|---|
APPX 5 - Linux/Unix - New Installation | ||||||||
| Line: 27 to 27 | ||||||||
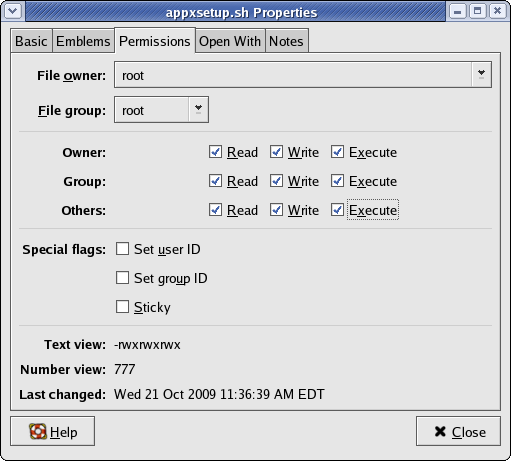
| Change the permissions on the downloaded installer file to have Execute permissions. | ||||||||
| Changed: | ||||||||
| < < |  | |||||||
| > > | | |||||||
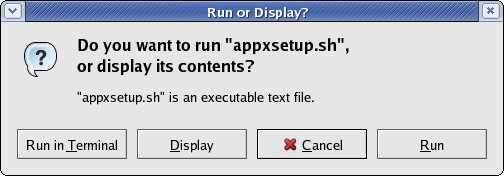
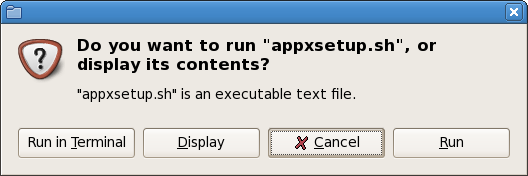
| Run the installer file (appxsetup.sh). If you are presented with a "Run or Display?" screen similar to the one below, click on the "Run" button. | ||||||||
| Changed: | ||||||||
| < < |  | |||||||
| > > | | |||||||
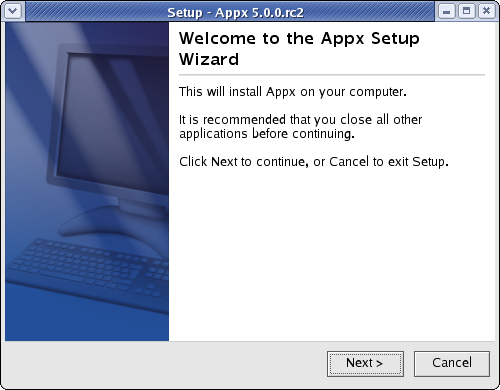
| After a few moments, the APPX Setup Wizard should display the Welcome screen. Click on the "Next" button to continue. | ||||||||
| Changed: | ||||||||
| < < |  | |||||||
| > > | | |||||||
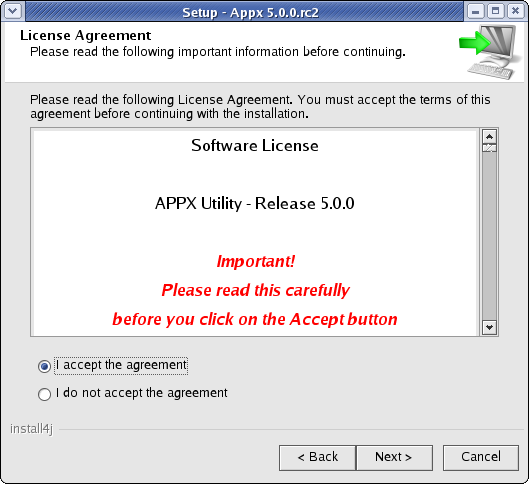
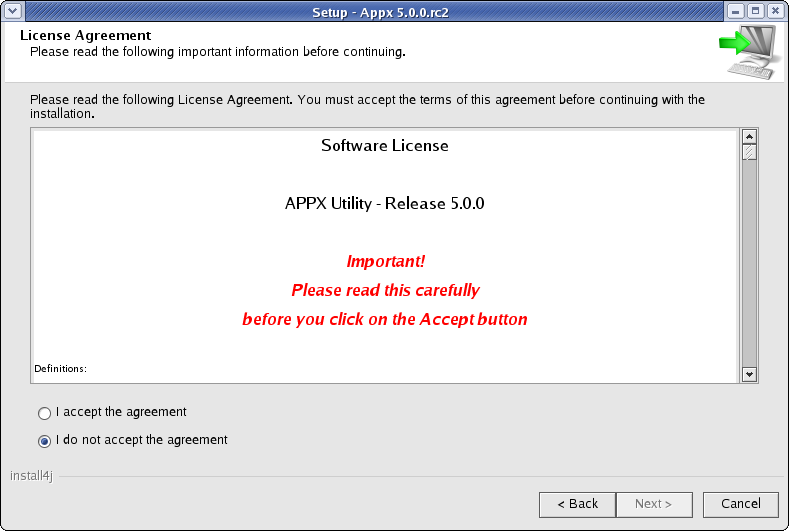
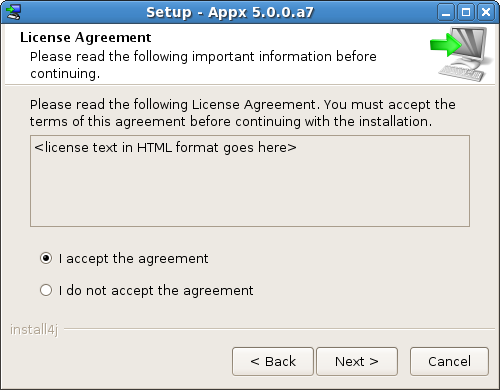
| Read and accept the license agreement. | ||||||||
| Changed: | ||||||||
| < < |  | |||||||
| > > | | |||||||
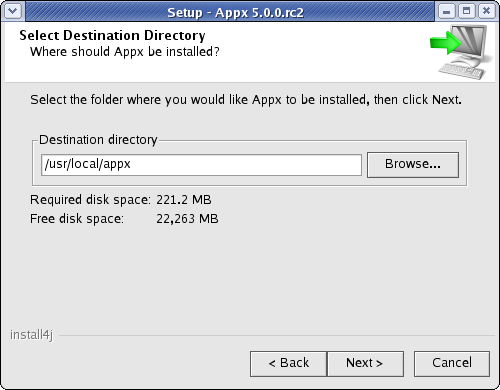
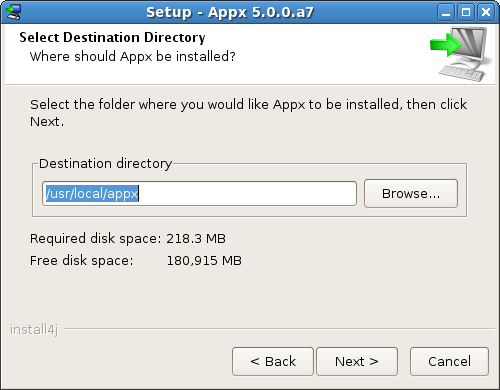
| Specify the Destination Directory into which APPX is to be installed. As a matter of convention, APPX is usually installed into /usr/local/appx but may be installed into the directory of your choice. | ||||||||
| Changed: | ||||||||
| < < |  | |||||||
| > > | | |||||||
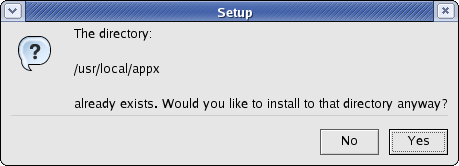
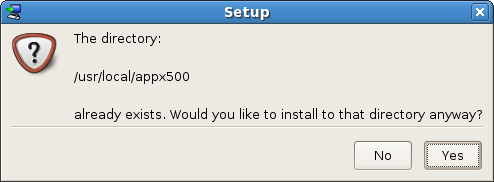
| You will be warned if the destination directory already exists. Otherwise, the APPX Setup Wizard will create it. | ||||||||
| Changed: | ||||||||
| < < |  | |||||||
| > > | | |||||||
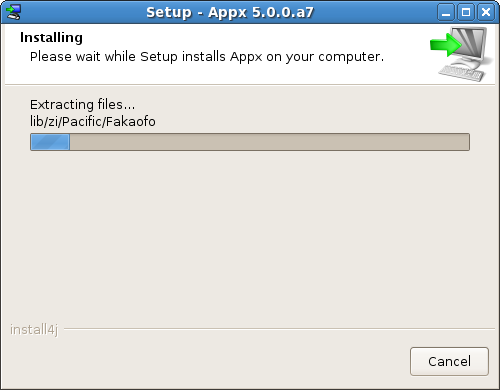
| APPX will then be installed into the specified destination directory. | ||||||||
| Changed: | ||||||||
| < < |  | |||||||
| > > | | |||||||
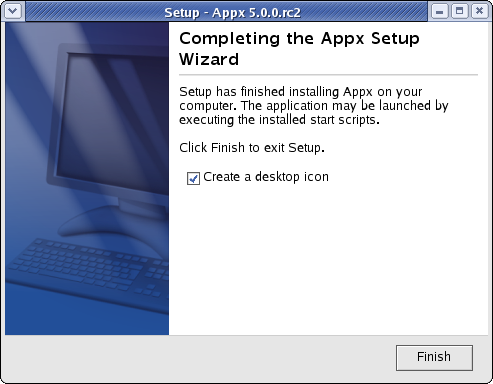
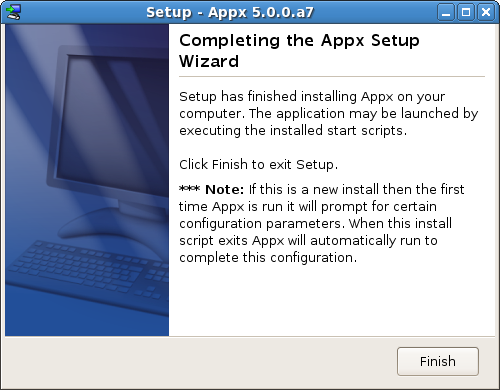
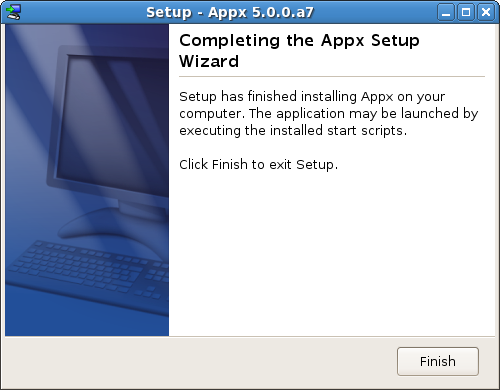
| When the APPX Setup Wizard displays the final screen, click on the Finish button to end the APPX Setup Wizard and to automatically run APPX to complete the configuration and installation of APPX. | ||||||||
| Changed: | ||||||||
| < < |  | |||||||
| > > | | |||||||
| Changed: | ||||||||
| < < | When you click on the Finish button, an APPX session will be automatically launched to run APPX to complete the installation of the APPX environment. | |||||||
| > > | When you click on the Finish button, an APPX session will be automatically launched to APPX500NewInstallConfigAPPX of the APPX environment. | |||||||
| Finally, if you intend to log into APPX as user "appx", then you must add a password for the "appx" o/s user that was created by the installer (use the "passwd appx" command). | ||||||||
| Line: 68 to 68 | ||||||||
|
If you don't have access to a GUI, you can run the Appx installer in character mode by appending "-c" to the command line. After a few moments, the Appx Setup Wizard should display the Welcome message. Press Enter to continue the installation. | ||||||||
| Added: | ||||||||
| > > | On some systems the Java based installer may fail to run with a notice as shown below even though you are supplying the -c argument. In this case, make sure you have dejavu-sans-font package installed, and also that you have a non headless version of a JRE available to the installer. You can do that with the following yum command on RHEL8.
yum install dejavu-sans-fonts java-1.8.0-openjdk
Could not display the GUI. This application needs access to an X Server.
*******************************************************************
You can also run this application in console mode without
access to an X server by passing the argument -c
*******************************************************************
[root@rhel8 Downloads]#
| |||||||
| # ./appxsetup.sh -c
Unpacking JRE ... Preparing JRE ... Starting Installer ... This will install Appx on your computer. OK [o, Enter], Cancel [c] | ||||||||
| Line: 107 to 120 | ||||||||
| [/appx50] | ||||||||
| Deleted: | ||||||||
| < < | ||||||||
| Create a desktop icon? Yes [y, Enter], No [n] | ||||||||
| Deleted: | ||||||||
| < < | ||||||||
| Create a Quick Launch icon? Yes [y, Enter], No [n] | ||||||||
| Line: 123 to 132 | ||||||||
|
| ||||||||
| Changed: | ||||||||
| < < | After all the files have been installed, you will have to run an APPX session to complete the installation of the APPX environment. | |||||||
| > > | After all the files have been installed, you will have to run an APPX session to APPX500NewInstallConfigAPPX of the APPX environment. | |||||||
| If you are installing in character mode, then follow these steps to complete the installation. These should be run as root user : | ||||||||
Revision 222010-01-18 - JeanNeron
Revision 212009-12-10 - SteveFrizzell
| Line: 1 to 1 | ||||||||
|---|---|---|---|---|---|---|---|---|
APPX 5 - Linux/Unix - New Installation | ||||||||
| Line: 57 to 57 | ||||||||
|
| ||||||||
| Changed: | ||||||||
| < < | When you click on the Finish button, an APPX session will be launched to run APPX to complete the installation of the APPX environment. | |||||||
| > > | When you click on the Finish button, an APPX session will be automatically launched to run APPX to complete the installation of the APPX environment. Finally, if you intend to log into APPX as user "appx", then you must add a password for the "appx" o/s user that was created by the installer (use the "passwd appx" command). After completing the above steps, you should be able to login to APPX as user "appx" from a remote desktop using the ADC. | |||||||
Character Mode Installation | ||||||||
| Line: 122 to 126 | ||||||||
| If you are installing in character mode, then follow these steps to complete the installation. These should be run as root user : | ||||||||
| Deleted: | ||||||||
| < < |
| |||||||
| ||||||||
| Added: | ||||||||
| > > |
| |||||||
After completing the above steps, you should be able to successfully log in to appx as user "appx" from a remote desktop using the ADC.
Comments: | ||||||||
Revision 202009-11-17 - JeanNeron
| Line: 1 to 1 | ||||||||
|---|---|---|---|---|---|---|---|---|
APPX 5 - Linux/Unix - New Installation | ||||||||
| Line: 88 to 88 | ||||||||
| After the agreement has been displayed, enter 1 to accept the license agreement, or 2 to cancel the installation. | ||||||||
| Changed: | ||||||||
| < < | For inquires regarding this agreement, please contact: APPX Software, Inc., 11363 San Jose Blvd., Suite 301, Jacksonville, Florida 32223, USA | |||||||
| > > | . . . For inquires regarding this agreement, please contact: APPX Software, Inc., 11363 San Jose Blvd., Suite 301, Jacksonville, Florida 32223, USA | |||||||
| I accept the agreement | ||||||||
| Line: 114 to 114 | ||||||||
| Yes [y, Enter], No [n] | ||||||||
| Changed: | ||||||||
| < < | ||||||||
| > > | ||||||||
|
After all the files have been installed, you will have to run an APPX session to complete the installation of the APPX environment. | ||||||||
| Added: | ||||||||
| > > | If you are installing in character mode, then follow these steps to complete the installation. These should be run as root user :
| |||||||
Comments:Read what other users have said about this page or add your own comments. | ||||||||
Revision 192009-11-12 - JeanNeron
| Line: 1 to 1 | ||||||||
|---|---|---|---|---|---|---|---|---|
APPX 5 - Linux/Unix - New Installation | ||||||||
| Line: 62 to 62 | ||||||||
Character Mode Installation | ||||||||
| Changed: | ||||||||
| < < | If you don't have access to a GUI (on either Windows or Linux/Unix), you can run the Appx installer in character mode by appending "-c" to the command line (either 'setup -c' for Windows or 'appxsetup.sh -c' for Linux/Unix). After a few moments, the Appx Setup Wizard should display the Welcome message. Press Enter to continue the installation. | |||||||
| > > | If you don't have access to a GUI, you can run the Appx installer in character mode by appending "-c" to the command line. After a few moments, the Appx Setup Wizard should display the Welcome message. Press Enter to continue the installation. | |||||||
|
# ./appxsetup.sh -c Unpacking JRE ... Preparing JRE ... Starting Installer ... This will install Appx on your computer. OK [o, Enter], Cancel [c] | ||||||||
Revision 182009-11-11 - JeanNeron
| Line: 1 to 1 | ||||||||
|---|---|---|---|---|---|---|---|---|
APPX 5 - Linux/Unix - New Installation | ||||||||
| Added: | ||||||||
| > > | ||||||||
OverviewTwo different methods are provided to install APPX on Linux/Unix. There is a GUI installer and a Console Mode (character mode) installer. The same installer is used for both methods. The installer will automatically detect if it is being run as a command or from a GUI Desktop, although in some cases you may have to add "-c" to the command line to force the character installer. Regardless of which installation method is used, the result is the same. A typical APPX installation on a system where APPX has not been previously installed performs the following steps: | ||||||||
| Line: 75 to 76 | ||||||||
| APPX Utility - Release 5.0.0 | ||||||||
| Changed: | ||||||||
| < < | _ Important! _ | |||||||
| > > | _ Important! _ | |||||||
| Please read this carefully before you click on the Accept button. | ||||||||
| Line: 113 to 114 | ||||||||
| Yes [y, Enter], No [n] | ||||||||
| Added: | ||||||||
| > > | ||||||||
After all the files have been installed, you will have to run an APPX session to complete the installation of the APPX environment. | ||||||||
Revision 172009-11-10 - JeanNeron
| Line: 1 to 1 | ||||||||
|---|---|---|---|---|---|---|---|---|
APPX 5 - Linux/Unix - New Installation | ||||||||
| Line: 61 to 61 | ||||||||
Character Mode Installation | ||||||||
| Changed: | ||||||||
| < < | If you don't have access to a GUI (on either Windows or Linux/Unix), you can run the Appx installer in character mode by appending "-c" to the command line (either 'setup -c' for Windows or 'appxsetup.sh -c' for Linux/Unix). After a few moments, the Appx Setup Wizard should display the Welcome message. Press Enter to continue the installation | |||||||
| > > | If you don't have access to a GUI (on either Windows or Linux/Unix), you can run the Appx installer in character mode by appending "-c" to the command line (either 'setup -c' for Windows or 'appxsetup.sh -c' for Linux/Unix). After a few moments, the Appx Setup Wizard should display the Welcome message. Press Enter to continue the installation. | |||||||
| Changed: | ||||||||
| < < | # ./appxsetup.sh -c
Unpacking JRE ... Preparing JRE ... Starting Installer ... This will install Appx on your computer. OK [o, Enter], Cancel [c] | |||||||
| > > | # ./appxsetup.sh -c Unpacking JRE ... Preparing JRE ... Starting Installer ... This will install Appx on your computer. OK [o, Enter], Cancel [c] | |||||||
|
| ||||||||
| Changed: | ||||||||
| < < | Next, read and accept the License agreement. Press Enter as each page is displayed | |||||||
| > > | Next, read and accept the License agreement. Press Enter as each page is displayed. | |||||||
| Please read the following License Agreement. You must accept the terms of this agreement before continuing with the installation. | ||||||||
| Line: 76 to 75 | ||||||||
| APPX Utility - Release 5.0.0 | ||||||||
| Changed: | ||||||||
| < < | _ Important! _ | |||||||
| > > | _ Important! _ | |||||||
| Please read this carefully before you click on the Accept button. | ||||||||
| Line: 86 to 85 | ||||||||
| [Enter] | ||||||||
| Changed: | ||||||||
| < < | After the agreement has been displayed, enter 1 to accept the license agreement, or 2 to cancel the installation | |||||||
| > > | After the agreement has been displayed, enter 1 to accept the license agreement, or 2 to cancel the installation. | |||||||
| For inquires regarding this agreement, please contact: APPX Software, Inc., 11363 San Jose Blvd., Suite 301, Jacksonville, Florida 32223, USA | ||||||||
| Line: 96 to 95 | ||||||||
|
| ||||||||
| Changed: | ||||||||
| < < | Choose the directory where APPX should be installed and the other installation options | |||||||
| > > | Choose the directory where APPX should be installed and the other installation options. | |||||||
| Where should Appx be installed? | ||||||||
Revision 162009-11-09 - JeanNeron
| Line: 1 to 1 | ||||||||
|---|---|---|---|---|---|---|---|---|
| ||||||||
| Changed: | ||||||||
| < < | APPX 5.0.0 - Linux - New Installation | |||||||
| > > | APPX 5 - Linux/Unix - New Installation | |||||||
Overview | ||||||||
| Changed: | ||||||||
| < < | Two different methods are provided to install APPX on Linux. There is a GUI installer and a Console Mode (character mode) installer. The same installer is used for both methods. The installer will automatically detect if it is being run as a command or from a GUI Desktop, although in some cases you may have to add "-c" to the command line to force the character installer. Regardless of which installation method is used, the result is the same. A typical APPX installation on a system where APPX has not been previously installed performs the following steps: | |||||||
| > > | Two different methods are provided to install APPX on Linux/Unix. There is a GUI installer and a Console Mode (character mode) installer. The same installer is used for both methods. The installer will automatically detect if it is being run as a command or from a GUI Desktop, although in some cases you may have to add "-c" to the command line to force the character installer. Regardless of which installation method is used, the result is the same. A typical APPX installation on a system where APPX has not been previously installed performs the following steps: | |||||||
| ||||||||
| Line: 18 to 18 | ||||||||
| ||||||||
| Changed: | ||||||||
| < < | GUI Installation on Linux | |||||||
| > > | GUI Installation on Linux/Unix | |||||||
| Changed: | ||||||||
| < < | Log in to your Linux system as the "root" user. | |||||||
| > > | Log in to your system as the "root" user. | |||||||
| Changed: | ||||||||
| < < | Download the APPX/Linux GUI installer (appxsetup.sh) from the APPX web site or the APPX ftp server and save it to your Desktop or to any other suitable folder. | |||||||
| > > | Download the APPX/Linux GUI installer (appxsetup.sh) from the APPX web site or the APPX ftp server and save it to your Desktop or to any other suitable folder. The following instructions will refer to the appxsetup.sh file, which is the name of the Linux installer. The installers for other operating systems have similar names, ie, appxsetup-aix.sh for AIX, appxsetup-sun.sh for Solaris, and so on. if you are downloading directly from the ftp site, make sure you choose the correct installer for your O/S, and substitute your installer's name in the following instructions. | |||||||
| Changed: | ||||||||
| < < | Change the permissions on the downloaded installer file (appxsetup.sh) to have Execute permissions. | |||||||
| > > | Change the permissions on the downloaded installer file to have Execute permissions. | |||||||
|
| ||||||||
| Line: 76 to 76 | ||||||||
| APPX Utility - Release 5.0.0 | ||||||||
| Changed: | ||||||||
| < < | _ Important! _ | |||||||
| > > | _ Important! _ | |||||||
| Please read this carefully before you click on the Accept button. | ||||||||
Revision 152009-11-09 - JeanNeron
| Line: 1 to 1 | ||||||||
|---|---|---|---|---|---|---|---|---|
APPX 5.0.0 - Linux - New Installation | ||||||||
| Line: 6 to 6 | ||||||||
Overview | ||||||||
| Changed: | ||||||||
| < < | Two different methods are provided to install APPX on Linux. There is a GUI installer and a Console Mode (character mode) installer. The same installer is used for both methods. The installer will automatically detect if it is being run as a command or from a GUI Desktop. Regardless of which installation method is used, the result is the same. A typical APPX installation on a system where APPX has not been previously installed performs the following steps: | |||||||
| > > | Two different methods are provided to install APPX on Linux. There is a GUI installer and a Console Mode (character mode) installer. The same installer is used for both methods. The installer will automatically detect if it is being run as a command or from a GUI Desktop, although in some cases you may have to add "-c" to the command line to force the character installer. Regardless of which installation method is used, the result is the same. A typical APPX installation on a system where APPX has not been previously installed performs the following steps: | |||||||
| ||||||||
| Line: 56 to 56 | ||||||||
|
| ||||||||
| Changed: | ||||||||
| < < | When you click on the Finish button, an APPX session will be launched to run APPX to complete the installation of the APPX environment.
Character Mode Installation on Linux | |||||||
| > > | When you click on the Finish button, an APPX session will be launched to run APPX to complete the installation of the APPX environment. | |||||||
| Changed: | ||||||||
| < < | xxxxx | |||||||
| > > |
Character Mode Installation | |||||||
| Changed: | ||||||||
| < < | xxxxx | |||||||
| > > | If you don't have access to a GUI (on either Windows or Linux/Unix), you can run the Appx installer in character mode by appending "-c" to the command line (either 'setup -c' for Windows or 'appxsetup.sh -c' for Linux/Unix). After a few moments, the Appx Setup Wizard should display the Welcome message. Press Enter to continue the installation | |||||||
| Changed: | ||||||||
| < < | xxxxx | |||||||
| > > | # ./appxsetup.sh -c
Unpacking JRE ... Preparing JRE ... Starting Installer ... This will install Appx on your computer. OK [o, Enter], Cancel [c] | |||||||
| Changed: | ||||||||
| < < | xxxxx | |||||||
| > > | Next, read and accept the License agreement. Press Enter as each page is displayed Please read the following License Agreement. You must accept the terms of this agreement before continuing with the installation. Software License APPX Utility - Release 5.0.0 _ Important! _ Please read this carefully before you click on the Accept button. Definitions: "Software License Agreement (SLA)" shall mean this Software License document and the associated *License Key document collectively. | |||||||
| Changed: | ||||||||
| < < | xxxxx | |||||||
| > > | [Enter] | |||||||
| Changed: | ||||||||
| < < | xxxxx | |||||||
| > > | After the agreement has been displayed, enter 1 to accept the license agreement, or 2 to cancel the installation | |||||||
| Changed: | ||||||||
| < < | xxxxx | |||||||
| > > | For inquires regarding this agreement, please contact: APPX Software, Inc., 11363 San Jose Blvd., Suite 301, Jacksonville, Florida 32223, USA | |||||||
| Changed: | ||||||||
| < < | xxxxx | |||||||
| > > | I accept the agreement | |||||||
| Changed: | ||||||||
| < < | xxxxx | |||||||
| > > | Yes [1], No [2] | |||||||
| Changed: | ||||||||
| < < | xxxxx | |||||||
| > > | Choose the directory where APPX should be installed and the other installation options Where should Appx be installed? [/appx50] | |||||||
| Changed: | ||||||||
| < < | xxxxx | |||||||
| > > | Create a desktop icon? | |||||||
| Changed: | ||||||||
| < < | xxxxx | |||||||
| > > | Yes [y, Enter], No [n] | |||||||
| Changed: | ||||||||
| < < | xxxxx | |||||||
| > > | Create a Quick Launch icon? Yes [y, Enter], No [n] | |||||||
| Changed: | ||||||||
| < < |
Run APPX to Complete the Installation | |||||||
| > > | After all the files have been installed, you will have to run an APPX session to complete the installation of the APPX environment. | |||||||
| Deleted: | ||||||||
| < < | The first time that APPX is run after the installation wizard completes, you will need to complete the initial configuration of APPX. | |||||||
Comments:Read what other users have said about this page or add your own comments. | ||||||||
Revision 142009-11-03 - SteveFrizzell
| Line: 1 to 1 | ||||||||
|---|---|---|---|---|---|---|---|---|
APPX 5.0.0 - Linux - New Installation | ||||||||
| Line: 20 to 20 | ||||||||
GUI Installation on Linux | ||||||||
| Changed: | ||||||||
| < < | Log in to your Linux desktop system as the "root" user. | |||||||
| > > | Log in to your Linux system as the "root" user. | |||||||
| Download the APPX/Linux GUI installer (appxsetup.sh) from the APPX web site or the APPX ftp server and save it to your Desktop or to any other suitable folder. | ||||||||
| Line: 44 to 44 | ||||||||
|
| ||||||||
| Changed: | ||||||||
| < < | You will be warned if the destination directory already exists. Otherwise, APPX will create it. | |||||||
| > > | You will be warned if the destination directory already exists. Otherwise, the APPX Setup Wizard will create it. | |||||||
|
| ||||||||
| Line: 52 to 52 | ||||||||
|
| ||||||||
| Changed: | ||||||||
| < < | When the installation wizard displays the final screen, click on the Finish button to end the installation wizard and to automatically run APPX to complete the configuration and installation of APPX. | |||||||
| > > | When the APPX Setup Wizard displays the final screen, click on the Finish button to end the APPX Setup Wizard and to automatically run APPX to complete the configuration and installation of APPX. | |||||||
|
| ||||||||
| Changed: | ||||||||
| < < | When you click on the Finish button, the APPX Client will be launched to run APPX to complete the installation of the APPX environment. | |||||||
| > > | When you click on the Finish button, an APPX session will be launched to run APPX to complete the installation of the APPX environment. | |||||||
Character Mode Installation on Linuxxxxxx | ||||||||
Revision 132009-10-27 - SteveFrizzell
| Line: 1 to 1 | ||||||||
|---|---|---|---|---|---|---|---|---|
APPX 5.0.0 - Linux - New Installation | ||||||||
| Line: 12 to 12 | ||||||||
| ||||||||
| Changed: | ||||||||
| < < |
| |||||||
| > > |
| |||||||
GUI Installation on Linux | ||||||||
Revision 122009-10-23 - SteveFrizzell
| Line: 1 to 1 | ||||||||
|---|---|---|---|---|---|---|---|---|
APPX 5.0.0 - Linux - New Installation | ||||||||
| Line: 42 to 42 | ||||||||
| Specify the Destination Directory into which APPX is to be installed. As a matter of convention, APPX is usually installed into /usr/local/appx but may be installed into the directory of your choice. | ||||||||
| Changed: | ||||||||
| < < | | |||||||
| > > | | |||||||
| You will be warned if the destination directory already exists. Otherwise, APPX will create it. | ||||||||
| Line: 56 to 56 | ||||||||
|
| ||||||||
| Changed: | ||||||||
| < < | When you click on the Finish button, the APPX Client will be launched to run APPX to complete the configuration of the APPX environment. | |||||||
| > > | When you click on the Finish button, the APPX Client will be launched to run APPX to complete the installation of the APPX environment. | |||||||
Character Mode Installation on Linux | ||||||||
| Changed: | ||||||||
| < < | ||||||||
| > > | xxxxx xxxxx xxxxx xxxxx xxxxx xxxxx xxxxx xxxxx xxxxx xxxxx xxxxx xxxxx xxxxx | |||||||
Run APPX to Complete the InstallationThe first time that APPX is run after the installation wizard completes, you will need to complete the initial configuration of APPX. | ||||||||
| Line: 91 to 117 | ||||||||
| ||||||||
| Changed: | ||||||||
| < < |
| |||||||
| > > |
| |||||||
| ||||||||
Revision 112009-10-23 - SteveFrizzell
| Line: 1 to 1 | ||||||||
|---|---|---|---|---|---|---|---|---|
APPX 5.0.0 - Linux - New Installation | ||||||||
| Line: 6 to 6 | ||||||||
Overview | ||||||||
| Changed: | ||||||||
| < < | Two different methods are provided to install APPX on Linux. There is a GUI installer and a Console Mode installer. The same installer is used for both methods. The installer will automatically detect if it is being run as a command or from a GUI Desktop. Regardless of which installation method is used, the result is the same. A typical APPX installation on a system where APPX has not been previously installed performs the following steps: | |||||||
| > > | Two different methods are provided to install APPX on Linux. There is a GUI installer and a Console Mode (character mode) installer. The same installer is used for both methods. The installer will automatically detect if it is being run as a command or from a GUI Desktop. Regardless of which installation method is used, the result is the same. A typical APPX installation on a system where APPX has not been previously installed performs the following steps: | |||||||
| ||||||||
| Line: 28 to 28 | ||||||||
|
| ||||||||
| Changed: | ||||||||
| < < | Run the installer file (appxsetup.sh). If you are presented with a screen like the one below, click on the "Run" button. | |||||||
| > > | Run the installer file (appxsetup.sh). If you are presented with a "Run or Display?" screen similar to the one below, click on the "Run" button. | |||||||
| Changed: | ||||||||
| < < |  | |||||||
| > > | | |||||||
| After a few moments, the APPX Setup Wizard should display the Welcome screen. Click on the "Next" button to continue. | ||||||||
| Line: 38 to 38 | ||||||||
| Read and accept the license agreement. | ||||||||
| Changed: | ||||||||
| < < |  | |||||||
| > > | | |||||||
| Specify the Destination Directory into which APPX is to be installed. As a matter of convention, APPX is usually installed into /usr/local/appx but may be installed into the directory of your choice. | ||||||||
| Line: 46 to 46 | ||||||||
| You will be warned if the destination directory already exists. Otherwise, APPX will create it. | ||||||||
| Changed: | ||||||||
| < < |  | |||||||
| > > | | |||||||
| APPX will then be installed into the specified destination directory. | ||||||||
| Line: 94 to 94 | ||||||||
| ||||||||
| Added: | ||||||||
| > > |
| |||||||
| ||||||||
Revision 102009-10-22 - SteveFrizzell
| Line: 1 to 1 | ||||||||
|---|---|---|---|---|---|---|---|---|
APPX 5.0.0 - Linux - New Installation | ||||||||
| Line: 52 to 52 | ||||||||
|
| ||||||||
| Changed: | ||||||||
| < < | When the installation wizard displays the final screen, click on the Finish button to end the installation wizard and to automatically run APPX to complete the configurationa and installation of APPX. | |||||||
| > > | When the installation wizard displays the final screen, click on the Finish button to end the installation wizard and to automatically run APPX to complete the configuration and installation of APPX. | |||||||
|
| ||||||||
| Changed: | ||||||||
| < < | When you click on the Finish button, the APPX Client will be launched to run APPX to complete the configuration of the APPX environment. | |||||||
| > > | When you click on the Finish button, the APPX Client will be launched to run APPX to complete the configuration of the APPX environment. | |||||||
Character Mode Installation on Linux | ||||||||
| Changed: | ||||||||
| < < | Run APPX to Complete the Installation. | |||||||
| > > | Run APPX to Complete the Installation | |||||||
| Changed: | ||||||||
| < < | The first time that APPX is run after the installation wizard completes, several screens will be presented to allow you to configure APPX and complete the installation of APPX.
Add APPX System Administrators to the APPX User FileYou must identify which users are to be allowed to initially run APPX. You must add at least one user. During the installation of APPX, an O/S user named "appx" was created. As a matter of convention, you should add the "appx" user to the APPX user file as an APPX System Administrator. After adding a user, you may identify additional users or you may proceed by clicking on the Next button.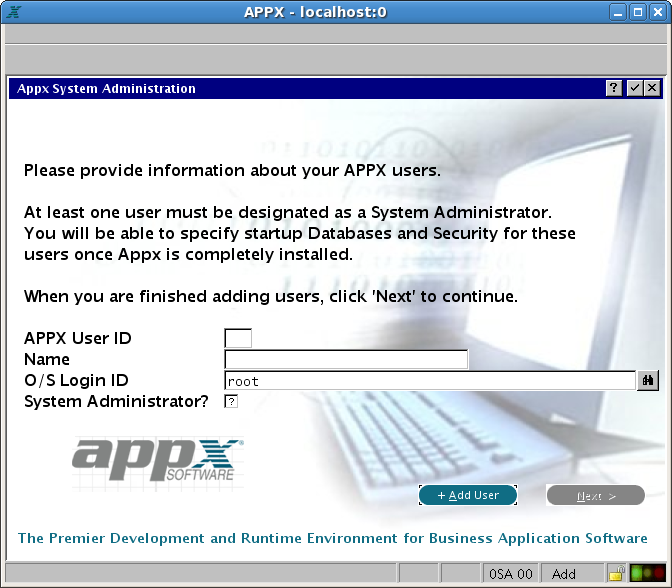
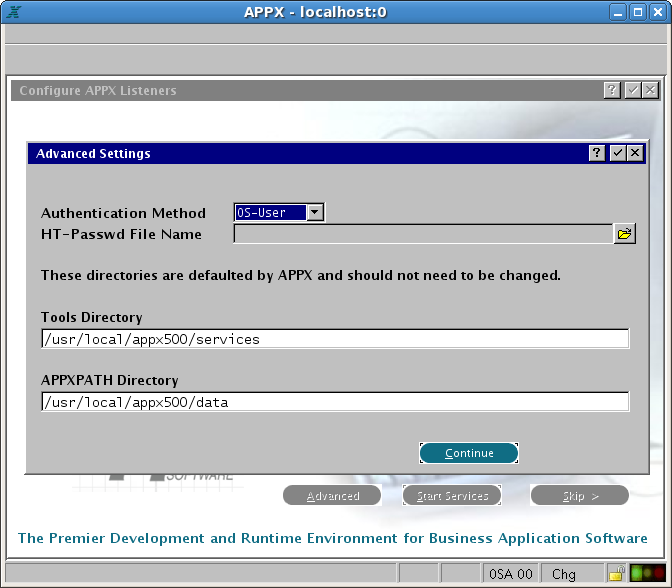
Configure the APPX Login Manager Service and the the APPX Audit Manager ServiceIf you want to allow remote clients to connect to your APPX installation, you should configure the APPX Login Manager Service by entering a Connection Port number. The Connection Port number is used by the various types of APPX clients that connect to APPX from a remote location. If you do not want to allow remote connections, blank out the Connection Port number. If you intend to enable the file I/O audit logging feature of APPX, you should configure the APPX Audit Log Service by entering a Logging Port number. The Logging Port number is used by APPX to log file I/O audit information. If you are not going to use this feature of APPX, blank out the Logging Port number. You may change these port numbers to be any other TCP/IP port numbers that are not already being used by your system but, as a matter of convention, you may want to use the numbers that are already filled in on this screen. After you have entered the appropriate port numbers, click on the "Start Services" button to create the services and start them. If you do not want to configure either of the services, click on the Skip button. You can always configure the services at a later time. You can click on the Advanced button to review and edit additional options relating to configuring the APPX Login Manager Service.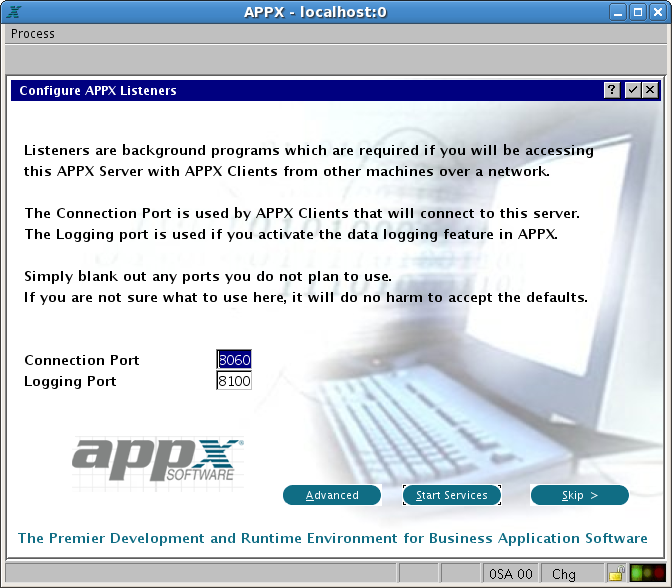 The Advanced Settings screen allows you to specify the Authentication Method that is to be used by the APPX Login Manager service. If you choose HT authentication, you will also need to provide the name of the HT password file.
You must also specify the directory where the APPX Login Manager and the APPX Audit Log Manager commands are installed. Unless you have moved them to a different directory, you should accept the default directory.
You must also specify the "APPXPATH" directory. You should accept the default APPXPATH directory that is provided unless instructed to change it by an APPX tech support technician.
The Advanced Settings screen allows you to specify the Authentication Method that is to be used by the APPX Login Manager service. If you choose HT authentication, you will also need to provide the name of the HT password file.
You must also specify the directory where the APPX Login Manager and the APPX Audit Log Manager commands are installed. Unless you have moved them to a different directory, you should accept the default directory.
You must also specify the "APPXPATH" directory. You should accept the default APPXPATH directory that is provided unless instructed to change it by an APPX tech support technician.
Install Your APPX License KeyFinally, you must install your APPX license key. The license key is usually provided as an attachment on an e-mail.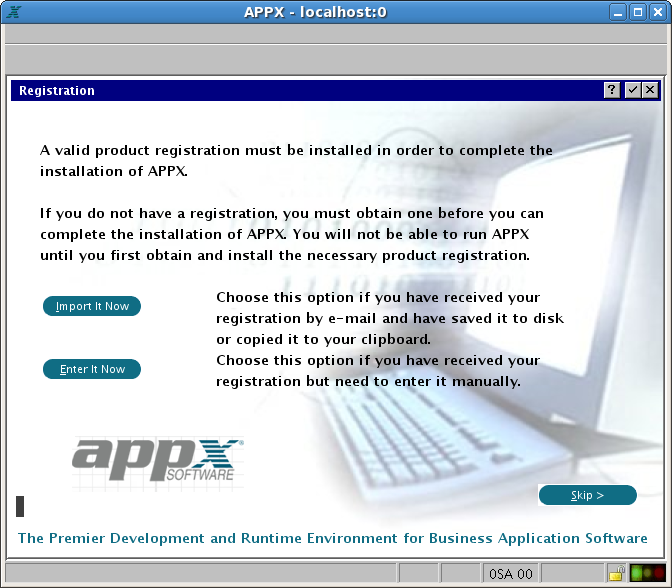
Installation Completed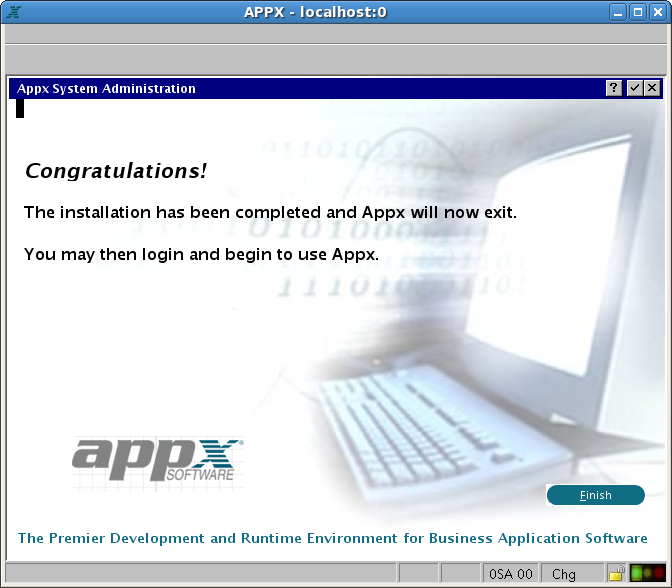 | |||||||
| > > | The first time that APPX is run after the installation wizard completes, you will need to complete the initial configuration of APPX. | |||||||
Comments:Read what other users have said about this page or add your own comments. | ||||||||
Revision 92009-10-22 - SteveFrizzell
| Line: 1 to 1 | |||||||||||||||
|---|---|---|---|---|---|---|---|---|---|---|---|---|---|---|---|
| |||||||||||||||
| Changed: | |||||||||||||||
| < < | Fedora - APPX 5.0.0 - New Install | ||||||||||||||
| > > | APPX 5.0.0 - Linux - New Installation | ||||||||||||||
Overview | |||||||||||||||
| Changed: | |||||||||||||||
| < < | Three different methods are provided to install APPX on Linux. There is a rpm installer, a GUI installer, and a Console Mode installer. Regardless of which installation method is used, the result is the same. A typical APPX installation performs the following steps: | ||||||||||||||
| > > | Two different methods are provided to install APPX on Linux. There is a GUI installer and a Console Mode installer. The same installer is used for both methods. The installer will automatically detect if it is being run as a command or from a GUI Desktop. Regardless of which installation method is used, the result is the same. A typical APPX installation on a system where APPX has not been previously installed performs the following steps: | ||||||||||||||
| Changed: | |||||||||||||||
| < < |
| ||||||||||||||
| > > |
| ||||||||||||||
| |||||||||||||||
| Changed: | |||||||||||||||
| < < |
Desktop System | ||||||||||||||
| > > |
| ||||||||||||||
| Changed: | |||||||||||||||
| < < | GUI Installation | ||||||||||||||
| > > | GUI Installation on Linux | ||||||||||||||
| Changed: | |||||||||||||||
| < < | Log in to your Fedora desktop system as the "root" user. | ||||||||||||||
| > > | Log in to your Linux desktop system as the "root" user. | ||||||||||||||
| Download the APPX/Linux GUI installer (appxsetup.sh) from the APPX web site or the APPX ftp server and save it to your Desktop or to any other suitable folder. | |||||||||||||||
| Changed: | |||||||||||||||
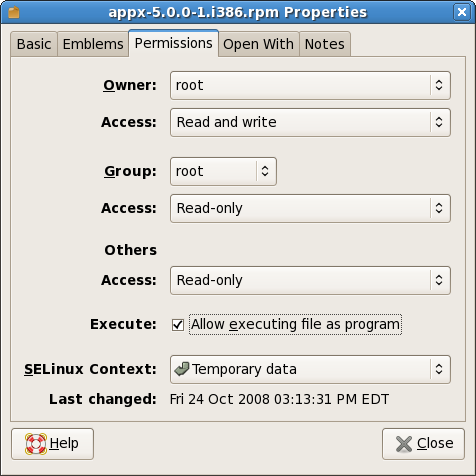
| < < | Change the permissions on the downloaded installer file (appxsetup.sh) to have Execute permissions. | ||||||||||||||
| > > | Change the permissions on the downloaded installer file (appxsetup.sh) to have Execute permissions. | ||||||||||||||
| Changed: | |||||||||||||||
| < < |  | ||||||||||||||
| > > | | ||||||||||||||
| Changed: | |||||||||||||||
| < < | Run the installer file (appxsetup.sh). If you are presented with a screen like the one below, click on the "Run" button. | ||||||||||||||
| > > | Run the installer file (appxsetup.sh). If you are presented with a screen like the one below, click on the "Run" button. | ||||||||||||||
| Changed: | |||||||||||||||
| < < | | ||||||||||||||
| > > | | ||||||||||||||
| Changed: | |||||||||||||||
| < < | After a few moments, the APPX Setup Wizard should display the Welcome screen. Click on the "Next" button to continue. | ||||||||||||||
| > > | After a few moments, the APPX Setup Wizard should display the Welcome screen. Click on the "Next" button to continue. | ||||||||||||||
| Changed: | |||||||||||||||
| < < |  | ||||||||||||||
| > > | | ||||||||||||||
| Changed: | |||||||||||||||
| < < | Read and accept the license agreement. | ||||||||||||||
| > > | Read and accept the license agreement. | ||||||||||||||
| Changed: | |||||||||||||||
| < < |  | ||||||||||||||
| > > | | ||||||||||||||
| Changed: | |||||||||||||||
| < < | Specify the Destination Directory into which APPX is to be installed. As a matter of convention, APPX is usually installed into /usr/local/appx but may be installed in the directory of your choice. | ||||||||||||||
| > > | Specify the Destination Directory into which APPX is to be installed. As a matter of convention, APPX is usually installed into /usr/local/appx but may be installed into the directory of your choice. | ||||||||||||||
| Changed: | |||||||||||||||
| < < |  | ||||||||||||||
| > > | | ||||||||||||||
| Changed: | |||||||||||||||
| < < | You will be warned if the destination directory already exists. Otherwise, APPX will create it. | ||||||||||||||
| > > | You will be warned if the destination directory already exists. Otherwise, APPX will create it. | ||||||||||||||
| Changed: | |||||||||||||||
| < < |
The Select Additional Tasks screen allows you to specify whether or not you want a desktop icon created to launch APPX. Make your selection and then click Next.
 | ||||||||||||||
| > > | | ||||||||||||||
| APPX will then be installed into the specified destination directory. | |||||||||||||||
| Changed: | |||||||||||||||
| < < |  When the installation wizard displays the final screen, click on the Finish button to end the installation wizard and to automatically run APPX to complete the configurationa and installation of APPX.
 | ||||||||||||||
| > > | | ||||||||||||||
| Changed: | |||||||||||||||
| < < | When you click on the Finish button, the APPX Client will be launched to run APPX to complete the configuration of the APPX environment.
Character Mode Installationrpm Installation | ||||||||||||||
| > > | When the installation wizard displays the final screen, click on the Finish button to end the installation wizard and to automatically run APPX to complete the configurationa and installation of APPX. | ||||||||||||||
| Changed: | |||||||||||||||
| < < | Log in to your Fedora desktop system as the "root" user. | ||||||||||||||
| > > | | ||||||||||||||
| Changed: | |||||||||||||||
| < < | Download the rpm installer (appx-5.0.0-1.i386.rpm) from the APPX web site or the APPX ftp server and save it to your Desktop or to any other suitable folder.
Change the permissions on the downloaded installer file (appx-5.0.0-1.i386.rpm) to allow execution.
 | ||||||||||||||
| > > | When you click on the Finish button, the APPX Client will be launched to run APPX to complete the configuration of the APPX environment.
Character Mode Installation on Linux | ||||||||||||||
| Changed: | |||||||||||||||
| < < | Run APPX to Complete the Installation. | ||||||||||||||
| > > | Run APPX to Complete the Installation. | ||||||||||||||
| The first time that APPX is run after the installation wizard completes, several screens will be presented to allow you to configure APPX and complete the installation of APPX. | |||||||||||||||
| Changed: | |||||||||||||||
| < < | Add Users to the APPX User File | ||||||||||||||
| > > | Add APPX System Administrators to the APPX User File | ||||||||||||||
| Changed: | |||||||||||||||
| < < | You must identify which users are to be allowed to initially run APPX. You must add at least one user. During the installation of APPX, an O/S user named "appx" was created. As a matter of convention, you should add the "appx" user to the APPX user file as an APPX System Administrator. After adding a user, you may identify additional users or you may proceed by clicking on the Next button. | ||||||||||||||
| > > | You must identify which users are to be allowed to initially run APPX. You must add at least one user. During the installation of APPX, an O/S user named "appx" was created. As a matter of convention, you should add the "appx" user to the APPX user file as an APPX System Administrator. After adding a user, you may identify additional users or you may proceed by clicking on the Next button. | ||||||||||||||
| Changed: | |||||||||||||||
| < < |
Configure the APPX Login Manager Service and the the APPX Audit Log Service | ||||||||||||||
| > > |
Configure the APPX Login Manager Service and the the APPX Audit Manager Service | ||||||||||||||
| Changed: | |||||||||||||||
| < < | If you want to allow remote clients to connect to your APPX installation, you should configure the APPX Login Manager Service by entering a Connection Port number. The Connection Port number is used by the various types of APPX clients that connect to APPX from a remote location. If you do not want to allow remote connections, blank out the Connection Port number. | ||||||||||||||
| > > | If you want to allow remote clients to connect to your APPX installation, you should configure the APPX Login Manager Service by entering a Connection Port number. The Connection Port number is used by the various types of APPX clients that connect to APPX from a remote location. If you do not want to allow remote connections, blank out the Connection Port number. | ||||||||||||||
| Changed: | |||||||||||||||
| < < | If you intend to enable the file I/O audit logging feature of APPX, you should configure the APPX Audit Log Service by entering a Logging Port number. The Logging Port number is used by APPX to log file I/O audit information. If you are not going to use this feature of APPX, blank out the Logging Port number. | ||||||||||||||
| > > | If you intend to enable the file I/O audit logging feature of APPX, you should configure the APPX Audit Log Service by entering a Logging Port number. The Logging Port number is used by APPX to log file I/O audit information. If you are not going to use this feature of APPX, blank out the Logging Port number. | ||||||||||||||
| Changed: | |||||||||||||||
| < < | You may change these port numbers to be any other TCP/IP port numbers that are not already being used by your system but, as a matter of convention, you may want to use the numbers that are already filled in on this screen. After you have entered the appropriate port numbers, click on the "Start Services" button to create the services and start them. | ||||||||||||||
| > > | You may change these port numbers to be any other TCP/IP port numbers that are not already being used by your system but, as a matter of convention, you may want to use the numbers that are already filled in on this screen. After you have entered the appropriate port numbers, click on the "Start Services" button to create the services and start them. | ||||||||||||||
| Changed: | |||||||||||||||
| < < | If you do not want to configure either of the services, click on the Skip button. You can always configure the services at a later time. | ||||||||||||||
| > > | If you do not want to configure either of the services, click on the Skip button. You can always configure the services at a later time. | ||||||||||||||
| You can click on the Advanced button to review and edit additional options relating to configuring the APPX Login Manager Service. | |||||||||||||||
| Changed: | |||||||||||||||
| < < |
The Advanced Settings screen allows you to specify the Authentication Method that is to be used by the APPX Login Manager service. If you choose HT authentication, you will also need to provide the name of the HT password file. | ||||||||||||||
| > > | | ||||||||||||||
| Changed: | |||||||||||||||
| < < | You must also specify the directory where the APPX Login Manager and the APPX Audit Log Manager commands are installed. Unless you have moved them to a different directory, you should accept the default directory. | ||||||||||||||
| > > | The Advanced Settings screen allows you to specify the Authentication Method that is to be used by the APPX Login Manager service. If you choose HT authentication, you will also need to provide the name of the HT password file. | ||||||||||||||
| Changed: | |||||||||||||||
| < < | You must also specify the "APPXPATH" directory. You should accept the default APPXPATH directory that is provided unless instructed to change it by an APPX tech support technician. | ||||||||||||||
| > > | You must also specify the directory where the APPX Login Manager and the APPX Audit Log Manager commands are installed. Unless you have moved them to a different directory, you should accept the default directory. | ||||||||||||||
| Changed: | |||||||||||||||
| < < |
Install Your APPX License Key | ||||||||||||||
| > > | You must also specify the "APPXPATH" directory. You should accept the default APPXPATH directory that is provided unless instructed to change it by an APPX tech support technician. | ||||||||||||||
| Changed: | |||||||||||||||
| < < | Finally, you must install your APPX license key. The license key is usually provided as an attachment on an e-mail. | ||||||||||||||
| > > |
Install Your APPX License Key | ||||||||||||||
| Changed: | |||||||||||||||
| < < | | ||||||||||||||
| > > | Finally, you must install your APPX license key. The license key is usually provided as an attachment on an e-mail. | ||||||||||||||
| Changed: | |||||||||||||||
| < < | Installation Completed | ||||||||||||||
| > > | | ||||||||||||||
| Changed: | |||||||||||||||
| < < | |||||||||||||||
| > > | Installation Completed | ||||||||||||||
| Changed: | |||||||||||||||
| < < | | ||||||||||||||
| > > | | ||||||||||||||
Comments: | |||||||||||||||
| Added: | |||||||||||||||
| > > | |||||||||||||||
| Read what other users have said about this page or add your own comments.
| |||||||||||||||
| Added: | |||||||||||||||
| > > | |||||||||||||||
| -- SteveFrizzell - 23 Oct 2008 | |||||||||||||||
| Line: 124 to 107 | |||||||||||||||
| -- SteveFrizzell - 23 Oct 2008 | |||||||||||||||
| Deleted: | |||||||||||||||
| < < | |||||||||||||||
| |||||||||||||||
| Line: 147 to 118 | |||||||||||||||
| |||||||||||||||
| Deleted: | |||||||||||||||
| < < |
| ||||||||||||||
| |||||||||||||||
| Deleted: | |||||||||||||||
| < < |
| ||||||||||||||
| |||||||||||||||
| Added: | |||||||||||||||
| > > |
| ||||||||||||||
Revision 82008-11-14 - JoeOrtagus
| Line: 1 to 1 | ||||||||
|---|---|---|---|---|---|---|---|---|
| ||||||||
| Deleted: | ||||||||
| < < | ||||||||
Fedora - APPX 5.0.0 - New Install | ||||||||
| Line: 76 to 75 | ||||||||
|
| ||||||||
| Changed: | ||||||||
| < < | Run APPX to Complete the Installation | |||||||
| > > | Run APPX to Complete the Installation. | |||||||
The first time that APPX is run after the installation wizard completes, several screens will be presented to allow you to configure APPX and complete the installation of APPX.
Add Users to the APPX User File | ||||||||
Revision 72008-11-04 - SteveFrizzell
| Line: 1 to 1 | ||||||||
|---|---|---|---|---|---|---|---|---|
Fedora - APPX 5.0.0 - New Install | ||||||||
| Line: 51 to 51 | ||||||||
|
| ||||||||
| Added: | ||||||||
| > > | The Select Additional Tasks screen allows you to specify whether or not you want a desktop icon created to launch APPX. Make your selection and then click Next.
| |||||||
| APPX will then be installed into the specified destination directory.
| ||||||||
| Line: 131 to 135 | ||||||||
| Added: | ||||||||
| > > | ||||||||
| ||||||||
| Line: 148 to 154 | ||||||||
| ||||||||
| Added: | ||||||||
| > > |
| |||||||
Revision 62008-11-04 - SteveFrizzell
| Line: 1 to 1 | ||||||||
|---|---|---|---|---|---|---|---|---|
Fedora - APPX 5.0.0 - New Install | ||||||||
| Line: 25 to 25 | ||||||||
| Log in to your Fedora desktop system as the "root" user. | ||||||||
| Changed: | ||||||||
| < < | Download the GUI installer (appxsetup.sh) from the APPX web site or the APPX ftp server and save it to your Desktop or to any other suitable folder. | |||||||
| > > | Download the APPX/Linux GUI installer (appxsetup.sh) from the APPX web site or the APPX ftp server and save it to your Desktop or to any other suitable folder. | |||||||
| Changed: | ||||||||
| < < | Change the permissions on the downloaded installer file (appxsetup.sh) to allow execution. | |||||||
| > > | Change the permissions on the downloaded installer file (appxsetup.sh) to have Execute permissions. | |||||||
|
| ||||||||
| Changed: | ||||||||
| < < | Run the installer. If you are presented with a screen like the one below, click on the "Run" button. | |||||||
| > > | Run the installer file (appxsetup.sh). If you are presented with a screen like the one below, click on the "Run" button. | |||||||
|
| ||||||||
| Line: 39 to 39 | ||||||||
|
| ||||||||
| Changed: | ||||||||
| < < | Accept the license agreement. | |||||||
| > > | Read and accept the license agreement. | |||||||
|
| ||||||||
| Changed: | ||||||||
| < < | Specify the Destination Directory into which APPX is to be installed. | |||||||
| > > | Specify the Destination Directory into which APPX is to be installed. As a matter of convention, APPX is usually installed into /usr/local/appx but may be installed in the directory of your choice. | |||||||
|
| ||||||||
| Line: 51 to 51 | ||||||||
|
| ||||||||
| Changed: | ||||||||
| < < | APPX will then be install into the destination directory. | |||||||
| > > | APPX will then be installed into the specified destination directory. | |||||||
|
| ||||||||
| Changed: | ||||||||
| < < | Click on the Finish button when the setup wizard competes. | |||||||
| > > | When the installation wizard displays the final screen, click on the Finish button to end the installation wizard and to automatically run APPX to complete the configurationa and installation of APPX. | |||||||
|
| ||||||||
| Changed: | ||||||||
| < < | When you click on the Finish button, the APPX Client will be launched to run APPX to complete the configuration of the APPX environment. | |||||||
| > > | When you click on the Finish button, the APPX Client will be launched to run APPX to complete the configuration of the APPX environment. | |||||||
Character Mode Installationrpm Installation | ||||||||
| Line: 70 to 70 | ||||||||
| Change the permissions on the downloaded installer file (appx-5.0.0-1.i386.rpm) to allow execution.
| ||||||||
| Added: | ||||||||
| > > | ||||||||
Run APPX to Complete the Installation | ||||||||
| Changed: | ||||||||
| < < | After you complete the installation of APPX, you will need to run APPX to install your license and complete the configuration of the APPX environment. | |||||||
| > > | The first time that APPX is run after the installation wizard completes, several screens will be presented to allow you to configure APPX and complete the installation of APPX. | |||||||
Add Users to the APPX User FileYou must identify which users are to be allowed to initially run APPX. You must add at least one user. During the installation of APPX, an O/S user named "appx" was created. As a matter of convention, you should add the "appx" user to the APPX user file as an APPX System Administrator. After adding a user, you may identify additional users or you may proceed by clicking on the Next button. | ||||||||
Revision 52008-11-04 - SteveFrizzell
| Line: 1 to 1 | ||||||||
|---|---|---|---|---|---|---|---|---|
Fedora - APPX 5.0.0 - New Install | ||||||||
| Line: 37 to 37 | ||||||||
| After a few moments, the APPX Setup Wizard should display the Welcome screen. Click on the "Next" button to continue. | ||||||||
| Changed: | ||||||||
| < < |  | |||||||
| > > | | |||||||
| Changed: | ||||||||
| < < | Accept the license agreement. | |||||||
| > > | Accept the license agreement. | |||||||
|
| ||||||||
| Line: 72 to 72 | ||||||||
Run APPX to Complete the Installation | ||||||||
| Changed: | ||||||||
| < < | After you complete the installation of APPX, you will need to run APPX to install your license and complete the configuration of the APPX environment. When you run the APPX Client, you will be presented with the APPX Client Login dialog. If the Remote tab is selected, click on the Local tab. | |||||||
| > > | After you complete the installation of APPX, you will need to run APPX to install your license and complete the configuration of the APPX environment.
Add Users to the APPX User File | |||||||
| Changed: | ||||||||
| < < |  When you click on the Local tab, you should see an APPX Client Login dialog similar to that show below. Click on the Connect button to run APPX.
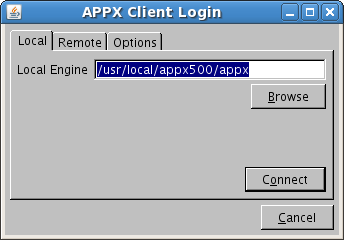
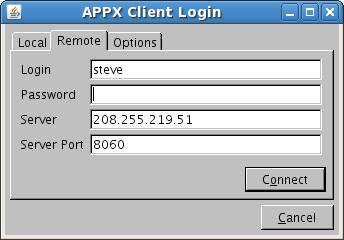
Identify initial APPX usersYou must identify which users are to be allowed to run APPX. The APPX installer created an OS user named "appx". This user has also been added to the APPX user file and has been designated as an APPX System Administrator. You may identify additional users at this time or you may proceed by clicking on the Next button. | |||||||
| > > | You must identify which users are to be allowed to initially run APPX. You must add at least one user. During the installation of APPX, an O/S user named "appx" was created. As a matter of convention, you should add the "appx" user to the APPX user file as an APPX System Administrator. After adding a user, you may identify additional users or you may proceed by clicking on the Next button. | |||||||
Configure the APPX Login Manager Service and the the APPX Audit Log Service | ||||||||
| Changed: | ||||||||
| < < | The connection port number is used by the various types of APPX clients that connect to APPX from a remote location. If you do not want to allow remote connections, blank out the Connection Port number. | |||||||
| > > | If you want to allow remote clients to connect to your APPX installation, you should configure the APPX Login Manager Service by entering a Connection Port number. The Connection Port number is used by the various types of APPX clients that connect to APPX from a remote location. If you do not want to allow remote connections, blank out the Connection Port number. If you intend to enable the file I/O audit logging feature of APPX, you should configure the APPX Audit Log Service by entering a Logging Port number. The Logging Port number is used by APPX to log file I/O audit information. If you are not going to use this feature of APPX, blank out the Logging Port number. | |||||||
| Changed: | ||||||||
| < < | The Logging Port is used by APPX to log file I/O audit information. If you are not going to use this feature of APPX, blank out the Logging Port number. | |||||||
| > > | You may change these port numbers to be any other TCP/IP port numbers that are not already being used by your system but, as a matter of convention, you may want to use the numbers that are already filled in on this screen. After you have entered the appropriate port numbers, click on the "Start Services" button to create the services and start them. | |||||||
| Changed: | ||||||||
| < < | You may change these port numbers to any other TCP/IP port numbers that are not already being used by your system but, as a matter of convention, you may want to use the number that are already filled in on this screen. | |||||||
| > > | If you do not want to configure either of the services, click on the Skip button. You can always configure the services at a later time. You can click on the Advanced button to review and edit additional options relating to configuring the APPX Login Manager Service. | |||||||
|
| ||||||||
| Changed: | ||||||||
| < < | This screen allows you to specify the Authentication Method that is to be used by the APPX Login Manager service. | |||||||
| > > | The Advanced Settings screen allows you to specify the Authentication Method that is to be used by the APPX Login Manager service. If you choose HT authentication, you will also need to provide the name of the HT password file. | |||||||
| You must also specify the directory where the APPX Login Manager and the APPX Audit Log Manager commands are installed. Unless you have moved them to a different directory, you should accept the default directory. You must also specify the "APPXPATH" directory. You should accept the default APPXPATH directory that is provided unless instructed to change it by an APPX tech support technician. | ||||||||
| Changed: | ||||||||
| < < |
| |||||||
| > > | | |||||||
Install Your APPX License Key | ||||||||
| Added: | ||||||||
| > > | Finally, you must install your APPX license key. The license key is usually provided as an attachment on an e-mail. | |||||||
Installation Completed | ||||||||
| Line: 147 to 145 | ||||||||
| ||||||||
| Added: | ||||||||
| > > |
| |||||||
Revision 42008-11-03 - SteveFrizzell
| Line: 1 to 1 | |||||||||
|---|---|---|---|---|---|---|---|---|---|
Fedora - APPX 5.0.0 - New Install | |||||||||
| Line: 7 to 7 | |||||||||
Overview | |||||||||
| Changed: | |||||||||
| < < | Three different methods are provided to install APPX on Linux. There is a rpm installer, a GUI installer, and a Console Mode installer. Regardless of which installation method is used, the result is the same. A typical APPX installation performs the following steps: | ||||||||
| > > | Three different methods are provided to install APPX on Linux. There is a rpm installer, a GUI installer, and a Console Mode installer. Regardless of which installation method is used, the result is the same. A typical APPX installation performs the following steps: | ||||||||
| |||||||||
| Changed: | |||||||||
| < < |
| ||||||||
| > > |
| ||||||||
| |||||||||
| Deleted: | |||||||||
| < < |
| ||||||||
| |||||||||
| Changed: | |||||||||
| < < |
| ||||||||
| > > |
| ||||||||
Desktop System | |||||||||
| Changed: | |||||||||
| < < | #GUIInstaller | ||||||||
| > > | |||||||||
GUI InstallationLog in to your Fedora desktop system as the "root" user. | |||||||||
| Line: 31 to 31 | |||||||||
|
| |||||||||
| Changed: | |||||||||
| < < | Run the installer and follow the instructions on the setup screens. | ||||||||
| > > | Run the installer. If you are presented with a screen like the one below, click on the "Run" button.
After a few moments, the APPX Setup Wizard should display the Welcome screen. Click on the "Next" button to continue. | ||||||||
|
| |||||||||
| Line: 39 to 43 | |||||||||
|
| |||||||||
| Changed: | |||||||||
| < < | Specify the Destination Directory into which APPX is to be installed. | ||||||||
| > > | Specify the Destination Directory into which APPX is to be installed. | ||||||||
| Changed: | |||||||||
| < < |  | ||||||||
| > > | | ||||||||
| Changed: | |||||||||
| < < | You will be warned if the destination directory already exists. Otherwise, APPX will create it. | ||||||||
| > > | You will be warned if the destination directory already exists. Otherwise, APPX will create it. | ||||||||
|
| |||||||||
| Line: 53 to 57 | |||||||||
| Click on the Finish button when the setup wizard competes. | |||||||||
| Changed: | |||||||||
| < < |  | ||||||||
| > > | | ||||||||
| Changed: | |||||||||
| < < | When you click on the Finish button, the APPX Client will be launched to allow you to run APPX to complete the configuration of the APPX environment. | ||||||||
| > > | When you click on the Finish button, the APPX Client will be launched to run APPX to complete the configuration of the APPX environment. | ||||||||
Character Mode Installationrpm Installation | |||||||||
| Line: 125 to 129 | |||||||||
| Added: | |||||||||
| > > | |||||||||
| |||||||||
| Line: 133 to 139 | |||||||||
| |||||||||
| Deleted: | |||||||||
| < < |
| ||||||||
| |||||||||
| Deleted: | |||||||||
| < < |
| ||||||||
| |||||||||
| Added: | |||||||||
| > > |
| ||||||||
Revision 32008-10-24 - SteveFrizzell
| Line: 1 to 1 | ||||||||
|---|---|---|---|---|---|---|---|---|
| ||||||||
| Added: | ||||||||
| > > | ||||||||
Fedora - APPX 5.0.0 - New Install | ||||||||
| Line: 28 to 29 | ||||||||
| Change the permissions on the downloaded installer file (appxsetup.sh) to allow execution. | ||||||||
| Added: | ||||||||
| > > | | |||||||
| Run the installer and follow the instructions on the setup screens.
| ||||||||
| Line: 55 to 58 | ||||||||
When you click on the Finish button, the APPX Client will be launched to allow you to run APPX to complete the configuration of the APPX environment.
Character Mode Installationrpm Installation | ||||||||
| Added: | ||||||||
| > > |
Log in to your Fedora desktop system as the "root" user.
Download the rpm installer (appx-5.0.0-1.i386.rpm) from the APPX web site or the APPX ftp server and save it to your Desktop or to any other suitable folder.
Change the permissions on the downloaded installer file (appx-5.0.0-1.i386.rpm) to allow execution.
| |||||||
Run APPX to Complete the InstallationAfter you complete the installation of APPX, you will need to run APPX to install your license and complete the configuration of the APPX environment. When you run the APPX Client, you will be presented with the APPX Client Login dialog. If the Remote tab is selected, click on the Local tab. | ||||||||
| Line: 110 to 121 | ||||||||
| Added: | ||||||||
| > > | ||||||||
| ||||||||
| Line: 123 to 138 | ||||||||
| ||||||||
| Added: | ||||||||
| > > |
| |||||||
Revision 22008-10-24 - SteveFrizzell
| Line: 1 to 1 | ||||||||
|---|---|---|---|---|---|---|---|---|
| ||||||||
| Deleted: | ||||||||
| < < | ||||||||
Fedora - APPX 5.0.0 - New Install | ||||||||
| Line: 7 to 6 | ||||||||
Overview | ||||||||
| Added: | ||||||||
| > > | Three different methods are provided to install APPX on Linux. There is a rpm installer, a GUI installer, and a Console Mode installer. Regardless of which installation method is used, the result is the same. A typical APPX installation performs the following steps: | |||||||
| Added: | ||||||||
| > > |
Desktop System | |||||||
| Changed: | ||||||||
| < < | Log in as the root user Download the installer (appxsetup.sh) Change the permissions on the installer file to allow execution chmod 775 appxsetup.sh
GUI Installer | |||||||
| > > | #GUIInstaller
GUI Installation | |||||||
| Changed: | ||||||||
| < < | Download the GUI installer (appxsetup.sh) from the web site. | |||||||
| > > | Log in to your Fedora desktop system as the "root" user. | |||||||
| Changed: | ||||||||
| < < | Change the permissions on the installer file to allow execution. | |||||||
| > > | Download the GUI installer (appxsetup.sh) from the APPX web site or the APPX ftp server and save it to your Desktop or to any other suitable folder. Change the permissions on the downloaded installer file (appxsetup.sh) to allow execution. | |||||||
| Run the installer and follow the instructions on the setup screens. | ||||||||
| Line: 24 to 36 | ||||||||
|
| ||||||||
| Changed: | ||||||||
| < < | Specify the directory in which APPX is to be installed. | |||||||
| > > | Specify the Destination Directory into which APPX is to be installed. | |||||||
|
| ||||||||
| Changed: | ||||||||
| < < | You will be warned if the destination directory already exists. | |||||||
| > > | You will be warned if the destination directory already exists. Otherwise, APPX will create it. | |||||||
|
| ||||||||
| Changed: | ||||||||
| < < | ||||||||
| > > | APPX will then be install into the destination directory.
Click on the Finish button when the setup wizard competes.
When you click on the Finish button, the APPX Client will be launched to allow you to run APPX to complete the configuration of the APPX environment.
Character Mode Installationrpm InstallationRun APPX to Complete the InstallationAfter you complete the installation of APPX, you will need to run APPX to install your license and complete the configuration of the APPX environment. When you run the APPX Client, you will be presented with the APPX Client Login dialog. If the Remote tab is selected, click on the Local tab.
When you click on the Local tab, you should see an APPX Client Login dialog similar to that show below. Click on the Connect button to run APPX.
Identify initial APPX usersYou must identify which users are to be allowed to run APPX. The APPX installer created an OS user named "appx". This user has also been added to the APPX user file and has been designated as an APPX System Administrator. You may identify additional users at this time or you may proceed by clicking on the Next button.
Configure the APPX Login Manager Service and the the APPX Audit Log ServiceThe connection port number is used by the various types of APPX clients that connect to APPX from a remote location. If you do not want to allow remote connections, blank out the Connection Port number. The Logging Port is used by APPX to log file I/O audit information. If you are not going to use this feature of APPX, blank out the Logging Port number. You may change these port numbers to any other TCP/IP port numbers that are not already being used by your system but, as a matter of convention, you may want to use the number that are already filled in on this screen. | |||||||
| Changed: | ||||||||
| < < | Comments:Read what other users have said about this page or add your own comments. | |||||||
| > > | This screen allows you to specify the Authentication Method that is to be used by the APPX Login Manager service. | |||||||
| Changed: | ||||||||
| < < | -- SteveFrizzell - 23 Oct 2008 | |||||||
| > > | You must also specify the directory where the APPX Login Manager and the APPX Audit Log Manager commands are installed. Unless you have moved them to a different directory, you should accept the default directory. You must also specify the "APPXPATH" directory. You should accept the default APPXPATH directory that is provided unless instructed to change it by an APPX tech support technician. | |||||||
| Added: | ||||||||
| > > | | |||||||
| Added: | ||||||||
| > > |
Install Your APPX License Key | |||||||
| Added: | ||||||||
| > > | Installation Completed | |||||||
| Added: | ||||||||
| > > | ||||||||
| Added: | ||||||||
| > > |
Comments:Read what other users have said about this page or add your own comments. | |||||||
| Added: | ||||||||
| > > | -- SteveFrizzell - 23 Oct 2008 | |||||||
| Changed: | ||||||||
| < < |
 | |||||||
| > > | ||||||||
| Changed: | ||||||||
| < < |
 | |||||||
| > > | ||||||||
| ||||||||
Revision 12008-10-23 - SteveFrizzell
| Line: 1 to 1 | |||||||||||||||||||||||||||||
|---|---|---|---|---|---|---|---|---|---|---|---|---|---|---|---|---|---|---|---|---|---|---|---|---|---|---|---|---|---|
| Added: | |||||||||||||||||||||||||||||
| > > |
Fedora - APPX 5.0.0 - New InstallOverviewLog in as the root user Download the installer (appxsetup.sh) Change the permissions on the installer file to allow execution chmod 775 appxsetup.shGUI InstallerDownload the GUI installer (appxsetup.sh) from the web site. Change the permissions on the installer file to allow execution. Run the installer and follow the instructions on the setup screens.
Accept the license agreement.
Specify the directory in which APPX is to be installed.
You will be warned if the destination directory already exists.
Comments:Read what other users have said about this page or add your own comments.-- SteveFrizzell - 23 Oct 2008
| ||||||||||||||||||||||||||||
View topic | History: r23 < r22 < r21 < r20 | More topic actions...
Ideas, requests, problems regarding TWiki? Send feedback