APPX 6.0 Upgrade Instructions
This page provides the information needed to upgrade an existing APPX 5.4.5 (or higher) installation to APPX 6.0- APPX 6.0 Upgrade Instructions
- Overview
- 1. Install APPX 6.0 in a new folder
- 2. Install the Migration Applications in Release 5.4.x
- 3. Run the migration utility for your System Administration files
- 4. Install the migrated System Admin files in your new 6.0 installation
- 5. Run the migration utility for your applications
- 6. Install the migrated applications
- 7. Copy the end user data to Release 6.0
- 8. Make any required changes to your applications
- Comments:
Overview
Release 6.0 has significant changes to the format & content of the System Administration files and Application Design files. As a result, these files must be migrated to the new format. A migration utility for the System Admin (6SA) and Application Design (6AD) is provided. This should be installed in your Release 5.4.x installation. This application requires Release 5.4.5 or higher, it will not run on earlier releases. Also note that Locked applications cannot be migrated, they must be unlocked, migrated and then re-locked in 6.0. The Structure files are incompatible between 6.x and all previous releases. After installing 6.0 and migrating your applications, you will have to create new Struct files for all end user data files. This also means you cannot share the APPXIO files between Release 5 & 6. Files that are stored in an RDBMS can be shared if you choose, although this is not recommended. The basic approach we will use for upgrading is:- Install APPX 6.0 in a new folder as if it was a new installation
- Install the migration applications in your existing 5.4.x installation
- Run the migration utility for your System Administration files
- Install the migrated System Admin files in your new 6.0 installation & confirm all is well
- Run the migration utility for your applications
- Install the migrated applications
- Copy the end user data to Release 6.0
- Make any required changes to your applications
1. Install APPX 6.0 in a new folder
Install a fresh copy of APPX in a new folder on your server. Refer to APPX600LinuxNewInstallation for Linux/Unix servers and APPX600WindowsNewInstallation for Windows servers. If you are using APPX_MONITOR_KEY, this must be set to a different value than your 5.4.x installation.2. Install the Migration Applications in Release 5.4.x
There are 2 migration applications: 6SA for the System Administration files, and 6AD for Application Design files. Download the Migration Utility and follow these steps:- Add application 6SA/00 to your Applications file.
- Create the Design Files for 6SA/00.
- Add application 6AD/00 to your Application file.
- Create the Design Files for 6AD/00.
- Define Database 6SA, with a startup application of 6SA/00.
- Define Database 6AD, with a startup application of 6AD/00.
- Create Data Files for Database 6SA, Application 6SA
- Create Data Files for Database 6AD, Application 6AD
3. Run the migration utility for your System Administration files
Before migrating your System Admin files, you should verify the integrity of the files and correct any errors. The Verify step can be found in System Administration -> System Setup -> System Administration File Management -> Verify Files. Correct any errors before proceeding. Continue by running Database 6SA from the APPX Main Menu. You will see this menu: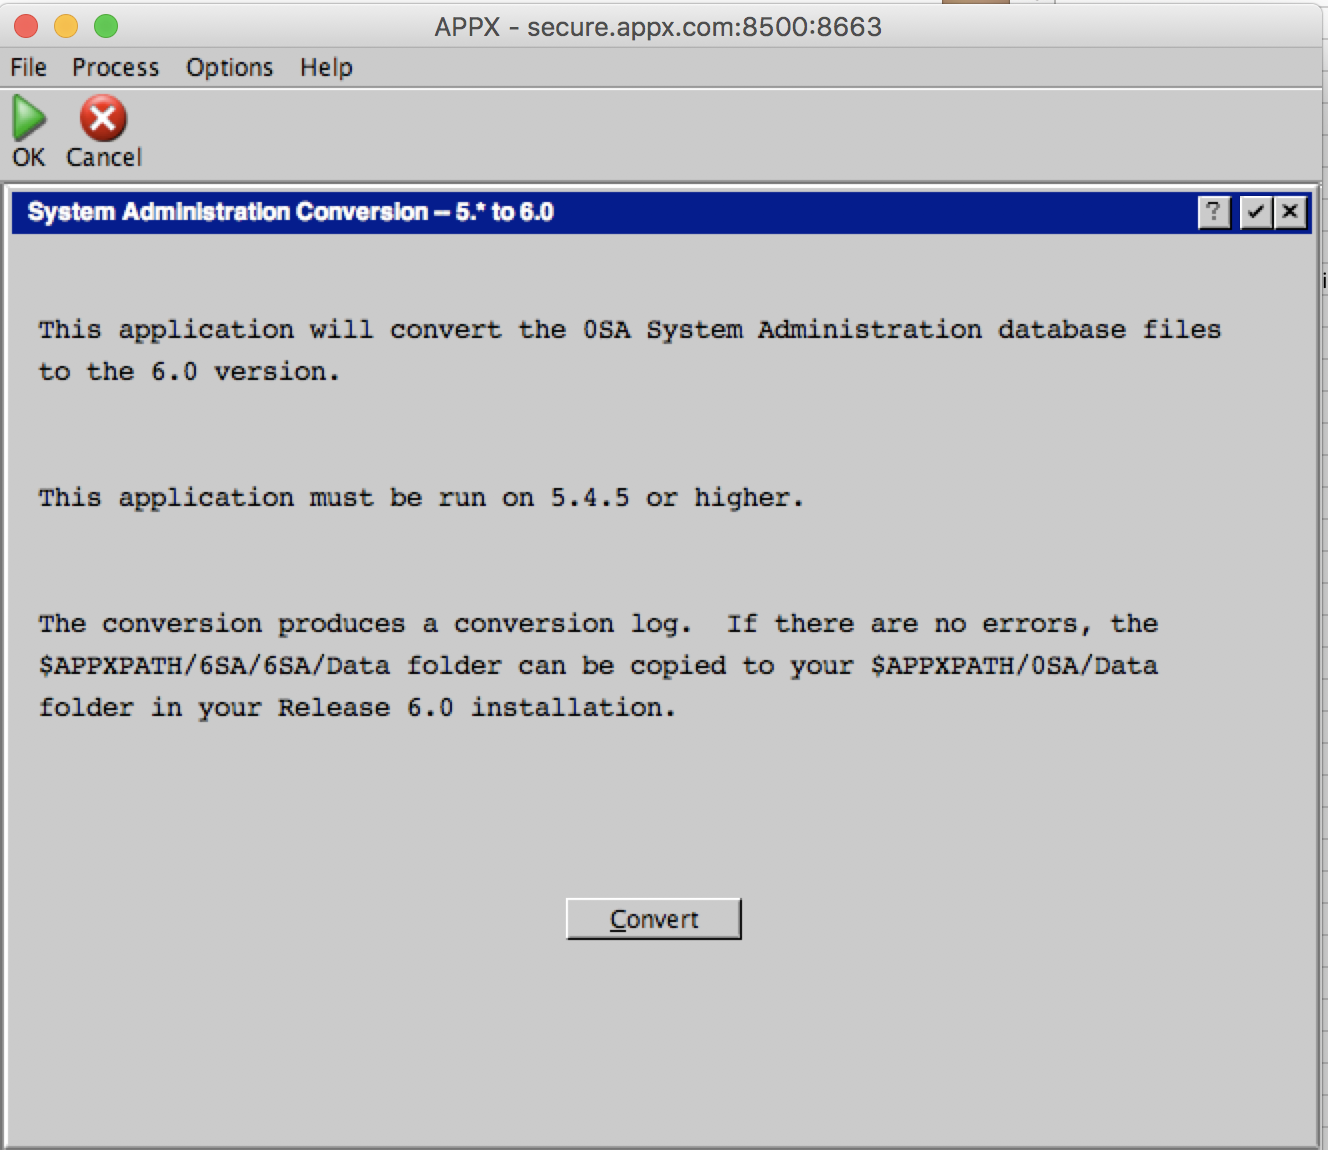 Click the 'Convert' button to proceed. A report will be produced showing the files that were converted. If any errors are shown, fix them before continuing.
The conversion step creates a new set of System Administration files in Release 6.0 format. These are located in $APPXPATH/6SA/6SA/Data.
Click the 'Convert' button to proceed. A report will be produced showing the files that were converted. If any errors are shown, fix them before continuing.
The conversion step creates a new set of System Administration files in Release 6.0 format. These are located in $APPXPATH/6SA/6SA/Data.
4. Install the migrated System Admin files in your new 6.0 installation
You are now ready to install the new System Administration files in your Release 6.0 folder. Follow these steps:- Make sure no Release 6.0 APPX sessions are running. In particular, make sure to terminate the License Server if it's running.
- Copy $APPXPATH/6SA/6SA/Data/* from your 5.4.x folder to $APPXPATH/0SA/Data in your 6.0 folder. Do NOT copy the Struct folder.
- Check permissions of $APPXPATH/0SA/Data in your Release 6.0 installation to make sure APPX users have read/write access.
- Delete these specific .key files in $APPXPATH/0SA/Data:
- EDITMSG.key
- SCJOB.key
- SCPROJ.key
- SCSTE.key
- SCTASK.key
- SECDEPT.key
- SECROLE.key
- SECWG.key
5. Run the migration utility for your applications
You are now ready to begin migrating your applications. This is a good time to review your applications and decide which ones need to be migrated. For example, it's possible you have old applications that are not used any longer. Once you have decided which applications you will migrate, you should run 'Verify Files' on each application and address any errors. When you are ready to proceed run Database 6AD from the main APPX menu: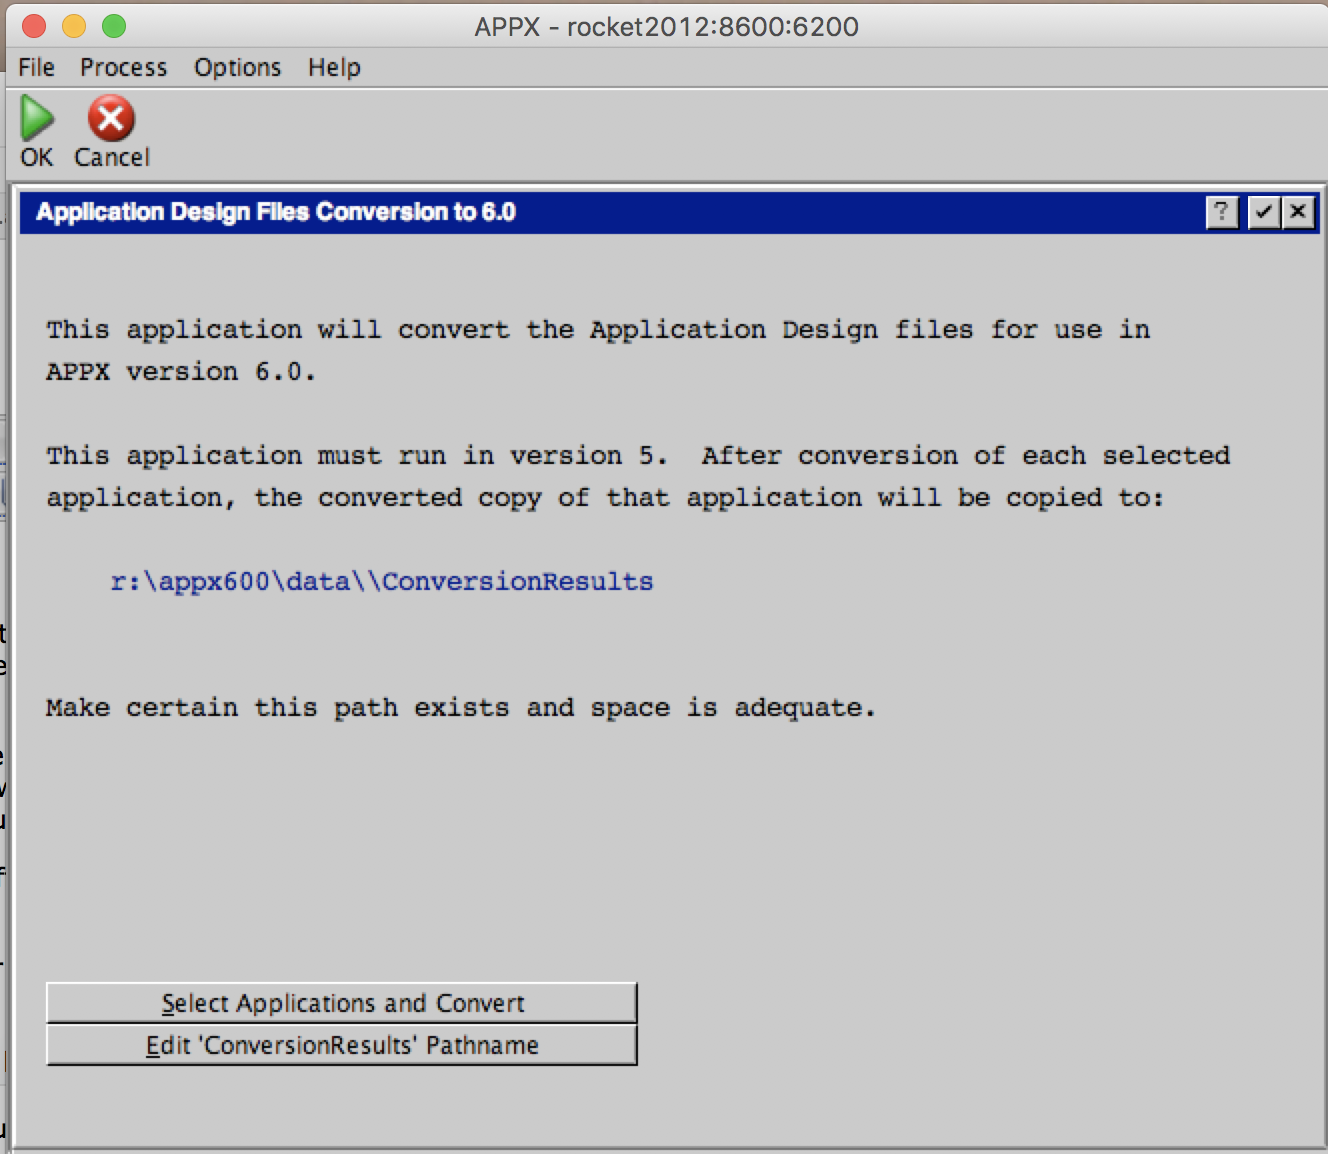 The path shown will be different on your system. You can choose a different path by clicking 'Edit ConversionResults Pathname'.
When you are satisfied with the location, click 'Select Applications and Convert':
The path shown will be different on your system. You can choose a different path by clicking 'Edit ConversionResults Pathname'.
When you are satisfied with the location, click 'Select Applications and Convert':
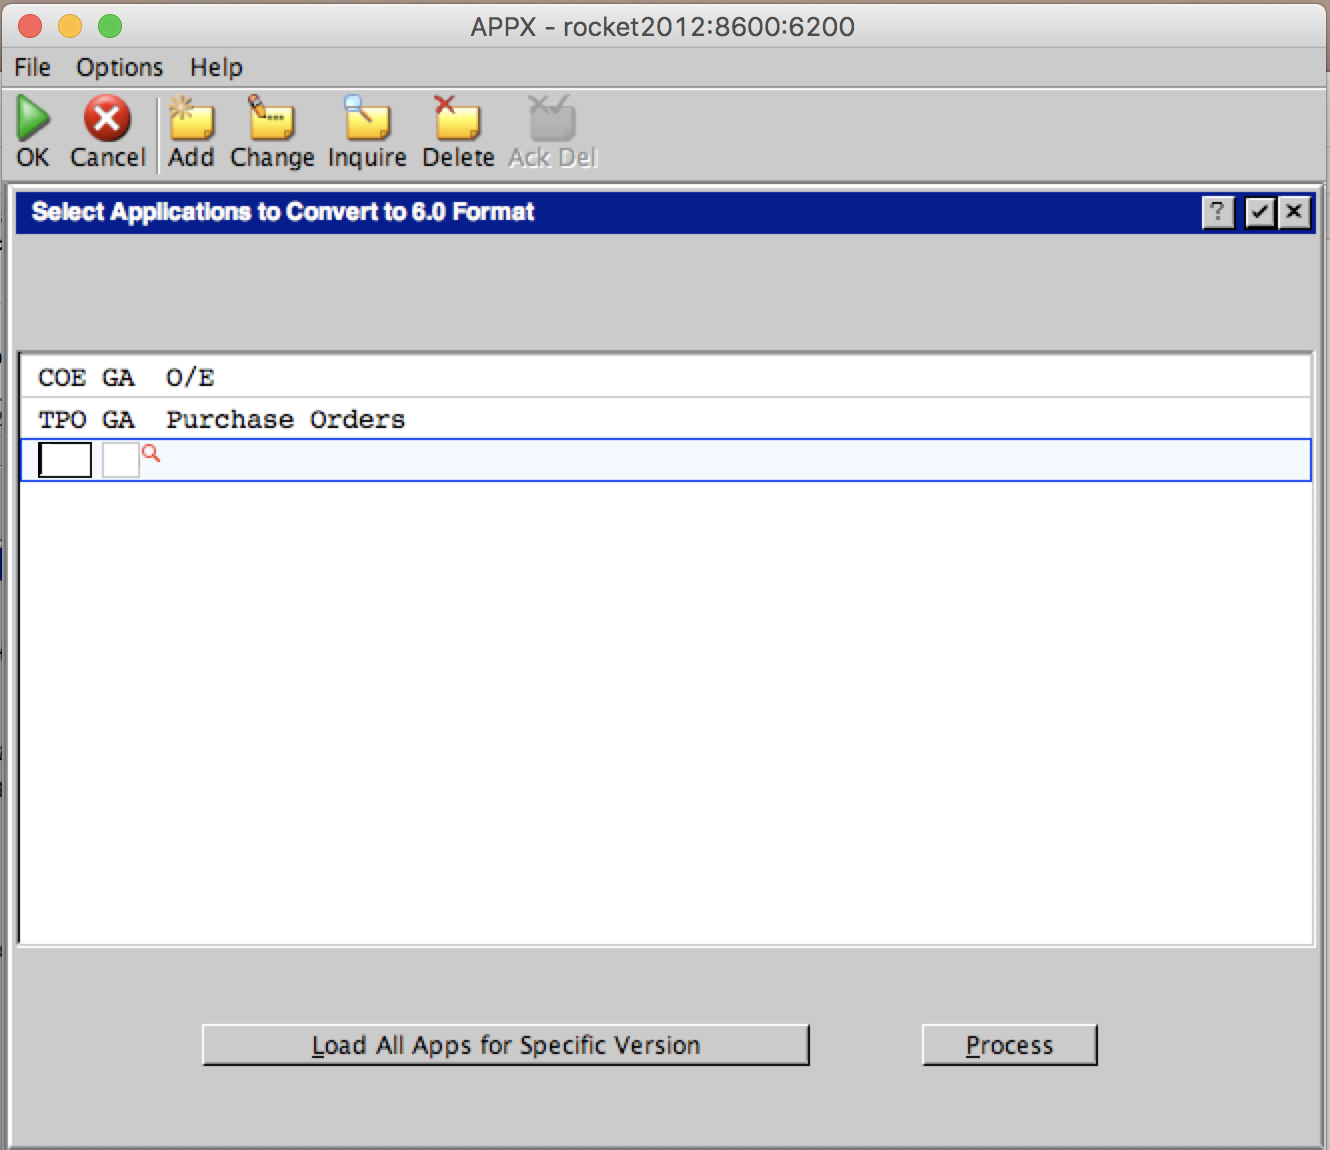 On this screen you can enter individual Application/Versions, or you can use the 'Load All Apps for Specific Version' button to automatically load all the applications for the entered version.
When you are ready to proceed, click the 'Process' button.
The applications will be processed and a report produced showing the applications and files that were processed. Check the report for any error messages. Note that not every application uses all possible design files, so the 'FI_STRUCT_NOT_FOUND' message is not necessarily an error.
It is not necessary to convert all your applications at once. For example, if you have a test version and a test database, you may want to just migrate those initially.
When this step completes, you can proceed to installing the migrated applications in Release 6.0.
On this screen you can enter individual Application/Versions, or you can use the 'Load All Apps for Specific Version' button to automatically load all the applications for the entered version.
When you are ready to proceed, click the 'Process' button.
The applications will be processed and a report produced showing the applications and files that were processed. Check the report for any error messages. Note that not every application uses all possible design files, so the 'FI_STRUCT_NOT_FOUND' message is not necessarily an error.
It is not necessary to convert all your applications at once. For example, if you have a test version and a test database, you may want to just migrate those initially.
When this step completes, you can proceed to installing the migrated applications in Release 6.0.
6. Install the migrated applications
To install the migrated applications, simply copy the folder(s) from the 'ConversionResults' path to $APPXPATH in Release 6.0. For example, let's assume our conversion results path was R:\appx\data\ConversionResults. We converted 2 applications, both in version GA. The migrated applications will be in R:\appx\data\ConversionResults\GA. Our Release 6 version is installed in R:\appx600new\, so I would copy (or move) the 'GA' folder to 'R:\appx600new\data'. If I converted more than one version at a time, there would be multiple folders in the conversion results folder, and they would all be copied/moved to $APPXPATH in Release 6.0. The migration tool does not copy Resources. If you are using any, you must manually copy the Resource folder from the Release 5.4.x location to the Release 6.0 location. The migration tool does not create the structure files or process the Data Dictionary. This must be done in Release 6.0 for every application. The easiest way to do this is to go to 'Applications' in System Administration and select the first migrated application. Then choose 'Design File Management', and from there, run 'Create Files', then 'Process Data Dictionary'. Repeat this for each migrated application.7. Copy the end user data to Release 6.0
Next, we must copy the end user data to our Release 6.0 installation. As mentioned previously, the Structure files are completely different between Release 5.4.x and Release 6.0, so we must create new Structure files in Release 6.0. If you are using an FMS group to redirect APPXIO files from their standard location, then you will have to change the Release 6.0 FMS group to point to a different location, otherwise Release 5.4.x & Release 6.0 will be accessing the same Structure files and that will not work. If you are using an FMS group to point to an RDBMS it will technically work, since each release of APPX has its own Structure files but this is not recommended. Instead, change the FMS group in Release 6.0 so that its files are unique. For example, you could add a prefix to the table naming scheme and then use the RDBMS utilities to copy the existing data to the new naming scheme. Do not copy the 'Struct' folders, or alternatively, delete them after copying. For example, to copy database '123', we would copy all the files in R:\appx\data\123 to R:\appx600\data\123. After the copy is complete, we would delete all the Struct folders in R:\appx600\data\123. To create the new Structure files, we have to run 'Create Files' for each application in the database. The easiest way to do this is to go to 'Databases/Applications' in System Administration, choose the Database, then click 'Related Applications'. For each application in the list, click 'Database Management', then 'Create Files. Once this step is complete, you should be able to run your applications under Release 6.0, subject to the application issues in the next section.8. Make any required changes to your applications
There are some differences in Release 6 that may have an impact on your applications. 1. All --- TEMP fields are now Unicode fields. If you are using --- TEMP to interface with external programs or O/S level subroutines, this may have an impact if they not expecting to receive UTF-32 encoded data. A number of --- WORK RAW xx fields have been added - you can use these in place of --- TEMP fields if you need a non Unicode field. 2. Older subroutines in 0LA have various issues:- FIND STRING LENGTH - limited to strings of 32k
- INSERT STRING - limited to strings of 32k
- REMOVE STRING - limited to strings of 32k
Comments:
Read what other users have said about this page or add your own comments.--

Ideas, requests, problems regarding TWiki? Send feedback