Difference: ScrollingInputsThatAdjustToTheClientScreenSize (2 vs. 3)
Revision 32016-04-05 - JeanNeron
| Line: 1 to 1 | ||||||||
|---|---|---|---|---|---|---|---|---|
| Changed: | ||||||||
| < < |
| |||||||
| > > |
| |||||||
Tech Tipby Gary Rogers, Director of Training, APPX Software, Inc. | ||||||||
| Changed: | ||||||||
| < < | In our last issue we discussed using the Appx Desktop Client to get more rows and columns to work with. This issue we will talk about how to take advantage of that extra room by designing scrolling inputs that adjust to the client screen size. This will allow you to have processes that will work for users using the standard 21-row window as well as those set up to use 28 rows. | |||||||
| > > | In this article we will talk about how to take advantage of any extra room by designing scrolling inputs that adjust to the client screen size. This will allow you to have processes that will work for users using the standard 21-row window as well as those set up to use 28 or more rows. | |||||||
| Changed: | ||||||||
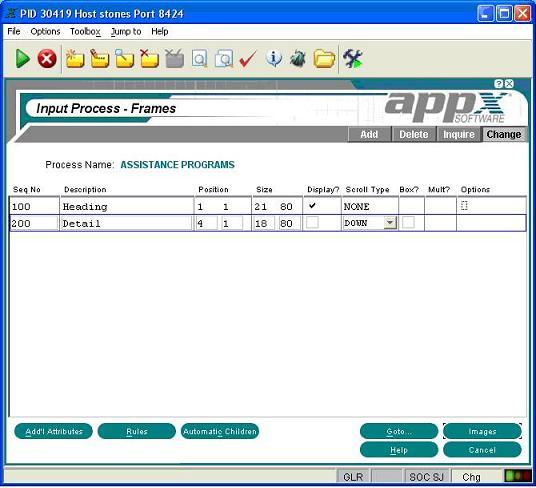
| < < | In general, when creating a scrolling input, a header frame is defined with an image size of 21 rows and 80 columns to fill the screen, or possibly a smaller size if there are only a few columns of data. The scrolling frame is then defined to overlay the heading frame, allowing room at the top for column headings and room at the bottom for any buttons or extra information you like. You would have frame definitions something like this: | |||||||
| > > | By default, when creating a scrolling input, a header frame is defined with an image size of 21 rows and 80 columns to fill the screen, or possibly a smaller size if there are only a few columns of data. The scrolling frame is then defined to overlay the heading frame, allowing room at the top for column headings and room at the bottom for any buttons or extra information you like. You would have frame definitions something like this: | |||||||
 | ||||||||
| Changed: | ||||||||
| < < | That works great, except now that you have 28 rows you end up with 7 unused rows where you could display more information, and you have a blank area of screen below the image. You can take advantage of the extra room when the process is run on a larger client screen by using negative values in the proper row position and size specifications. The input will then adjust to the display area of the client. Instead of defining the frame positions as above, try this: | |||||||
| > > | That works great, except if you client window was set to 28 rows, now you have 7 unused rows where you could display more information, and you have a blank area of screen below the image. You can take advantage of the extra room when the process is run on a larger client screen by using negative values in the proper row position and size specifications. The input will then adjust to the display area of the client. Instead of defining the frame positions as above, try this: | |||||||
 | ||||||||
| Deleted: | ||||||||
| < < | ||||||||
Notice the process has three frames instead of two. The header and footer are separate frames. If left as a single frame, buttons and such would not be able to float to the bottom of a larger client screen. The frame would adjust, but the location of the widgets on the screen would be in the same place, in relation to the upper left corner of the image, no matter the size of the screen. | ||||||||
| Changed: | ||||||||
| < < | The footer must also display before the detail frame. In fact, both the header and footer (Display only frames) must appear before teh detail frame otherwise a compile error will occur. | |||||||
| > > | The footer must also display before the detail frame. In fact, both the header and footer (Display only frames) must appear before the detail frame otherwise a compile error will occur. | |||||||
| The placement and sizing are controlled by the negative numbers in the row position and size parameters. The header is a fixed frame starting in the first row and is 4 rows long. The -3 in the footers row position tells APPX that the frame should be positioned 3 rows up from the bottom of the display area and it will be 3 rows long. The detail frame is started in row 5, one row below the boxed header frame. The -4 in the size row field tells APPX the frame will end 4 rows up from the bottom of the display area, one row above where the footer starts. | ||||||||
View topic | History: r3 < r2 < r1 | More topic actions...
Ideas, requests, problems regarding TWiki? Send feedback