Difference: APPX500LinuxUpgradeInstallation (1 vs. 23)
Revision 232021-08-23 - JoeOrtagus
Revision 222019-02-12 - JeanNeron
| Line: 1 to 1 | ||||||||
|---|---|---|---|---|---|---|---|---|
APPX Linux/Unix - APPX 5 Upgrade Instructions | ||||||||
| Line: 179 to 180 | ||||||||
After executing the above command, users should be able to use the APPX 5.x Desktop Client to successfully login on port 8060. For additional information on managing APPX Login Services, please refer to the complete documentation.
Final Tasks | ||||||||
| Changed: | ||||||||
| < < |
| |||||||
| > > |
| |||||||
| ||||||||
Revision 212014-12-05 - JeanNeron
| Line: 1 to 1 | ||||||||
|---|---|---|---|---|---|---|---|---|
APPX Linux/Unix - APPX 5 Upgrade Instructions | ||||||||
| Line: 40 to 40 | ||||||||
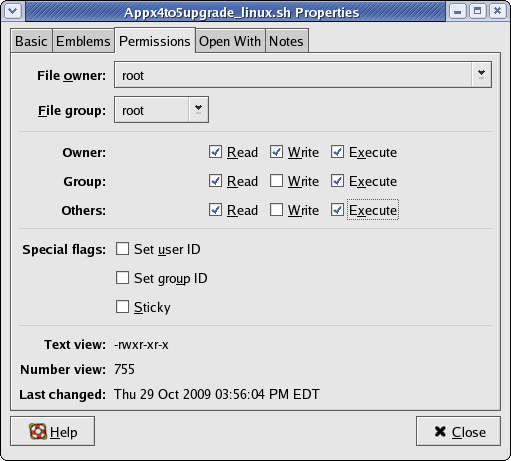
| Change the permissions on the downloaded installer file (APPX4to5upgrade_linux.sh) to have Execute permissions. | ||||||||
| Changed: | ||||||||
| < < |  | |||||||
| > > | | |||||||
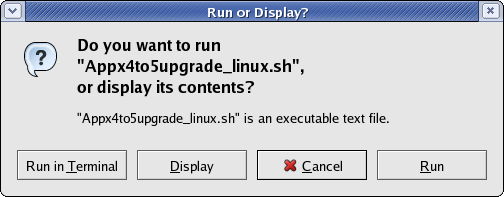
| Run the installer file (APPX4to5upgrade_linux.sh). If you are presented with a "Run or Display?" screen similar to the one below, click on the "Run" button. | ||||||||
| Changed: | ||||||||
| < < |  | |||||||
| > > | | |||||||
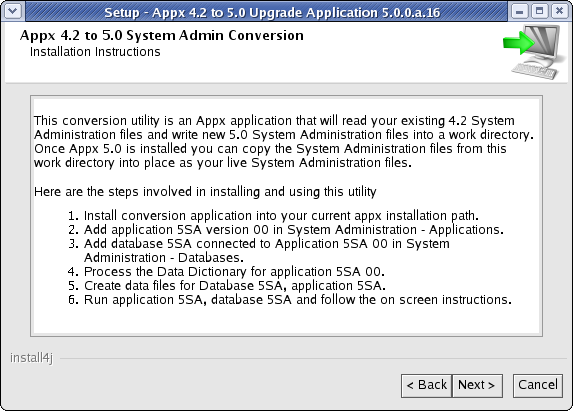
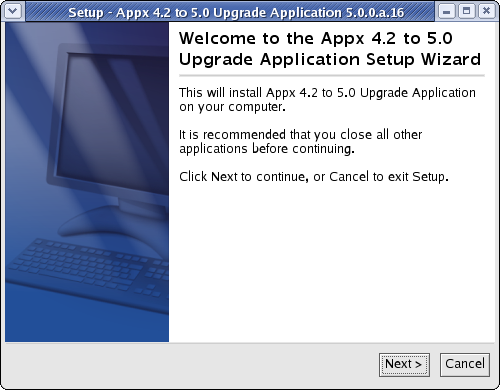
| After a few moments, the APPX 4.2 to 5.0 Upgrade Application Setup Wizard should display the Welcome screen. Click on the "Next" button to continue. | ||||||||
| Changed: | ||||||||
| < < |  | |||||||
| > > |  | |||||||
| Read the Installation Instructions and then click on the "Next" button to continue. | ||||||||
| Changed: | ||||||||
| < < |  | |||||||
| > > | | |||||||
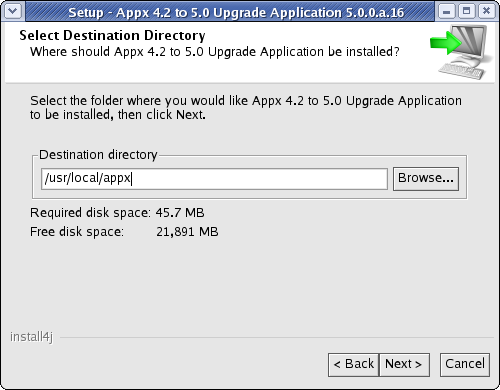
| Specify the Destination Directory into which the upgrade utility is to be installed. The directory that you specify must be the directory where APPX 4.2.a is installed on your system. As a matter of convention, this directory is usually "/usr/local/appx/". | ||||||||
| Changed: | ||||||||
| < < |  | |||||||
| > > | | |||||||
| The APPX Upgrade Application (5SA Version 00) will then be installed into the specified destination directory. | ||||||||
| Changed: | ||||||||
| < < |  | |||||||
| > > | | |||||||
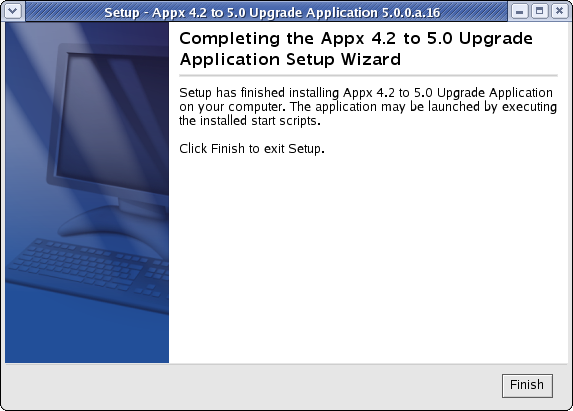
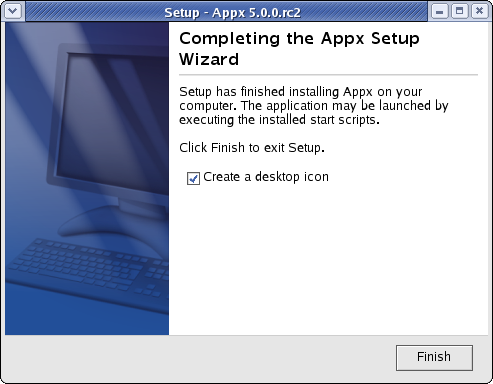
| When the installation wizard displays the final screen, click on the Finish button to end the installation wizard. | ||||||||
| Changed: | ||||||||
| < < |  | |||||||
| > > | | |||||||
Character Mode Installation | ||||||||
| Added: | ||||||||
| > > | ||||||||
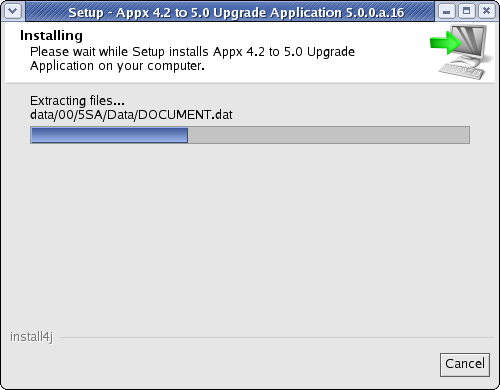
If you don't have access to a GUI you can run the this installer in character mode by appending "-c" to the command line. After a few moments, the Appx Setup Wizard should display the Welcome message. Press Enter to continue the installation.
# ./Appx4to5upgrade_linux.sh -cUnpacking JRE ... Preparing JRE ... Starting Installer ... This will install Appx 4.2 to 5.0 Upgrade Application on your computer. OK [o, Enter], Cancel [c] | ||||||||
| Line: 91 to 92 | ||||||||
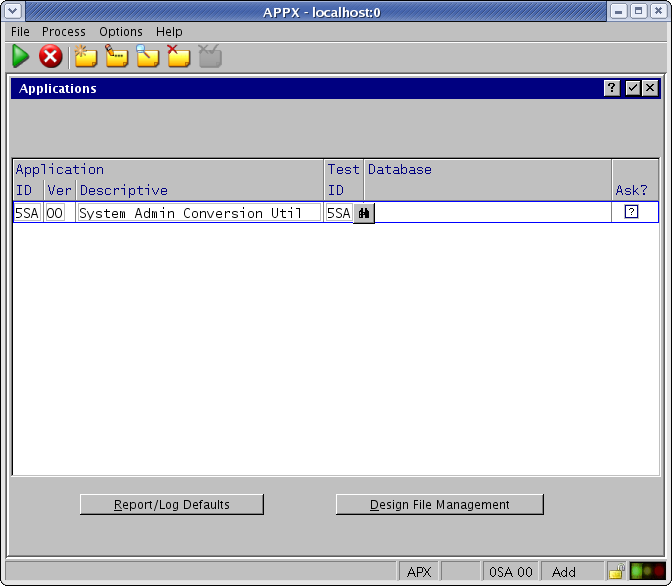
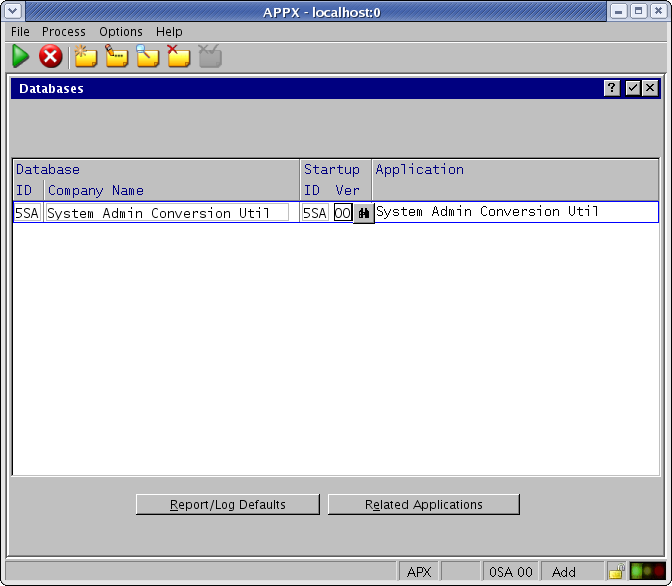
| Add the upgrade application (5SA 00) to the Applications file. | ||||||||
| Changed: | ||||||||
| < < |  | |||||||
| > > | | |||||||
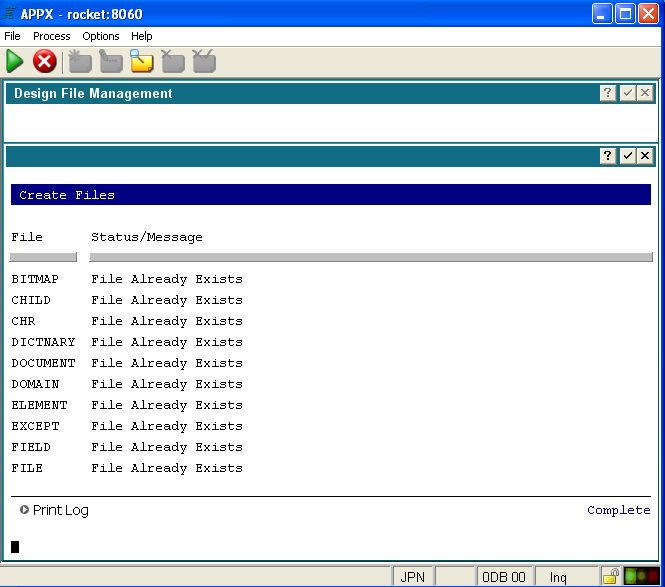
| Create the Design Files for Application 5SA. APPX should report "File Already Exists" for each file. If not, the application was not installed in the correct location. Repeat the installation steps above, specifing the correct location | ||||||||
| Changed: | ||||||||
| < < |  | |||||||
| > > | | |||||||
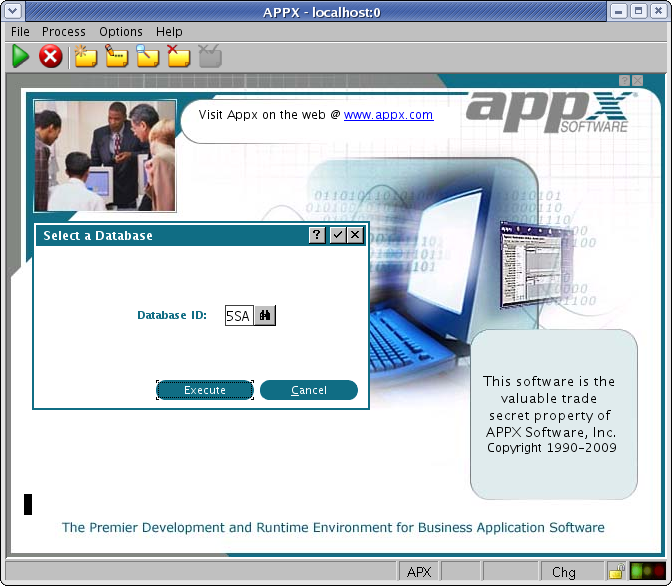
| Add the database (5SA) for the Upgrade Application to the Databases file. | ||||||||
| Changed: | ||||||||
| < < |  | |||||||
| > > | | |||||||
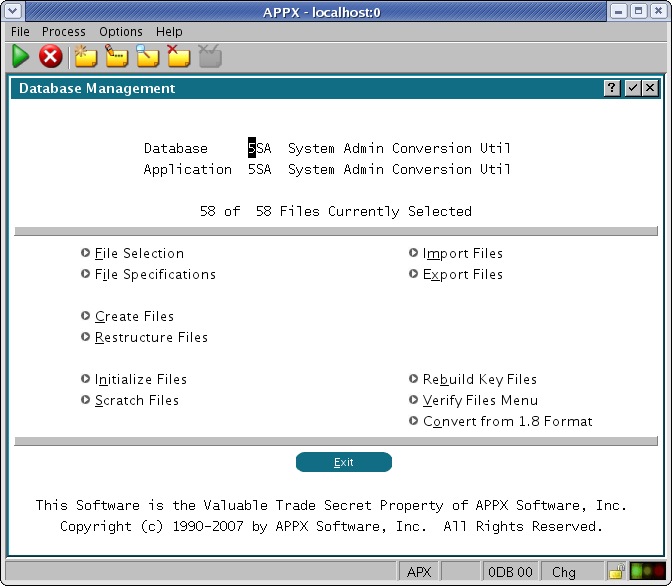
| Run Database Management for the Upgrade Application and Database. | ||||||||
| Changed: | ||||||||
| < < |  | |||||||
| > > | | |||||||
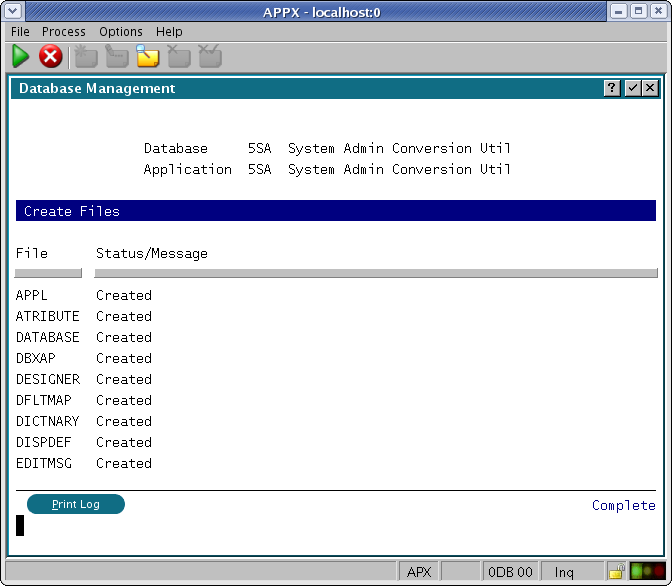
| Run Create Files. | ||||||||
| Changed: | ||||||||
| < < |  | |||||||
| > > | | |||||||
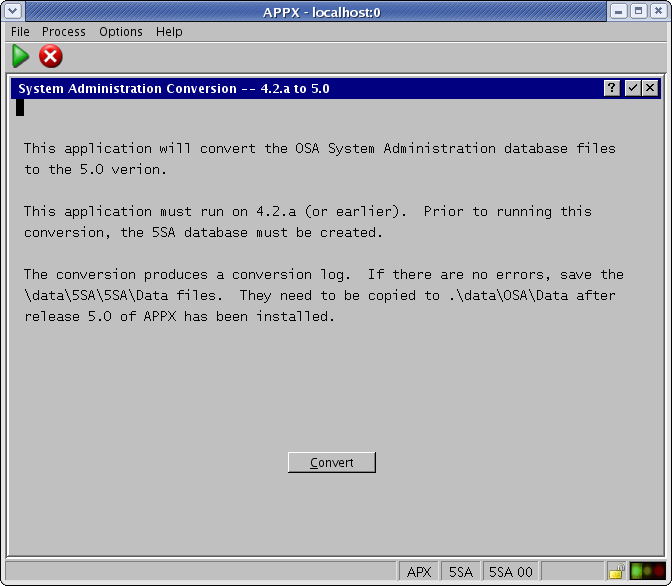
Run the Upgrade ApplicationAfter configuring the Upgrade Application, you must run the Upgrade Utility to convert your System Administration files. | ||||||||
| Changed: | ||||||||
| < < |  | |||||||
| > > | | |||||||
| Click on the "Convert" button to run the conversion utility. | ||||||||
| Changed: | ||||||||
| < < |  | |||||||
| > > | | |||||||
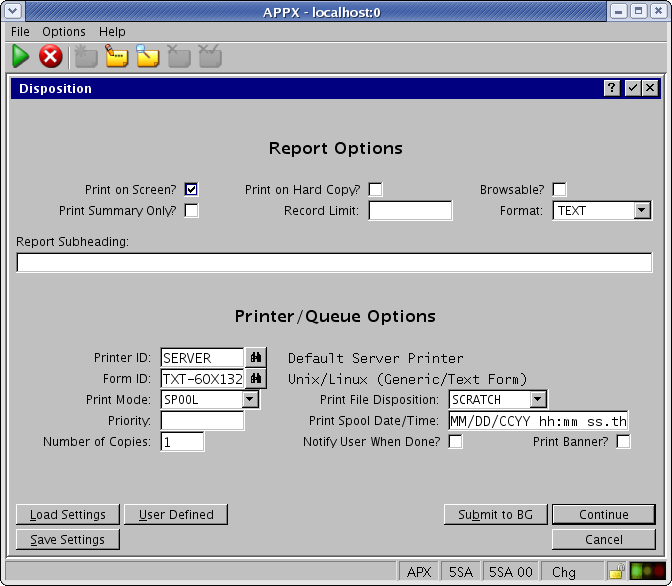
| The conversion utility will create a log. Specify the appropriate disposition options to print the conversion log. | ||||||||
| Changed: | ||||||||
| < < |  | |||||||
| > > | | |||||||
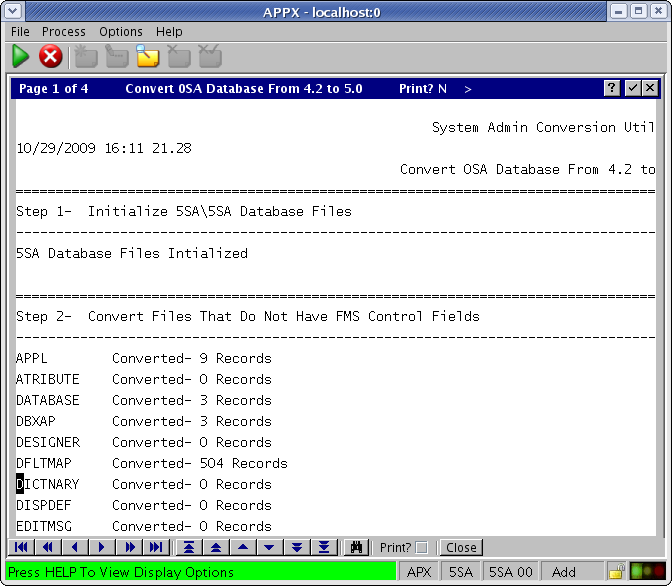
| The conversion log will inform you of any problems that may have been encountered while running the conversion utility. | ||||||||
| Changed: | ||||||||
| < < |  | |||||||
| > > | | |||||||
Install the Upgraded System Administration FilesYou are almost ready to install Release 5 on top of your existing installation. Before actually installing APPX, you should: | ||||||||
| Line: 138 to 139 | ||||||||
| You should also remove the System Administration structure files. You can use a "rm" command similar to the example below to remove your System Administration structure files. Be sure to edit the rm command to reference the directory where APPX is installed on your system if APPX is not installed in "/usr/local/appx". rm -f /usr/local/appx/data/0SA/Struct/* | ||||||||
| Changed: | ||||||||
| < < | Install APPX 5.0.0 or 5.1.0 | |||||||
| > > | Install APPX 5.x | |||||||
| Changed: | ||||||||
| < < | Now follow these steps to install APPX 5.0.0 or 5.1.0: | |||||||
| > > | Now follow these steps to install APPX 5.x: | |||||||
| Changed: | ||||||||
| < < | OverviewTwo different methods are provided to install APPX on Linux/Unix. There is a GUI installer and a Console Mode (character mode) installer. The same installer is used for both methods. The installer will automatically detect if it is being run as a command or from a GUI Desktop, although in some cases you may have to add "-c" to the command line to force the character installer. Regardless of which installation method is used, the result is the same. A typical APPX installation on a system where APPX has not been previously installed performs the following steps:
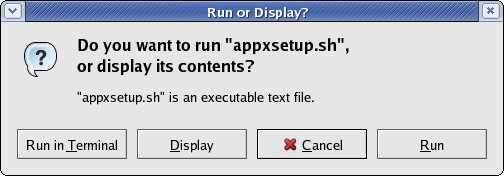
GUI Installation on Linux/UnixLog in to your system as the "root" user. Download the APPX/Linux GUI installer (appxsetup.sh) from the APPX web site or the APPX ftp server and save it to your Desktop or to any other suitable folder. The following instructions will refer to the appxsetup.sh file, which is the name of the Linux installer. The installers for other operating systems have similar names, ie, appxsetup-aix.sh for AIX, appxsetup-sun.sh for Solaris, and so on. if you are downloading directly from the ftp site, make sure you choose the correct installer for your O/S, and substitute your installer's name in the following instructions. Change the permissions on the downloaded installer file to have Execute permissions. Run the installer file (appxsetup.sh). If you are presented with a "Run or Display?" screen similar to the one below, click on the "Run" button.
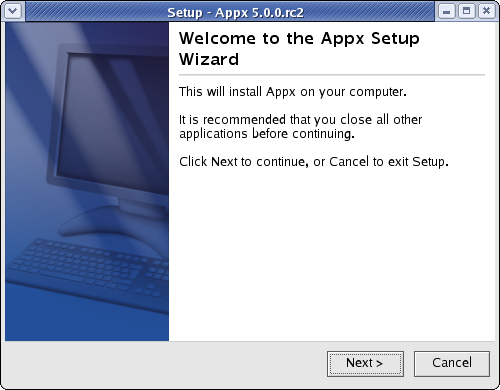
 After a few moments, the APPX Setup Wizard should display the Welcome screen. Click on the "Next" button to continue.
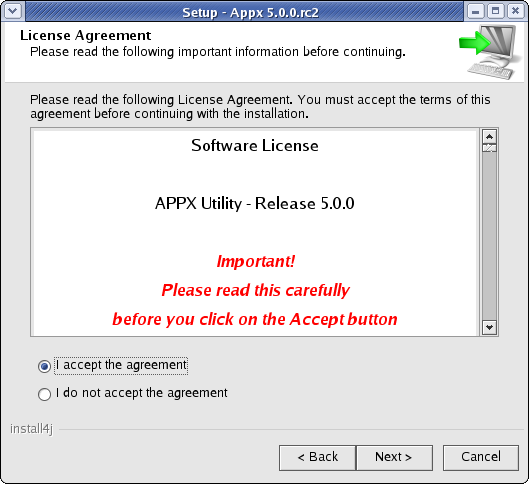
 Read and accept the license agreement.
 Specify the Destination Directory into which APPX is to be installed. As a matter of convention, APPX is usually installed into /usr/local/appx but may be installed into the directory of your choice.
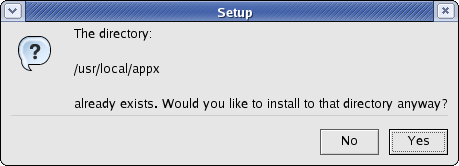
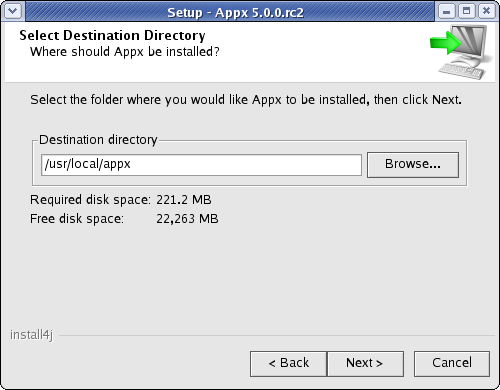 You will be warned if the destination directory already exists. Otherwise, the APPX Setup Wizard will create it.
 APPX will then be installed into the specified destination directory.
 When the APPX Setup Wizard displays the final screen, click on the Finish button to end the APPX Setup Wizard and to automatically run APPX to complete the configuration and installation of APPX.
 When you click on the Finish button, an APPX session will be automatically launched to APPX500NewInstallConfigAPPX of the APPX environment.
Finally, if you intend to log into APPX as user "appx", then you must add a password for the "appx" o/s user that was created by the installer (use the "passwd appx" command).
After completing the above steps, you should be able to login to APPX as user "appx" from a remote desktop using the ADC.
When you click on the Finish button, an APPX session will be automatically launched to APPX500NewInstallConfigAPPX of the APPX environment.
Finally, if you intend to log into APPX as user "appx", then you must add a password for the "appx" o/s user that was created by the installer (use the "passwd appx" command).
After completing the above steps, you should be able to login to APPX as user "appx" from a remote desktop using the ADC.
Character Mode InstallationIf you don't have access to a GUI, you can run the Appx installer in character mode by appending "-c" to the command line. After a few moments, the Appx Setup Wizard should display the Welcome message. Press Enter to continue the installation.
On some systems the Java based installer may fail to run with a notice as shown below even though you are supplying the -c argument. In this case, make sure you have dejavu-sans-font package installed, and also that you have a non headless version of a JRE available to the installer. You can do that with the following yum command on RHEL8.
yum install dejavu-sans-fonts java-1.8.0-openjdk
Could not display the GUI. This application needs access to an X Server.
*******************************************************************
You can also run this application in console mode without
access to an X server by passing the argument -c
*******************************************************************
[root@rhel8 Downloads]#
# ./appxsetup.sh -c
Unpacking JRE ... Preparing JRE ... Starting Installer ... This will install Appx on your computer. OK [o, Enter], Cancel [c]
Next, read and accept the License agreement. Press Enter as each page is displayed. Please read the following License Agreement. You must accept the terms of this agreement before continuing with the installation. Software License APPX Utility - Release 5.0.0 _ Important! _ Please read this carefully before you click on the Accept button. Definitions: "Software License Agreement (SLA)" shall mean this Software License document and the associated *License Key document collectively. [Enter] After the agreement has been displayed, enter 1 to accept the license agreement, or 2 to cancel the installation. . . . For inquires regarding this agreement, please contact: APPX Software, Inc., 11363 San Jose Blvd., Suite 301, Jacksonville, Florida 32223, USA I accept the agreement Yes [1], No [2] Choose the directory where APPX should be installed and the other installation options. Where should Appx be installed? [/appx50] Create a desktop icon? Yes [y, Enter], No [n] Create a Quick Launch icon? Yes [y, Enter], No [n] | |||||||
| > > | OverviewTwo different methods are provided to install APPX on Linux/Unix. There is a GUI installer and a Console Mode (character mode) installer. The same installer is used for both methods. The installer will automatically detect if it is being run as a command or from a GUI Desktop, although in some cases you may have to add "-c" to the command line to force the character installer. Regardless of which installation method is used, the result is the same. A typical APPX installation on a system where APPX has not been previously installed performs the following steps:
GUI Installation on Linux/UnixLog in to your system as the "root" user. Download the APPX/Linux GUI installer (appxsetup.sh) from the APPX web site or the APPX ftp server and save it to your Desktop or to any other suitable folder. The following instructions will refer to the appxsetup.sh file, which is the name of the Linux installer. The installers for other operating systems have similar names, ie, appxsetup-aix.sh for AIX, appxsetup-sun.sh for Solaris, and so on. if you are downloading directly from the ftp site, make sure you choose the correct installer for your O/S, and substitute your installer's name in the following instructions. Change the permissions on the downloaded installer file to have Execute permissions.
Run the installer file (appxsetup.sh). If you are presented with a "Run or Display?" screen similar to the one below, click on the "Run" button.
After a few moments, the APPX Setup Wizard should display the Welcome screen. Click on the "Next" button to continue.
Read and accept the license agreement.
Specify the Destination Directory into which APPX is to be installed. As a matter of convention, APPX is usually installed into /usr/local/appx but may be installed into the directory of your choice.
You will be warned if the destination directory already exists. Otherwise, the APPX Setup Wizard will create it.
APPX will then be installed into the specified destination directory.
When the APPX Setup Wizard displays the final screen, click on the Finish button to end the APPX Setup Wizard and to automatically run APPX to complete the configuration and installation of APPX.
When you click on the Finish button, an APPX session will be automatically launched to APPX500NewInstallConfigAPPX of the APPX environment.
Finally, if you intend to log into APPX as user "appx", then you must add a password for the "appx" o/s user that was created by the installer (use the "passwd appx" command).
After completing the above steps, you should be able to login to APPX as user "appx" from a remote desktop using the ADC.
Character Mode InstallationIf you don't have access to a GUI, you can run the Appx installer in character mode by appending "-c" to the command line. After a few moments, the Appx Setup Wizard should display the Welcome message. Press Enter to continue the installation.
On some systems the Java based installer may fail to run with a notice as shown below even though you are supplying the -c argument. In this case, make sure you have dejavu-sans-font package installed, and also that you have a non headless version of a JRE available to the installer. You can do that with the following yum command on RHEL8.
yum install dejavu-sans-fonts java-1.8.0-openjdk
Could not display the GUI. This application needs access to an X Server.
*******************************************************************
You can also run this application in console mode without
access to an X server by passing the argument -c
*******************************************************************
[root@rhel8 Downloads]#
# ./appxsetup.sh -c
Unpacking JRE ... Preparing JRE ... Starting Installer ... This will install Appx on your computer. OK [o, Enter], Cancel [c]
Next, read and accept the License agreement. Press Enter as each page is displayed. Please read the following License Agreement. You must accept the terms of this agreement before continuing with the installation. Software License APPX Utility - Release 5.0.0 _ Important! _ Please read this carefully before you click on the Accept button. Definitions: "Software License Agreement (SLA)" shall mean this Software License document and the associated *License Key document collectively. [Enter] After the agreement has been displayed, enter 1 to accept the license agreement, or 2 to cancel the installation. . . . For inquires regarding this agreement, please contact: APPX Software, Inc., 11363 San Jose Blvd., Suite 301, Jacksonville, Florida 32223, USA I accept the agreement Yes [1], No [2] Choose the directory where APPX should be installed and the other installation options. Where should Appx be installed? [/appx50] Create a desktop icon? Yes [y, Enter], No [n] Create a Quick Launch icon? Yes [y, Enter], No [n] | |||||||
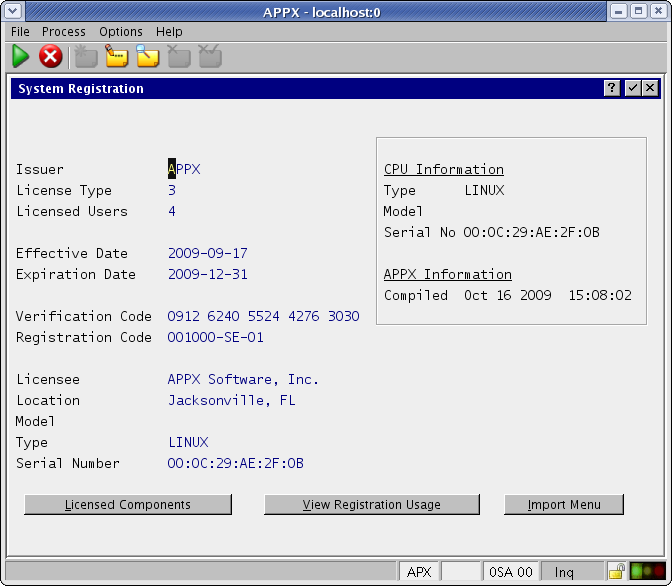
Install a new APPX 5.x License KeyLog on to your Linux system as a user who is an APPX System Administrator. Then start a local APPX session by running client-local.sh. You should be presented with the following System Registration screen. Notice that the Effective Date field on this registration is blank. Starting with APPX 5.0.0, all License Keys include an Effective Date. You must install an updated License Key before you will be able to run APPX 5.0.0 or higher. Note that in Release 5 and higher you can copy your registration to the clipboard, and APPX will detect it when you choose "Typical Import" from the "Import Menu" below. | ||||||||
| Changed: | ||||||||
| < < |  | |||||||
| > > | | |||||||
| Changed: | ||||||||
| < < | After installing a new 5.0.0 License Key, your System Registration screen should include an Effective Date. | |||||||
| > > | After installing a new 5.x License Key, your System Registration screen should include an Effective Date. | |||||||
| Changed: | ||||||||
| < < |  | |||||||
| > > | | |||||||
Configure the new APPX Login ManagerAPPX 5.0.0 includes the new APPX Login Manager service. This service replaces the Connection Manager (appxd) which was included with APPX releases prior to APPX 5.0.0. The old Connection Manager will not work with APPX 5.0.0 and should not be used. You should remove appxd and start-appxd.sh from the tools directory since they are no longer needed. You should also remove any commands that might be run to start appxd during the boot process. | ||||||||
| Line: 177 to 177 | ||||||||
| up and running (process 31754 servicing port 8060) Installation Complete_ | ||||||||
| Changed: | ||||||||
| < < | After executing the above command, users should be able to use the APPX 5.0.0 Desktop Client to successfully login on port 8060. For additional information on managing APPX Login Services, please refer to the complete documentation. | |||||||
| > > | After executing the above command, users should be able to use the APPX 5.x Desktop Client to successfully login on port 8060. For additional information on managing APPX Login Services, please refer to the complete documentation. | |||||||
Final Tasks
| ||||||||
Revision 202012-06-21 - JoeOrtagus
| Line: 1 to 1 | ||||||||
|---|---|---|---|---|---|---|---|---|
APPX Linux/Unix - APPX 5 Upgrade Instructions | ||||||||
| Line: 140 to 138 | ||||||||
| You should also remove the System Administration structure files. You can use a "rm" command similar to the example below to remove your System Administration structure files. Be sure to edit the rm command to reference the directory where APPX is installed on your system if APPX is not installed in "/usr/local/appx". rm -f /usr/local/appx/data/0SA/Struct/* | ||||||||
| Changed: | ||||||||
| < < | Install APPX 5.0.0 | |||||||
| > > | Install APPX 5.0.0 or 5.1.0 | |||||||
| Changed: | ||||||||
| < < | Now follow these steps to install APPX 5.0.0: | |||||||
| > > | Now follow these steps to install APPX 5.0.0 or 5.1.0: | |||||||
OverviewTwo different methods are provided to install APPX on Linux/Unix. There is a GUI installer and a Console Mode (character mode) installer. The same installer is used for both methods. The installer will automatically detect if it is being run as a command or from a GUI Desktop, although in some cases you may have to add "-c" to the command line to force the character installer. Regardless of which installation method is used, the result is the same. A typical APPX installation on a system where APPX has not been previously installed performs the following steps:
GUI Installation on Linux/UnixLog in to your system as the "root" user. Download the APPX/Linux GUI installer (appxsetup.sh) from the APPX web site or the APPX ftp server and save it to your Desktop or to any other suitable folder. The following instructions will refer to the appxsetup.sh file, which is the name of the Linux installer. The installers for other operating systems have similar names, ie, appxsetup-aix.sh for AIX, appxsetup-sun.sh for Solaris, and so on. if you are downloading directly from the ftp site, make sure you choose the correct installer for your O/S, and substitute your installer's name in the following instructions. Change the permissions on the downloaded installer file to have Execute permissions.
Run the installer file (appxsetup.sh). If you are presented with a "Run or Display?" screen similar to the one below, click on the "Run" button.
After a few moments, the APPX Setup Wizard should display the Welcome screen. Click on the "Next" button to continue.
Read and accept the license agreement.
Specify the Destination Directory into which APPX is to be installed. As a matter of convention, APPX is usually installed into /usr/local/appx but may be installed into the directory of your choice.
You will be warned if the destination directory already exists. Otherwise, the APPX Setup Wizard will create it.
APPX will then be installed into the specified destination directory.
When the APPX Setup Wizard displays the final screen, click on the Finish button to end the APPX Setup Wizard and to automatically run APPX to complete the configuration and installation of APPX.
When you click on the Finish button, an APPX session will be automatically launched to APPX500NewInstallConfigAPPX of the APPX environment.
Finally, if you intend to log into APPX as user "appx", then you must add a password for the "appx" o/s user that was created by the installer (use the "passwd appx" command).
After completing the above steps, you should be able to login to APPX as user "appx" from a remote desktop using the ADC.
Character Mode InstallationIf you don't have access to a GUI, you can run the Appx installer in character mode by appending "-c" to the command line. After a few moments, the Appx Setup Wizard should display the Welcome message. Press Enter to continue the installation.
On some systems the Java based installer may fail to run with a notice as shown below even though you are supplying the -c argument. In this case, make sure you have dejavu-sans-font package installed, and also that you have a non headless version of a JRE available to the installer. You can do that with the following yum command on RHEL8.
yum install dejavu-sans-fonts java-1.8.0-openjdk
Could not display the GUI. This application needs access to an X Server.
*******************************************************************
You can also run this application in console mode without
access to an X server by passing the argument -c
*******************************************************************
[root@rhel8 Downloads]#
# ./appxsetup.sh -c
Unpacking JRE ... Preparing JRE ... Starting Installer ... This will install Appx on your computer. OK [o, Enter], Cancel [c]
Next, read and accept the License agreement. Press Enter as each page is displayed. Please read the following License Agreement. You must accept the terms of this agreement before continuing with the installation. Software License APPX Utility - Release 5.0.0 _ Important! _ Please read this carefully before you click on the Accept button. Definitions: "Software License Agreement (SLA)" shall mean this Software License document and the associated *License Key document collectively. [Enter] After the agreement has been displayed, enter 1 to accept the license agreement, or 2 to cancel the installation. . . . For inquires regarding this agreement, please contact: APPX Software, Inc., 11363 San Jose Blvd., Suite 301, Jacksonville, Florida 32223, USA I accept the agreement Yes [1], No [2] Choose the directory where APPX should be installed and the other installation options. Where should Appx be installed? [/appx50] Create a desktop icon? Yes [y, Enter], No [n] Create a Quick Launch icon? Yes [y, Enter], No [n] | ||||||||
| Changed: | ||||||||
| < < | Install a new APPX 5.0.0 License Key | |||||||
| > > | Install a new APPX 5.x License Key | |||||||
| Log on to your Linux system as a user who is an APPX System Administrator. Then start a local APPX session by running client-local.sh. You should be presented with the following System Registration screen. Notice that the Effective Date field on this registration is blank. Starting with APPX 5.0.0, all License Keys include an Effective Date. You must install an updated License Key before you will be able to run APPX 5.0.0 or higher. Note that in Release 5 and higher you can copy your registration to the clipboard, and APPX will detect it when you choose "Typical Import" from the "Import Menu" below. | ||||||||
Revision 192011-03-25 - JeanNeron
| Line: 1 to 1 | ||||||||
|---|---|---|---|---|---|---|---|---|
APPX Linux/Unix - APPX 5 Upgrade Instructions | ||||||||
| Line: 181 to 181 | ||||||||
After executing the above command, users should be able to use the APPX 5.0.0 Desktop Client to successfully login on port 8060. For additional information on managing APPX Login Services, please refer to the complete documentation.
Final Tasks | ||||||||
| Added: | ||||||||
| > > |
| |||||||
| ||||||||
Revision 182010-11-11 - JeanNeron
| Line: 1 to 1 | ||||||||
|---|---|---|---|---|---|---|---|---|
APPX Linux/Unix - APPX 5 Upgrade Instructions | ||||||||
| Line: 187 to 187 | ||||||||
| ||||||||
| Added: | ||||||||
| > > |
| |||||||
Comments: | ||||||||
Revision 172010-02-23 - JeanNeron
| Line: 1 to 1 | ||||||||
|---|---|---|---|---|---|---|---|---|
APPX Linux/Unix - APPX 5 Upgrade Instructions | ||||||||
| Line: 183 to 183 | ||||||||
Final Tasks
| ||||||||
| Changed: | ||||||||
| < < |
| |||||||
| > > |
| |||||||
Comments: | ||||||||
Revision 162010-02-01 - JeanNeron
| Line: 1 to 1 | ||||||||
|---|---|---|---|---|---|---|---|---|
APPX Linux/Unix - APPX 5 Upgrade Instructions | ||||||||
| Line: 49 to 49 | ||||||||
| After a few moments, the APPX 4.2 to 5.0 Upgrade Application Setup Wizard should display the Welcome screen. Click on the "Next" button to continue. | ||||||||
| Changed: | ||||||||
| < < | ||||||||
| > > | | |||||||
| Read the Installation Instructions and then click on the "Next" button to continue. | ||||||||
Revision 152010-01-30 - RayPelegrino
| Line: 1 to 1 | ||||||||
|---|---|---|---|---|---|---|---|---|
APPX Linux/Unix - APPX 5 Upgrade Instructions | ||||||||
| Changed: | ||||||||
| < < | Esta pagina tiene contenidos de age provides the information needed to upgrade an existing APPX 4.2.a Linux/Unix installation to APPX 5. | |||||||
| > > | This page provides the information needed to upgrade an existing APPX 4.2.a Linux/Unix installation to APPX 5. | |||||||
Overview | ||||||||
| Changed: | ||||||||
| < < | ||||||||
| > > | ||||||||
| Changed: | ||||||||
| < < | Warning - These instructions specifically apply to upgrading from APPX 4.2.a to APPX 5. If you are upgrading from an older release of APPX, these instructions may not be applicable. You should consider upgrading to APPX 4.2.a first and then upgrading to APPX 5. | |||||||
| > > | Warning - These instructions specifically apply to upgrading from APPX 4.2.a to APPX 5. If you are upgrading from an older release of APPX, these instructions may not be applicable. You should consider upgrading to APPX 4.2.a first and then upgrading to APPX 5. | |||||||
| To upgrade your existing APPX Linux/Unix installation from APPX 4.2.a to APPX 5, you must complete the following steps: | ||||||||
| Line: 50 to 49 | ||||||||
| After a few moments, the APPX 4.2 to 5.0 Upgrade Application Setup Wizard should display the Welcome screen. Click on the "Next" button to continue. | ||||||||
| Changed: | ||||||||
| < < | <img width="500" alt="Welcome.png" src="37;ATTACHURLPATH%/Welcome.png" height="390" /> | |||||||
| > > | ||||||||
| Read the Installation Instructions and then click on the "Next" button to continue. | ||||||||
| Line: 145 to 144 | ||||||||
| Now follow these steps to install APPX 5.0.0: | ||||||||
| Changed: | ||||||||
| < < |
OverviewTwo different methods are provided to install APPX on Linux/Unix. There is a GUI installer and a Console Mode (character mode) installer. The same installer is used for both methods. The installer will automatically detect if it is being run as a command or from a GUI Desktop, although in some cases you may have to add "-c" to the command line to force the character installer. Regardless of which installation method is used, the result is the same. A typical APPX installation on a system where APPX has not been previously installed performs the following steps:
GUI Installation on Linux/UnixLog in to your system as the "root" user. Download the APPX/Linux GUI installer (appxsetup.sh) from the APPX web site or the APPX ftp server and save it to your Desktop or to any other suitable folder. The following instructions will refer to the appxsetup.sh file, which is the name of the Linux installer. The installers for other operating systems have similar names, ie, appxsetup-aix.sh for AIX, appxsetup-sun.sh for Solaris, and so on. if you are downloading directly from the ftp site, make sure you choose the correct installer for your O/S, and substitute your installer's name in the following instructions. Change the permissions on the downloaded installer file to have Execute permissions.
Run the installer file (appxsetup.sh). If you are presented with a "Run or Display?" screen similar to the one below, click on the "Run" button.
After a few moments, the APPX Setup Wizard should display the Welcome screen. Click on the "Next" button to continue.
Read and accept the license agreement.
Specify the Destination Directory into which APPX is to be installed. As a matter of convention, APPX is usually installed into /usr/local/appx but may be installed into the directory of your choice.
You will be warned if the destination directory already exists. Otherwise, the APPX Setup Wizard will create it.
APPX will then be installed into the specified destination directory.
When the APPX Setup Wizard displays the final screen, click on the Finish button to end the APPX Setup Wizard and to automatically run APPX to complete the configuration and installation of APPX.
When you click on the Finish button, an APPX session will be automatically launched to APPX500NewInstallConfigAPPX of the APPX environment.
Finally, if you intend to log into APPX as user "appx", then you must add a password for the "appx" o/s user that was created by the installer (use the "passwd appx" command).
After completing the above steps, you should be able to login to APPX as user "appx" from a remote desktop using the ADC.
Character Mode InstallationIf you don't have access to a GUI, you can run the Appx installer in character mode by appending "-c" to the command line. After a few moments, the Appx Setup Wizard should display the Welcome message. Press Enter to continue the installation.
On some systems the Java based installer may fail to run with a notice as shown below even though you are supplying the -c argument. In this case, make sure you have dejavu-sans-font package installed, and also that you have a non headless version of a JRE available to the installer. You can do that with the following yum command on RHEL8.
yum install dejavu-sans-fonts java-1.8.0-openjdk
Could not display the GUI. This application needs access to an X Server.
*******************************************************************
You can also run this application in console mode without
access to an X server by passing the argument -c
*******************************************************************
[root@rhel8 Downloads]#
# ./appxsetup.sh -c
Unpacking JRE ... Preparing JRE ... Starting Installer ... This will install Appx on your computer. OK [o, Enter], Cancel [c]
Next, read and accept the License agreement. Press Enter as each page is displayed. Please read the following License Agreement. You must accept the terms of this agreement before continuing with the installation. Software License APPX Utility - Release 5.0.0 _ Important! _ Please read this carefully before you click on the Accept button. Definitions: "Software License Agreement (SLA)" shall mean this Software License document and the associated *License Key document collectively. [Enter] After the agreement has been displayed, enter 1 to accept the license agreement, or 2 to cancel the installation. . . . For inquires regarding this agreement, please contact: APPX Software, Inc., 11363 San Jose Blvd., Suite 301, Jacksonville, Florida 32223, USA I accept the agreement Yes [1], No [2] Choose the directory where APPX should be installed and the other installation options. Where should Appx be installed? [/appx50] Create a desktop icon? Yes [y, Enter], No [n] Create a Quick Launch icon? Yes [y, Enter], No [n] | |||||||
| > > | OverviewTwo different methods are provided to install APPX on Linux/Unix. There is a GUI installer and a Console Mode (character mode) installer. The same installer is used for both methods. The installer will automatically detect if it is being run as a command or from a GUI Desktop, although in some cases you may have to add "-c" to the command line to force the character installer. Regardless of which installation method is used, the result is the same. A typical APPX installation on a system where APPX has not been previously installed performs the following steps:
GUI Installation on Linux/UnixLog in to your system as the "root" user. Download the APPX/Linux GUI installer (appxsetup.sh) from the APPX web site or the APPX ftp server and save it to your Desktop or to any other suitable folder. The following instructions will refer to the appxsetup.sh file, which is the name of the Linux installer. The installers for other operating systems have similar names, ie, appxsetup-aix.sh for AIX, appxsetup-sun.sh for Solaris, and so on. if you are downloading directly from the ftp site, make sure you choose the correct installer for your O/S, and substitute your installer's name in the following instructions. Change the permissions on the downloaded installer file to have Execute permissions.
Run the installer file (appxsetup.sh). If you are presented with a "Run or Display?" screen similar to the one below, click on the "Run" button.
After a few moments, the APPX Setup Wizard should display the Welcome screen. Click on the "Next" button to continue.
Read and accept the license agreement.
Specify the Destination Directory into which APPX is to be installed. As a matter of convention, APPX is usually installed into /usr/local/appx but may be installed into the directory of your choice.
You will be warned if the destination directory already exists. Otherwise, the APPX Setup Wizard will create it.
APPX will then be installed into the specified destination directory.
When the APPX Setup Wizard displays the final screen, click on the Finish button to end the APPX Setup Wizard and to automatically run APPX to complete the configuration and installation of APPX.
When you click on the Finish button, an APPX session will be automatically launched to APPX500NewInstallConfigAPPX of the APPX environment.
Finally, if you intend to log into APPX as user "appx", then you must add a password for the "appx" o/s user that was created by the installer (use the "passwd appx" command).
After completing the above steps, you should be able to login to APPX as user "appx" from a remote desktop using the ADC.
Character Mode InstallationIf you don't have access to a GUI, you can run the Appx installer in character mode by appending "-c" to the command line. After a few moments, the Appx Setup Wizard should display the Welcome message. Press Enter to continue the installation.
On some systems the Java based installer may fail to run with a notice as shown below even though you are supplying the -c argument. In this case, make sure you have dejavu-sans-font package installed, and also that you have a non headless version of a JRE available to the installer. You can do that with the following yum command on RHEL8.
yum install dejavu-sans-fonts java-1.8.0-openjdk
Could not display the GUI. This application needs access to an X Server.
*******************************************************************
You can also run this application in console mode without
access to an X server by passing the argument -c
*******************************************************************
[root@rhel8 Downloads]#
# ./appxsetup.sh -c
Unpacking JRE ... Preparing JRE ... Starting Installer ... This will install Appx on your computer. OK [o, Enter], Cancel [c]
Next, read and accept the License agreement. Press Enter as each page is displayed. Please read the following License Agreement. You must accept the terms of this agreement before continuing with the installation. Software License APPX Utility - Release 5.0.0 _ Important! _ Please read this carefully before you click on the Accept button. Definitions: "Software License Agreement (SLA)" shall mean this Software License document and the associated *License Key document collectively. [Enter] After the agreement has been displayed, enter 1 to accept the license agreement, or 2 to cancel the installation. . . . For inquires regarding this agreement, please contact: APPX Software, Inc., 11363 San Jose Blvd., Suite 301, Jacksonville, Florida 32223, USA I accept the agreement Yes [1], No [2] Choose the directory where APPX should be installed and the other installation options. Where should Appx be installed? [/appx50] Create a desktop icon? Yes [y, Enter], No [n] Create a Quick Launch icon? Yes [y, Enter], No [n] | |||||||
Install a new APPX 5.0.0 License KeyLog on to your Linux system as a user who is an APPX System Administrator. Then start a local APPX session by running client-local.sh. You should be presented with the following System Registration screen. Notice that the Effective Date field on this registration is blank. Starting with APPX 5.0.0, all License Keys include an Effective Date. You must install an updated License Key before you will be able to run APPX 5.0.0 or higher. Note that in Release 5 and higher you can copy your registration to the clipboard, and APPX will detect it when you choose "Typical Import" from the "Import Menu" below. | ||||||||
| Line: 161 to 160 | ||||||||
| To configure and start the new APPX Login Manager service, log in as the root user and execute a command similar to the following: | ||||||||
| Changed: | ||||||||
| < < | /usr/local/appx/services/appxLoginMgr -install -name=appxLogin8060 -port=8060 | |||||||
| > > | /usr/local/appx/services/appxLoginMgr -install -name=appxLogin8060 -port=8060 | |||||||
| Warning - the engine that you named has the setuid bit enabled, you may not want that bit set for the authentication | ||||||||
| Line: 178 to 177 | ||||||||
| method that you have chosen (OS-User) To turn off the setuid bit, chmod u-s ../appx up and running (process 31754 servicing port 8060) | ||||||||
| Changed: | ||||||||
| < < | Installation Complete_ | |||||||
| > > | Installation Complete_ | |||||||
After executing the above command, users should be able to use the APPX 5.0.0 Desktop Client to successfully login on port 8060. For additional information on managing APPX Login Services, please refer to the complete documentation.
Final Tasks | ||||||||
| Line: 197 to 196 | ||||||||
| Did an AIX upgrade, ran into the following: - when using the character installer, the permissions were not set. Had to manually change ownership & set sticky bit. - using 'ssh -X user@host' and then trying to run either client-local or client.sh did not work. The ADC would hang at 'Negotiating GUI something or other' - When trying to create new Sys Admin files, got error about Invalid Prototype Record Length on SYSDFLT. Scratched all Ems/Dbgs for the 0-apps and problem went away. | ||||||||
| Changed: | ||||||||
| < < | -- JeanNeron - 2010-01-27 | |||||||
| > > | -- JeanNeron - 2010-01-27 | |||||||
| -- SteveFrizzell - 2 Nov 2009 | ||||||||
Revision 142010-01-29 - RayPelegrino
| Line: 1 to 1 | ||||||||
|---|---|---|---|---|---|---|---|---|
APPX Linux/Unix - APPX 5 Upgrade Instructions | ||||||||
| Changed: | ||||||||
| < < | This page provides the information needed to upgrade an existing APPX 4.2.a Linux/Unix installation to APPX 5. | |||||||
| > > | Esta pagina tiene contenidos de age provides the information needed to upgrade an existing APPX 4.2.a Linux/Unix installation to APPX 5. | |||||||
Overview | ||||||||
| Line: 195 to 195 | ||||||||
| Read what other users have said about this page or add your own comments.
| ||||||||
| Changed: | ||||||||
| < < | Did an AIX upgrade, ran into the following: - when using the character installer, the permissions were not set. Had to manually change ownership & set sticky bit. - using 'ssh -X user@host' and then trying to run either client-local or client.sh did not work. The ADC would hang at 'Negotiating GUI something or other' - When trying to create new Sys Admin files, got error about Invalid Prototype Record Length on SYSDFLT. Scratched all Ems/Dbgs for the 0-apps and problem went away. | |||||||
| > > | Did an AIX upgrade, ran into the following: - when using the character installer, the permissions were not set. Had to manually change ownership & set sticky bit. - using 'ssh -X user@host' and then trying to run either client-local or client.sh did not work. The ADC would hang at 'Negotiating GUI something or other' - When trying to create new Sys Admin files, got error about Invalid Prototype Record Length on SYSDFLT. Scratched all Ems/Dbgs for the 0-apps and problem went away. | |||||||
| -- JeanNeron - 2010-01-27 | ||||||||
Revision 132010-01-27 - JeanNeron
| Line: 1 to 1 | ||||||||
|---|---|---|---|---|---|---|---|---|
APPX Linux/Unix - APPX 5 Upgrade Instructions | ||||||||
| Line: 195 to 195 | ||||||||
| Read what other users have said about this page or add your own comments.
| ||||||||
| Changed: | ||||||||
| < < | ||||||||
| > > | Did an AIX upgrade, ran into the following: - when using the character installer, the permissions were not set. Had to manually change ownership & set sticky bit. - using 'ssh -X user@host' and then trying to run either client-local or client.sh did not work. The ADC would hang at 'Negotiating GUI something or other' - When trying to create new Sys Admin files, got error about Invalid Prototype Record Length on SYSDFLT. Scratched all Ems/Dbgs for the 0-apps and problem went away. -- JeanNeron - 2010-01-27 | |||||||
| -- SteveFrizzell - 2 Nov 2009 | ||||||||
Revision 122009-12-10 - SteveFrizzell
| Line: 1 to 1 | ||||||||
|---|---|---|---|---|---|---|---|---|
APPX Linux/Unix - APPX 5 Upgrade Instructions | ||||||||
| Line: 129 to 129 | ||||||||
Install the Upgraded System Administration Files | ||||||||
| Added: | ||||||||
| > > | You are almost ready to install Release 5 on top of your existing installation. Before actually installing APPX, you should:
| |||||||
| Before you install the APPX Utility, you must first replace your old System Administration files with the new System Administration files that were created when you ran the upgrade utility to convert your System Administration files to the new APPX 5.0.0 structure. You can use a "cp" command similar to the example below to replace your old System Administration with the upgraded files. Be sure to edit the copy command to reference the directory where APPX is installed on your system if APPX is not installed in "/usr/local/appx". cp -f /usr/local/appx/data/5SA/5SA/Data/* /usr/local/appx/data/0SA/Data | ||||||||
| Line: 136 to 141 | ||||||||
| You should also remove the System Administration structure files. You can use a "rm" command similar to the example below to remove your System Administration structure files. Be sure to edit the rm command to reference the directory where APPX is installed on your system if APPX is not installed in "/usr/local/appx". rm -f /usr/local/appx/data/0SA/Struct/* | ||||||||
| Added: | ||||||||
| > > | Install APPX 5.0.0 | |||||||
| Changed: | ||||||||
| < < | You are now ready to install Release 5 on top of your existing installation. Before actually installing APPX, you should:
| |||||||
| > > | Now follow these steps to install APPX 5.0.0: | |||||||
OverviewTwo different methods are provided to install APPX on Linux/Unix. There is a GUI installer and a Console Mode (character mode) installer. The same installer is used for both methods. The installer will automatically detect if it is being run as a command or from a GUI Desktop, although in some cases you may have to add "-c" to the command line to force the character installer. Regardless of which installation method is used, the result is the same. A typical APPX installation on a system where APPX has not been previously installed performs the following steps:
GUI Installation on Linux/UnixLog in to your system as the "root" user. Download the APPX/Linux GUI installer (appxsetup.sh) from the APPX web site or the APPX ftp server and save it to your Desktop or to any other suitable folder. The following instructions will refer to the appxsetup.sh file, which is the name of the Linux installer. The installers for other operating systems have similar names, ie, appxsetup-aix.sh for AIX, appxsetup-sun.sh for Solaris, and so on. if you are downloading directly from the ftp site, make sure you choose the correct installer for your O/S, and substitute your installer's name in the following instructions. Change the permissions on the downloaded installer file to have Execute permissions.
Run the installer file (appxsetup.sh). If you are presented with a "Run or Display?" screen similar to the one below, click on the "Run" button.
After a few moments, the APPX Setup Wizard should display the Welcome screen. Click on the "Next" button to continue.
Read and accept the license agreement.
Specify the Destination Directory into which APPX is to be installed. As a matter of convention, APPX is usually installed into /usr/local/appx but may be installed into the directory of your choice.
You will be warned if the destination directory already exists. Otherwise, the APPX Setup Wizard will create it.
APPX will then be installed into the specified destination directory.
When the APPX Setup Wizard displays the final screen, click on the Finish button to end the APPX Setup Wizard and to automatically run APPX to complete the configuration and installation of APPX.
When you click on the Finish button, an APPX session will be automatically launched to APPX500NewInstallConfigAPPX of the APPX environment.
Finally, if you intend to log into APPX as user "appx", then you must add a password for the "appx" o/s user that was created by the installer (use the "passwd appx" command).
After completing the above steps, you should be able to login to APPX as user "appx" from a remote desktop using the ADC.
Character Mode InstallationIf you don't have access to a GUI, you can run the Appx installer in character mode by appending "-c" to the command line. After a few moments, the Appx Setup Wizard should display the Welcome message. Press Enter to continue the installation.
On some systems the Java based installer may fail to run with a notice as shown below even though you are supplying the -c argument. In this case, make sure you have dejavu-sans-font package installed, and also that you have a non headless version of a JRE available to the installer. You can do that with the following yum command on RHEL8.
yum install dejavu-sans-fonts java-1.8.0-openjdk
Could not display the GUI. This application needs access to an X Server.
*******************************************************************
You can also run this application in console mode without
access to an X server by passing the argument -c
*******************************************************************
[root@rhel8 Downloads]#
# ./appxsetup.sh -c
Unpacking JRE ... Preparing JRE ... Starting Installer ... This will install Appx on your computer. OK [o, Enter], Cancel [c]
Next, read and accept the License agreement. Press Enter as each page is displayed. Please read the following License Agreement. You must accept the terms of this agreement before continuing with the installation. Software License APPX Utility - Release 5.0.0 _ Important! _ Please read this carefully before you click on the Accept button. Definitions: "Software License Agreement (SLA)" shall mean this Software License document and the associated *License Key document collectively. [Enter] After the agreement has been displayed, enter 1 to accept the license agreement, or 2 to cancel the installation. . . . For inquires regarding this agreement, please contact: APPX Software, Inc., 11363 San Jose Blvd., Suite 301, Jacksonville, Florida 32223, USA I accept the agreement Yes [1], No [2] Choose the directory where APPX should be installed and the other installation options. Where should Appx be installed? [/appx50] Create a desktop icon? Yes [y, Enter], No [n] Create a Quick Launch icon? Yes [y, Enter], No [n] Install a new APPX 5.0.0 License Key | ||||||||
Revision 112009-12-08 - JeanNeron
| Line: 1 to 1 | ||||||||
|---|---|---|---|---|---|---|---|---|
| ||||||||
| Changed: | ||||||||
| < < | &#---+ APPX Linux/Unix - APPX 5 Upgrade Instructions | |||||||
| > > | APPX Linux/Unix - APPX 5 Upgrade Instructions | |||||||
| This page provides the information needed to upgrade an existing APPX 4.2.a Linux/Unix installation to APPX 5. | ||||||||
| Line: 27 to 27 | ||||||||
| ||||||||
| Deleted: | ||||||||
| < < |
| |||||||
| ||||||||
| Line: 140 to 137 | ||||||||
| rm -f /usr/local/appx/data/0SA/Struct/* | ||||||||
| Changed: | ||||||||
| < < | You are now ready to install Release 5 on top of your existing installation. Follow these steps: | |||||||
| > > | You are now ready to install Release 5 on top of your existing installation. Before actually installing APPX, you should:
| |||||||
OverviewTwo different methods are provided to install APPX on Linux/Unix. There is a GUI installer and a Console Mode (character mode) installer. The same installer is used for both methods. The installer will automatically detect if it is being run as a command or from a GUI Desktop, although in some cases you may have to add "-c" to the command line to force the character installer. Regardless of which installation method is used, the result is the same. A typical APPX installation on a system where APPX has not been previously installed performs the following steps:
GUI Installation on Linux/UnixLog in to your system as the "root" user. Download the APPX/Linux GUI installer (appxsetup.sh) from the APPX web site or the APPX ftp server and save it to your Desktop or to any other suitable folder. The following instructions will refer to the appxsetup.sh file, which is the name of the Linux installer. The installers for other operating systems have similar names, ie, appxsetup-aix.sh for AIX, appxsetup-sun.sh for Solaris, and so on. if you are downloading directly from the ftp site, make sure you choose the correct installer for your O/S, and substitute your installer's name in the following instructions. Change the permissions on the downloaded installer file to have Execute permissions.
Run the installer file (appxsetup.sh). If you are presented with a "Run or Display?" screen similar to the one below, click on the "Run" button.
After a few moments, the APPX Setup Wizard should display the Welcome screen. Click on the "Next" button to continue.
Read and accept the license agreement.
Specify the Destination Directory into which APPX is to be installed. As a matter of convention, APPX is usually installed into /usr/local/appx but may be installed into the directory of your choice.
You will be warned if the destination directory already exists. Otherwise, the APPX Setup Wizard will create it.
APPX will then be installed into the specified destination directory.
When the APPX Setup Wizard displays the final screen, click on the Finish button to end the APPX Setup Wizard and to automatically run APPX to complete the configuration and installation of APPX.
When you click on the Finish button, an APPX session will be automatically launched to APPX500NewInstallConfigAPPX of the APPX environment.
Finally, if you intend to log into APPX as user "appx", then you must add a password for the "appx" o/s user that was created by the installer (use the "passwd appx" command).
After completing the above steps, you should be able to login to APPX as user "appx" from a remote desktop using the ADC.
Character Mode InstallationIf you don't have access to a GUI, you can run the Appx installer in character mode by appending "-c" to the command line. After a few moments, the Appx Setup Wizard should display the Welcome message. Press Enter to continue the installation.
On some systems the Java based installer may fail to run with a notice as shown below even though you are supplying the -c argument. In this case, make sure you have dejavu-sans-font package installed, and also that you have a non headless version of a JRE available to the installer. You can do that with the following yum command on RHEL8.
yum install dejavu-sans-fonts java-1.8.0-openjdk
Could not display the GUI. This application needs access to an X Server.
*******************************************************************
You can also run this application in console mode without
access to an X server by passing the argument -c
*******************************************************************
[root@rhel8 Downloads]#
# ./appxsetup.sh -c
Unpacking JRE ... Preparing JRE ... Starting Installer ... This will install Appx on your computer. OK [o, Enter], Cancel [c]
Next, read and accept the License agreement. Press Enter as each page is displayed. Please read the following License Agreement. You must accept the terms of this agreement before continuing with the installation. Software License APPX Utility - Release 5.0.0 _ Important! _ Please read this carefully before you click on the Accept button. Definitions: "Software License Agreement (SLA)" shall mean this Software License document and the associated *License Key document collectively. [Enter] After the agreement has been displayed, enter 1 to accept the license agreement, or 2 to cancel the installation. . . . For inquires regarding this agreement, please contact: APPX Software, Inc., 11363 San Jose Blvd., Suite 301, Jacksonville, Florida 32223, USA I accept the agreement Yes [1], No [2] Choose the directory where APPX should be installed and the other installation options. Where should Appx be installed? [/appx50] Create a desktop icon? Yes [y, Enter], No [n] Create a Quick Launch icon? Yes [y, Enter], No [n] Install a new APPX 5.0.0 License Key | ||||||||
Revision 102009-11-20 - JeanNeron
| Line: 1 to 1 | ||||||||
|---|---|---|---|---|---|---|---|---|
| ||||||||
| Changed: | ||||||||
| < < | APPX Linux/Unix - APPX 5 Upgrade Instructions | |||||||
| > > | &#---+ APPX Linux/Unix - APPX 5 Upgrade Instructions | |||||||
| This page provides the information needed to upgrade an existing APPX 4.2.a Linux/Unix installation to APPX 5. | ||||||||
| Line: 53 to 53 | ||||||||
| After a few moments, the APPX 4.2 to 5.0 Upgrade Application Setup Wizard should display the Welcome screen. Click on the "Next" button to continue. | ||||||||
| Changed: | ||||||||
| < < |  | |||||||
| > > | <img width="500" alt="Welcome.png" src="37;ATTACHURLPATH%/Welcome.png" height="390" /> | |||||||
| Read the Installation Instructions and then click on the "Next" button to continue. | ||||||||
| Line: 185 to 185 | ||||||||
| ||||||||
| Changed: | ||||||||
| < < |
| |||||||
| > > |
| |||||||
Comments: | ||||||||
Revision 92009-11-17 - JeanNeron
| Line: 1 to 1 | ||||||||
|---|---|---|---|---|---|---|---|---|
APPX Linux/Unix - APPX 5 Upgrade Instructions | ||||||||
| Line: 179 to 179 | ||||||||
After executing the above command, users should be able to use the APPX 5.0.0 Desktop Client to successfully login on port 8060. For additional information on managing APPX Login Services, please refer to the complete documentation.
Final Tasks | ||||||||
| Added: | ||||||||
| > > |
| |||||||
| ||||||||
| Deleted: | ||||||||
| < < |
| |||||||
Comments: | ||||||||
Revision 82009-11-12 - JeanNeron
| Line: 1 to 1 | ||||||||
|---|---|---|---|---|---|---|---|---|
APPX Linux/Unix - APPX 5 Upgrade Instructions | ||||||||
| Line: 14 to 14 | ||||||||
| To upgrade your existing APPX Linux/Unix installation from APPX 4.2.a to APPX 5, you must complete the following steps: | ||||||||
| Changed: | ||||||||
| < < |
| |||||||
| > > |
| |||||||
| ||||||||
| Line: 70 to 71 | ||||||||
Character Mode Installation | ||||||||
| Changed: | ||||||||
| < < | If you don't have access to a GUI (on either Windows or Linux/Unix), you can run the this installer in character mode by appending "-c" to the command line. After a few moments, the Appx Setup Wizard should display the Welcome message. Press Enter to continue the installation. | |||||||
| > > | If you don't have access to a GUI you can run the this installer in character mode by appending "-c" to the command line. After a few moments, the Appx Setup Wizard should display the Welcome message. Press Enter to continue the installation. | |||||||
|
# ./Appx4to5upgrade_linux.sh -c Unpacking JRE ... Preparing JRE ... Starting Installer ... This will install Appx 4.2 to 5.0 Upgrade Application on your computer. OK [o, Enter], Cancel [c] | ||||||||
| Line: 133 to 134 | ||||||||
| Before you install the APPX Utility, you must first replace your old System Administration files with the new System Administration files that were created when you ran the upgrade utility to convert your System Administration files to the new APPX 5.0.0 structure. You can use a "cp" command similar to the example below to replace your old System Administration with the upgraded files. Be sure to edit the copy command to reference the directory where APPX is installed on your system if APPX is not installed in "/usr/local/appx". | ||||||||
| Changed: | ||||||||
| < < | cp -f /usr/local/appx/data/5SA/5SA/Data/ /usr/local/appx/data/0SA/Data* | |||||||
| > > | cp -f /usr/local/appx/data/5SA/5SA/Data/* /usr/local/appx/data/0SA/Data | |||||||
| You should also remove the System Administration structure files. You can use a "rm" command similar to the example below to remove your System Administration structure files. Be sure to edit the rm command to reference the directory where APPX is installed on your system if APPX is not installed in "/usr/local/appx". | ||||||||
| Line: 144 to 145 | ||||||||
OverviewTwo different methods are provided to install APPX on Linux/Unix. There is a GUI installer and a Console Mode (character mode) installer. The same installer is used for both methods. The installer will automatically detect if it is being run as a command or from a GUI Desktop, although in some cases you may have to add "-c" to the command line to force the character installer. Regardless of which installation method is used, the result is the same. A typical APPX installation on a system where APPX has not been previously installed performs the following steps:
GUI Installation on Linux/UnixLog in to your system as the "root" user. Download the APPX/Linux GUI installer (appxsetup.sh) from the APPX web site or the APPX ftp server and save it to your Desktop or to any other suitable folder. The following instructions will refer to the appxsetup.sh file, which is the name of the Linux installer. The installers for other operating systems have similar names, ie, appxsetup-aix.sh for AIX, appxsetup-sun.sh for Solaris, and so on. if you are downloading directly from the ftp site, make sure you choose the correct installer for your O/S, and substitute your installer's name in the following instructions. Change the permissions on the downloaded installer file to have Execute permissions.
Run the installer file (appxsetup.sh). If you are presented with a "Run or Display?" screen similar to the one below, click on the "Run" button.
After a few moments, the APPX Setup Wizard should display the Welcome screen. Click on the "Next" button to continue.
Read and accept the license agreement.
Specify the Destination Directory into which APPX is to be installed. As a matter of convention, APPX is usually installed into /usr/local/appx but may be installed into the directory of your choice.
You will be warned if the destination directory already exists. Otherwise, the APPX Setup Wizard will create it.
APPX will then be installed into the specified destination directory.
When the APPX Setup Wizard displays the final screen, click on the Finish button to end the APPX Setup Wizard and to automatically run APPX to complete the configuration and installation of APPX.
When you click on the Finish button, an APPX session will be automatically launched to APPX500NewInstallConfigAPPX of the APPX environment.
Finally, if you intend to log into APPX as user "appx", then you must add a password for the "appx" o/s user that was created by the installer (use the "passwd appx" command).
After completing the above steps, you should be able to login to APPX as user "appx" from a remote desktop using the ADC.
Character Mode InstallationIf you don't have access to a GUI, you can run the Appx installer in character mode by appending "-c" to the command line. After a few moments, the Appx Setup Wizard should display the Welcome message. Press Enter to continue the installation.
On some systems the Java based installer may fail to run with a notice as shown below even though you are supplying the -c argument. In this case, make sure you have dejavu-sans-font package installed, and also that you have a non headless version of a JRE available to the installer. You can do that with the following yum command on RHEL8.
yum install dejavu-sans-fonts java-1.8.0-openjdk
Could not display the GUI. This application needs access to an X Server.
*******************************************************************
You can also run this application in console mode without
access to an X server by passing the argument -c
*******************************************************************
[root@rhel8 Downloads]#
# ./appxsetup.sh -c
Unpacking JRE ... Preparing JRE ... Starting Installer ... This will install Appx on your computer. OK [o, Enter], Cancel [c]
Next, read and accept the License agreement. Press Enter as each page is displayed. Please read the following License Agreement. You must accept the terms of this agreement before continuing with the installation. Software License APPX Utility - Release 5.0.0 _ Important! _ Please read this carefully before you click on the Accept button. Definitions: "Software License Agreement (SLA)" shall mean this Software License document and the associated *License Key document collectively. [Enter] After the agreement has been displayed, enter 1 to accept the license agreement, or 2 to cancel the installation. . . . For inquires regarding this agreement, please contact: APPX Software, Inc., 11363 San Jose Blvd., Suite 301, Jacksonville, Florida 32223, USA I accept the agreement Yes [1], No [2] Choose the directory where APPX should be installed and the other installation options. Where should Appx be installed? [/appx50] Create a desktop icon? Yes [y, Enter], No [n] Create a Quick Launch icon? Yes [y, Enter], No [n] Install a new APPX 5.0.0 License Key | ||||||||
| Changed: | ||||||||
| < < | Log On to your Linux system as a user who is an APPX System Administrator. Then start a local APPX session by running client-local.sh. You should be presented with the following System Registration screen. Notice that the Effective Date field on this registration is blank. Starting with APPX 5.0.0, all License Keys include an Effective Date. You must install an updated License Key before you will be able to run APPX 5.0.0. If you have an updated License Key for your system, you should install it now. Note that in Release 5 and higher you can copy your registration to the clipboard, and APPX will detect it when you choose "Typical Import" from the "Import Menu" below. | |||||||
| > > | Log on to your Linux system as a user who is an APPX System Administrator. Then start a local APPX session by running client-local.sh. You should be presented with the following System Registration screen. Notice that the Effective Date field on this registration is blank. Starting with APPX 5.0.0, all License Keys include an Effective Date. You must install an updated License Key before you will be able to run APPX 5.0.0 or higher. Note that in Release 5 and higher you can copy your registration to the clipboard, and APPX will detect it when you choose "Typical Import" from the "Import Menu" below. | |||||||
|
| ||||||||
| Line: 183 to 184 | ||||||||
| ||||||||
| Changed: | ||||||||
| < < |
| |||||||
| > > |
| |||||||
Comments: | ||||||||
Revision 72009-11-11 - JeanNeron
| Line: 1 to 1 | ||||||||
|---|---|---|---|---|---|---|---|---|
APPX Linux/Unix - APPX 5 Upgrade Instructions | ||||||||
| Line: 131 to 131 | ||||||||
Install the Upgraded System Administration Files | ||||||||
| Changed: | ||||||||
| < < | Before you install the APPX Utility, you must first replace your old System Administration files with the new System Administration files that were created when you ran the upgrade utility to convert your System Administration files to the new APPX 5.0.0 structure. You can use a "cp" command similar to the example below to replace your old System Administration with the upgraded files. Be sure to edit the copy command to reference the directory where APPX is installed on your system if APPX is not installed in "/usr/local/appx". cp -f /usr/local/appx/data/5SA/5SA/Data/* /usr/local/appx/data/0SA/Data | |||||||
| > > | Before you install the APPX Utility, you must first replace your old System Administration files with the new System Administration files that were created when you ran the upgrade utility to convert your System Administration files to the new APPX 5.0.0 structure. You can use a "cp" command similar to the example below to replace your old System Administration with the upgraded files. Be sure to edit the copy command to reference the directory where APPX is installed on your system if APPX is not installed in "/usr/local/appx". | |||||||
| Changed: | ||||||||
| < < | You should also remove the System Administration structure files. You can use a "rm" command similar to the example below to remove your System Administration structure files. Be sure to edit the rm command to reference the directory where APPX is installed on your system if APPX is not installed in "/usr/local/appx". rm -f /usr/local/appx/data/0SA/Struct | |||||||
| > > | cp -f /usr/local/appx/data/5SA/5SA/Data/ /usr/local/appx/data/0SA/Data* You should also remove the System Administration structure files. You can use a "rm" command similar to the example below to remove your System Administration structure files. Be sure to edit the rm command to reference the directory where APPX is installed on your system if APPX is not installed in "/usr/local/appx". rm -f /usr/local/appx/data/0SA/Struct/* | |||||||
You are now ready to install Release 5 on top of your existing installation. Follow these steps:
OverviewTwo different methods are provided to install APPX on Linux/Unix. There is a GUI installer and a Console Mode (character mode) installer. The same installer is used for both methods. The installer will automatically detect if it is being run as a command or from a GUI Desktop, although in some cases you may have to add "-c" to the command line to force the character installer. Regardless of which installation method is used, the result is the same. A typical APPX installation on a system where APPX has not been previously installed performs the following steps:
GUI Installation on Linux/UnixLog in to your system as the "root" user. Download the APPX/Linux GUI installer (appxsetup.sh) from the APPX web site or the APPX ftp server and save it to your Desktop or to any other suitable folder. The following instructions will refer to the appxsetup.sh file, which is the name of the Linux installer. The installers for other operating systems have similar names, ie, appxsetup-aix.sh for AIX, appxsetup-sun.sh for Solaris, and so on. if you are downloading directly from the ftp site, make sure you choose the correct installer for your O/S, and substitute your installer's name in the following instructions. Change the permissions on the downloaded installer file to have Execute permissions.
Run the installer file (appxsetup.sh). If you are presented with a "Run or Display?" screen similar to the one below, click on the "Run" button.
After a few moments, the APPX Setup Wizard should display the Welcome screen. Click on the "Next" button to continue.
Read and accept the license agreement.
Specify the Destination Directory into which APPX is to be installed. As a matter of convention, APPX is usually installed into /usr/local/appx but may be installed into the directory of your choice.
You will be warned if the destination directory already exists. Otherwise, the APPX Setup Wizard will create it.
APPX will then be installed into the specified destination directory.
When the APPX Setup Wizard displays the final screen, click on the Finish button to end the APPX Setup Wizard and to automatically run APPX to complete the configuration and installation of APPX.
When you click on the Finish button, an APPX session will be automatically launched to APPX500NewInstallConfigAPPX of the APPX environment.
Finally, if you intend to log into APPX as user "appx", then you must add a password for the "appx" o/s user that was created by the installer (use the "passwd appx" command).
After completing the above steps, you should be able to login to APPX as user "appx" from a remote desktop using the ADC.
Character Mode InstallationIf you don't have access to a GUI, you can run the Appx installer in character mode by appending "-c" to the command line. After a few moments, the Appx Setup Wizard should display the Welcome message. Press Enter to continue the installation.
On some systems the Java based installer may fail to run with a notice as shown below even though you are supplying the -c argument. In this case, make sure you have dejavu-sans-font package installed, and also that you have a non headless version of a JRE available to the installer. You can do that with the following yum command on RHEL8.
yum install dejavu-sans-fonts java-1.8.0-openjdk
Could not display the GUI. This application needs access to an X Server.
*******************************************************************
You can also run this application in console mode without
access to an X server by passing the argument -c
*******************************************************************
[root@rhel8 Downloads]#
# ./appxsetup.sh -c
Unpacking JRE ... Preparing JRE ... Starting Installer ... This will install Appx on your computer. OK [o, Enter], Cancel [c]
Next, read and accept the License agreement. Press Enter as each page is displayed. Please read the following License Agreement. You must accept the terms of this agreement before continuing with the installation. Software License APPX Utility - Release 5.0.0 _ Important! _ Please read this carefully before you click on the Accept button. Definitions: "Software License Agreement (SLA)" shall mean this Software License document and the associated *License Key document collectively. [Enter] After the agreement has been displayed, enter 1 to accept the license agreement, or 2 to cancel the installation. . . . For inquires regarding this agreement, please contact: APPX Software, Inc., 11363 San Jose Blvd., Suite 301, Jacksonville, Florida 32223, USA I accept the agreement Yes [1], No [2] Choose the directory where APPX should be installed and the other installation options. Where should Appx be installed? [/appx50] Create a desktop icon? Yes [y, Enter], No [n] Create a Quick Launch icon? Yes [y, Enter], No [n] Install a new APPX 5.0.0 License Key | ||||||||
| Changed: | ||||||||
| < < | Log On to your Linux system as a user who is an APPX System Administrator. Then start a local APPX session by running client-local.sh. You should be presented with the following System Registration screen. Notice that the Effective Date field on this registration is blank. Starting with APPX 5.0.0, all License Keys include an Effective Date. You must install an updated License Key before you will be able to run APPX 5.0.0. If you have an updated License Key for your system, you should install it now. | |||||||
| > > | Log On to your Linux system as a user who is an APPX System Administrator. Then start a local APPX session by running client-local.sh. You should be presented with the following System Registration screen. Notice that the Effective Date field on this registration is blank. Starting with APPX 5.0.0, all License Keys include an Effective Date. You must install an updated License Key before you will be able to run APPX 5.0.0. If you have an updated License Key for your system, you should install it now. Note that in Release 5 and higher you can copy your registration to the clipboard, and APPX will detect it when you choose "Typical Import" from the "Import Menu" below. | |||||||
|
| ||||||||
Revision 62009-11-11 - JeanNeron
| Line: 1 to 1 | ||||||||
|---|---|---|---|---|---|---|---|---|
APPX Linux/Unix - APPX 5 Upgrade Instructions | ||||||||
| Line: 129 to 129 | ||||||||
| The conversion log will inform you of any problems that may have been encountered while running the conversion utility.
| ||||||||
| Deleted: | ||||||||
| < < | Install the APPX Utility UpgradeThe APPX 5.0.0 installer supports two different methods for upgrading your APPX/Linux system. The installer may be run as GUI installer or as a Console Mode (character mode) installer. The same installer is used for either method. The installer will automatically detect if it is being run as a command or from a GUI Desktop. Regardless of which installation method is used, the result is the same. A typical APPX installation on a system where APPX has been previously installed performs the following steps:
| |||||||
Install the Upgraded System Administration FilesBefore you install the APPX Utility, you must first replace your old System Administration files with the new System Administration files that were created when you ran the upgrade utility to convert your System Administration files to the new APPX 5.0.0 structure. You can use a "cp" command similar to the example below to replace your old System Administration with the upgraded files. Be sure to edit the copy command to reference the directory where APPX is installed on your system if APPX is not installed in "/usr/local/appx". cp -f /usr/local/appx/data/5SA/5SA/Data/* /usr/local/appx/data/0SA/Data | ||||||||
| Changed: | ||||||||
| < < | You should also remove the System Administration structure files. You can use a "rm" command similar to the example below to remove your System Administration structure files. Be sure to edit the rm command to reference the directory where APPX is installed on your system if APPX is not installed in "/usr/local/appx". rm -f /usr/local/appx/data/0SA/Struct
GUI InstallationLog in to your Linux system as the "root" user. Download the APPX/Linux GUI installer (appxsetup.sh) from the APPX web site or the APPX ftp server and save it to your Desktop or to any other suitable folder. Change the permissions on the downloaded installer file (appxsetup.sh) to have Execute permissions.
Run the installer file (appxsetup.sh). If you are presented with a "Run or Display?" screen similar to the one below, click on the "Run" button.
After a few moments, the APPX Setup Wizard should display the Welcome screen. Click on the "Next" button to continue.
Read and accept the license agreement.
Specify the Destination Directory into which the APPX Utility is to be installed. The directory that you specify must be the directory where APPX 4.2.a is installed on your system. As a matter of convention, this directory is usually "/usr/local/appx/".
You will be warned that the destination directory already exists. Click on the "Yes" button to continue.
APPX will then be installed into the specified destination directory.
When the installation wizard displays the final screen, click on the Finish button to end the APPX Setup Wizard. | |||||||
| > > | You should also remove the System Administration structure files. You can use a "rm" command similar to the example below to remove your System Administration structure files. Be sure to edit the rm command to reference the directory where APPX is installed on your system if APPX is not installed in "/usr/local/appx". rm -f /usr/local/appx/data/0SA/Struct | |||||||
| Changed: | ||||||||
| < < | | |||||||
| > > | You are now ready to install Release 5 on top of your existing installation. Follow these steps: | |||||||
| Changed: | ||||||||
| < < |
Character Mode InstallationInstall a new APPX 5.0.0 License Key | |||||||
| > > |
OverviewTwo different methods are provided to install APPX on Linux/Unix. There is a GUI installer and a Console Mode (character mode) installer. The same installer is used for both methods. The installer will automatically detect if it is being run as a command or from a GUI Desktop, although in some cases you may have to add "-c" to the command line to force the character installer. Regardless of which installation method is used, the result is the same. A typical APPX installation on a system where APPX has not been previously installed performs the following steps:
GUI Installation on Linux/UnixLog in to your system as the "root" user. Download the APPX/Linux GUI installer (appxsetup.sh) from the APPX web site or the APPX ftp server and save it to your Desktop or to any other suitable folder. The following instructions will refer to the appxsetup.sh file, which is the name of the Linux installer. The installers for other operating systems have similar names, ie, appxsetup-aix.sh for AIX, appxsetup-sun.sh for Solaris, and so on. if you are downloading directly from the ftp site, make sure you choose the correct installer for your O/S, and substitute your installer's name in the following instructions. Change the permissions on the downloaded installer file to have Execute permissions.
Run the installer file (appxsetup.sh). If you are presented with a "Run or Display?" screen similar to the one below, click on the "Run" button.
After a few moments, the APPX Setup Wizard should display the Welcome screen. Click on the "Next" button to continue.
Read and accept the license agreement.
Specify the Destination Directory into which APPX is to be installed. As a matter of convention, APPX is usually installed into /usr/local/appx but may be installed into the directory of your choice.
You will be warned if the destination directory already exists. Otherwise, the APPX Setup Wizard will create it.
APPX will then be installed into the specified destination directory.
When the APPX Setup Wizard displays the final screen, click on the Finish button to end the APPX Setup Wizard and to automatically run APPX to complete the configuration and installation of APPX.
When you click on the Finish button, an APPX session will be automatically launched to APPX500NewInstallConfigAPPX of the APPX environment.
Finally, if you intend to log into APPX as user "appx", then you must add a password for the "appx" o/s user that was created by the installer (use the "passwd appx" command).
After completing the above steps, you should be able to login to APPX as user "appx" from a remote desktop using the ADC.
Character Mode InstallationIf you don't have access to a GUI, you can run the Appx installer in character mode by appending "-c" to the command line. After a few moments, the Appx Setup Wizard should display the Welcome message. Press Enter to continue the installation.
On some systems the Java based installer may fail to run with a notice as shown below even though you are supplying the -c argument. In this case, make sure you have dejavu-sans-font package installed, and also that you have a non headless version of a JRE available to the installer. You can do that with the following yum command on RHEL8.
yum install dejavu-sans-fonts java-1.8.0-openjdk
Could not display the GUI. This application needs access to an X Server.
*******************************************************************
You can also run this application in console mode without
access to an X server by passing the argument -c
*******************************************************************
[root@rhel8 Downloads]#
# ./appxsetup.sh -c
Unpacking JRE ... Preparing JRE ... Starting Installer ... This will install Appx on your computer. OK [o, Enter], Cancel [c]
Next, read and accept the License agreement. Press Enter as each page is displayed. Please read the following License Agreement. You must accept the terms of this agreement before continuing with the installation. Software License APPX Utility - Release 5.0.0 _ Important! _ Please read this carefully before you click on the Accept button. Definitions: "Software License Agreement (SLA)" shall mean this Software License document and the associated *License Key document collectively. [Enter] After the agreement has been displayed, enter 1 to accept the license agreement, or 2 to cancel the installation. . . . For inquires regarding this agreement, please contact: APPX Software, Inc., 11363 San Jose Blvd., Suite 301, Jacksonville, Florida 32223, USA I accept the agreement Yes [1], No [2] Choose the directory where APPX should be installed and the other installation options. Where should Appx be installed? [/appx50] Create a desktop icon? Yes [y, Enter], No [n] Create a Quick Launch icon? Yes [y, Enter], No [n] Install a new APPX 5.0.0 License Key | |||||||
| Log On to your Linux system as a user who is an APPX System Administrator. Then start a local APPX session by running client-local.sh. You should be presented with the following System Registration screen. Notice that the Effective Date field on this registration is blank. Starting with APPX 5.0.0, all License Keys include an Effective Date. You must install an updated License Key before you will be able to run APPX 5.0.0. If you have an updated License Key for your system, you should install it now. | ||||||||
| Line: 222 to 178 | ||||||||
| ||||||||
| Changed: | ||||||||
| < < |
| |||||||
| > > |
| |||||||
Comments: | ||||||||
Revision 52009-11-10 - JeanNeron
| Line: 1 to 1 | ||||||||
|---|---|---|---|---|---|---|---|---|
APPX Linux/Unix - APPX 5 Upgrade Instructions | ||||||||
| Changed: | ||||||||
| < < | This page provides the information needed to upgrade an existing APPX Linux/Unix installation to APPX 5. | |||||||
| > > | This page provides the information needed to upgrade an existing APPX 4.2.a Linux/Unix installation to APPX 5. | |||||||
Overview | ||||||||
| Line: 22 to 22 | ||||||||
Preliminary Tasks
| ||||||||
| Changed: | ||||||||
| < < |
| |||||||
| > > |
| |||||||
| ||||||||
| Line: 70 to 70 | ||||||||
Character Mode Installation | ||||||||
| Added: | ||||||||
| > > | If you don't have access to a GUI (on either Windows or Linux/Unix), you can run the this installer in character mode by appending "-c" to the command line. After a few moments, the Appx Setup Wizard should display the Welcome message. Press Enter to continue the installation.
# ./Appx4to5upgrade_linux.sh -cUnpacking JRE ... Preparing JRE ... Starting Installer ... This will install Appx 4.2 to 5.0 Upgrade Application on your computer. OK [o, Enter], Cancel [c] Next, the installation and conversion instructions will be displayed. Press Enter when you are ready to continue. Installation Instructions This conversion utility is an Appx application that will read your existing 4.2 System Administration files and write new 5.0 System Administration files into a work directory. Once Appx 5.0 is installed you can copy the System Administration files from this work directory into place as your live System Administration files. Here are the steps involved in installing and using this utility 1. Install conversion application into your current appx installation path. 2. Add application 5SA version 00 in System Administration - Applications. 3. Add database 5SA connected to Application 5SA 00 in System Administration - Databases. 4. Process the Data Dictionary for application 5SA 00. 5. Create data files for Database 5SA, application 5SA. 6. Run application 5SA, database 5SA and follow the on screen instructions. Choose the location for the installation. Where should Appx 4.2 to 5.0 Upgrade Application be installed? [/usr/local/appx/] The files will then be copied to your hard disk. When this is finished, you are ready to continue with 'Configure the Upgrade Application' | |||||||
Configure the Upgrade ApplicationAfter installing the Upgrade Application, you must run APPX as an APPX System Administrator and configure the Upgrade Application. | ||||||||
| Line: 78 to 97 | ||||||||
|
| ||||||||
| Added: | ||||||||
| > > | Create the Design Files for Application 5SA. APPX should report "File Already Exists" for each file. If not, the application was not installed in the correct location. Repeat the installation steps above, specifing the correct location
| |||||||
| Add the database (5SA) for the Upgrade Application to the Databases file.
| ||||||||
| Line: 198 to 221 | ||||||||
| ||||||||
| Added: | ||||||||
| > > |
| |||||||
Comments: | ||||||||
| Line: 209 to 234 | ||||||||
| -- SteveFrizzell - 2 Nov 2009 | ||||||||
| Deleted: | ||||||||
| < < |
| |||||||
| ||||||||
Revision 42009-11-10 - JeanNeron
| Line: 1 to 1 | ||||||||
|---|---|---|---|---|---|---|---|---|
APPX Linux/Unix - APPX 5 Upgrade Instructions | ||||||||
| Line: 209 to 209 | ||||||||
| -- SteveFrizzell - 2 Nov 2009 | ||||||||
| Added: | ||||||||
| > > |
| |||||||
| ||||||||
| Line: 228 to 231 | ||||||||
| ||||||||
| Added: | ||||||||
| > > |
| |||||||
Revision 32009-11-10 - JeanNeron
| Line: 1 to 1 | ||||||||
|---|---|---|---|---|---|---|---|---|
| ||||||||
| Changed: | ||||||||
| < < | APPX/Linux - APPX 5.0.0 Upgrade Instructions | |||||||
| > > | APPX Linux/Unix - APPX 5 Upgrade Instructions | |||||||
| Changed: | ||||||||
| < < | This page provides the information needed to upgrade an existing APPX/Linux installation to APPX 5.0.0. | |||||||
| > > | This page provides the information needed to upgrade an existing APPX Linux/Unix installation to APPX 5. | |||||||
Overview | ||||||||
| Changed: | ||||||||
| < < | Warning - These instructions specifically apply to upgrading from APPX 4.2.a to APPX 5.0.0. If you are upgrading from an older release of APPX, these instructions may not be applicable. You should consider upgrading to APPX 4.2.a first and then upgrading to APPX 5.0.0. | |||||||
| > > | Warning - These instructions specifically apply to upgrading from APPX 4.2.a to APPX 5. If you are upgrading from an older release of APPX, these instructions may not be applicable. You should consider upgrading to APPX 4.2.a first and then upgrading to APPX 5. | |||||||
| Changed: | ||||||||
| < < | To upgrade your existing APPX/Linux installation from APPX 4.2.a to APPX 5.0.0, you must complete the following steps: | |||||||
| > > | To upgrade your existing APPX Linux/Unix installation from APPX 4.2.a to APPX 5, you must complete the following steps: | |||||||
| ||||||||
| Line: 34 to 34 | ||||||||
Convert Your System Administration Files | ||||||||
| Changed: | ||||||||
| < < | The first step of upgrading your APPX 4.2.a installation to APPX 5.0.0 is to convert your System Administration files to the new APPX 5.0.0 format. The System Administration files for APPX 4.2.a are not compatible with APPX 5.0.0 and must be converted to the APPX 5.0.0 format. | |||||||
| > > | The first step of upgrading your APPX 4.2.a installation to APPX 5 is to convert your System Administration files to the new APPX 5 format. The System Administration files for APPX 4.2.a are not compatible with APPX 5 and must be converted to the APPX 5 format. | |||||||
Install the Upgrade ApplicationGUI InstallationLog in to your Linux system as the "root" user. | ||||||||
| Changed: | ||||||||
| < < | Download the installer for the APPX 4.2.a to APPX 5.0.0 upgrade application (APPX4to5upgrade_linux.sh) from the APPX web site or the APPX ftp server and save it to your Desktop or to any other suitable folder. | |||||||
| > > | Download the installer for the APPX 4.2.a to APPX 5 upgrade application (APPX4to5upgrade_linux.sh for Intel based computers running Linux, or Appx4to5upgrade_risc.tar.gz for RISC based computers) from the APPX web site or the APPX ftp server and save it to your Desktop or to any other suitable folder. | |||||||
| Change the permissions on the downloaded installer file (APPX4to5upgrade_linux.sh) to have Execute permissions. | ||||||||
| Line: 58 to 58 | ||||||||
|
| ||||||||
| Changed: | ||||||||
| < < | Specify the Destination Directory into which the upgrade utility is to be installed. The directory that you specify must be the directory where APPX 4.2.a is installed on your system. As a matter of convention, this directory is usually "/usr/local/appx/". | |||||||
| > > | Specify the Destination Directory into which the upgrade utility is to be installed. The directory that you specify must be the directory where APPX 4.2.a is installed on your system. As a matter of convention, this directory is usually "/usr/local/appx/". | |||||||
|
| ||||||||
Revision 22009-11-03 - SteveFrizzell
| Line: 1 to 1 | |||||||||
|---|---|---|---|---|---|---|---|---|---|
| |||||||||
| Changed: | |||||||||
| < < | APPX 5.0.0 - Linux - Upgrade Installation | ||||||||
| > > | APPX/Linux - APPX 5.0.0 Upgrade Instructions | ||||||||
| Changed: | |||||||||
| < < | |||||||||
| > > | This page provides the information needed to upgrade an existing APPX/Linux installation to APPX 5.0.0. | ||||||||
| Added: | |||||||||
| > > | |||||||||
Overview | |||||||||
| Changed: | |||||||||
| < < | Two different methods are provided to install APPX on Linux. There is a GUI installer and a Console Mode (character mode) installer. The same installer is used for both methods. The installer will automatically detect if it is being run as a command or from a GUI Desktop. Regardless of which installation method is used, the result is the same. A typical APPX installation on a system where APPX has not been previously installed performs the following steps: | ||||||||
| > > | |||||||||
| Changed: | |||||||||
| < < |
| ||||||||
| > > | Warning - These instructions specifically apply to upgrading from APPX 4.2.a to APPX 5.0.0. If you are upgrading from an older release of APPX, these instructions may not be applicable. You should consider upgrading to APPX 4.2.a first and then upgrading to APPX 5.0.0.
To upgrade your existing APPX/Linux installation from APPX 4.2.a to APPX 5.0.0, you must complete the following steps:
Preliminary Tasks
| ||||||||
Convert Your System Administration FilesThe first step of upgrading your APPX 4.2.a installation to APPX 5.0.0 is to convert your System Administration files to the new APPX 5.0.0 format. The System Administration files for APPX 4.2.a are not compatible with APPX 5.0.0 and must be converted to the APPX 5.0.0 format. | |||||||||
| Changed: | |||||||||
| < < | Install the Upgrade Application (GUI) | ||||||||
| > > | Install the Upgrade ApplicationGUI Installation | ||||||||
| Changed: | |||||||||
| < < | Log in to your Linux desktop system as the "root" user. | ||||||||
| > > | Log in to your Linux system as the "root" user. | ||||||||
| Download the installer for the APPX 4.2.a to APPX 5.0.0 upgrade application (APPX4to5upgrade_linux.sh) from the APPX web site or the APPX ftp server and save it to your Desktop or to any other suitable folder. | |||||||||
| Line: 52 to 69 | |||||||||
| When the installation wizard displays the final screen, click on the Finish button to end the installation wizard.
| |||||||||
| Added: | |||||||||
| > > | Character Mode Installation | ||||||||
Configure the Upgrade ApplicationAfter installing the Upgrade Application, you must run APPX as an APPX System Administrator and configure the Upgrade Application. | |||||||||
| Line: 88 to 106 | |||||||||
| The conversion log will inform you of any problems that may have been encountered while running the conversion utility.
| |||||||||
| Added: | |||||||||
| > > | Install the APPX Utility UpgradeThe APPX 5.0.0 installer supports two different methods for upgrading your APPX/Linux system. The installer may be run as GUI installer or as a Console Mode (character mode) installer. The same installer is used for either method. The installer will automatically detect if it is being run as a command or from a GUI Desktop. Regardless of which installation method is used, the result is the same. A typical APPX installation on a system where APPX has been previously installed performs the following steps:
Install the Upgraded System Administration FilesBefore you install the APPX Utility, you must first replace your old System Administration files with the new System Administration files that were created when you ran the upgrade utility to convert your System Administration files to the new APPX 5.0.0 structure. You can use a "cp" command similar to the example below to replace your old System Administration with the upgraded files. Be sure to edit the copy command to reference the directory where APPX is installed on your system if APPX is not installed in "/usr/local/appx". cp -f /usr/local/appx/data/5SA/5SA/Data/* /usr/local/appx/data/0SA/Data You should also remove the System Administration structure files. You can use a "rm" command similar to the example below to remove your System Administration structure files. Be sure to edit the rm command to reference the directory where APPX is installed on your system if APPX is not installed in "/usr/local/appx". rm -f /usr/local/appx/data/0SA/Struct | ||||||||
| Changed: | |||||||||
| < < | GUI Installation on Linux | ||||||||
| > > | GUI Installation | ||||||||
| Changed: | |||||||||
| < < | Log in to your Linux desktop system as the "root" user. | ||||||||
| > > | Log in to your Linux system as the "root" user. | ||||||||
| Download the APPX/Linux GUI installer (appxsetup.sh) from the APPX web site or the APPX ftp server and save it to your Desktop or to any other suitable folder. | |||||||||
| Line: 112 to 141 | |||||||||
|
| |||||||||
| Changed: | |||||||||
| < < | Specify the Destination Directory into which APPX is to be installed. As a matter of convention, APPX is usually installed into /usr/local/appx but may be installed into the directory of your choice. | ||||||||
| > > | Specify the Destination Directory into which the APPX Utility is to be installed. The directory that you specify must be the directory where APPX 4.2.a is installed on your system. As a matter of convention, this directory is usually "/usr/local/appx/". | ||||||||
|
| |||||||||
| Changed: | |||||||||
| < < | You will be warned if the destination directory already exists. Otherwise, APPX will create it. | ||||||||
| > > | You will be warned that the destination directory already exists. Click on the "Yes" button to continue. | ||||||||
|
| |||||||||
| Line: 124 to 153 | |||||||||
|
| |||||||||
| Changed: | |||||||||
| < < | When the installation wizard displays the final screen, click on the Finish button to end the installation wizard and to automatically run APPX to complete the configuration and installation of APPX. | ||||||||
| > > | When the installation wizard displays the final screen, click on the Finish button to end the APPX Setup Wizard. | ||||||||
|
| |||||||||
| Changed: | |||||||||
| < < | When you click on the Finish button, the APPX Client will be launched to run APPX to complete the installation of the APPX environment.
Character Mode Installation on Linuxxxxxx xxxxx xxxxx xxxxx xxxxx xxxxx xxxxx xxxxx xxxxx xxxxx xxxxx xxxxx xxxxxRun APPX to Complete the InstallationThe first time that APPX is run after the installation wizard completes, you will need to complete the initial configuration of APPX. | ||||||||
| > > |
Character Mode InstallationInstall a new APPX 5.0.0 License KeyLog On to your Linux system as a user who is an APPX System Administrator. Then start a local APPX session by running client-local.sh. You should be presented with the following System Registration screen. Notice that the Effective Date field on this registration is blank. Starting with APPX 5.0.0, all License Keys include an Effective Date. You must install an updated License Key before you will be able to run APPX 5.0.0. If you have an updated License Key for your system, you should install it now.
After installing a new 5.0.0 License Key, your System Registration screen should include an Effective Date.
Configure the new APPX Login ManagerAPPX 5.0.0 includes the new APPX Login Manager service. This service replaces the Connection Manager (appxd) which was included with APPX releases prior to APPX 5.0.0. The old Connection Manager will not work with APPX 5.0.0 and should not be used. You should remove appxd and start-appxd.sh from the tools directory since they are no longer needed. You should also remove any commands that might be run to start appxd during the boot process. To configure and start the new APPX Login Manager service, log in as the root user and execute a command similar to the following: /usr/local/appx/services/appxLoginMgr -install -name=appxLogin8060 -port=8060
Warning - the engine that you named has the setuid bit enabled,
you may not want that bit set for the authentication
method that you have chosen (OS-User)
To turn off the setuid bit, chmod u-s ../appx
Configuration written to: appxLogin8060.ini
Environment written to: appxLogin8060.env
Service script written to: /etc/init.d/appxLogin8060
Configuration complete
Registering service
Starting appxLogin8060: [ OK ]
Warning - the engine that you named has the setuid bit enabled,
you may not want that bit set for the authentication
method that you have chosen (OS-User)
To turn off the setuid bit, chmod u-s ../appx
up and running (process 31754 servicing port 8060)
Installation Complete_
After executing the above command, users should be able to use the APPX 5.0.0 Desktop Client to successfully login on port 8060. For additional information on managing APPX Login Services, please refer to the complete documentation.
Final Tasks
| ||||||||
Comments:Read what other users have said about this page or add your own comments. | |||||||||
| Line: 185 to 224 | |||||||||
| |||||||||
| Added: | |||||||||
| > > |
| ||||||||
Revision 12009-11-02 - SteveFrizzell
| Line: 1 to 1 | |||||||||||||||||||||||||||||||||
|---|---|---|---|---|---|---|---|---|---|---|---|---|---|---|---|---|---|---|---|---|---|---|---|---|---|---|---|---|---|---|---|---|---|
| Added: | |||||||||||||||||||||||||||||||||
| > > |
APPX 5.0.0 - Linux - Upgrade InstallationOverviewTwo different methods are provided to install APPX on Linux. There is a GUI installer and a Console Mode (character mode) installer. The same installer is used for both methods. The installer will automatically detect if it is being run as a command or from a GUI Desktop. Regardless of which installation method is used, the result is the same. A typical APPX installation on a system where APPX has not been previously installed performs the following steps:
Convert Your System Administration FilesThe first step of upgrading your APPX 4.2.a installation to APPX 5.0.0 is to convert your System Administration files to the new APPX 5.0.0 format. The System Administration files for APPX 4.2.a are not compatible with APPX 5.0.0 and must be converted to the APPX 5.0.0 format.Install the Upgrade Application (GUI)Log in to your Linux desktop system as the "root" user. Download the installer for the APPX 4.2.a to APPX 5.0.0 upgrade application (APPX4to5upgrade_linux.sh) from the APPX web site or the APPX ftp server and save it to your Desktop or to any other suitable folder. Change the permissions on the downloaded installer file (APPX4to5upgrade_linux.sh) to have Execute permissions.
Run the installer file (APPX4to5upgrade_linux.sh). If you are presented with a "Run or Display?" screen similar to the one below, click on the "Run" button.
After a few moments, the APPX 4.2 to 5.0 Upgrade Application Setup Wizard should display the Welcome screen. Click on the "Next" button to continue.
Read the Installation Instructions and then click on the "Next" button to continue.
Specify the Destination Directory into which the upgrade utility is to be installed. The directory that you specify must be the directory where APPX 4.2.a is installed on your system. As a matter of convention, this directory is usually "/usr/local/appx/".
The APPX Upgrade Application (5SA Version 00) will then be installed into the specified destination directory.
When the installation wizard displays the final screen, click on the Finish button to end the installation wizard.
Configure the Upgrade ApplicationAfter installing the Upgrade Application, you must run APPX as an APPX System Administrator and configure the Upgrade Application. Add the upgrade application (5SA 00) to the Applications file.
Add the database (5SA) for the Upgrade Application to the Databases file.
Run Database Management for the Upgrade Application and Database.
Run Create Files.
Run the Upgrade ApplicationAfter configuring the Upgrade Application, you must run the Upgrade Utility to convert your System Administration files.
Click on the "Convert" button to run the conversion utility.
The conversion utility will create a log. Specify the appropriate disposition options to print the conversion log.
The conversion log will inform you of any problems that may have been encountered while running the conversion utility.
GUI Installation on LinuxLog in to your Linux desktop system as the "root" user. Download the APPX/Linux GUI installer (appxsetup.sh) from the APPX web site or the APPX ftp server and save it to your Desktop or to any other suitable folder. Change the permissions on the downloaded installer file (appxsetup.sh) to have Execute permissions.
Run the installer file (appxsetup.sh). If you are presented with a "Run or Display?" screen similar to the one below, click on the "Run" button.
After a few moments, the APPX Setup Wizard should display the Welcome screen. Click on the "Next" button to continue.
Read and accept the license agreement.
Specify the Destination Directory into which APPX is to be installed. As a matter of convention, APPX is usually installed into /usr/local/appx but may be installed into the directory of your choice.
You will be warned if the destination directory already exists. Otherwise, APPX will create it.
APPX will then be installed into the specified destination directory.
When the installation wizard displays the final screen, click on the Finish button to end the installation wizard and to automatically run APPX to complete the configuration and installation of APPX.
When you click on the Finish button, the APPX Client will be launched to run APPX to complete the installation of the APPX environment.
Character Mode Installation on Linuxxxxxx xxxxx xxxxx xxxxx xxxxx xxxxx xxxxx xxxxx xxxxx xxxxx xxxxx xxxxx xxxxxRun APPX to Complete the InstallationThe first time that APPX is run after the installation wizard completes, you will need to complete the initial configuration of APPX.Comments:Read what other users have said about this page or add your own comments.-- SteveFrizzell - 2 Nov 2009
| ||||||||||||||||||||||||||||||||
View topic | History: r23 < r22 < r21 < r20 | More topic actions...
Ideas, requests, problems regarding TWiki? Send feedback